Owners Manual
Page 1
E Digital Camera User's Guide Thank you for purchasing this CASIO product. • Before using it, be sure to read the precautions contained in this User's Guide. • Keep the User's Guide in a safe place for future reference. • For the most up-to-date information about this product, visit the official EXILIM Website at http://www.exilim.com/
E Digital Camera User's Guide Thank you for purchasing this CASIO product. • Before using it, be sure to read the precautions contained in this User's Guide. • Keep the User's Guide in a safe place for future reference. • For the most up-to-date information about this product, visit the official EXILIM Website at http://www.exilim.com/
Owners Manual
Page 2
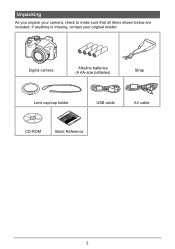
Unpacking As you unpack your original retailer. Digital camera Alkaline batteries (4 AA-size batteries) Strap Lens cap/cap holder USB cable AV cable CD-ROM Basic Reference 2 If anything is missing, contact your camera, check to make sure that all items shown below are included.
Unpacking As you unpack your original retailer. Digital camera Alkaline batteries (4 AA-size batteries) Strap Lens cap/cap holder USB cable AV cable CD-ROM Basic Reference 2 If anything is missing, contact your camera, check to make sure that all items shown below are included.
Owners Manual
Page 3
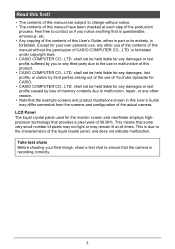
This is forbidden under copyright laws. • CASIO COMPUTER CO., LTD. shall not be held liable for your final image, shoot a test shot to ensure that the camera is forbidden. Except for any damages or lost profits suffered by you notice anything that provides a pixel yield of 99.99...%. LCD Panel The liquid crystal panel used for CASIO. • CASIO COMPUTER CO., LTD. Feel free to contact us ...
This is forbidden under copyright laws. • CASIO COMPUTER CO., LTD. shall not be held liable for your final image, shoot a test shot to ensure that the camera is forbidden. Except for any damages or lost profits suffered by you notice anything that provides a pixel yield of 99.99...%. LCD Panel The liquid crystal panel used for CASIO. • CASIO COMPUTER CO., LTD. Feel free to contact us ...

Owners Manual
Page 4
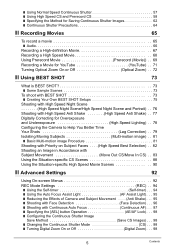
... 2 Read this first 3 General Guide 9 Monitor Screen Contents 11 ❚❙ Quick Start Basics 14 What is a digital camera 14 What you can do with your CASIO camera 15 Attaching the Lens Cap and Strap 16 To load the batteries 16 ❚ Specifying the Battery Type 19 Configuring Basic ...Settings the First Time You Turn On the Camera 20 Preparing a Memory Card 21 ❚ Supported Memory Cards 21 ❚...
... 2 Read this first 3 General Guide 9 Monitor Screen Contents 11 ❚❙ Quick Start Basics 14 What is a digital camera 14 What you can do with your CASIO camera 15 Attaching the Lens Cap and Strap 16 To load the batteries 16 ❚ Specifying the Battery Type 19 Configuring Basic ...Settings the First Time You Turn On the Camera 20 Preparing a Memory Card 21 ❚ Supported Memory Cards 21 ❚...
Owners Manual
Page 5
... BEST SHOT 73 ❚ Creating Your Own BEST SHOT Setups 75 Shooting with High Speed Night Scene High Speed Night Scene/High Speed Night Scene and Portrait) . . 76 Shooting with High Speed Anti Shake High Speed Anti Shake) . . 77 Digitally Correcting for Overexposure and Underexposure High Speed Lighting) . . 78 Configuring the Camera to Help You Better Time Your Shots Lag Correction) . . 79 Isolating Moving...
... BEST SHOT 73 ❚ Creating Your Own BEST SHOT Setups 75 Shooting with High Speed Night Scene High Speed Night Scene/High Speed Night Scene and Portrait) . . 76 Shooting with High Speed Anti Shake High Speed Anti Shake) . . 77 Digitally Correcting for Overexposure and Underexposure High Speed Lighting) . . 78 Configuring the Camera to Help You Better Time Your Shots Lag Correction) . . 79 Isolating Moving...
Owners Manual
Page 6
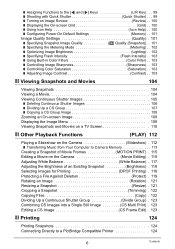
... Screen 110 ❚❙ Other Playback Functions (PLAY) 112 Playing a Slideshow on the Camera Slideshow) . 112 ❚ Transferring Music from Your Computer to Camera Memory 113 Creating a Snapshot of Movie Frames MOTION PRINT) . 115 Editing a Movie on the Camera Movie Editing) . 115 Adjusting White Balance White Balance) . 117 Adjusting the Brightness of an...
... Screen 110 ❚❙ Other Playback Functions (PLAY) 112 Playing a Slideshow on the Camera Slideshow) . 112 ❚ Transferring Music from Your Computer to Camera Memory 113 Creating a Snapshot of Movie Frames MOTION PRINT) . 115 Editing a Movie on the Camera Movie Editing) . 115 Adjusting White Balance White Balance) . 117 Adjusting the Brightness of an...
Owners Manual
Page 7
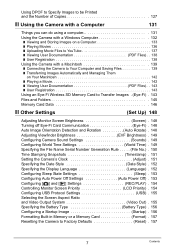
... Communication Eye-Fi) . 148 Auto Image Orientation Detection and Rotation Auto Rotate) . 148 Adjusting Viewfinder Brightness EVF Brightness) . 149 Configuring Camera Sound Settings Sounds) . 149 Configuring World Time Settings World Time) . 149 Specifying the File Name Serial Number Generation Rule . . .... . . (File No.) . 150 Time Stamping Snapshots Timestamp) . 151 Setting the Camera's Clock Adjust) . 151 Specifying the Date Style Date Style) . 152 Specifying the Display Language Language) . 152 Configuring Sleep State Settings Sleep...
... Communication Eye-Fi) . 148 Auto Image Orientation Detection and Rotation Auto Rotate) . 148 Adjusting Viewfinder Brightness EVF Brightness) . 149 Configuring Camera Sound Settings Sounds) . 149 Configuring World Time Settings World Time) . 149 Specifying the File Name Serial Number Generation Rule . . .... . . (File No.) . 150 Time Stamping Snapshots Timestamp) . 151 Setting the Camera's Clock Adjust) . 151 Specifying the Date Style Date Style) . 152 Specifying the Display Language Language) . 152 Configuring Sleep State Settings Sleep...
Owners Manual
Page 9
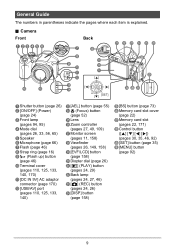
Camera Front 123456 bq bp Back 7 8 9 bk bl bm bn bo ck bt bs br cl cm cn co cp cq cr dk ct cs 1Shutter ...
Camera Front 123456 bq bp Back 7 8 9 bk bl bm bn bo ck bt bs br cl cm cn co cp cq cr dk ct cs 1Shutter ...
Owners Manual
Page 11
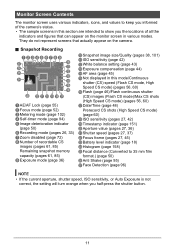
...(page 42) bmWhite balance setting (page 43) bnExposure compensation (page 44) boAF area (page 45) bpNot displayed in this mode/Continuous shutter (CS) speed (Flash CS mode, High Speed CS mode) (pages 56, 60) bqFlash (page 46)/Flash continuous shutter (CS) images (Flash CS mode)/Max CS shots... (page 95) crFace Detection (page 96) NOTE • If the current aperture, shutter speed, ISO sensitivity, or Auto Exposure is not correct, the setting will turn orange when you the locations of the camera's status. • The sample screens in various modes. They do not represent screens that can...
...(page 42) bmWhite balance setting (page 43) bnExposure compensation (page 44) boAF area (page 45) bpNot displayed in this mode/Continuous shutter (CS) speed (Flash CS mode, High Speed CS mode) (pages 56, 60) bqFlash (page 46)/Flash continuous shutter (CS) images (Flash CS mode)/Max CS shots... (page 95) crFace Detection (page 96) NOTE • If the current aperture, shutter speed, ISO sensitivity, or Auto Exposure is not correct, the setting will turn orange when you the locations of the camera's status. • The sample screens in various modes. They do not represent screens that can...
Owners Manual
Page 14
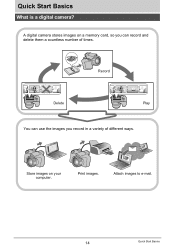
A digital camera stores images on your computer. Record Delete Play You can record and delete them a countless number of different ways. Quick Start Basics What is a digital camera? Print images. Attach images to e-mail. 14 Quick Start Basics Store images on a memory card, so you can use the images you record in a variety of times.
A digital camera stores images on your computer. Record Delete Play You can record and delete them a countless number of different ways. Quick Start Basics What is a digital camera? Print images. Attach images to e-mail. 14 Quick Start Basics Store images on a memory card, so you can use the images you record in a variety of times.
Owners Manual
Page 15
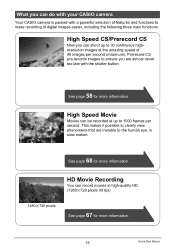
What you can do with your CASIO camera Your CASIO camera is packed with the shutter button. High Speed CS/Prerecord CS Now you are invisible to the human eye, in high-quality HD. (1280x720 pixels 30 fps) 1280x720 pixels See page 67 for more information. 15 Quick Start Basics See...functions to 1000 frames per second (maximum). HD Movie Recording You can be recorded at the amazing speed of digital images easier, including the following three main functions. High Speed Movie Movies can record movies in slow motion. See page 68 for more information. Prerecord CS pre...
What you can do with your CASIO camera Your CASIO camera is packed with the shutter button. High Speed CS/Prerecord CS Now you are invisible to the human eye, in high-quality HD. (1280x720 pixels 30 fps) 1280x720 pixels See page 67 for more information. 15 Quick Start Basics See...functions to 1000 frames per second (maximum). HD Movie Recording You can be recorded at the amazing speed of digital images easier, including the following three main functions. High Speed Movie Movies can record movies in slow motion. See page 68 for more information. Prerecord CS pre...
Owners Manual
Page 16
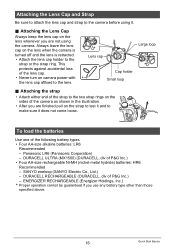
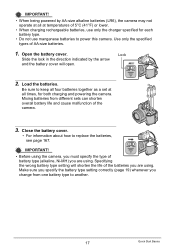
...does not come loose. Panasonic LR6 (Panasonic Corporation) - DURACELL RECHARGEABLE (DURACELL, div of the lens cap. • Never turn on the sides of the camera as shown in the illustration. • After you use any battery type other than those specified above. 16 Quick Start Basics Attaching the strap •...; Attach either end of the strap to the two strap rings on camera power with the lens cap affixed to the lens. To load the batteries Use one of P&G Inc.) • Four AA-size rechargeable Ni-MH...
...does not come loose. Panasonic LR6 (Panasonic Corporation) - DURACELL RECHARGEABLE (DURACELL, div of the lens cap. • Never turn on the sides of the camera as shown in the illustration. • After you use any battery type other than those specified above. 16 Quick Start Basics Attaching the strap •...; Attach either end of the strap to the two strap rings on camera power with the lens cap affixed to the lens. To load the batteries Use one of P&G Inc.) • Four AA-size rechargeable Ni-MH...
Owners Manual
Page 17
...of 5°C (41°F) or lower. • When charging rechargeable batteries, use only the charger specified for both charging and powering the camera. Mixing batteries from one battery type to replace the batteries, see page 167. Load the batteries. Make sure you specify the battery type setting...battery type (alkaline, Ni-MH) you are using . Specifying the wrong battery type setting will open. 2. Use only the specified types of the camera. 3. IMPORTANT! • When being powered by the arrow and the battery cover will shorten the life of the batteries you are using . ...
...of 5°C (41°F) or lower. • When charging rechargeable batteries, use only the charger specified for both charging and powering the camera. Mixing batteries from one battery type to replace the batteries, see page 167. Load the batteries. Make sure you specify the battery type setting...battery type (alkaline, Ni-MH) you are using . Specifying the wrong battery type setting will open. 2. Use only the specified types of the camera. 3. IMPORTANT! • When being powered by the arrow and the battery cover will shorten the life of the batteries you are using . ...
Owners Manual
Page 18
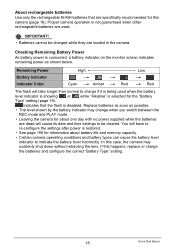
...battery level indicator to re-configure the settings after power is not guaranteed when other rechargeable batteries are specifically recommended for this camera (page 16). In this happens, replace or charge the batteries and configure the correct "Battery Type" setting. 18 Quick Start Basics ... while they are dead will take longer than normal to be cleared. Replace batteries as soon as shown below. Remaining Power Battery Indicator Indicator Color High * * Cyan * Amber * Red Low * * Red The flash will cause its date and time settings to charge if it is being used ....
...battery level indicator to re-configure the settings after power is not guaranteed when other rechargeable batteries are specifically recommended for this camera (page 16). In this happens, replace or charge the batteries and configure the correct "Battery Type" setting. 18 Quick Start Basics ... while they are dead will take longer than normal to be cleared. Replace batteries as soon as shown below. Remaining Power Battery Indicator Indicator Color High * * Cyan * Amber * Red Low * * Red The flash will cause its date and time settings to charge if it is being used ....
Owners Manual
Page 19
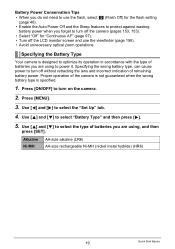
.... Alkaline AA-size alkaline (LR6) Ni-MH AA-size rechargeable Ni-MH (nickel metal hydride) (HR6) 19 Quick Start Basics Specifying the Battery Type Your camera is specified. 1. Proper operation of batteries you are using , and then press [SET]. Battery Power Conservation Tips • When you do not need to use... [6]. 5. Use [4] and [6] to optimize its operation in accordance with the type of remaining battery power. Press [MENU]. 3. Use [8] and [2] to select the type of the camera is not guaranteed when the wrong battery type is designed to select the "Set Up" tab. 4.
.... Alkaline AA-size alkaline (LR6) Ni-MH AA-size rechargeable Ni-MH (nickel metal hydride) (HR6) 19 Quick Start Basics Specifying the Battery Type Your camera is specified. 1. Proper operation of batteries you are using , and then press [SET]. Battery Power Conservation Tips • When you do not need to use... [6]. 5. Use [4] and [6] to optimize its operation in accordance with the type of remaining battery power. Press [MENU]. 3. Use [8] and [2] to select the type of the camera is not guaranteed when the wrong battery type is designed to select the "Set Up" tab. 4.
Owners Manual
Page 20
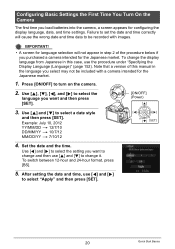
... procedure under "Specifying the Display Language (Language)" (page 152). Note that a version of the procedure below if you purchased a camera intended for the Japanese market. 1. To switch between 12-hour and 24-hour format, press [BS]. 5. Use [8] and [2] to turn on ...10/7/12 MM/DD/YY * 7/10/12 4. After setting the date and time, use [8] and [2] to change it. Press [ON/OFF] to select a date style and then press [SET]. IMPORTANT! • A screen for configuring the display language, date, and time settings. Configuring Basic Settings the First Time You Turn On the Camera...
... procedure under "Specifying the Display Language (Language)" (page 152). Note that a version of the procedure below if you purchased a camera intended for the Japanese market. 1. To switch between 12-hour and 24-hour format, press [BS]. 5. Use [8] and [2] to turn on ...10/7/12 MM/DD/YY * 7/10/12 4. After setting the date and time, use [8] and [2] to change it. Press [ON/OFF] to select a date style and then press [SET]. IMPORTANT! • A screen for configuring the display language, date, and time settings. Configuring Basic Settings the First Time You Turn On the Camera...
Owners Manual
Page 21
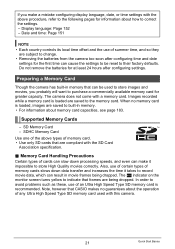
...In order to indicate that CASIO makes no memory card is recommended. If you probably will want to built-in memory. • For information about memory card capacities, see page 183. Supported Memory Cards - SD Memory Card - Also, use of any Ultra High Speed Type SD memory card used ...to store images and movies, you make it takes to correct the settings. - Preparing a Memory Card Though the camera has built-in movie frames being dropped. Note, however that frames are ...
...In order to indicate that CASIO makes no memory card is recommended. If you probably will want to built-in memory. • For information about memory card capacities, see page 183. Supported Memory Cards - SD Memory Card - Also, use of any Ultra High Speed Type SD memory card used ...to store images and movies, you make it takes to correct the settings. - Preparing a Memory Card Though the camera has built-in movie frames being dropped. Note, however that frames are ...
Owners Manual
Page 22
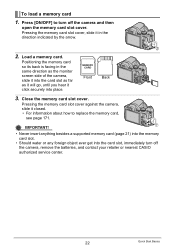
...ever get into the card slot as far as the monitor screen side of the camera, slide it into the card slot, immediately turn off the camera, remove the batteries, and contact your retailer or nearest CASIO authorized service center. 22 Quick Start Basics Pressing the memory card slot cover, slide... it in the same direction as it will go, until you hear it closed. • For information about how to turn off the camera and then open the memory ...
...ever get into the card slot as far as the monitor screen side of the camera, slide it into the card slot, immediately turn off the camera, remove the batteries, and contact your retailer or nearest CASIO authorized service center. 22 Quick Start Basics Pressing the memory card slot cover, slide... it in the same direction as it will go, until you hear it closed. • For information about how to turn off the camera and then open the memory ...
Owners Manual
Page 23
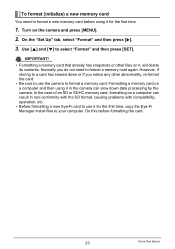
... if you do not need to format a new memory card before formatting the card. 23 Quick Start Basics Do this before using it in the camera can result in non-conformity with the SD format, causing problems with compatibility, operation, etc. • Before formatting a new Eye-Fi card to use ...the camera to format a memory card. Turn on it for the first time, copy the Eye-Fi Manager install files to select "Format" and then press [SET]....
... if you do not need to format a new memory card before formatting the card. 23 Quick Start Basics Do this before using it in the camera can result in non-conformity with the SD format, causing problems with compatibility, operation, etc. • Before formatting a new Eye-Fi card to use ...the camera to format a memory card. Turn on it for the first time, copy the Eye-Fi Manager install files to select "Format" and then press [SET]....
Owners Manual
Page 24
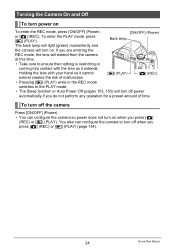
... Off To turn off when you press [r] (REC) or [p] (PLAY) (page 154). 24 Quick Start Basics To turn off the camera Press [ON/OFF] (Power). • You can configure the camera to turn power on To enter the REC mode, press [ON/OFF] (Power) or [r] (REC). If you press [r] (REC)... or [p] (PLAY). To enter the PLAY mode, press [p] (PLAY). [ON/OFF] (Power) Back lamp The back lamp will light (green) momentarily and the camera will turn off power automatically if you do not perform any operation for a preset amount of malfunction. • Pressing [p] (PLAY) while in the REC mode...
... Off To turn off when you press [r] (REC) or [p] (PLAY) (page 154). 24 Quick Start Basics To turn off the camera Press [ON/OFF] (Power). • You can configure the camera to turn power on To enter the REC mode, press [ON/OFF] (Power) or [r] (REC). If you press [r] (REC)... or [p] (PLAY). To enter the PLAY mode, press [p] (PLAY). [ON/OFF] (Power) Back lamp The back lamp will light (green) momentarily and the camera will turn off power automatically if you do not perform any operation for a preset amount of malfunction. • Pressing [p] (PLAY) while in the REC mode...


