

User Guide
Page 7
Contents Safety Precautions 1 Operating Precautions 5 CW-K85 Printer Features 7 General Guide 8 Power Requirements 9 Using the AC Adaptor 9 Using batteries 10 Initializing Printer Memory 12 To initialize printer memory 12 Data Error 12 Powering Up and Selecting a Printing Mode 12 To turn ...an Ink Ribbon Cassette 15 To load the ink ribbon cassette 15 To remove the ink ribbon cassette 16 Using the Printer's Keys 17 Display Symbols and Indicators 18 Label Printing Basics 19 Label Printing General Procedure 19 DISC Label Data 25 Disc Printing Terms 25 Creating Disc Label...
Contents Safety Precautions 1 Operating Precautions 5 CW-K85 Printer Features 7 General Guide 8 Power Requirements 9 Using the AC Adaptor 9 Using batteries 10 Initializing Printer Memory 12 To initialize printer memory 12 Data Error 12 Powering Up and Selecting a Printing Mode 12 To turn ...an Ink Ribbon Cassette 15 To load the ink ribbon cassette 15 To remove the ink ribbon cassette 16 Using the Printer's Keys 17 Display Symbols and Indicators 18 Label Printing Basics 19 Label Printing General Procedure 19 DISC Label Data 25 Disc Printing Terms 25 Creating Disc Label...
User Guide
Page 10
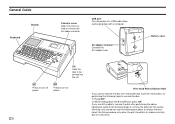
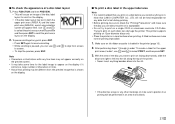
.... Normally, you are still unable to remove the disc after performing the above operations, perform the following steps to remove the disc from the printer due to printer malfunction, try performing the following procedure to turn off power. Use this cover to remove the disc. 1 Press OFF. 2 While holding down the ... a USB cable when exchanging data with a computer. If you should not use the following steps to load or remove the ink ribbon cassette. E 8 Print Head Release Button Hole If you cannot remove the disc from the printer. AC adaptor terminal Connect the AC adaptor here.
.... Normally, you are still unable to remove the disc after performing the above operations, perform the following steps to remove the disc from the printer due to printer malfunction, try performing the following procedure to turn off power. Use this cover to remove the disc. 1 Press OFF. 2 While holding down the ... a USB cable when exchanging data with a computer. If you should not use the following steps to load or remove the ink ribbon cassette. E 8 Print Head Release Button Hole If you cannot remove the disc from the printer. AC adaptor terminal Connect the AC adaptor here.
User Guide
Page 17
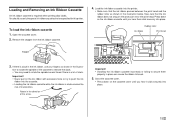
... the ink ribbon cassette 1. Rubber roller Ink ribbon Print head Stopper 3. If there is required when printing disc labels. Close the cassette cover. • Press down on the protrusion near the print head. Loading and Removing an Ink Ribbon Cassette An ink ribbon cassette is slack in the ink ribbon, use only the special ink ribbon cassettes that are specified for this printer. Remove...
... the ink ribbon cassette 1. Rubber roller Ink ribbon Print head Stopper 3. If there is required when printing disc labels. Close the cassette cover. • Press down on the protrusion near the print head. Loading and Removing an Ink Ribbon Cassette An ink ribbon cassette is slack in the ink ribbon, use only the special ink ribbon cassettes that are specified for this printer. Remove...
User Guide
Page 18
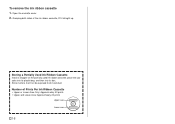
Open the cassette cover. 2. Store it where it straight up. Number of the ink ribbon cassette, lift it will not be exposed to dirt and dust. Storing a Partially Used Ink Ribbon Cassette Install a stopper on the partially used ink ribbon cassette, place the cassette into its plastic bag, and then into its box. To remove the ink ribbon cassette 1. Grasping both sides of Prints Per Ink Ribbon Cassette • Upper or Lower Area Only: Approximately 40 prints • Upper and Lower Area: Approximately 20 prints Upper area Lower area E 16
Open the cassette cover. 2. Store it where it straight up. Number of the ink ribbon cassette, lift it will not be exposed to dirt and dust. Storing a Partially Used Ink Ribbon Cassette Install a stopper on the partially used ink ribbon cassette, place the cassette into its plastic bag, and then into its box. To remove the ink ribbon cassette 1. Grasping both sides of Prints Per Ink Ribbon Cassette • Upper or Lower Area Only: Approximately 40 prints • Upper and Lower Area: Approximately 20 prints Upper area Lower area E 16
User Guide
Page 21
... load batteries into the printer. (Page 10) Load an ink ribbon cassette (Page 15). q Size indicator This indicator appears when you want to use (Page 20). Print the label (Page 21). ■ To create a label for laying out and printing disc labels. Disc Label Printing General Procedure ... the AC adaptor (Page 9). Select the format and input its text. Label Printing Basics This section contains general procedures for the upper print area of a disc Example 19 E This indicator: x 1 x 2 x 3 x 4 x 5 Means this: 3 mm (1Ú8") 6 mm (1Ú4") 9 mm (3Ú8") 12 mm (1Ú2") 15 mm...
... load batteries into the printer. (Page 10) Load an ink ribbon cassette (Page 15). q Size indicator This indicator appears when you want to use (Page 20). Print the label (Page 21). ■ To create a label for laying out and printing disc labels. Disc Label Printing General Procedure ... the AC adaptor (Page 9). Select the format and input its text. Label Printing Basics This section contains general procedures for the upper print area of a disc Example 19 E This indicator: x 1 x 2 x 3 x 4 x 5 Means this: 3 mm (1Ú8") 6 mm (1Ú4") 9 mm (3Ú8") 12 mm (1Ú2") 15 mm...
User Guide
Page 23
... print area's layout on the display. • If the disc label layout has text in both the upper print area (AREA A) and the lower print area (AREA B), a print area selection screen will be performed in the printer (page 15). 2. Make sure an ink ribbon cassette is acceptable. • Do not try to print on.... • Press SET again to select PRINT, and then press SET. 3. A tilted surface can use and to resume scrolling. • While scrolling is recommended that CASIO COMPUTER CO., LTD.
... print area's layout on the display. • If the disc label layout has text in both the upper print area (AREA A) and the lower print area (AREA B), a print area selection screen will be performed in the printer (page 15). 2. Make sure an ink ribbon cassette is acceptable. • Do not try to print on.... • Press SET again to select PRINT, and then press SET. 3. A tilted surface can use and to resume scrolling. • While scrolling is recommended that CASIO COMPUTER CO., LTD.
User Guide
Page 27
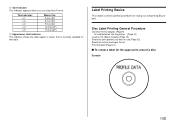
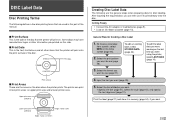
...,and all other information pre-printed on this side. ■ Print Data This is the side of the disc. To edit the label data you were working on the disc where the printer prints. Select the format you want . • Specify the font (page 41), select the style (page...Creating a Disc Label 1. To edit an existing label, select STORED DATA (page 44). Print the label (page 21) and store it to use (page 27). 4. Input the text you want (page 33). 5. Getting Ready • Connect the AC adaptor or load batteries (page 9). • Load an ink ribbon cassette ...
...,and all other information pre-printed on this side. ■ Print Data This is the side of the disc. To edit the label data you were working on the disc where the printer prints. Select the format you want . • Specify the font (page 41), select the style (page...Creating a Disc Label 1. To edit an existing label, select STORED DATA (page 44). Print the label (page 21) and store it to use (page 27). 4. Input the text you want (page 33). 5. Getting Ready • Connect the AC adaptor or load batteries (page 9). • Load an ink ribbon cassette ...

User Guide
Page 47
.... 1. Important! • If there is label data from your last label layout session is still in the printer. • See page 15 for information about loading ink ribbon cassettes. 2. If the printer is selected: DEFAULT FONT INPUT CONTRAST DENSITY SOUND LANGUAGE DEMO PRINT Change its setting like this: • Use...select DEMO PRINT, and then press SET. 6. Use and to adjust the print density setting. • Use and or off . 3. Insert a disc into the printer. 10. When this setting is on, press to change , and then press SET. 4. If you think you will delete it , and then ...
.... 1. Important! • If there is label data from your last label layout session is still in the printer. • See page 15 for information about loading ink ribbon cassettes. 2. If the printer is selected: DEFAULT FONT INPUT CONTRAST DENSITY SOUND LANGUAGE DEMO PRINT Change its setting like this: • Use...select DEMO PRINT, and then press SET. 6. Use and to adjust the print density setting. • Use and or off . 3. Insert a disc into the printer. 10. When this setting is on, press to change , and then press SET. 4. If you think you will delete it , and then ...
User Guide
Page 49
...Consult the troubleshooting tables below , contact your original retailer or your nearest authorized CASIO service center. Battery power is low or the wrong type of batteries are loaded in the printer. Batteries are input for the label. Only spaces are not loaded properly.... adaptor power or replace the current batteries with the printer or application. If you can interfere with proper printing. • A disc printing surface that meets the requirements described in the printer. Printing is printed. Re-load the ink ribbon cassette properly. Re-import the data. I press ...
...Consult the troubleshooting tables below , contact your original retailer or your nearest authorized CASIO service center. Battery power is low or the wrong type of batteries are loaded in the printer. Batteries are input for the label. Only spaces are not loaded properly.... adaptor power or replace the current batteries with the printer or application. If you can interfere with proper printing. • A disc printing surface that meets the requirements described in the printer. Printing is printed. Re-load the ink ribbon cassette properly. Re-import the data. I press ...

User Guide
Page 50
... a different USB port on your computer, or try using a lighter color disc or a darker color ink ribbon. The disc stops part way through printing. Close the cassette cover properly and insert the disc. (page 9) Remove the disc and then reinsert it straight into the printer. The printing operation is finished normally, but nothing is malfunctioning. The USB...
... a different USB port on your computer, or try using a lighter color disc or a darker color ink ribbon. The disc stops part way through printing. Close the cassette cover properly and insert the disc. (page 9) Remove the disc and then reinsert it straight into the printer. The printing operation is finished normally, but nothing is malfunctioning. The USB...
User Guide
Page 52
..., or delete operation on the display and it appears as if printing will not resume, contact your retailer or your nearest CASIO service center. • There is no text input. ➜ Input text before printing or previewing. • There is not enough ink ribbon left to continue. NO INPUT TEXT! PLACE DISC IN PRINTER CORRECTLY!
..., or delete operation on the display and it appears as if printing will not resume, contact your retailer or your nearest CASIO service center. • There is no text input. ➜ Input text before printing or previewing. • There is not enough ink ribbon left to continue. NO INPUT TEXT! PLACE DISC IN PRINTER CORRECTLY!


