
User Guide
Page 1
RCA502991-001V01 Printing on a disc that already has data recorded on it . Be sure to read the Safety Precautions contained in this manual before you print on a disc* before trying to become corrupted. • Note that CASIO COMPUTER CO., LTD. shall not be held liable for future reference. E CW-K85 User's Guide • We recommend that you record anything on it can cause the data to use the printer for the first time, and always keep this manual on hand for any loss or corruption of data on discs arising through the use of this printer. * CD-R, CD-RW, DVD-R, etc.
RCA502991-001V01 Printing on a disc that already has data recorded on it . Be sure to read the Safety Precautions contained in this manual before you print on a disc* before trying to become corrupted. • Note that CASIO COMPUTER CO., LTD. shall not be held liable for future reference. E CW-K85 User's Guide • We recommend that you record anything on it can cause the data to use the printer for the first time, and always keep this manual on hand for any loss or corruption of data on discs arising through the use of this printer. * CD-R, CD-RW, DVD-R, etc.
User Guide
Page 3
...the possibility of personal injury or material damage. Keep the manual in part or its entirety, is forbidden without the express permission of CASIO COMPUTER CO., LTD. • The contents of death or serious personal injury. indicates something you should unplug the unit from the wall... outlet. 1 E Safety Precautions Thank you should not try to use of this printer. • Reproduction of graphic markings indicates something you or any form, either in a convenient location for the first time. All rights ...
...the possibility of personal injury or material damage. Keep the manual in part or its entirety, is forbidden without the express permission of CASIO COMPUTER CO., LTD. • The contents of death or serious personal injury. indicates something you should unplug the unit from the wall... outlet. 1 E Safety Precautions Thank you should not try to use of this printer. • Reproduction of graphic markings indicates something you or any form, either in a convenient location for the first time. All rights ...

User Guide
Page 5
...explode, creating the risk of batteries can damage it will go on a trip), unplug the power cord and USB cable. • When not using the printer, be sure to dropping or other personal injury. Immediately perform the following steps if liquid or a foreign object should ever become damaged. 1. Never pull on... the cord or cable. • Plug in the power cord into the computer and the printer as far as it will go. • Before leaving the product unattended for use with this product. • Remove batteries from the...
...explode, creating the risk of batteries can damage it will go on a trip), unplug the power cord and USB cable. • When not using the printer, be sure to dropping or other personal injury. Immediately perform the following steps if liquid or a foreign object should ever become damaged. 1. Never pull on... the cord or cable. • Plug in the power cord into the computer and the printer as far as it will go. • Before leaving the product unattended for use with this product. • Remove batteries from the...

User Guide
Page 7
...temperature changes, and temperature extremes. Contents Safety Precautions 1 Operating Precautions 5 CW-K85 Printer Features 7 General Guide 8 Power Requirements 9 Using the AC Adaptor 9 Using batteries 10 Initializing Printer Memory 12 To initialize printer memory 12 Data Error 12 Powering Up and Selecting a Printing Mode ...To remove the ink ribbon cassette 16 Using the Printer's Keys 17 Display Symbols and Indicators 18 Label Printing Basics 19 Label Printing General Procedure 19 DISC Label Data 25 Disc Printing Terms 25 Creating Disc Label Data 25 Creating a New Label 26 ...
...temperature changes, and temperature extremes. Contents Safety Precautions 1 Operating Precautions 5 CW-K85 Printer Features 7 General Guide 8 Power Requirements 9 Using the AC Adaptor 9 Using batteries 10 Initializing Printer Memory 12 To initialize printer memory 12 Data Error 12 Powering Up and Selecting a Printing Mode ...To remove the ink ribbon cassette 16 Using the Printer's Keys 17 Display Symbols and Indicators 18 Label Printing Basics 19 Label Printing General Procedure 19 DISC Label Data 25 Disc Printing Terms 25 Creating Disc Label Data 25 Creating a New Label 26 ...

User Guide
Page 8
... Saving, Recalling and Deleting Labels 44 To save a label 44 To recall a label 44 To delete a label 44 Configuring the Printer Setup 45 Demo Printing 45 Reference 46 Caring for the Printer 46 Troubleshooting 47 Error Messages 49 Illustrations 52 Symbols, Dingbats, and Special Characters 52 Frames 53 Label Formats 54 Specifications...
... Saving, Recalling and Deleting Labels 44 To save a label 44 To recall a label 44 To delete a label 44 Configuring the Printer Setup 45 Demo Printing 45 Reference 46 Caring for the Printer 46 Troubleshooting 47 Error Messages 49 Illustrations 52 Symbols, Dingbats, and Special Characters 52 Frames 53 Label Formats 54 Specifications...

User Guide
Page 9
A selection of illustrations and fonts makes labels stylish and informative. 7 E CW-K85 Printer Features The CW-K85 makes it possible to print on discs without connecting to a computer or installing any special software.
A selection of illustrations and fonts makes labels stylish and informative. 7 E CW-K85 Printer Features The CW-K85 makes it possible to print on discs without connecting to a computer or installing any special software.
User Guide
Page 10
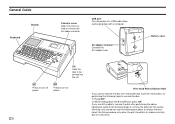
Press to malfunction. Use this cover to be printed into the slit. Normally, you should not use the following procedure to remove the disc. 1 Press OFF. 2 While holding down the D and H keys, press ON. AC adaptor terminal Connect the AC adaptor here. E 8 Print Head Release Button Hole ... cover Open this procedure only when the print head fails to release normally due to turn on power. If you cannot remove the disc from the printer. Press to remove the disc from the printer due to printer malfunction, try performing the following steps to turn off power.
Press to malfunction. Use this cover to be printed into the slit. Normally, you should not use the following procedure to remove the disc. 1 Press OFF. 2 While holding down the D and H keys, press ON. AC adaptor terminal Connect the AC adaptor here. E 8 Print Head Release Button Hole ... cover Open this procedure only when the print head fails to release normally due to turn on power. If you cannot remove the disc from the printer. Press to remove the disc from the printer due to printer malfunction, try performing the following steps to turn off power.
User Guide
Page 11
... Cover Press the cassette cover release to the printer. 9 E Do not use a toothpick or other object with an AC adaptor You can run the printer by the arrow. • This will cause the print head to release the disc so you hear it onto the printer at least 30mm (1-3/16") long and no ...thicker than 1.5mm (1/16"). Power Requirements Depending on your printer model it past its bundled AC adaptor to turn off automatically and result in the ...
... Cover Press the cassette cover release to the printer. 9 E Do not use a toothpick or other object with an AC adaptor You can run the printer by the arrow. • This will cause the print head to release the disc so you hear it onto the printer at least 30mm (1-3/16") long and no ...thicker than 1.5mm (1/16"). Power Requirements Depending on your printer model it past its bundled AC adaptor to turn off automatically and result in the ...

User Guide
Page 12
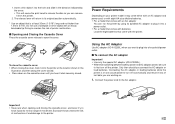
... is not bent excessively at the wrong time can cause loss of the power cord (points marked A and B in the illustration). Turn over the printer and remove the bat- Load a set of eight new batteries. • Make sure the positive g and negative h poles of the batteries are ...cover. • Never bend or twist the battery cover, or otherwise subject it to use alkaline batteries only. 1. 2. Connect the AC adaptor plug to the printer's AC adaptor terminal (1), and then plug the power cord into a household power outlet (2). 1 2 ■ To disconnect the AC adaptor Important! • ...
... is not bent excessively at the wrong time can cause loss of the power cord (points marked A and B in the illustration). Turn over the printer and remove the bat- Load a set of eight new batteries. • Make sure the positive g and negative h poles of the batteries are ...cover. • Never bend or twist the battery cover, or otherwise subject it to use alkaline batteries only. 1. 2. Connect the AC adaptor plug to the printer's AC adaptor terminal (1), and then plug the power cord into a household power outlet (2). 1 2 ■ To disconnect the AC adaptor Important! • ...

User Guide
Page 13
...730;C (68˚F)), one printing per disc. * When printing text or graphics that contain large areas of black, and printing under cold temperatures can cause loss of text you are working on , as well as text and preset phrases you have stored in printer memory. • Be sure to keep ... printing. • Be sure to 95˚F)) • Never disconnect the AC adaptor or remove the batteries while the printer is turned on . Important! • The printer may appear prematurely when the temperature is completely blank after turning off during that the display is below 10˚C(50˚...
...730;C (68˚F)), one printing per disc. * When printing text or graphics that contain large areas of black, and printing under cold temperatures can cause loss of text you are working on , as well as text and preset phrases you have stored in printer memory. • Be sure to keep ... printing. • Be sure to 95˚F)) • Never disconnect the AC adaptor or remove the batteries while the printer is turned on . Important! • The printer may appear prematurely when the temperature is completely blank after turning off during that the display is below 10˚C(50˚...

User Guide
Page 14
... select the type of operation you turn power on and off . 2. When this message appears, press any key. To initialize printer memory 1. Initializing Printer Memory You should initialize the memory of the printer before using it for the first time, after you have not used it for a long time, or if it fails... to operate normally when you turn the printer on. • This turns on power and displays a main menu screen like the one shown below. • The selection boundary indicates the icon that is...
... select the type of operation you turn power on and off . 2. When this message appears, press any key. To initialize printer memory 1. Initializing Printer Memory You should initialize the memory of the printer before using it for the first time, after you have not used it for a long time, or if it fails... to operate normally when you turn the printer on. • This turns on power and displays a main menu screen like the one shown below. • The selection boundary indicates the icon that is...

User Guide
Page 15
..., and language (English, German, French, Italian, Spanish) settings. • All of printing operation you want to a computer. Note Auto Power Off is disabled while the printer is being powered by the AC adaptor and is connected to perform. • See "Mode Selection Basics" on the type of the display examples in... display language. 13 E What you do after turning on power depends on page 14 for about six minutes. To restore power, press . To turn the printer off if you should do not perform any key operation for more information. 3. Auto Power Off The...
..., and language (English, German, French, Italian, Spanish) settings. • All of printing operation you want to a computer. Note Auto Power Off is disabled while the printer is being powered by the AC adaptor and is connected to perform. • See "Mode Selection Basics" on the type of the display examples in... display language. 13 E What you do after turning on power depends on page 14 for about six minutes. To restore power, press . To turn the printer off if you should do not perform any key operation for more information. 3. Auto Power Off The...

User Guide
Page 16
To input new label text ••• To recall previously saved text into a label To display the text you were working on the last time you were using the printer (LAST DATA) E 14 • Producing a demo print (page 45) or initializing printer memory will delete any data you were last working on the printer. Mode Selection Basics The illustration below shows the basic flow for mode selection after turning on .
To input new label text ••• To recall previously saved text into a label To display the text you were working on the last time you were using the printer (LAST DATA) E 14 • Producing a demo print (page 45) or initializing printer memory will delete any data you were last working on the printer. Mode Selection Basics The illustration below shows the basic flow for mode selection after turning on .
User Guide
Page 17
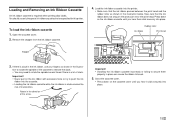
...incorrectly or failing to push the ink ribbon into place. Press down on the cassette cover until you hear it click securely into the printer. • Make sure that the ink ribbon passes between the print head and the rubber roller as shown in the illustra- Rubber roller...Stopper 3. tion to rotate the spindle of slack. Rotate in the direction of malfunction. Take care that are specified for this printer. If there is required when printing disc labels. Close the cassette cover. • Press down on the ink ribbon cassette until you hear them properly in place ...
...incorrectly or failing to push the ink ribbon into place. Press down on the cassette cover until you hear it click securely into the printer. • Make sure that the ink ribbon passes between the print head and the rubber roller as shown in the illustra- Rubber roller...Stopper 3. tion to rotate the spindle of slack. Rotate in the direction of malfunction. Take care that are specified for this printer. If there is required when printing disc labels. Close the cassette cover. • Press down on the ink ribbon cassette until you hear them properly in place ...

User Guide
Page 19
... character to the left of the cursor. • Press and then this key to delete all of the text you are currently inputting. Using the Printer's Keys wq 1234 1 2 56 3 4 5 90 6 7 87 8 9 0 q w • Press to print. • Press and then this key to preview the label you are currently creating. Press...
... character to the left of the cursor. • Press and then this key to delete all of the text you are currently inputting. Using the Printer's Keys wq 1234 1 2 56 3 4 5 90 6 7 87 8 9 0 q w • Press to print. • Press and then this key to preview the label you are currently creating. Press...

User Guide
Page 20
...key to the currently selected font. 6 Small font indicator A pointer appears here when the SMALL FONT is selected automatically by the printer. 7 Label format Shows the format of the label being created. 8 Auto format indicator This indicator appears when Auto Format is ... " " indicates lowercase overwrite. 3 Character style indicators A pointer appears under the currently selected character style. Pressing a key while this indicator is on the label printer display. ■ Symbols and Indicators 23 04 1 9 cursor 8 7 SANS-SERIF SANS-S ITC SANS-S RND 5 ROMAN ROMAN ITC SMALL FONT q 6 ...
...key to the currently selected font. 6 Small font indicator A pointer appears here when the SMALL FONT is selected automatically by the printer. 7 Label format Shows the format of the label being created. 8 Auto format indicator This indicator appears when Auto Format is ... " " indicates lowercase overwrite. 3 Character style indicators A pointer appears under the currently selected character style. Pressing a key while this indicator is on the label printer display. ■ Symbols and Indicators 23 04 1 9 cursor 8 7 SANS-SERIF SANS-S ITC SANS-S RND 5 ROMAN ROMAN ITC SMALL FONT q 6 ...
User Guide
Page 21
...mm (5Ú8") w Upper/lower label indicator This indicator shows the label (upper or lower) that is currently selected for the upper print area of a disc Example 19 E Select the print pattern you are using Auto Format. q Size indicator This indicator appears when you want to use (Page 20). Or... load batteries into the printer. (Page 10) Load an ink ribbon cassette (Page 15). Print the label (Page 21). ■ To create a label for text input. Disc Label Printing General Procedure Connect the AC adaptor (Page 9). Select the format and...
...mm (5Ú8") w Upper/lower label indicator This indicator shows the label (upper or lower) that is currently selected for the upper print area of a disc Example 19 E Select the print pattern you are using Auto Format. q Size indicator This indicator appears when you want to use (Page 20). Or... load batteries into the printer. (Page 10) Load an ink ribbon cassette (Page 15). Print the label (Page 21). ■ To create a label for text input. Disc Label Printing General Procedure Connect the AC adaptor (Page 9). Select the format and...

User Guide
Page 22
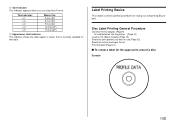
...Page 31 1. After inputting the text press SET. • Now you can preview your disc label ("To check the appearance of a disc label layout", page 21) or print it without previewing ("To print a disc label in the upper label area", page 21). Use and to select the label format you...A (upper only). 4. Use and to select the print area(s) you want . • Here we will select FORMAT 1. 5. Input the text you used the printer. AREA A AREA A 6. See page 14 for information about inputting text. Press to select NEW, and then press SET. • This displays a print pattern ...
...Page 31 1. After inputting the text press SET. • Now you can preview your disc label ("To check the appearance of a disc label layout", page 21) or print it without previewing ("To print a disc label in the upper label area", page 21). Use and to select the label format you...A (upper only). 4. Use and to select the print area(s) you want . • Here we will select FORMAT 1. 5. Input the text you used the printer. AREA A AREA A 6. See page 14 for information about inputting text. Press to select NEW, and then press SET. • This displays a print pattern ...
User Guide
Page 23
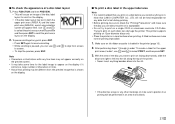
...; Never insert anything on the display. 2. This printer supports printing on 12cm diameter discs only. • Place the printer on it . Make sure an ink ribbon cassette is blank. 21 E Note that is loaded in an area that CASIO COMPUTER CO., LTD. A tilted surface can damage the printer. To pause scrolling at any point, press...
...; Never insert anything on the display. 2. This printer supports printing on 12cm diameter discs only. • Place the printer on it . Make sure an ink ribbon cassette is blank. 21 E Note that is loaded in an area that CASIO COMPUTER CO., LTD. A tilted surface can damage the printer. To pause scrolling at any point, press...
User Guide
Page 24
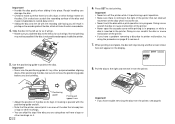
...; Check to the right and remove it exits the slit. • Never touch the disc while a print operation is in progress. Doing so can scratch the disc or cause malfunction of the disc when it from the printer, see page 8. Normal printing may not be sure to start printing. 8. Important! &#...facing you will result in printing on the recording side of the disc, which will appear on page 8 to the right of the printer that can obstruct movement of the printer. • If you have a problem removing a disc due to printer malfunction, try using does not have a logo or other markings ...
...; Check to the right and remove it exits the slit. • Never touch the disc while a print operation is in progress. Doing so can scratch the disc or cause malfunction of the disc when it from the printer, see page 8. Normal printing may not be sure to start printing. 8. Important! &#...facing you will result in printing on the recording side of the disc, which will appear on page 8 to the right of the printer that can obstruct movement of the printer. • If you have a problem removing a disc due to printer malfunction, try using does not have a logo or other markings ...

