

User Guide
Page 7
... Precautions 5 CW-K85 Printer Features 7 General Guide 8 Power Requirements 9 Using the AC Adaptor 9 Using batteries 10 Initializing Printer Memory 12 To initialize printer memory 12 Data Error 12 Powering Up and Selecting a Printing Mode 12 To turn power on and off 12 Auto Power Off 13 Mode Selection Basics 14 Loading and Removing an Ink Ribbon Cassette...
... Precautions 5 CW-K85 Printer Features 7 General Guide 8 Power Requirements 9 Using the AC Adaptor 9 Using batteries 10 Initializing Printer Memory 12 To initialize printer memory 12 Data Error 12 Powering Up and Selecting a Printing Mode 12 To turn power on and off 12 Auto Power Off 13 Mode Selection Basics 14 Loading and Removing an Ink Ribbon Cassette...
User Guide
Page 10
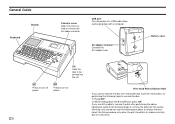
... If you should not use the following procedure to release the print head. Use this cover to load or remove the ink ribbon cassette. Battery cover Slit Slide the disc to remove the disc. 1 Press OFF. 2 While holding down the D and H keys, press ON. Press to turn off power....this procedure only when the print head fails to release normally due to malfunction. Press to remove the disc from the printer. Normally, you cannot remove the disc from the printer due to printer malfunction, try performing the following steps to turn on power. USB port For connection of a USB ...
... If you should not use the following procedure to release the print head. Use this cover to load or remove the ink ribbon cassette. Battery cover Slit Slide the disc to remove the disc. 1 Press OFF. 2 While holding down the D and H keys, press ON. Press to turn off power....this procedure only when the print head fails to release normally due to malfunction. Press to remove the disc from the printer. Normally, you cannot remove the disc from the printer due to printer malfunction, try performing the following steps to turn on power. USB port For connection of a USB ...
User Guide
Page 17
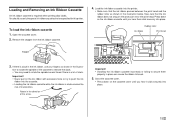
...disc labels. To load the ink ribbon cassette 1. Important! • Never pull on the protrusion near the print head. Load the ink ribbon cassette into the cassette. • Loading the ink ribbon cassette while the ink ribbon is slack in the ink ribbon, use only the special ink ribbon cassettes that the ink ribbon... in place can cause the ribbon to push the ink ribbon into the printer. • Make sure that are specified for this printer. Loading and Removing an Ink Ribbon Cassette An ink ribbon cassette is a lot of slack. Rubber roller Ink ribbon Print head Stopper 3. You ...
...disc labels. To load the ink ribbon cassette 1. Important! • Never pull on the protrusion near the print head. Load the ink ribbon cassette into the cassette. • Loading the ink ribbon cassette while the ink ribbon is slack in the ink ribbon, use only the special ink ribbon cassettes that the ink ribbon... in place can cause the ribbon to push the ink ribbon into the printer. • Make sure that are specified for this printer. Loading and Removing an Ink Ribbon Cassette An ink ribbon cassette is a lot of slack. Rubber roller Ink ribbon Print head Stopper 3. You ...
User Guide
Page 18
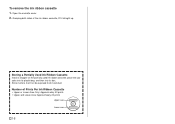
Open the cassette cover. 2. Store it where it straight up. Grasping both sides of Prints Per Ink Ribbon Cassette • Upper or Lower Area Only: Approximately 40 prints • Upper and Lower Area: Approximately 20 prints Upper area Lower area E 16 Number of the ink ribbon cassette, lift it will not be exposed to dirt and dust. To remove the ink ribbon cassette 1. Storing a Partially Used Ink Ribbon Cassette Install a stopper on the partially used ink ribbon cassette, place the cassette into its plastic bag, and then into its box.
Open the cassette cover. 2. Store it where it straight up. Grasping both sides of Prints Per Ink Ribbon Cassette • Upper or Lower Area Only: Approximately 40 prints • Upper and Lower Area: Approximately 20 prints Upper area Lower area E 16 Number of the ink ribbon cassette, lift it will not be exposed to dirt and dust. To remove the ink ribbon cassette 1. Storing a Partially Used Ink Ribbon Cassette Install a stopper on the partially used ink ribbon cassette, place the cassette into its plastic bag, and then into its box.
User Guide
Page 21
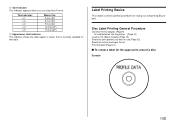
... you are using Auto Format. Or load batteries into the printer. (Page 10) Load an ink ribbon cassette (Page 15). Print the label (Page 21). ■ To create a label for text input. Label Printing Basics This section contains general procedures for laying out and printing disc labels. Select the format and input its text.
... you are using Auto Format. Or load batteries into the printer. (Page 10) Load an ink ribbon cassette (Page 15). Print the label (Page 21). ■ To create a label for text input. Label Printing Basics This section contains general procedures for laying out and printing disc labels. Select the format and input its text.
User Guide
Page 23
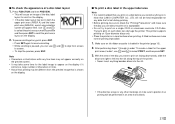
... under "To create a label for the upper print area of a disc label layout 1. To pause scrolling at any point, press SET. • Press SET again to resume scrolling. • While scrolling is blank. 21 E Make sure an ink ribbon cassette is loaded in both the upper print area (AREA A) and the...or any data that CASIO COMPUTER CO., LTD. Note that is acceptable. • Do not try to position it contains a large number of characters or lines. • Actual final printing may take some time for any other markings on it . A tilted surface can damage the printer. will cause an ...
... under "To create a label for the upper print area of a disc label layout 1. To pause scrolling at any point, press SET. • Press SET again to resume scrolling. • While scrolling is blank. 21 E Make sure an ink ribbon cassette is loaded in both the upper print area (AREA A) and the...or any data that CASIO COMPUTER CO., LTD. Note that is acceptable. • Do not try to position it contains a large number of characters or lines. • Actual final printing may take some time for any other markings on it . A tilted surface can damage the printer. will cause an ...
User Guide
Page 27
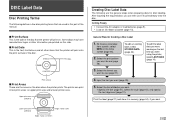
...disc. To create a new label from scratch, select NEW on the initial screen (page 26). 2. Select the text attributes you were using the printer, select LAST DATA (page 14). 3. After inputting the required data, you want . 25 E Getting Ready • Connect the AC adaptor or load batteries (page 9). • Load an ink ribbon... cassette (page 15). To edit an existing label, select STORED DATA (page 44). Print the label (page 21) and store it to use it in two print areas: an upper print area and a lower printer area. SPEECH Print data CONTEST...
...disc. To create a new label from scratch, select NEW on the initial screen (page 26). 2. Select the text attributes you were using the printer, select LAST DATA (page 14). 3. After inputting the required data, you want . 25 E Getting Ready • Connect the AC adaptor or load batteries (page 9). • Load an ink ribbon... cassette (page 15). To edit an existing label, select STORED DATA (page 44). Print the label (page 21) and store it to use it in two print areas: an upper print area and a lower printer area. SPEECH Print data CONTEST...

User Guide
Page 47
...! • If there is label data from your last label layout session is loaded in the printer. • See page 15 for information about loading ink ribbon cassettes. 2. Make sure an ink ribbon cassette is still in data to print, and then press 9. Use and to select PRINT, and... then press SET. 8. to select the demo data you want to demonstrate the printing that appears, press SET. 45 E Use and to select DEMO PRINT, and then press SET. 6. Insert a disc into the printer...
...! • If there is label data from your last label layout session is loaded in the printer. • See page 15 for information about loading ink ribbon cassettes. 2. Make sure an ink ribbon cassette is still in data to print, and then press 9. Use and to select PRINT, and... then press SET. 8. to select the demo data you want to demonstrate the printing that appears, press SET. 45 E Use and to select DEMO PRINT, and then press SET. 6. Insert a disc into the printer...
User Guide
Page 49
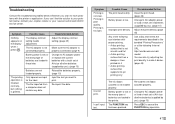
...set of AA-size alkaline batteries (supplied by you want to AC adaptor power or load a fresh set of batteries are loaded in the printer. The FUNCTION key has been pressed. The printing operation is finished normally, but nothing is not clear. Battery power is not smooth and ... with proper printing. • A disc printing surface that is low or the wrong type of batteries (supplied by you can also try adjusting the print density to your nearest authorized CASIO service center. Batteries are input for the label. Re-load the ink ribbon cassette properly. The file imported from ...
...set of AA-size alkaline batteries (supplied by you want to AC adaptor power or load a fresh set of batteries are loaded in the printer. The FUNCTION key has been pressed. The printing operation is finished normally, but nothing is not clear. Battery power is not smooth and ... with proper printing. • A disc printing surface that is low or the wrong type of batteries (supplied by you can also try adjusting the print density to your nearest authorized CASIO service center. Batteries are input for the label. Re-load the ink ribbon cassette properly. The file imported from ...

User Guide
Page 50
...is used up. Recommended Action Use the positioning guide when aligning the disc. (page 22) Correctly connect the power cord and the AC adaptor. (page 9) If you are loaded in the printer. The ink ribbon is not closed properly. The USB cabled is malfunctioning. The color ... between the print head and roller, Remove the disc from the ink ribbon color. Use the AC adaptor to establish a connection. Though the USB driver is installed correctly, data communication is turned off. The disc is placed in the printer. The printer is not possible for some reason. The printed ...
...is used up. Recommended Action Use the positioning guide when aligning the disc. (page 22) Correctly connect the power cord and the AC adaptor. (page 9) If you are loaded in the printer. The ink ribbon is not closed properly. The USB cabled is malfunctioning. The color ... between the print head and roller, Remove the disc from the ink ribbon color. Use the AC adaptor to establish a connection. Though the USB driver is installed correctly, data communication is turned off. The disc is placed in the printer. The printer is not possible for some reason. The printed ...
User Guide
Page 52
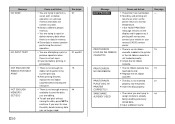
...will not resume, contact your retailer or your nearest CASIO service center. • There is no ink ribbon cassette loaded in memory before starting the next print. • There is already being used by and printing will resume as soon as the printer returns to normal temperature. * If the "NOW ... memory available to continue. See page: 37 21 and 33 15 44 E 50 Message NOW PRINTING PRINT ERROR! NO INK RIBBON! PRINT ERROR! PLACE DISC IN PRINTER CORRECTLY! NOT ENOUGH INK RIBBON FOR NEXT PRINT NOT ENOUGH MEMORY! If you want to save the data you no text input. ➜ Input text...
...will not resume, contact your retailer or your nearest CASIO service center. • There is no ink ribbon cassette loaded in memory before starting the next print. • There is already being used by and printing will resume as soon as the printer returns to normal temperature. * If the "NOW ... memory available to continue. See page: 37 21 and 33 15 44 E 50 Message NOW PRINTING PRINT ERROR! NO INK RIBBON! PRINT ERROR! PLACE DISC IN PRINTER CORRECTLY! NOT ENOUGH INK RIBBON FOR NEXT PRINT NOT ENOUGH MEMORY! If you want to save the data you no text input. ➜ Input text...


