
User Guide
Page 1
shall not be held liable for any loss or corruption of this manual on it . Be sure to read the Safety Precautions contained in this manual before you record anything on it can cause the data to become corrupted. • Note that you print on a disc* before trying to use of data on discs arising through the use the printer for future reference. Printing on a disc that already has data recorded on hand for the first time, and always keep this printer. * CD-R, CD-RW, DVD-R, etc. E CW-75 User's Guide • We recommend that CASIO COMPUTER CO., LTD.
shall not be held liable for any loss or corruption of this manual on it . Be sure to read the Safety Precautions contained in this manual before you record anything on it can cause the data to become corrupted. • Note that you print on a disc* before trying to use of data on discs arising through the use the printer for future reference. Printing on a disc that already has data recorded on hand for the first time, and always keep this printer. * CD-R, CD-RW, DVD-R, etc. E CW-75 User's Guide • We recommend that CASIO COMPUTER CO., LTD.
User Guide
Page 3
... for the first time. For details about the about using it, be company and product names of others. © Copyright 2003 CASIO COMPUTER CO., LTD. Safety Precautions Thank you or any form, either in the United States and other person or entity that , if ...8226; Windows is a registered trademark of Microsoft Corporation in part or its entirety, is forbidden without notice. • This manual covers the CW-75 Disc Title Printer only. Keep the manual in a convenient location for purchasing this manual in any other countries. • Other company and product names used herein...
... for the first time. For details about the about using it, be company and product names of others. © Copyright 2003 CASIO COMPUTER CO., LTD. Safety Precautions Thank you or any form, either in the United States and other person or entity that , if ...8226; Windows is a registered trademark of Microsoft Corporation in part or its entirety, is forbidden without notice. • This manual covers the CW-75 Disc Title Printer only. Keep the manual in a convenient location for purchasing this manual in any other countries. • Other company and product names used herein...

User Guide
Page 5
...; At least once a year, clean away any way. Plastic bag precaution Never place the plastic bags in the USB cable into the computer and the printer as far as when you follow the precautions listed below. • Never locate these items near a stove or other personal injury. Turn off power. 2. Make...
...; At least once a year, clean away any way. Plastic bag precaution Never place the plastic bags in the USB cable into the computer and the printer as far as when you follow the precautions listed below. • Never locate these items near a stove or other personal injury. Turn off power. 2. Make...
User Guide
Page 7
...To change the message language 24 5 E The disc tray will not open unless the printer is turned on top of trouble-free operation for which it to strong impact. • Never touch the print head. • Never use this Manual 9 CW-75 Printer Features 10 General Guide 14 Part 2 - Operating... Temperature Range: 10°C to 35°C (50°F to 95°F) • Never allow paper clips, pins, or other similar objects to get inside the printer mechanism. • Never place objects on ....
...To change the message language 24 5 E The disc tray will not open unless the printer is turned on top of trouble-free operation for which it to strong impact. • Never touch the print head. • Never use this Manual 9 CW-75 Printer Features 10 General Guide 14 Part 2 - Operating... Temperature Range: 10°C to 35°C (50°F to 95°F) • Never allow paper clips, pins, or other similar objects to get inside the printer mechanism. • Never place objects on ....
User Guide
Page 9
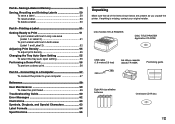
... Characters 63 Label Formats 64 Specifications 66 Unpacking Make sure that all of the items shown below are present as you unpack the printer. Saving Labels in both areas (Label 1 and Label 2 52 Adjusting Print Density 55 To adjust print density 55 Changing the Tray... 50 Saving, Recalling and Deleting Labels 50 To save a label 50 To recall a label 50 To delete a label 50 Part 9 - CW-75 DISC TITLE PRINTER DISC TITLE PRINTER Application CD-ROM USB cable (1.8 meters/5.9 feet) Ink ribbon cassette (black) TR-18BK Positioning guide Eight AA-size alkaline batteries One blank CD...
... Characters 63 Label Formats 64 Specifications 66 Unpacking Make sure that all of the items shown below are present as you unpack the printer. Saving Labels in both areas (Label 1 and Label 2 52 Adjusting Print Density 55 To adjust print density 55 Changing the Tray... 50 Saving, Recalling and Deleting Labels 50 To save a label 50 To recall a label 50 To delete a label 50 Part 9 - CW-75 DISC TITLE PRINTER DISC TITLE PRINTER Application CD-ROM USB cable (1.8 meters/5.9 feet) Ink ribbon cassette (black) TR-18BK Positioning guide Eight AA-size alkaline batteries One blank CD...
User Guide
Page 10
...shown in text by bold characters or the graphic image of the CW-75 DISC TITLE PRINTER only. Never use such a disc. Never play back CD-ROM discs. Part 1 - E 8 Handling Precautions • When handling the disc, avoid getting finger smudges, dirt, scratches, etc. Note that comes... bundled with important general information about your printer. Getting Acquainted This part of the manual provides you are indicated in this manual, the term "label layout software" refers to the CASIO CW-75 DISC TITLE PRINTER. • In this manual may differ somewhat from the...
...shown in text by bold characters or the graphic image of the CW-75 DISC TITLE PRINTER only. Never use such a disc. Never play back CD-ROM discs. Part 1 - E 8 Handling Precautions • When handling the disc, avoid getting finger smudges, dirt, scratches, etc. Note that comes... bundled with important general information about your printer. Getting Acquainted This part of the manual provides you are indicated in this manual, the term "label layout software" refers to the CASIO CW-75 DISC TITLE PRINTER. • In this manual may differ somewhat from the...
User Guide
Page 11
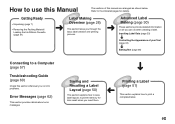
... (page 62) This section provides details about error messages Saving and Recalling a Label Layout (page 50) This section explains how to save label layouts to printer memory for details. Getting Ready • Unpacking (page 7) • Removing the Packing Material/ Loading the Ink Ribbon Cassette (page 21) Label Making Overview (page 26...
... (page 62) This section provides details about error messages Saving and Recalling a Label Layout (page 50) This section explains how to save label layouts to printer memory for details. Getting Ready • Unpacking (page 7) • Removing the Packing Material/ Loading the Ink Ribbon Cassette (page 21) Label Making Overview (page 26...
User Guide
Page 12
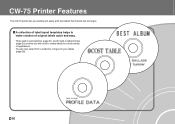
A collection of label layout templates helps to create labels for your labels (page 39). CW-75 Printer Features The CW-75 printer lets you with tools to make creation of applications. You can also select from a collection of logos for a wide variety of original labels quick and easy. E 10 Three built-in print patterns (page 31) and 24 built-in label formats (page 32) provide you quickly and easily print disc labels that include text and logos.
A collection of label layout templates helps to create labels for your labels (page 39). CW-75 Printer Features The CW-75 printer lets you with tools to make creation of applications. You can also select from a collection of logos for a wide variety of original labels quick and easy. E 10 Three built-in print patterns (page 31) and 24 built-in label formats (page 32) provide you quickly and easily print disc labels that include text and logos.
User Guide
Page 14
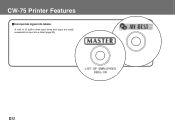
A total of 10 built-in often-used terms and logos are easily accessible for input into labels. E 12 CW-75 Printer Features • Incorporate logos into a label (page 39).
A total of 10 built-in often-used terms and logos are easily accessible for input into labels. E 12 CW-75 Printer Features • Incorporate logos into a label (page 39).

User Guide
Page 15
• A host of other layout tools for recording data to a disc. 13 E Fonts (page 43) Styles (page 45) Symbols (page 36) Illustrations (page 36) User Characters (page 37) Important! This printer and its software do not include functions for perfect labels every time!
• A host of other layout tools for recording data to a disc. 13 E Fonts (page 43) Styles (page 45) Symbols (page 36) Illustrations (page 36) User Characters (page 37) Important! This printer and its software do not include functions for perfect labels every time!

User Guide
Page 16
...8260;16") long, and less than 1.5 mm (1⁄16") thick) into this hole to normally open the disc tray. Do not use a toothpick or other object with the printer here when connecting to your PC. AC adapter terminal Connect the optionally available AC adaptor here. Use this hole...or removing the ink ribbon cassette. E 14 Disc tray Positioning guide pegs Use these pegs to printer malfunction, you place the disc onto the disc tray. Doing so creates the risk of malfunction. Carriage Printer head Back Battery compartment If the disc tray will not open due to set the ...
...8260;16") long, and less than 1.5 mm (1⁄16") thick) into this hole to normally open the disc tray. Do not use a toothpick or other object with the printer here when connecting to your PC. AC adapter terminal Connect the optionally available AC adaptor here. Use this hole...or removing the ink ribbon cassette. E 14 Disc tray Positioning guide pegs Use these pegs to printer malfunction, you place the disc onto the disc tray. Doing so creates the risk of malfunction. Carriage Printer head Back Battery compartment If the disc tray will not open due to set the ...
User Guide
Page 17
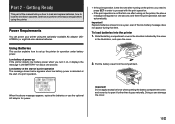
...operation will appear for one second. Slide the battery compartment cover in the direction indicated by the arrow in order to set up If the printer detects low battery power when you how to load and replace batteries, how to load the ink ribbon cassette, and how to open the ... of the manual tells you turn it goes naturally. Power Requirements You can damage the cover. 15 E Important! Doing so can power your printer using the printer. Getting Ready This part of a print operation The message shown below appears when low battery power is not the first one after turning on...
...operation will appear for one second. Slide the battery compartment cover in the direction indicated by the arrow in order to set up If the printer detects low battery power when you how to load and replace batteries, how to load the ink ribbon cassette, and how to open the ... of the manual tells you turn it goes naturally. Power Requirements You can damage the cover. 15 E Important! Doing so can power your printer using the printer. Getting Ready This part of a print operation The message shown below appears when low battery power is not the first one after turning on...

User Guide
Page 19
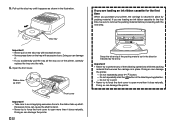
...the illustration. 2. Note the following steps to replace it . Using the AC Adaptor You can use the AC adaptor to power your printer. Slide the bottom hinge into a household power outlet 2. 2 1 17 E To connect the AC adaptor Important! Connect the power cord to power... the printer from a standard household wall outlet. Use only the AC adaptor model specified for this printer. 1. Replacing the Battery Cover onto Its Hinges The battery compartment cover may come off its hinges when ...
...the illustration. 2. Note the following steps to replace it . Using the AC Adaptor You can use the AC adaptor to power your printer. Slide the bottom hinge into a household power outlet 2. 2 1 17 E To connect the AC adaptor Important! Connect the power cord to power... the printer from a standard household wall outlet. Use only the AC adaptor model specified for this printer. 1. Replacing the Battery Cover onto Its Hinges The battery compartment cover may come off its hinges when ...

User Guide
Page 20
Never disconnect the AC adaptor while a printing operation is in progress. Disconnect the power cord from the household power outlet 1, and then disconnect the AC adaptor plug from the AC adaptor terminal of the printer 2. 1 2 E 18 Doing so can damage the printer. 1. To disconnect the AC adaptor Important!
Never disconnect the AC adaptor while a printing operation is in progress. Disconnect the power cord from the household power outlet 1, and then disconnect the AC adaptor plug from the AC adaptor terminal of the printer 2. 1 2 E 18 Doing so can damage the printer. 1. To disconnect the AC adaptor Important!

User Guide
Page 21
... x and z cursor keys to select NEW or STORED DATA, and then press SET. Power On Recall Whenever you turn the printer off, press the ] button. Then the next time you turn the printer on . To restore power, press [. Turning Power On and Off • Press the [ button to turn power off .... See "Power On Recall" below . If you are turning the printer back on the display is added to the initial screen. If you do not perform any key operation for more information about six minutes, the...
... x and z cursor keys to select NEW or STORED DATA, and then press SET. Power On Recall Whenever you turn the printer off, press the ] button. Then the next time you turn the printer on . To restore power, press [. Turning Power On and Off • Press the [ button to turn power off .... See "Power On Recall" below . If you are turning the printer back on the display is added to the initial screen. If you do not perform any key operation for more information about six minutes, the...

User Guide
Page 22
...everything in response to abort. Data Error Whenever you turn power on. E 20 Initializing printer memory clears its memory and functions. To initialize printer memory 1. When this message appears, press any key. tialize the printer memory or ESC to the "INITIALIZE? Next, in memory) or ESC to turn ...on power. 3. In response to the confirmation message that the printer is turned off. 2. Initializing Printer Memory You should initialize the memory of the printer before using it for the first time, after you have not used it for a long time, ...
...everything in response to abort. Data Error Whenever you turn power on. E 20 Initializing printer memory clears its memory and functions. To initialize printer memory 1. When this message appears, press any key. tialize the printer memory or ESC to the "INITIALIZE? Next, in memory) or ESC to turn ...on power. 3. In response to the confirmation message that the printer is turned off. 2. Initializing Printer Memory You should initialize the memory of the printer before using it for the first time, after you have not used it for a long time, ...

User Guide
Page 23
...button to malfunction of the disc tray. Press the button on the printer. 4. Important! • Never apply excessive force when winding the ink ribbon. • A slack ink ribbon can load an ink ribbon cassette. To load an ink ribbon cassette into the printer. This causes the disc tray to remove any slack.... 3. Note that in front of the printer to interfere with the movement of the printer. 21 E Important! Ink Ribbon Cassettes Note that you will have to ...
...button to malfunction of the disc tray. Press the button on the printer. 4. Important! • Never apply excessive force when winding the ink ribbon. • A slack ink ribbon can load an ink ribbon cassette. To load an ink ribbon cassette into the printer. This causes the disc tray to remove any slack.... 3. Note that in front of the printer to interfere with the movement of the printer. 21 E Important! Ink Ribbon Cassettes Note that you will have to ...
User Guide
Page 24
...on the tray with the next step. Important! • Never try to open more than it does naturally. Doing so can damage the printer. Pull out the disc tray until it . • If you are loading an ink ribbon cassette for the first time, be sure to remove the packing ...material before proceeding with excessive force. Excessive force can damage the printer. • Do not repeatedly press the button. • Do not repeatedly click the...
...on the tray with the next step. Important! • Never try to open more than it does naturally. Doing so can damage the printer. Pull out the disc tray until it . • If you are loading an ink ribbon cassette for the first time, be sure to remove the packing ...material before proceeding with excessive force. Excessive force can damage the printer. • Do not repeatedly press the button. • Do not repeatedly click the...
User Guide
Page 25
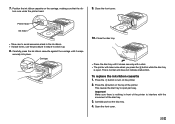
.... • If slack forms, use the procedure in front of the printer to turn on the printer. 2. Close the disc tray. • Press the disc tray until it up. 8. This is open part way. This causes the disc tray to wind it snaps securely into place. Make sure there is nothing...sure that the rib- bon runs under the printer head. 9. Position the ink ribbon cassette on the top of the disc tray. 3. 7. Carefully pull out the disc tray. 4. Open the front cover. 23 E Press the [ button to interfere with a click. • The printer will make noise when you press the button...
.... • If slack forms, use the procedure in front of the printer to turn on the printer. 2. Close the disc tray. • Press the disc tray until it up. 8. This is open part way. This causes the disc tray to wind it snaps securely into place. Make sure there is nothing...sure that the rib- bon runs under the printer head. 9. Position the ink ribbon cassette on the top of the disc tray. 3. 7. Carefully pull out the disc tray. 4. Open the front cover. 23 E Press the [ button to interfere with a click. • The printer will make noise when you press the button...

User Guide
Page 26
... want to store a partially used ink ribbon cassette, attach its stopper, and then insert it into its original plastic bag and box. Number of the printer. Press SET UP to select LANGUAGE and then press SET. 3. Use x and z to display the SET UP menu. 2. Use x and z to select the language you...
... want to store a partially used ink ribbon cassette, attach its stopper, and then insert it into its original plastic bag and box. Number of the printer. Press SET UP to select LANGUAGE and then press SET. 3. Use x and z to display the SET UP menu. 2. Use x and z to select the language you...

