
User Guide
Page 7
...ink ribbon cassette 23 Selecting the Display Language 24 To change the message language 24 5 E Operating Precautions Observe the following precautions to ensure that the printer provides you with the years of trouble-free operation for which it to strong impact. • Never touch the print head. • Never use this Manual 9 CW-75 Printer... Features 10 General Guide 14 Part 2 - The disc tray will not open unless the printer is designed. • Avoid use in areas subjected to direct sunlight, high ...
...ink ribbon cassette 23 Selecting the Display Language 24 To change the message language 24 5 E Operating Precautions Observe the following precautions to ensure that the printer provides you with the years of trouble-free operation for which it to strong impact. • Never touch the print head. • Never use this Manual 9 CW-75 Printer... Features 10 General Guide 14 Part 2 - The disc tray will not open unless the printer is designed. • Avoid use in areas subjected to direct sunlight, high ...
User Guide
Page 9
Connecting to a Computer 57 To connect the printer to Print 51 To print a label with text in only one area (Label 1 or Label 2 51 To print a label with text in Memory 50 Saving, ... Formats 64 Specifications 66 Unpacking Make sure that all of the items shown below are present as you unpack the printer. Printing a Label 51 Getting Ready to your original retailer. CW-75 DISC TITLE PRINTER DISC TITLE PRINTER Application CD-ROM USB cable (1.8 meters/5.9 feet) Ink ribbon cassette (black) TR-18BK Positioning guide Eight AA-size alkaline batteries One blank CD...
Connecting to a Computer 57 To connect the printer to Print 51 To print a label with text in only one area (Label 1 or Label 2 51 To print a label with text in Memory 50 Saving, ... Formats 64 Specifications 66 Unpacking Make sure that all of the items shown below are present as you unpack the printer. Printing a Label 51 Getting Ready to your original retailer. CW-75 DISC TITLE PRINTER DISC TITLE PRINTER Application CD-ROM USB cable (1.8 meters/5.9 feet) Ink ribbon cassette (black) TR-18BK Positioning guide Eight AA-size alkaline batteries One blank CD...
User Guide
Page 11
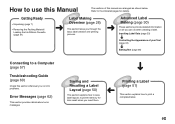
... how to save label layouts to printer memory for details. Refer to print a completed label. 9 E Printing a Label (page 51) This section explains how to the indicated pages for later recall when you need them. Getting Ready • Unpacking (page 7) • Removing the Packing Material/ Loading the Ink Ribbon Cassette (page 21) Label Making...
... how to save label layouts to printer memory for details. Refer to print a completed label. 9 E Printing a Label (page 51) This section explains how to the indicated pages for later recall when you need them. Getting Ready • Unpacking (page 7) • Removing the Packing Material/ Loading the Ink Ribbon Cassette (page 21) Label Making...

User Guide
Page 16
... loading or removing the ink ribbon cassette. AC adapter terminal Connect the optionally available AC adaptor here. USB port Connect the USB cable that comes with an easily breakable tip. Carriage Printer head Back Battery compartment If the disc tray will not open due to printer malfunction, you place the disc onto the disc tray. General Guide...
... loading or removing the ink ribbon cassette. AC adapter terminal Connect the optionally available AC adaptor here. USB port Connect the USB cable that comes with an easily breakable tip. Carriage Printer head Back Battery compartment If the disc tray will not open due to printer malfunction, you place the disc onto the disc tray. General Guide...
User Guide
Page 17
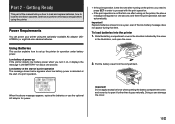
... This part of a print operation. • If the print operation is the first one after turning on the printer, you how to load and replace batteries, how to load the ink ribbon cassette, and how to proceed with the print operation. • If the print operation is not the first one... of a print operation The message shown below appears when low battery power is detected at the start automatically. Doing so can power your printer using the printer. Low battery at least once a year, even if the low battery message does not appear during that time. Using Batteries This section ...
... This part of a print operation. • If the print operation is the first one after turning on the printer, you how to load and replace batteries, how to load the ink ribbon cassette, and how to proceed with the print operation. • If the print operation is not the first one... of a print operation The message shown below appears when low battery power is detected at the start automatically. Doing so can power your printer using the printer. Low battery at least once a year, even if the low battery message does not appear during that time. Using Batteries This section ...

User Guide
Page 23
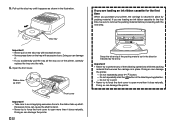
... any slack. 3. Important! Important! Stopper 2. Important! • Never apply excessive force when winding the ink ribbon. • A slack ink ribbon can load an ink ribbon cassette. Rotate in front of the printer to open part way. Note that in order to be able to print, you purchase your... Press the [ button to turn on the top of the ink ribbon cassette and rotate it to malfunction of the disc tray. When you must first load an ink ribbon cassette into the printer 1. Unpack an ink ribbon cassette and remove its stopper. Make sure there is held stationary ...
... any slack. 3. Important! Important! Stopper 2. Important! • Never apply excessive force when winding the ink ribbon. • A slack ink ribbon can load an ink ribbon cassette. Rotate in front of the printer to open part way. Note that in order to be able to print, you purchase your... Press the [ button to turn on the top of the ink ribbon cassette and rotate it to malfunction of the disc tray. When you must first load an ink ribbon cassette into the printer 1. Unpack an ink ribbon cassette and remove its stopper. Make sure there is held stationary ...
User Guide
Page 24
... loading an ink ribbon cassette for the first time, be sure to open more than it appears as shown in the direction indicated by packing material. Important! • Never try to force the front cover to open more than it does naturally. Doing so can damage the printer. Pull out the disc tray until... following operations while the packing material that secures the carriage is secured in place. Doing so can damage it. • If you are loading an ink ribbon cassette for the first time When you purchase your printer, the carriage is in place by the arrow.
... loading an ink ribbon cassette for the first time, be sure to open more than it appears as shown in the direction indicated by packing material. Important! • Never try to force the front cover to open more than it does naturally. Doing so can damage the printer. Pull out the disc tray until... following operations while the packing material that secures the carriage is secured in place. Doing so can damage it. • If you are loading an ink ribbon cassette for the first time When you purchase your printer, the carriage is in place by the arrow.
User Guide
Page 25
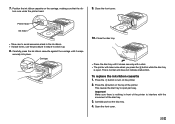
... in step 2 to turn on the top of the disc tray. 3. Press the button on the printer. 2. Close the disc tray. • Press the disc tray until it snaps securely into place. Carefully press the ink ribbon cassette against the carriage until it up. 8. Important! 7. Position the ink ribbon cassette on the carriage, making sure that the rib...
... in step 2 to turn on the top of the disc tray. 3. Press the button on the printer. 2. Close the disc tray. • Press the disc tray until it snaps securely into place. Carefully press the ink ribbon cassette against the carriage until it up. 8. Important! 7. Position the ink ribbon cassette on the carriage, making sure that the rib...

User Guide
Page 26
... (English, German, French, Italian, Spanish) for display of message text. • All of the printer. Selecting the Display Language You can use the following procedure to store a partially used ink ribbon cassette, attach its stopper, and then insert it into its original plastic bag and box. Number of ...dirt and dust. E 24 Storing a Partially Used Ink Ribbon Cassette If you want to move the carriage, grasp both sides of the ink ribbon cassette and pull it in this manual use and then press SET. Press SET UP to select LANGUAGE...
... (English, German, French, Italian, Spanish) for display of message text. • All of the printer. Selecting the Display Language You can use the following procedure to store a partially used ink ribbon cassette, attach its stopper, and then insert it into its original plastic bag and box. Number of ...dirt and dust. E 24 Storing a Partially Used Ink Ribbon Cassette If you want to move the carriage, grasp both sides of the ink ribbon cassette and pull it in this manual use and then press SET. Press SET UP to select LANGUAGE...
User Guide
Page 32
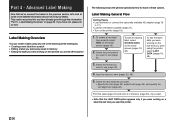
...scratch • Editing a label you previously saved in memory • Editing the label you were working on a label the last time you were using the printer, select LAST DATA (pages 19, 48). 3. Select the print pattern you want (pages 33, 48). 5. Select the format you want to layout labels....let's look at some more detailed information about how to use (page 32). 4. Advanced Label Making Now that you want to 17). • Load an ink ribbon cassette (page 21). • Turn on the initial screen (page 19). 2. Input the text you have not, please do so now. Label Making General...
...scratch • Editing a label you previously saved in memory • Editing the label you were working on a label the last time you were using the printer, select LAST DATA (pages 19, 48). 3. Select the print pattern you want (pages 33, 48). 5. Select the format you want to layout labels....let's look at some more detailed information about how to use (page 32). 4. Advanced Label Making Now that you want to 17). • Load an ink ribbon cassette (page 21). • Turn on the initial screen (page 19). 2. Input the text you have not, please do so now. Label Making General...
User Guide
Page 53
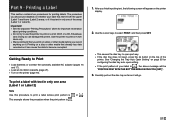
...batteries or connect the optionally available AC adaptor (pages 15 and 17). • Load an ink ribbon cassette (page 21). • Turn on the printer display. 2. Printing on a disc or other media that you print on a disc or other media before you record anything on page 55 for printing labels. Carefully pull out ...CD-R or a CD-R business card. After you should use this procedure to open part way. • If the disc tray does not open setting. • If the print pattern of the printer. Doing so can cause the data to print on the top of your label has text in only one...
...batteries or connect the optionally available AC adaptor (pages 15 and 17). • Load an ink ribbon cassette (page 21). • Turn on the printer display. 2. Printing on a disc or other media that you print on a disc or other media before you record anything on page 55 for printing labels. Carefully pull out ...CD-R or a CD-R business card. After you should use this procedure to open part way. • If the disc tray does not open setting. • If the print pattern of the printer. Doing so can cause the data to print on the top of your label has text in only one...
User Guide
Page 58
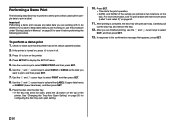
... to save it off. 3. If you want to print, and then press SET. 7. Place the disc onto the disc tray. • If the disc tray does not open part way. If the printer is complete, the disc tray will open , press the button on , press ] to be deleted. Use the x and ... how to perform a demo print, which uses built-in both areas (Label 1 and Label 2)" on the disc. To perform a demo print 1. Check to the confirmation message that the printer has an ink ribbon cassette loaded. 2. In response to make sure that appears, press SET. Performing a Demo Print The following procedure...
... to save it off. 3. If you want to print, and then press SET. 7. Place the disc onto the disc tray. • If the disc tray does not open part way. If the printer is complete, the disc tray will open , press the button on , press ] to be deleted. Use the x and ... how to perform a demo print, which uses built-in both areas (Label 1 and Label 2)" on the disc. To perform a demo print 1. Check to the confirmation message that the printer has an ink ribbon cassette loaded. 2. In response to make sure that appears, press SET. Performing a Demo Print The following procedure...
User Guide
Page 61
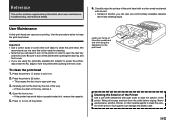
...wipe the exterior of the printer. Use the procedure below to turn off the printer after opening the front cover. Press the printer's button. • This causes the disc tray to open part way. 3. Open the front cover. • If the printer has an ink ribbon cassette loaded in order ...to open the disc tray and front cover. Never use...
...wipe the exterior of the printer. Use the procedure below to turn off the printer after opening the front cover. Press the printer's button. • This causes the disc tray to open part way. 3. Open the front cover. • If the printer has an ink ribbon cassette loaded in order ...to open the disc tray and front cover. Never use...

User Guide
Page 63
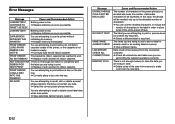
... the FUNCTION key, and the printer is not misaligned. Replace the batteries or switch to produce a different color. Press ESC to abort the FUNCTION key operation. 61 E positioned correctly on is from that of the ink combining with the ribbon cassette. Action Print on light colored discs and use a dark color ink ribbon cassette. Ink ribbon cassette is low. Correctly position...
... the FUNCTION key, and the printer is not misaligned. Replace the batteries or switch to produce a different color. Press ESC to abort the FUNCTION key operation. 61 E positioned correctly on is from that of the ink combining with the ribbon cassette. Action Print on light colored discs and use a dark color ink ribbon cassette. Ink ribbon cassette is low. Correctly position...
User Guide
Page 64
... some of the data from the new data. PRINT ERROR! LOAD AN INK RIBBON CASSETTE! NO DATA! You are attempting to use to recall it with another ink ribbon cassette. CONTINUE TO ➔ Replace batteries as soon as possible. LOAD A DISC INTO THE PRINTER! MEMORY FULL! NO INPUT TEXT! SAME NAME ALREADY USED! Data could not...
... some of the data from the new data. PRINT ERROR! LOAD AN INK RIBBON CASSETTE! NO DATA! You are attempting to use to recall it with another ink ribbon cassette. CONTINUE TO ➔ Replace batteries as soon as possible. LOAD A DISC INTO THE PRINTER! MEMORY FULL! NO INPUT TEXT! SAME NAME ALREADY USED! Data could not...
User Guide
Page 68
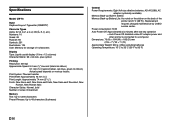
...Thermal transfer Print Width: Approximately 16 mm (5⁄8") Print Length: Approximately 74 mm (215⁄16") Fonts: New Sans-serif, New Sans-serif Italic, New Sans-serif Rounded, New Roman, New Roman Italic Character Styles: Normal, bold Number of the printer (at 20°C (68°F)). Replacement requires charged maintenance by CASIO...dots, plus symbol Printing Resolution: 200 dpi Approximate Speed: 9.0 mm (3⁄8")/second (black ink ribbon) 5.1 mm (3⁄16")/second (silver, red, blue, green ink ribbon) Actual speed depends on the back of Lines: 8 maximum Memory Text: Up to 4,...
...Thermal transfer Print Width: Approximately 16 mm (5⁄8") Print Length: Approximately 74 mm (215⁄16") Fonts: New Sans-serif, New Sans-serif Italic, New Sans-serif Rounded, New Roman, New Roman Italic Character Styles: Normal, bold Number of the printer (at 20°C (68°F)). Replacement requires charged maintenance by CASIO...dots, plus symbol Printing Resolution: 200 dpi Approximate Speed: 9.0 mm (3⁄8")/second (black ink ribbon) 5.1 mm (3⁄16")/second (silver, red, blue, green ink ribbon) Actual speed depends on the back of Lines: 8 maximum Memory Text: Up to 4,...


