
User Guide
Page 7
... piano play . J Synthesizer Mode Edit built-in display shows chord names, tempo setting, keyboard information, staff notation of notes played, and more powerful. This keyboard provides you connect to a personal computer to enjoy "desktop music" capabilities. J 50 Drawbar Organ Tones In addition to make them as a desktop music input device or sound source, and it's just the thing for playback of 160 rhythms includes accompaniments for playback. J Auto Accompaniment Simply play a chord and the corresponding rhythm, bass and chord parts play...
... piano play . J Synthesizer Mode Edit built-in display shows chord names, tempo setting, keyboard information, staff notation of notes played, and more powerful. This keyboard provides you connect to a personal computer to enjoy "desktop music" capabilities. J 50 Drawbar Organ Tones In addition to make them as a desktop music input device or sound source, and it's just the thing for playback of 160 rhythms includes accompaniments for playback. J Auto Accompaniment Simply play a chord and the corresponding rhythm, bass and chord parts play...

User Guide
Page 10
... Transposing the Keyboard E-64 Using Touch Response E-64 Tuning the Keyboard E-65 Changing Other Settings E-66 E-8 Using the SMF Player... Contents Synthesizer Mode......... E-46 Registration Memory Features............E-46 To Save a Setup in Registration Memory E-47 To Recall a Setup from Song Memory........E-52 Recording Melody and Chords with Step Recording E-52 Recording Multiple Tracks E-55 Correcting Mistakes While Step Recording E-57 Editing Memory Contents E-58 Editing a Song E-59 Keyboard Settings ....... E-83 Appendix A-1 Tone List A-1 Drum Assignment List A-8 Rhythm...
... Transposing the Keyboard E-64 Using Touch Response E-64 Tuning the Keyboard E-65 Changing Other Settings E-66 E-8 Using the SMF Player... Contents Synthesizer Mode......... E-46 Registration Memory Features............E-46 To Save a Setup in Registration Memory E-47 To Recall a Setup from Song Memory........E-52 Recording Melody and Chords with Step Recording E-52 Recording Multiple Tracks E-55 Correcting Mistakes While Step Recording E-57 Editing Memory Contents E-58 Editing a Song E-59 Keyboard Settings ....... E-83 Appendix A-1 Tone List A-1 Drum Assignment List A-8 Rhythm...

User Guide
Page 15
... repeatedly pull on the cord. • Never twist the cord at the base of the plug or connector. • The power cord should not be sure to unplug the AC adaptor from the power outlet. Power Supply Using the AC Adaptor Make sure that the keyboard is turned off , Auto Harmonize type, Mixer hold, DSP hold, Auto Accompaniment mode, all Mixer parameters, all Synthesizer Mode parameters, Song Memory song numbers, SMF player settings (play mode, manual play part, SMF playback volume) 707A-E-015A E-13 Auto Power...
... repeatedly pull on the cord. • Never twist the cord at the base of the plug or connector. • The power cord should not be sure to unplug the AC adaptor from the power outlet. Power Supply Using the AC Adaptor Make sure that the keyboard is turned off , Auto Harmonize type, Mixer hold, DSP hold, Auto Accompaniment mode, all Mixer parameters, all Synthesizer Mode parameters, Song Memory song numbers, SMF player settings (play mode, manual play part, SMF playback volume) 707A-E-015A E-13 Auto Power...

User Guide
Page 17
... connected to the keyboard must be a stereo plug, otherwise you want, see "Changing Other Settings" on the other external equipment, be sure to first turn down the volume settings of the keyboard to a relatively low level and make output volume adjustments using a commercially available connecting cord with a standard plug on one of stereo channels. White Red PIN plug LEFT RIGHT AUX IN or similar terminal of the notes being played. Sustain/Assignable jack Terminal...
... connected to the keyboard must be a stereo plug, otherwise you want, see "Changing Other Settings" on the other external equipment, be sure to first turn down the volume settings of the keyboard to a relatively low level and make output volume adjustments using a commercially available connecting cord with a standard plug on one of stereo channels. White Red PIN plug LEFT RIGHT AUX IN or similar terminal of the notes being played. Sustain/Assignable jack Terminal...

User Guide
Page 19
... the drum sets is selected (tone numbers 600 through 617), each keyboard key is being played by the keyboard, the number of notes (polyphony) available for data transferred from 050 to select. Find the tone you want to 099). Polyphony The term polyphony refers to use the [+] and [-] buttons to 700. The keyboard has 32-note polyphony, which includes the notes you can play at the same time. See "Synthesizer Mode...
... the drum sets is selected (tone numbers 600 through 617), each keyboard key is being played by the keyboard, the number of notes (polyphony) available for data transferred from 050 to select. Find the tone you want to 099). Polyphony The term polyphony refers to use the [+] and [-] buttons to 700. The keyboard has 32-note polyphony, which includes the notes you can play at the same time. See "Synthesizer Mode...
User Guide
Page 20
... real-time recording, step recording, or while using the editing function of the keyboard does not change SUS On Depends on the display * During demo tune play . Settings Tone number: Rhythm number: Accompaniment Mode: Layer: Split: Auto Harmonize: Transpose: Touch Response: Assignable Jack: Local Control: Mixer Channel 1 Parameter Setup: "000" "140" Normal Off Off Off 0 Off: Returns to play. • To stop rhythm play, press the START/STOP button again. • Pressing the PIANO SETTING button while a rhythm is playing stops rhythm play and then changes the keyboard setup. •...
... real-time recording, step recording, or while using the editing function of the keyboard does not change SUS On Depends on the display * During demo tune play . Settings Tone number: Rhythm number: Accompaniment Mode: Layer: Split: Auto Harmonize: Transpose: Touch Response: Assignable Jack: Local Control: Mixer Channel 1 Parameter Setup: "000" "140" Normal Off Off Off 0 Off: Returns to play. • To stop rhythm play, press the START/STOP button again. • Pressing the PIANO SETTING button while a rhythm is playing stops rhythm play and then changes the keyboard setup. •...

User Guide
Page 26
... [+] and [-] buttons at the same time returns the parameter to the parts that can control the relative strength of a DSP and how it is being output by the keyboard causes a slight break in accordance with the algorithm* of tones, called "Advanced Tones," automatically turn DSP back on automatically and the DSP selection changes in the sound when the effect changes. • A number of...
... [+] and [-] buttons at the same time returns the parameter to the parts that can control the relative strength of a DSP and how it is being output by the keyboard causes a slight break in accordance with the algorithm* of tones, called "Advanced Tones," automatically turn DSP back on automatically and the DSP selection changes in the sound when the effect changes. • A number of...

User Guide
Page 32
... and beat number 3 Basic fingering of the major chord key. For details, see "Adjusting the Accompaniment Volume" on the keyboard.) 4. J Chord Types CASIO CHORD accompaniment lets you how to the right of current chord (May be different from chord actually being played on page E-35. Use the MODE button to play chords, regardless of the main volume. J CASIO CHORD Accompaniment Keyboard and Melody Keyboard • The accompaniment keyboard can adjust the accompaniment part volume level independently of previous musical knowledge and experience. Auto Accompaniment Using Auto...
... and beat number 3 Basic fingering of the major chord key. For details, see "Adjusting the Accompaniment Volume" on the keyboard.) 4. J Chord Types CASIO CHORD accompaniment lets you how to the right of current chord (May be different from chord actually being played on page E-35. Use the MODE button to play chords, regardless of the main volume. J CASIO CHORD Accompaniment Keyboard and Melody Keyboard • The accompaniment keyboard can adjust the accompaniment part volume level independently of previous musical knowledge and experience. Auto Accompaniment Using Auto...
User Guide
Page 38
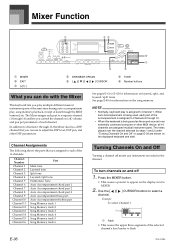
... any instrument recorded in the channel. Channel Number Channel 1 Channel 2 Channel 3 Channel 4 Channel 5 Channel 6 Channel 7 Channel 8 Channel 9 Channel 10 Channel 11 Channel 12 Channel 13 Channel 14 Channel 15 Channel 16 Part Main tone Layered tone Split tone Layered/split tone Harmonize Tone Auto Accompaniment chord part 1 Auto Accompaniment chord part 2 Auto Accompaniment chord part 3 Auto Accompaniment bass part Auto Accompaniment rhythm part Song Memory track 1 Song Memory track 2 Song Memory track 3 Song Memory track 4 Song Memory track 5 Song Memory track 6 Turning Channels On and...
... any instrument recorded in the channel. Channel Number Channel 1 Channel 2 Channel 3 Channel 4 Channel 5 Channel 6 Channel 7 Channel 8 Channel 9 Channel 10 Channel 11 Channel 12 Channel 13 Channel 14 Channel 15 Channel 16 Part Main tone Layered tone Split tone Layered/split tone Harmonize Tone Auto Accompaniment chord part 1 Auto Accompaniment chord part 2 Auto Accompaniment chord part 3 Auto Accompaniment bass part Auto Accompaniment rhythm part Song Memory track 1 Song Memory track 2 Song Memory track 3 Song Memory track 4 Song Memory track 5 Song Memory track 6 Turning Channels On and...

User Guide
Page 51
.... Song Memory Function Song Memory Function 12 34 5 6 7 8 9 bk bl 1 MODE 4 DRAWBAR ORGAN 7 VARIATION/FILL-IN 1/2 bk TEMPO bn [+]/[-], YES/NO 2 SONG MEMORY 5 CURSOR 8 SYNCHRO/FILL-IN NEXT bl SONG MEMORY TRACK This keyboard lets you play back the tracks together, it sounds like a standard tape recorder. Tracks 2 through 6 can use different Mixer settings for later playback. bm bn 3 TONE 6 INTRO/ENDING 1/2 9 START/STOP bm Number buttons • Layer and split cannot be used for recording or while recording is...
.... Song Memory Function Song Memory Function 12 34 5 6 7 8 9 bk bl 1 MODE 4 DRAWBAR ORGAN 7 VARIATION/FILL-IN 1/2 bk TEMPO bn [+]/[-], YES/NO 2 SONG MEMORY 5 CURSOR 8 SYNCHRO/FILL-IN NEXT bl SONG MEMORY TRACK This keyboard lets you play back the tracks together, it sounds like a standard tape recorder. Tracks 2 through 6 can use different Mixer settings for later playback. bm bn 3 TONE 6 INTRO/ENDING 1/2 9 START/STOP bm Number buttons • Layer and split cannot be used for recording or while recording is...

User Guide
Page 55
... Length of the SONG MEMORY TRACK buttons, to NORMAL, specify the chord using the root input keyboard and chord type input keyboard. Specifying release timing specifies that already contains recorded data by for input of the next chord. • Repeat steps 5 and 6 to chords, the following the previously recorded data. • Inputting "0" as the chord length in steps 5 and 6 of the above procedure specifies a rest, but the rest is not reflected in the Normal Mode" on page E-54...
... Length of the SONG MEMORY TRACK buttons, to NORMAL, specify the chord using the root input keyboard and chord type input keyboard. Specifying release timing specifies that already contains recorded data by for input of the next chord. • Repeat steps 5 and 6 to chords, the following the previously recorded data. • Inputting "0" as the chord length in steps 5 and 6 of the above procedure specifies a rest, but the rest is not reflected in the Normal Mode" on page E-54...

User Guide
Page 58
... delay before the first note of the track sounds. Specify a tone number. • Pressing a TONE button or the DRAWBAR ORGAN button displays the tone number and name on to change the tone. • After changing the tone number, press any keyboard key to clear the tone number and name screen, and return to (2 through 6). Doing so automatically locates the step recording start a recording of a track. • Mixer settings of other tracks • Effect type • Accompaniment volume • Reverb Level • Chorus...
... delay before the first note of the track sounds. Specify a tone number. • Pressing a TONE button or the DRAWBAR ORGAN button displays the tone number and name on to change the tone. • After changing the tone number, press any keyboard key to clear the tone number and name screen, and return to (2 through 6). Doing so automatically locates the step recording start a recording of a track. • Mixer settings of other tracks • Effect type • Accompaniment volume • Reverb Level • Chorus...

User Guide
Page 60
... change tone numbers you specified while recording to keyboard memory, you record to Tracks 1 through 6 using step recording. • You cannot use the edit procedure to add more data to a recording. • You cannot move to the location in tone selections, etc. Press the [ ] CURSOR button to the "Delete?" See "Editing Techniques and Display Contents" on page E-59 for Track 1 using step recording. • In the case of real-time recording, you later can change rhythm numbers you use...
... change tone numbers you specified while recording to keyboard memory, you record to Tracks 1 through 6 using step recording. • You cannot use the edit procedure to add more data to a recording. • You cannot move to the location in tone selections, etc. Press the [ ] CURSOR button to the "Delete?" See "Editing Techniques and Display Contents" on page E-59 for Track 1 using step recording. • In the case of real-time recording, you later can change rhythm numbers you use...

User Guide
Page 61
...; This displays the song delete screen. 4. to appear, confirming whether you specified while recording to delete. 3. Doing so may alter the length of a note. Cho r d J To change a tone number Use the number buttons or [+] and [-] buttons to change a chord Use the chord fingering method selected by the MODE button (FINGERED, CASIO CHORD, etc.) to adjust the key pressure. J To change a tone number. J To change a rhythm number Use the number buttons or [+] and [-] buttons to change the key pressure (velocity) of real-time recording, you later can change tone numbers you specify...
...; This displays the song delete screen. 4. to appear, confirming whether you specified while recording to delete. 3. Doing so may alter the length of a note. Cho r d J To change a tone number Use the number buttons or [+] and [-] buttons to change a chord Use the chord fingering method selected by the MODE button (FINGERED, CASIO CHORD, etc.) to adjust the key pressure. J To change a tone number. J To change a rhythm number Use the number buttons or [+] and [-] buttons to change the key pressure (velocity) of real-time recording, you later can change tone numbers you specify...

User Guide
Page 64
Turning off layering returns to change the tone and volume settings for these channels. • Note that time, you are using the SMF Player Mode. S t r i ng1G 2. Now try playing something on the keyboard where the changeover between parts. You can also use the [ ] and [ ] CURSOR buttons to switch between the two tones occurs. • Leave the MODE button in the Song Memory Mode, or while you can assign two different tones (a main tone and a split tone) to input 4, 4 and...
Turning off layering returns to change the tone and volume settings for these channels. • Note that time, you are using the SMF Player Mode. S t r i ng1G 2. Now try playing something on the keyboard where the changeover between parts. You can also use the [ ] and [ ] CURSOR buttons to switch between the two tones occurs. • Leave the MODE button in the Song Memory Mode, or while you can assign two different tones (a main tone and a split tone) to input 4, 4 and...

User Guide
Page 65
.... • Turning on split switches the currently selected part to change the tone and volume settings for these channels. • Note that time, you can also use the [ ] and [ ] CURSOR buttons to CASIO CHORD or FINGERED, the accompaniment keyboard range is not possible during record standby or recording in accordance with the split point you are displayed. 5. S t r i ng1G 6. Turning off layer returns to Part 3, while turning off split returns to unsplit the keyboard. 3. J LAYER SPLIT To split the keyboard and...
.... • Turning on split switches the currently selected part to change the tone and volume settings for these channels. • Note that time, you can also use the [ ] and [ ] CURSOR buttons to CASIO CHORD or FINGERED, the accompaniment keyboard range is not possible during record standby or recording in accordance with the split point you are displayed. 5. S t r i ng1G 6. Turning off layer returns to Part 3, while turning off split returns to unsplit the keyboard. 3. J LAYER SPLIT To split the keyboard and...

User Guide
Page 78
... details about downloading data. Other language versions of data. • SMF • Rhythm Patterns • Registrations • User songs created in the data folders, see the "list.txt" file inside the same language folder where the Music Data Management Software you arrive at the CASIO MUSIC SITE depend on your computer's hard disk. „ Parameter Editor Parameter Editor makes it to save keyboard data to keyboard memory. Downloading Data Visit the CASIO MUSIC SITE for free download from SMF format rhythm data stored...
... details about downloading data. Other language versions of data. • SMF • Rhythm Patterns • Registrations • User songs created in the data folders, see the "list.txt" file inside the same language folder where the Music Data Management Software you arrive at the CASIO MUSIC SITE depend on your computer's hard disk. „ Parameter Editor Parameter Editor makes it to save keyboard data to keyboard memory. Downloading Data Visit the CASIO MUSIC SITE for free download from SMF format rhythm data stored...

User Guide
Page 80
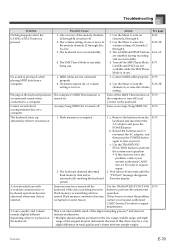
... the MODE button setting is varied. The number of the display when playing at high volume • Continued sound output even after you release a key • A tone that is totally different from a connected computer or MIDI device Auto Accompaniment does not sound. Possible Cause Action See page 1. Press the TRANSPOSE/ FUNCTION button to turn the channels on Local Control. The tuning or transpose parameter is too low. Troubleshooting Troubleshooting Problem No keyboard Sound Any of parts being played at all during song memory playback...
... the MODE button setting is varied. The number of the display when playing at high volume • Continued sound output even after you release a key • A tone that is totally different from a connected computer or MIDI device Auto Accompaniment does not sound. Possible Cause Action See page 1. Press the TRANSPOSE/ FUNCTION button to turn the channels on Local Control. The tuning or transpose parameter is too low. Troubleshooting Troubleshooting Problem No keyboard Sound Any of parts being played at all during song memory playback...
User Guide
Page 81
... AC adaptor, and then press the POWER button again to turn the E-36, 38 channel on the keyboard. caused Flash memory contents to a computer. E-70 707A-E-081A E-79 Channel is turned off, or volume setting is automatically resetting the keyboard system. 1. Use the Mixer to turn off the Use the TRANSPOSE/FUNCTION keyboard while data was being use . Cannot record chord accompaniment data on Accomp/Song MIDI Out. Flash memory is in button to request repair. 2. Use the TRANSPOSE/ FUNCTION button to perform the system reset operation •...
... AC adaptor, and then press the POWER button again to turn the E-36, 38 channel on the keyboard. caused Flash memory contents to a computer. E-70 707A-E-081A E-79 Channel is turned off, or volume setting is automatically resetting the keyboard system. 1. Use the Mixer to turn off the Use the TRANSPOSE/FUNCTION keyboard while data was being use . Cannot record chord accompaniment data on Accomp/Song MIDI Out. Flash memory is in button to request repair. 2. Use the TRANSPOSE/ FUNCTION button to perform the system reset operation •...

User Guide
Page 82
... Model: Keyboard: Tones: Polyphony: Effects: Auto Accompaniment • Rhythm Patterns: • Tempo: • Chords: • Rhythm Controller: • Accomp Volume: • One-touch Presets: • Auto Harmonize: Memory Function • Songs: • Recording Tracks: • Recording Methods: • Memory Capacity: • Edit Function: Demo Tunes: Synthesizer Function • Parameters: Registration Memory • Number of notes that harmonize with melody note in accordance with waves* + 50 drawbar organ tones + 100 user drawbar organ tones (824 tones total); vibrato type...
... Model: Keyboard: Tones: Polyphony: Effects: Auto Accompaniment • Rhythm Patterns: • Tempo: • Chords: • Rhythm Controller: • Accomp Volume: • One-touch Presets: • Auto Harmonize: Memory Function • Songs: • Recording Tracks: • Recording Methods: • Memory Capacity: • Edit Function: Demo Tunes: Synthesizer Function • Parameters: Registration Memory • Number of notes that harmonize with melody note in accordance with waves* + 50 drawbar organ tones + 100 user drawbar organ tones (824 tones total); vibrato type...


