
User Guide
Page 7
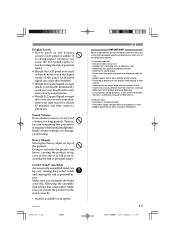
... alternate power sources whenever you release a key • A tone that come with clear water for long periods. Particular care concerning this precaution is totally different from a connected computer or MIDI device • Distortion of the panel. When using batteries, be sure to replace them or shift to fall from it, creating the risk of sound when playing at high vol- High volume settings...
... alternate power sources whenever you release a key • A tone that come with clear water for long periods. Particular care concerning this precaution is totally different from a connected computer or MIDI device • Distortion of the panel. When using batteries, be sure to replace them or shift to fall from it, creating the risk of sound when playing at high vol- High volume settings...
User Guide
Page 8
... pre-recorded MIDI data. This keyboard provides you sound notes on both this keyboard and the connected device by playing on the keyboard. ❐ Musical Information System • A big LCD screen graphically shows you fingerings, keyboard keys to be pressed, and notes, making keyboard play more . ❐ 100 rhythms • 100 versatile rhythms help to add plenty of life to another MIDI device lets you with the following features and functions. ❐ 100 tones •...
... pre-recorded MIDI data. This keyboard provides you sound notes on both this keyboard and the connected device by playing on the keyboard. ❐ Musical Information System • A big LCD screen graphically shows you fingerings, keyboard keys to be pressed, and notes, making keyboard play more . ❐ 100 rhythms • 100 versatile rhythms help to add plenty of life to another MIDI device lets you with the following features and functions. ❐ 100 tones •...
User Guide
Page 9
... Tone List A-1 Note Table A-2 Fingered Chord Chart A-4 Percussion Instrument List A-5 MIDI Implementation Chart E-7 CTK481_E01-07.p65 Page 7 03.10.7, 2:58 PM Adobe PageMaker 6.5J/PPC E-23 Changing the Tone of a Song Bank Tune's Melody E-24 Playing Along with Rhythm Play E-21 Adjusting the Accompaniment Volume .... E-26 Looking Up a Chord Using the Chord Book E-27 Keyboard Settings E-29 Transposing the Keyboard E-29 Tuning the Keyboard E-30 MIDI E-31 What is MIDI E-31 General MIDI E-31 Changing MIDI Settings E-32 Troubleshooting E-34 Specifications E-36 Care of a Song...
... Tone List A-1 Note Table A-2 Fingered Chord Chart A-4 Percussion Instrument List A-5 MIDI Implementation Chart E-7 CTK481_E01-07.p65 Page 7 03.10.7, 2:58 PM Adobe PageMaker 6.5J/PPC E-23 Changing the Tone of a Song Bank Tune's Melody E-24 Playing Along with Rhythm Play E-21 Adjusting the Accompaniment Volume .... E-26 Looking Up a Chord Using the Chord Book E-27 Keyboard Settings E-29 Transposing the Keyboard E-29 Tuning the Keyboard E-30 MIDI E-31 What is MIDI E-31 General MIDI E-31 Changing MIDI Settings E-32 Troubleshooting E-34 Specifications E-36 Care of a Song...

User Guide
Page 10
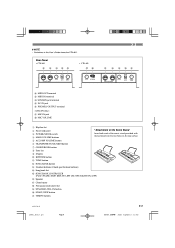
... button PLAY/PAUSE button STOP button 625A-E-010A 03.10.7, 2:58 PM Adobe PageMaker 6.5J/PPC F E SONG BANK CONTROLLER RIGHT ON/OFF button (MELODY) LEFT ON/OFF button (ACCOMP) Number buttons/ Chord specification buttons • For input of chord specification data when using the Chord Book. General Guide • Key, button, and other names are indicated in the text of this manual using bold type. 2 4 68 9 13 5 7* A 0B C E D F H G J I K C [+]/[-] buttons • Negative values can be changed only by using [+] and [-] to change displayed settings...
... button PLAY/PAUSE button STOP button 625A-E-010A 03.10.7, 2:58 PM Adobe PageMaker 6.5J/PPC F E SONG BANK CONTROLLER RIGHT ON/OFF button (MELODY) LEFT ON/OFF button (ACCOMP) Number buttons/ Chord specification buttons • For input of chord specification data when using the Chord Book. General Guide • Key, button, and other names are indicated in the text of this manual using bold type. 2 4 68 9 13 5 7* A 0B C E D F H G J I K C [+]/[-] buttons • Negative values can be changed only by using [+] and [-] to change displayed settings...
User Guide
Page 11
...CTK-491 QR L M N OP L MIDI OUT terminal M MIDI IN terminal N SUSTAIN jack terminal O DC 9V jack P PHONES/OUTPUT terminal Q MIC IN jack R MIC VOLUME 1 Rhythm list 2 Power indicator 3 POWER/MODE switch 4 MAIN VOLUME buttons *Attachment of the Score Stand Insert both ends of the music stand provided with the keyboard into the two holes on the top surface. 5 ACCOMP VOLUME button 6 TRANSPOSE/TUNE/MIDI button 7 CHORD BOOK button 8 Tone list 9 Display 0 RHYTHM button A TONE button B SONG BANK button C Number buttons (Chord specification buttons) D Song bank list E SONG BANK CONTROLLER...
...CTK-491 QR L M N OP L MIDI OUT terminal M MIDI IN terminal N SUSTAIN jack terminal O DC 9V jack P PHONES/OUTPUT terminal Q MIC IN jack R MIC VOLUME 1 Rhythm list 2 Power indicator 3 POWER/MODE switch 4 MAIN VOLUME buttons *Attachment of the Score Stand Insert both ends of the music stand provided with the keyboard into the two holes on the top surface. 5 ACCOMP VOLUME button 6 TRANSPOSE/TUNE/MIDI button 7 CHORD BOOK button 8 Tone list 9 Display 0 RHYTHM button A TONE button B SONG BANK button C Number buttons (Chord specification buttons) D Song bank list E SONG BANK CONTROLLER...
User Guide
Page 13
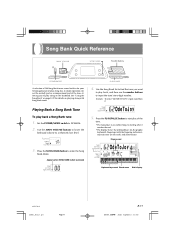
...), musical notes (on the staff), and chord names. Playing Back a Song Bank Tune To play back, and then use the number buttons to play back a Song Bank tune 1. Use the MAIN VOLUME buttons to lower the keyboard volume to NORMAL. 2. PLAY/PAUSE 4. Press the PLAY/PAUSE button to enter the Song Bank Mode. A simple operation cuts out the melody part or accompaniment part of the tune. • The tune plays in for details on the keyboard. Set the POWER/MODE switch to a relatively low level. 5. Press the SONG BANK button to start play along...
...), musical notes (on the staff), and chord names. Playing Back a Song Bank Tune To play back, and then use the number buttons to play back a Song Bank tune 1. Use the MAIN VOLUME buttons to lower the keyboard volume to NORMAL. 2. PLAY/PAUSE 4. Press the PLAY/PAUSE button to enter the Song Bank Mode. A simple operation cuts out the melody part or accompaniment part of the tune. • The tune plays in for details on the keyboard. Set the POWER/MODE switch to a relatively low level. 5. Press the SONG BANK button to start play along...
User Guide
Page 15
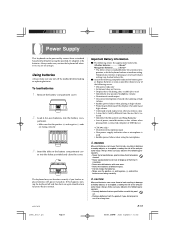
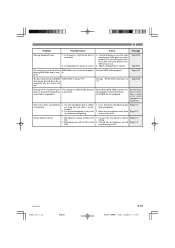
...; Make sure that is selected • Abnormal rhythm pattern and Song Bank play • Loss of power, sound distortion, or low volume when playing from a connected computer or MIDI device • Distortion of the display when playing at medium setting. Tab The keyboard may not function correctly if you load or replace batteries with power turned on the battery compartment cov- er into the battery com- If this prod- Power Supply This keyboard can be powered by...
...; Make sure that is selected • Abnormal rhythm pattern and Song Bank play • Loss of power, sound distortion, or low volume when playing from a connected computer or MIDI device • Distortion of the display when playing at medium setting. Tab The keyboard may not function correctly if you load or replace batteries with power turned on the battery compartment cov- er into the battery com- If this prod- Power Supply This keyboard can be powered by...
User Guide
Page 16
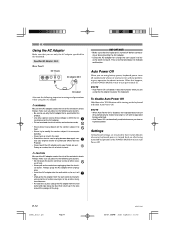
... to use the POWER/MODE switch to excessive bending. • Never twist or stretch the cord. • Should the electric cord or plug become warm to touch. cal outlet. IMPORTANT! • Make sure that the keyboard is turned off automatically no matter how long it is left with no operation being performed. • Auto Power Off is automatically enabled whenever you turn power back on. ❚ NOTE • Auto Power Off...
... to use the POWER/MODE switch to excessive bending. • Never twist or stretch the cord. • Should the electric cord or plug become warm to touch. cal outlet. IMPORTANT! • Make sure that the keyboard is turned off automatically no matter how long it is left with no operation being performed. • Auto Power Off is automatically enabled whenever you turn power back on. ❚ NOTE • Auto Power Off...
User Guide
Page 17
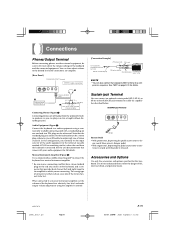
... also connect the keyboard's MIDI terminal to a relatively low level and make output volume adjustments using a commercially available connecting cord with your audio equipment for full details. ger, much like a piano's damper pedal. • With organ tones, depressing the pedal causes notes to the desired level after connections are connecting. Use of non-authorized items creates the danger of the keyboard and the connected equipment. Note that provides dual channel (left and right) input to...
... also connect the keyboard's MIDI terminal to a relatively low level and make output volume adjustments using a commercially available connecting cord with your audio equipment for full details. ger, much like a piano's damper pedal. • With organ tones, depressing the pedal causes notes to the desired level after connections are connecting. Use of non-authorized items creates the danger of the keyboard and the connected equipment. Note that provides dual channel (left and right) input to...

User Guide
Page 19
... the tones offer only 6-note polyphony. ❚ NOTE • When rhythm or auto accompaniment is located. Microphone ON/OFF switch Microphone Cannon type (3-prong) MIC VOLUME dial Low High IMPORTANT! • Be sure to use the microphone's ON/OFF switch to turn off the microphone and to the maximum number of notes (polyphony) available for keyboard play them at the same time. Required Microphone Specifications • Microphone Type : Metal...
... the tones offer only 6-note polyphony. ❚ NOTE • When rhythm or auto accompaniment is located. Microphone ON/OFF switch Microphone Cannon type (3-prong) MIC VOLUME dial Low High IMPORTANT! • Be sure to use the microphone's ON/OFF switch to turn off the microphone and to the maximum number of notes (polyphony) available for keyboard play them at the same time. Required Microphone Specifications • Microphone Type : Metal...
User Guide
Page 20
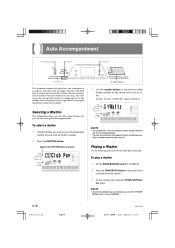
... that are using. Find the rhythm you can also increment the displayed rhythm number by pressing [+] and decrement it by pressing [-]. The bass and chord parts are played using the following procedure to NORMAL. 2. All of the keyboard keys are melody keys while the POWER/ MODE switch is the initial default rhythm setting whenever you turn on keyboard power. • You can select using sounds and tones that you get full, realistic accompaniments for the rhythm you...
... that are using. Find the rhythm you can also increment the displayed rhythm number by pressing [+] and decrement it by pressing [-]. The bass and chord parts are played using the following procedure to NORMAL. 2. All of the keyboard keys are melody keys while the POWER/ MODE switch is the initial default rhythm setting whenever you turn on keyboard power. • You can select using sounds and tones that you get full, realistic accompaniments for the rhythm you...
User Guide
Page 21
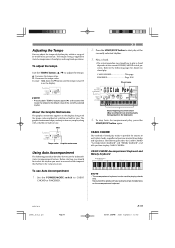
... START/STOP button to 255 beats per minute. Beat Tempo value Graphic metronome Using Auto Accompaniment The following describes the CASIO CHORD "Accompaniment keyboard" and "Melody keyboard", and tells you play CASIO CHORDs. To stop Auto Accompaniment play chords, regardless of chord play makes it possible for anyone to play a chord depends on chord play , and song bank operations. To adjust the tempo Use the TEMPO buttons (̆ / ̄) to CASIO CHORD or FINGERED. Before starting, you should first select the rhythm you should use Auto Accompaniment 1. Set the POWER/MODE switch...
... START/STOP button to 255 beats per minute. Beat Tempo value Graphic metronome Using Auto Accompaniment The following describes the CASIO CHORD "Accompaniment keyboard" and "Melody keyboard", and tells you play CASIO CHORDs. To stop Auto Accompaniment play chords, regardless of chord play makes it possible for anyone to play a chord depends on chord play , and song bank operations. To adjust the tempo Use the TEMPO buttons (̆ / ̄) to CASIO CHORD or FINGERED. Before starting, you should first select the rhythm you should use Auto Accompaniment 1. Set the POWER/MODE switch...
User Guide
Page 23
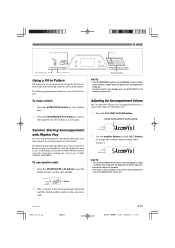
... SYNCHRO/FILL-IN button one more time. Number buttons ❚ NOTE • If the POWER/MODE switch is set to insert a fill-in pattern for the rhythm you are using. Adjusting the Accompaniment Volume You can set the tempo, and use synchro start. The following procedure describes how to put the keyboard into synchro start standby. 2. Use the number buttons or the [+]/[-] buttons to start rhythm play. 2. Current accompaniment volume setting Synchro Starting Accompaniment with Rhythm Play You can adjust the volume of the accompaniment parts as a value...
... SYNCHRO/FILL-IN button one more time. Number buttons ❚ NOTE • If the POWER/MODE switch is set to insert a fill-in pattern for the rhythm you are using. Adjusting the Accompaniment Volume You can set the tempo, and use synchro start. The following procedure describes how to put the keyboard into synchro start standby. 2. Use the number buttons or the [+]/[-] buttons to start rhythm play. 2. Current accompaniment volume setting Synchro Starting Accompaniment with Rhythm Play You can adjust the volume of the accompaniment parts as a value...

User Guide
Page 25
... a new Song Bank tune, the tone, tempo, and rhythm that is programmed for tunes 00 through 79. The indicator "̇̇" appears while a fast reverse operation is in progress, hold down the REW button. To fast forward during playback 1. The indicator " II " appears while a tune play 1. While playback is in progress. ❚ NOTE • Each time you set within a range of information about the tune being played. [Playback Display] Notes played...
... a new Song Bank tune, the tone, tempo, and rhythm that is programmed for tunes 00 through 79. The indicator "̇̇" appears while a fast reverse operation is in progress, hold down the REW button. To fast forward during playback 1. The indicator " II " appears while a tune play 1. While playback is in progress. ❚ NOTE • Each time you set within a range of information about the tune being played. [Playback Display] Notes played...

User Guide
Page 26
... not displayed. A part is turned on when its letter is displayed, and turned off when its original settings, simply select that appear inside the hand graphics on the keyboard. The tone setting can be used to play the melody part of a Song Bank tune and play along with . 2. STOP PLAY/PAUSE RIGHT ON/OFF LEFT ON/OFF Playing Along with a Song Bank tune 1. Type accompaniment Piano Solo Left-hand Part Auto-accompaniment (percussion, bass, chords) Left-hand notes Right-hand Part...
... not displayed. A part is turned on when its letter is displayed, and turned off when its original settings, simply select that appear inside the hand graphics on the keyboard. The tone setting can be used to play the melody part of a Song Bank tune and play along with . 2. STOP PLAY/PAUSE RIGHT ON/OFF LEFT ON/OFF Playing Along with a Song Bank tune 1. Type accompaniment Piano Solo Left-hand Part Auto-accompaniment (percussion, bass, chords) Left-hand notes Right-hand Part...

User Guide
Page 27
... STOP button. • The accompaniment volume setting (page E-21) affects autoaccompaniment tunes (00 to 79) only. • Chord names are indicated on the display's graphic keyboard. • You can play it back, an applause sound is not on the keyboard. Indicator turns off both the left-hand and right-hand parts of the POWER/MODE switch setting. ❚ NOTE • With two-hand tunes (80 to start playback of the Song Bank Tune...
... STOP button. • The accompaniment volume setting (page E-21) affects autoaccompaniment tunes (00 to 79) only. • Chord names are indicated on the display's graphic keyboard. • You can play it back, an applause sound is not on the keyboard. Indicator turns off both the left-hand and right-hand parts of the POWER/MODE switch setting. ❚ NOTE • With two-hand tunes (80 to start playback of the Song Bank Tune...
User Guide
Page 33
... few parts and is being pressed or released) and velocity (keyboard pressure as tone numbering, drum sounds, and available MIDI channels for that will have most success playing back General MIDI data that is made up to reproduce the same nuances when playing General MIDI data, regardless of the manufacturer of manufacturer. The tone and volume settings for these five channels must be controlled by this keyboard, you can still connect the keyboard...
... few parts and is being pressed or released) and velocity (keyboard pressure as tone numbering, drum sounds, and available MIDI channels for that will have most success playing back General MIDI data that is made up to reproduce the same nuances when playing General MIDI data, regardless of the manufacturer of manufacturer. The tone and volume settings for these five channels must be controlled by this keyboard, you can still connect the keyboard...
User Guide
Page 36
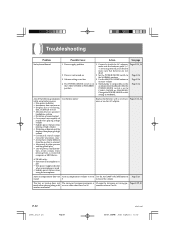
... not turn on . 3. Set the POWER/MODE switch to increase volume. 4. Troubleshooting Problem Possible Cause Action See page No keyboard Sound 1. increase the volume. Power is Change the transpose or tuning pa- Pages E-13, 14 Page E-16 Page E-16 Page E-16 Any of the following symptoms while using the microphone Auto Accompaniment does not Auto accompaniment volume is totally different from a connected computer or MIDI device Low battery power Replace the batteries with set to Use the ACCOMP VOLUME button to CASIO CHORD...
... not turn on . 3. Set the POWER/MODE switch to increase volume. 4. Troubleshooting Problem Possible Cause Action See page No keyboard Sound 1. increase the volume. Power is Change the transpose or tuning pa- Pages E-13, 14 Page E-16 Page E-16 Page E-16 Any of the following symptoms while using the microphone Auto Accompaniment does not Auto accompaniment volume is totally different from a connected computer or MIDI device Low battery power Replace the batteries with set to Use the ACCOMP VOLUME button to CASIO CHORD...
User Guide
Page 37
.... Change TONE MAP parameter to turn off switch setting to OFF. 1. Change the microphone on . 2. playing MIDI data from source of the parts is set to a computer. Microphone on the keyboard. Page E-17 Page E-17 625A-E-037B CTK481_E34_37.p65 Page 35 E-35 03.10.7, 2:58 PM Adobe PageMaker 6.5J/PPC Move the microphone away from a com- Adjust accompaniment volume. Page E-31 The bass notes of fluorescent lighting. 1. Playing...
.... Change TONE MAP parameter to turn off switch setting to OFF. 1. Change the microphone on . 2. playing MIDI data from source of the parts is set to a computer. Microphone on the keyboard. Page E-17 Page E-17 625A-E-037B CTK481_E34_37.p65 Page 35 E-35 03.10.7, 2:58 PM Adobe PageMaker 6.5J/PPC Move the microphone away from a com- Adjust accompaniment volume. Page E-31 The bass notes of fluorescent lighting. 1. Playing...
User Guide
Page 38
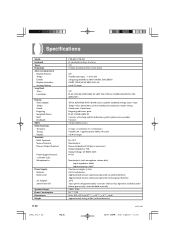
.../PPC Specifications Model: Keyboard: Tones: Polyphony: Auto Accompaniment Rhythm Patterns: Tempo: Chords: Rhythm Controller: Accomp Volume: Song Bank Tunes: Controllers: Display Name display: Tempo: Chord: Fingering: Song Bank Status: Staff: Keyboard: MIDI: Other Functions Transpose: Tuning: Volume: Terminals MIDI Terminals: Sustain Terminal: Phones/Output Terminal: Power Supply Terminal: Microphone In: Power Supply: Batteries: Battery Life: AC Adaptor: Auto Power Off: Speaker Output: Power Consumption: Dimensions: Weight: E-36 CTK-481/CTK-491 61 standard-size keys, 5 octaves 100 12 notes...
.../PPC Specifications Model: Keyboard: Tones: Polyphony: Auto Accompaniment Rhythm Patterns: Tempo: Chords: Rhythm Controller: Accomp Volume: Song Bank Tunes: Controllers: Display Name display: Tempo: Chord: Fingering: Song Bank Status: Staff: Keyboard: MIDI: Other Functions Transpose: Tuning: Volume: Terminals MIDI Terminals: Sustain Terminal: Phones/Output Terminal: Power Supply Terminal: Microphone In: Power Supply: Batteries: Battery Life: AC Adaptor: Auto Power Off: Speaker Output: Power Consumption: Dimensions: Weight: E-36 CTK-481/CTK-491 61 standard-size keys, 5 octaves 100 12 notes...


