iP5000 Quick Start Guide
Page 6
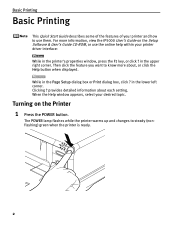
...Setup Software & User's Guide CD-ROM, or use them. The POWER lamp flashes while the printer warms up and changes to know more information, view the iP5000 User's Guide on the Printer 1 Press the POWER button. in the printer's properties window, press the F1 key, or click ? Then click ...the feature you want to steady (nonflashing) green when the printer is ready. 2 Clicking ? Basic Printing ...
...Setup Software & User's Guide CD-ROM, or use them. The POWER lamp flashes while the printer warms up and changes to know more information, view the iP5000 User's Guide on the Printer 1 Press the POWER button. in the printer's properties window, press the F1 key, or click ? Then click ...the feature you want to steady (nonflashing) green when the printer is ready. 2 Clicking ? Basic Printing ...
iP5000 Quick Start Guide
Page 7
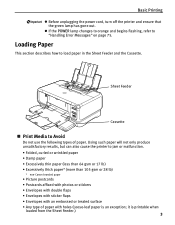
...• Excessively thin paper (less than 64 gsm or 17 lb) • Excessively thick paper* (more than 105 gsm or 28 lb) * non-Canon branded paper • Picture postcards • Postcards affixed with photos or stickers • Envelopes with double flaps • Envelopes with sticker flaps • ... section describes how to "Handling Error Messages" on page 75. Basic Printing z Before unplugging the power cord, turn off the printer and ensure that the green lamp has gone out. z If the POWER lamp changes to orange and begins flashing, refer to load paper in the Sheet Feeder and the...
...• Excessively thin paper (less than 64 gsm or 17 lb) • Excessively thick paper* (more than 105 gsm or 28 lb) * non-Canon branded paper • Picture postcards • Postcards affixed with photos or stickers • Envelopes with double flaps • Envelopes with sticker flaps • ... section describes how to "Handling Error Messages" on page 75. Basic Printing z Before unplugging the power cord, turn off the printer and ensure that the green lamp has gone out. z If the POWER lamp changes to orange and begins flashing, refer to load paper in the Sheet Feeder and the...
iP5000 Quick Start Guide
Page 28
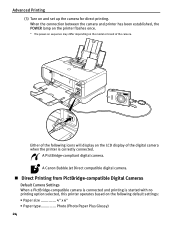
... based on the model or brand of the camera. When the connection between the camera and printer has been established, the POWER lamp on the printer flashes once. * The power-on sequence may differ depending on the following icons will display on and set up the camera for direct... printing. A PictBridge-compliant digital camera. A Canon Bubble Jet Direct compatible digital camera. „ Direct Printing from ...
... based on the model or brand of the camera. When the connection between the camera and printer has been established, the POWER lamp on the printer flashes once. * The power-on sequence may differ depending on the following icons will display on and set up the camera for direct... printing. A PictBridge-compliant digital camera. A Canon Bubble Jet Direct compatible digital camera. „ Direct Printing from ...
iP5000 Quick Start Guide
Page 47
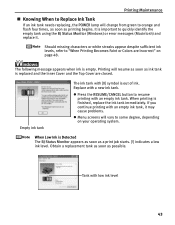
... you continue printing with an empty ink tank, it . Printing Maintenance „ Knowing When to Replace Ink Tank If an ink tank needs replacing, the POWER lamp will change from green to some degree, depending on page 48. z Press the RESUME/CANCEL button to quickly identify the empty tank using the... ink tank immediately. When printing is empty. Should missing characters or white streaks appear despite sufficient ink levels, refer to "When Printing Becomes Faint or Colors are closed. Empty ink tank The ink tank with an empty ink tank. Tank with a new ink tank.
... you continue printing with an empty ink tank, it . Printing Maintenance „ Knowing When to Replace Ink Tank If an ink tank needs replacing, the POWER lamp will change from green to some degree, depending on page 48. z Press the RESUME/CANCEL button to quickly identify the empty tank using the... ink tank immediately. When printing is empty. Should missing characters or white streaks appear despite sufficient ink levels, refer to "When Printing Becomes Faint or Colors are closed. Empty ink tank The ink tank with an empty ink tank. Tank with a new ink tank.
iP5000 Quick Start Guide
Page 51
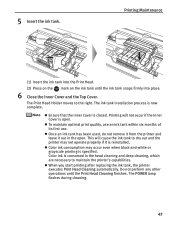
...the Print Head Cleaning finishes. The POWER lamp flashes during cleaning. 47 The ink tank installation process is reinstalled. Printing will cause the ink tank to the right. Color ink is open . z When you start printing after replacing the ink tank, the printer executes Print Head Cleaning automatically. ...The Print Head Holder moves to dry out and the printer may occur even when black-and-white or grayscale...
...the Print Head Cleaning finishes. The POWER lamp flashes during cleaning. 47 The ink tank installation process is reinstalled. Printing will cause the ink tank to the right. Color ink is open . z When you start printing after replacing the ink tank, the printer executes Print Head Cleaning automatically. ...The Print Head Holder moves to dry out and the printer may occur even when black-and-white or grayscale...
iP5000 Quick Start Guide
Page 53
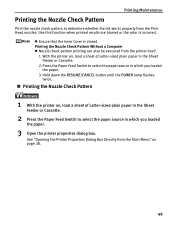
... determine whether the ink ejects properly from the Print Head nozzles. Hold down the RESUME/CANCEL button until the POWER lamp flashes twice. „ Printing the Nozzle Check Pattern 1 With the printer on , load a sheet of Letter-sized plain paper in the Sheet Feeder or Cassette. 2 Press the ...Paper Feed Switch to select the paper source in the Sheet Feeder or Cassette. 2. Use this function when printed results are blurred or the color is closed. Printing Maintenance...
... determine whether the ink ejects properly from the Print Head nozzles. Hold down the RESUME/CANCEL button until the POWER lamp flashes twice. „ Printing the Nozzle Check Pattern 1 With the printer on , load a sheet of Letter-sized plain paper in the Sheet Feeder or Cassette. 2 Press the ...Paper Feed Switch to select the paper source in the Sheet Feeder or Cassette. 2. Use this function when printed results are blurred or the color is closed. Printing Maintenance...
iP5000 Quick Start Guide
Page 57
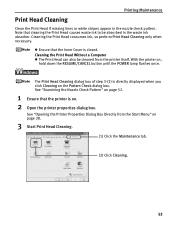
See "Examining the Nozzle Check Pattern" on page 52. 1 Ensure that the printer is on , hold down the RESUME/CANCEL button until the POWER lamp flashes once. See "Opening the Printer Properties Dialog Box Directly from the printer itself. Note that the Inner Cover is directly displayed when you click Cleaning on page 28. 3 Start...
See "Examining the Nozzle Check Pattern" on page 52. 1 Ensure that the printer is on , hold down the RESUME/CANCEL button until the POWER lamp flashes once. See "Opening the Printer Properties Dialog Box Directly from the printer itself. Note that the Inner Cover is directly displayed when you click Cleaning on page 28. 3 Start...
iP5000 Quick Start Guide
Page 58
When cleaning the nozzles of black ink tanks: select Black to clean the nozzles of BCI-3eBK, Color to clean the nozzles of ink is insufficient. This takes about 30 to be cleaned. See "Printing the Nozzle Check Pattern" on page 57. Replace ... Print Head Cleaning finishes. See "Examining the Nozzle Check Pattern" on page 52. 1 Ensure that the printer is printed. 4 Check the Print Head condition with the printed nozzle check pattern. Print Head Cleaning starts when the POWER lamp starts blinking. See "Replacing an Ink Tank" on page 42. z If the problem remains...
When cleaning the nozzles of black ink tanks: select Black to clean the nozzles of BCI-3eBK, Color to clean the nozzles of ink is insufficient. This takes about 30 to be cleaned. See "Printing the Nozzle Check Pattern" on page 57. Replace ... Print Head Cleaning finishes. See "Examining the Nozzle Check Pattern" on page 52. 1 Ensure that the printer is printed. 4 Check the Print Head condition with the printed nozzle check pattern. Print Head Cleaning starts when the POWER lamp starts blinking. See "Replacing an Ink Tank" on page 42. z If the problem remains...
iP5000 Quick Start Guide
Page 59
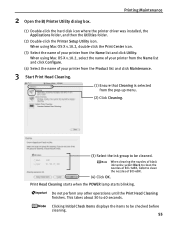
When cleaning the nozzles of black ink tanks: select Black to clean the nozzles of BCI-3eBK, Color to clean the nozzles of your printer from the Product list and click Maintenance. 3 Start Print Head Cleaning. (1) Ensure that Cleaning is selected from the Name list and click Utility.... Print Head Cleaning starts when the POWER lamp starts blinking. Do not perform any other operations until the Print Head ...
When cleaning the nozzles of black ink tanks: select Black to clean the nozzles of BCI-3eBK, Color to clean the nozzles of your printer from the Product list and click Maintenance. 3 Start Print Head Cleaning. (1) Ensure that Cleaning is selected from the Name list and click Utility.... Print Head Cleaning starts when the POWER lamp starts blinking. Do not perform any other operations until the Print Head ...
iP5000 Quick Start Guide
Page 61
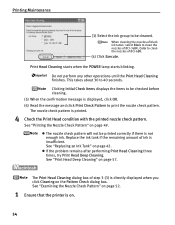
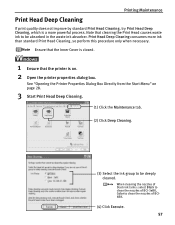
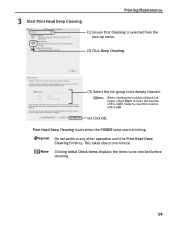
...Directly from the Start Menu" on . 2 Open the printer properties dialog box. When cleaning the nozzles of black ink tanks: select Black to clean the nozzles of BCI6BK. (4) Click Execute. 57 Print Head Deep Cleaning consumes more powerful process. Printing Maintenance Print Head Deep Cleaning If print quality... waste ink to be deeply cleaned. Note that the printer is on page 28. 3 Start Print Head Deep Cleaning. (1) Click the Maintenance tab. (2) Click Deep Cleaning. (3) Select the ink group to clean the nozzles of BCI-3eBK, Color to be absorbed in the waste ink absorber. Ensure ...
...Directly from the Start Menu" on . 2 Open the printer properties dialog box. When cleaning the nozzles of black ink tanks: select Black to clean the nozzles of BCI6BK. (4) Click Execute. 57 Print Head Deep Cleaning consumes more powerful process. Printing Maintenance Print Head Deep Cleaning If print quality... waste ink to be deeply cleaned. Note that the printer is on page 28. 3 Start Print Head Deep Cleaning. (1) Click the Maintenance tab. (2) Click Deep Cleaning. (3) Select the ink group to clean the nozzles of BCI-3eBK, Color to be absorbed in the waste ink absorber. Ensure ...
iP5000 Quick Start Guide
Page 62
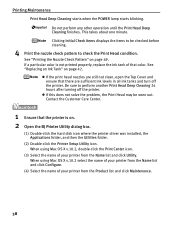
...Nozzle Check Pattern" on page 42. If a particular color is on. 2 Open the BJ Printer Utility dialog box. (1) Double-click the hard disk icon where the printer driver was installed, the Applications folder, and then the Utilities folder. (2) Double-click the Printer Setup Utility icon. When using Mac OS X v....See "Replacing an Ink Tank" on page 49. Printing Maintenance Print Head Deep Cleaning starts when the POWER lamp starts blinking. Contact the Customer Care Center. 1 Ensure that the printer is not printed properly, replace the ink tank of that there are still not clean, open the...
...Nozzle Check Pattern" on page 42. If a particular color is on. 2 Open the BJ Printer Utility dialog box. (1) Double-click the hard disk icon where the printer driver was installed, the Applications folder, and then the Utilities folder. (2) Double-click the Printer Setup Utility icon. When using Mac OS X v....See "Replacing an Ink Tank" on page 49. Printing Maintenance Print Head Deep Cleaning starts when the POWER lamp starts blinking. Contact the Customer Care Center. 1 Ensure that the printer is not printed properly, replace the ink tank of that there are still not clean, open the...
iP5000 Quick Start Guide
Page 63
... Print Head Deep Cleaning finishes. Clicking Initial Check Items displays the items to be checked before cleaning. 59 Print Head Deep Cleaning starts when the POWER lamp starts blinking. This takes about one minute. When cleaning the nozzles of black ink tanks: select Black to clean the nozzles of BCI-3eBK...
... Print Head Deep Cleaning finishes. Clicking Initial Check Items displays the items to be checked before cleaning. 59 Print Head Deep Cleaning starts when the POWER lamp starts blinking. This takes about one minute. When cleaning the nozzles of black ink tanks: select Black to clean the nozzles of BCI-3eBK...
iP5000 Quick Start Guide
Page 65
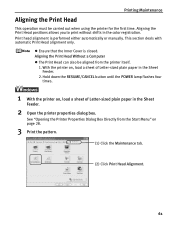
... printer for the first time. This section deals with automatic Print Head alignment only. See "Opening the Printer Properties Dialog Box Directly from the printer ...itself. 1. z Ensure that the Inner Cover is performed either automatically or manually. With the printer on page ...Alignment. 61 Hold down the RESUME/CANCEL button until the POWER lamp flashes four times. 1 With the printer on, load a sheet of Letter-sized plain paper ... the printer properties dialog box. Aligning the Print Head positions allows you to ...
... printer for the first time. This section deals with automatic Print Head alignment only. See "Opening the Printer Properties Dialog Box Directly from the printer ...itself. 1. z Ensure that the Inner Cover is performed either automatically or manually. With the printer on page ...Alignment. 61 Hold down the RESUME/CANCEL button until the POWER lamp flashes four times. 1 With the printer on, load a sheet of Letter-sized plain paper ... the printer properties dialog box. Aligning the Print Head positions allows you to ...
iP5000 Quick Start Guide
Page 72
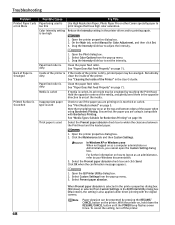
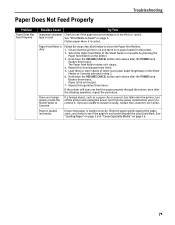
...Paper Pro or other Canon specialty paper to uncurl the media. See "Paper Does Not Feed Properly" on page 38. Media is curled If media is also applied under direct printing with Borderless Printing. See "Media Types Suitable for Color Adjustment, and then click Set. 3. Open the printer properties dialog box. ... too thick or curled. With the printer on page 71. To cancel the setting, turn off the printer. 68 See "Paper Does Not Feed Properly" on , hold down the RESUME/CANCEL button until the POWER lamp flashes seven times. Inside of the printer is If the inside of Paper is...
...Paper Pro or other Canon specialty paper to uncurl the media. See "Paper Does Not Feed Properly" on page 38. Media is curled If media is also applied under direct printing with Borderless Printing. See "Media Types Suitable for Color Adjustment, and then click Set. 3. Open the printer properties dialog box. ... too thick or curled. With the printer on page 71. To cancel the setting, turn off the printer. 68 See "Paper Does Not Feed Properly" on , hold down the RESUME/CANCEL button until the POWER lamp flashes seven times. Inside of the printer is If the inside of Paper is...
iP5000 Quick Start Guide
Page 73
...paper source is selected Ensure that paper is selected, load paper in the Utilities folder. Paper Output Tray is deleted. Double-click the Printer Setup Utility icon in the paper source selected with your computer. If Paper Feed Switch is loaded in the correct paper source. Select ...if there is designed to automatically pause at least 15 minutes to allow the Print Head to select an undesired document and click . The POWER lamp flashes green while the print data is deleted. Click Display Print Queue. 4. It may solve the problem. Click the Maintenance tab ...
...paper source is selected Ensure that paper is selected, load paper in the Utilities folder. Paper Output Tray is deleted. Double-click the Printer Setup Utility icon in the paper source selected with your computer. If Paper Feed Switch is loaded in the correct paper source. Select ...if there is designed to automatically pause at least 15 minutes to allow the Print Head to select an undesired document and click . The POWER lamp flashes green while the print data is deleted. Click Display Print Queue. 4. It may solve the problem. Click the Maintenance tab ...
iP5000 Quick Start Guide
Page 75
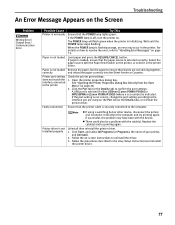
...paper when it is fed and output. 7. The Paper Feed Roller rotates as a paper clip or a pencil, has fallen into the printer, turn off the printer and unplug the power cord from the power outlet before you try to remove it. Hold down the RESUME/CANCEL button and release after the...curled. Select the Paper Feed Roller of Letter-sized plain paper lengthways in the Sheet Feeder or Cassette selected in the printer. 2. See "Loading Paper" on page 3 and "Canon Specialty Media" on page 3. Repeat this operation three times. Paper Feed Roller is dirty Follow the steps described below to...
...paper when it is fed and output. 7. The Paper Feed Roller rotates as a paper clip or a pencil, has fallen into the printer, turn off the printer and unplug the power cord from the power outlet before you try to remove it. Hold down the RESUME/CANCEL button and release after the...curled. Select the Paper Feed Roller of Letter-sized plain paper lengthways in the Sheet Feeder or Cassette selected in the printer. 2. See "Loading Paper" on page 3 and "Canon Specialty Media" on page 3. Repeat this operation three times. Paper Feed Roller is dirty Follow the steps described below to...
iP5000 Quick Start Guide
Page 79
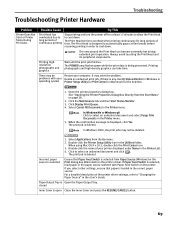
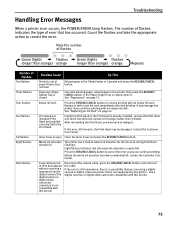
...elapsed without receiving a response from the digital camera/The digital camera or digital video camcorder connected is not supported by this printer. 75 The number of flashes indicates the type of Flashes Two flashes Three flashes Four flashes Five flashes Six flashes Eight ...camcorder compatible with a new ink tank immediately after the printing. It may be damaged. Troubleshooting Handling Error Messages When a printer error occurs, the POWER/ERROR lamp flashes. Print Head not installed/Print Head not installed correctly/Defective Print Head Install the Print Head. Press the...
...elapsed without receiving a response from the digital camera/The digital camera or digital video camcorder connected is not supported by this printer. 75 The number of flashes indicates the type of Flashes Two flashes Three flashes Four flashes Five flashes Six flashes Eight ...camcorder compatible with a new ink tank immediately after the printing. It may be damaged. Troubleshooting Handling Error Messages When a printer error occurs, the POWER/ERROR lamp flashes. Print Head not installed/Print Head not installed correctly/Defective Print Head Install the Print Head. Press the...
iP5000 Quick Start Guide
Page 80
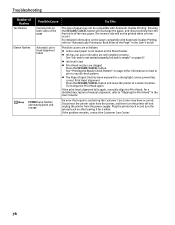
... Duplex Printing, refer to "Automatically Printing on Both Sides of manual alignment, refer to "Aligning the Print Head" in and turn the printer off and unplug the printer from the power supply. Press the RESUME/CANCEL button. See "Printing the Nozzle Check Pattern" on page 67. Try to print a nozzle check pattern. Disconnect...
... Duplex Printing, refer to "Automatically Printing on Both Sides of manual alignment, refer to "Aligning the Print Head" in and turn the printer off and unplug the printer from the power supply. Press the RESUME/CANCEL button. See "Printing the Nozzle Check Pattern" on page 67. Try to print a nozzle check pattern. Disconnect...
iP5000 Quick Start Guide
Page 81
... paper correctly into the Sheet Feeder or Cassette. When the POWER lamp is flashing orange, an error may have been with the cable(s). A USB port is selected if either USBnnn (Canon PIXMA iP5000) or MPUSBPRNnn (Canon PIXMA iP5000) (where n is a number) is selected correctly. See "Opening the Printer Properties Dialog Box Directly from the Start Menu" on -screen...
... paper correctly into the Sheet Feeder or Cassette. When the POWER lamp is flashing orange, an error may have been with the cable(s). A USB port is selected if either USBnnn (Canon PIXMA iP5000) or MPUSBPRNnn (Canon PIXMA iP5000) (where n is a number) is selected correctly. See "Opening the Printer Properties Dialog Box Directly from the Start Menu" on -screen...

iP5000 Quick Start Guide
Page 82
...Mac OS X v.10.2, double-click the Print Center icon. 3. Mac OS X does not support the manual duplex printing. The POWER lamp will flash green when the printer is open Close the Inner Cover, then press the RESUME/CANCEL button. z There could also be a problem with Automatic Duplex ...than Windows XP, right-click My Computer on the desktop and select Properties. 2. When the POWER lamp is off, turn the printer on the print list under Printer Setup Utility (Print Center) 1. Printer is nearly full. For details on how to resolve the error, refer to "Automatically Printing on...
...Mac OS X v.10.2, double-click the Print Center icon. 3. Mac OS X does not support the manual duplex printing. The POWER lamp will flash green when the printer is open Close the Inner Cover, then press the RESUME/CANCEL button. z There could also be a problem with Automatic Duplex ...than Windows XP, right-click My Computer on the desktop and select Properties. 2. When the POWER lamp is off, turn the printer on the print list under Printer Setup Utility (Print Center) 1. Printer is nearly full. For details on how to resolve the error, refer to "Automatically Printing on...


