iP4500 series Quick Start Guide
Page 5
Table of Contents Before Using the Printer 2 Turning the Printer On and Off 2 Loading Printing Paper 4 Hints for Handling the Paper Source 7 Changing the Paper Source 10 Loading Paper 11 Loading Envelopes 17 Loading Small-Sized Paper 20 Printing from Your Computer 22 Printing with Windows 22 Printing with Macintosh 23 Printing ...26 Routine Maintenance 28 Replacing an Ink Tank 28 Keeping the Best Printing Results 33 When Printing Becomes Faint or Colors Are Incorrect 34 Printing the Nozzle Check Pattern 35 Examining the Nozzle Check Pattern ...........37 Print Head Cleaning 38 ...
Table of Contents Before Using the Printer 2 Turning the Printer On and Off 2 Loading Printing Paper 4 Hints for Handling the Paper Source 7 Changing the Paper Source 10 Loading Paper 11 Loading Envelopes 17 Loading Small-Sized Paper 20 Printing from Your Computer 22 Printing with Windows 22 Printing with Macintosh 23 Printing ...26 Routine Maintenance 28 Replacing an Ink Tank 28 Keeping the Best Printing Results 33 When Printing Becomes Faint or Colors Are Incorrect 34 Printing the Nozzle Check Pattern 35 Examining the Nozzle Check Pattern ...........37 Print Head Cleaning 38 ...
iP4500 series Quick Start Guide
Page 8
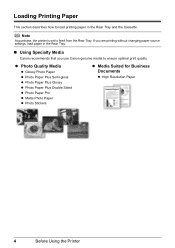
... Suited for Business Documents z High Resolution Paper 4 Before Using the Printer If you are printing without changing paper source settings, load paper in the Rear Tray and the Cassette. Loading Printing Paper This section describes how to load printing paper in the Rear Tray. „ Using Specialty Media Canon recommends that you use Canon genuine media to feed from the Rear...
... Suited for Business Documents z High Resolution Paper 4 Before Using the Printer If you are printing without changing paper source settings, load paper in the Rear Tray and the Cassette. Loading Printing Paper This section describes how to load printing paper in the Rear Tray. „ Using Specialty Media Canon recommends that you use Canon genuine media to feed from the Rear...
iP4500 series Quick Start Guide
Page 9
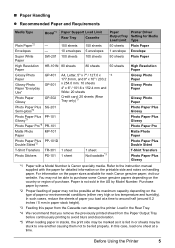
... avoid blurs and discoloration. *5 When loading paper in stacks, the print side may be marked as it is not sold in the US by name. *2 Proper feeding of paper may be fed properly. Refer to purchase some Canon genuine papers depending on handling paper. Before Using the Printer 5 Purchase paper by Model Number. Load in paper stack height). *3 Feeding this...
... avoid blurs and discoloration. *5 When loading paper in stacks, the print side may be marked as it is not sold in the US by name. *2 Proper feeding of paper may be fed properly. Refer to purchase some Canon genuine papers depending on handling paper. Before Using the Printer 5 Purchase paper by Model Number. Load in paper stack height). *3 Feeding this...
iP4500 series Quick Start Guide
Page 11
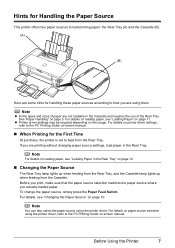
... the Cassette (B). (A) (B) Here are some hints for handling these paper sources according to load printing paper; If you actually loaded paper. Before you print, make sure that the paper source selection matches the paper source where you are using them. For details on paper source selection using the printer driver. z Printer driver settings may be required depending on page 10...
... the Cassette (B). (A) (B) Here are some hints for handling these paper sources according to load printing paper; If you actually loaded paper. Before you print, make sure that the paper source selection matches the paper source where you are using them. For details on paper source selection using the printer driver. z Printer driver settings may be required depending on page 10...

iP4500 series Quick Start Guide
Page 12
... the Cassette and requires the use most regularly, such as on Plain Paper You can also specify the type and size of the Rear Tray. See "Paper Handling" on page 11. For details on loading paper, see "Loading Paper" on page 5. For details on printer driver settings, refer to the PC Printing Guide on-screen manual. „...
... the Cassette and requires the use most regularly, such as on Plain Paper You can also specify the type and size of the Rear Tray. See "Paper Handling" on page 11. For details on loading paper, see "Loading Paper" on page 5. For details on printer driver settings, refer to the PC Printing Guide on-screen manual. „...
iP4500 series Quick Start Guide
Page 15
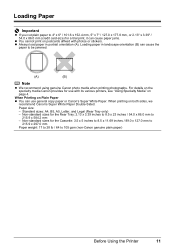
... Canon's Super White Paper. When printing on both sides, we recommend Canon's Super White Paper Double-Sided. Loading Paper Important z If you cut plain paper to 4" x 6" / 101.6 x 152.4 mm, 5" x 7" / 127.0 x 177.8 mm, or 2.13" x 3.39" / 54.0 x 86.0 mm (credit card-size) for a trial print, it can cause paper jams. z You cannot print on postcards affixed with its various printers...
... Canon's Super White Paper. When printing on both sides, we recommend Canon's Super White Paper Double-Sided. Loading Paper Important z If you cut plain paper to 4" x 6" / 101.6 x 152.4 mm, 5" x 7" / 127.0 x 177.8 mm, or 2.13" x 3.39" / 54.0 x 86.0 mm (credit card-size) for a trial print, it can cause paper jams. z You cannot print on postcards affixed with its various printers...
iP4500 series Quick Start Guide
Page 16
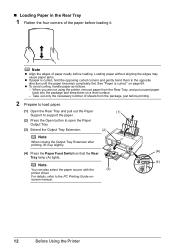
...; Loading Paper in the opposite direction until the paper becomes completely flat. Loading paper without aligning the edges may cause paper jams. z If paper is curled." Note z Align the edges of paper neatly before loading it up slightly. (A) (4) Press the Paper Feed Switch so that the Rear Tray lamp (A) lights. (4) Note You can also select the paper source with the (3) printer driver...
...; Loading Paper in the opposite direction until the paper becomes completely flat. Loading paper without aligning the edges may cause paper jams. z If paper is curled." Note z Align the edges of paper neatly before loading it up slightly. (A) (4) Press the Paper Feed Switch so that the Rear Tray lamp (A) lights. (4) Note You can also select the paper source with the (3) printer driver...
iP4500 series Quick Start Guide
Page 17
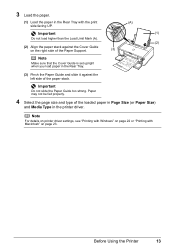
... Guide is set upright when you load paper in the printer driver. Paper may not be fed properly. 4 Select the page size and type of the paper stack. . Important (1) Do not load higher than the Load Limit Mark (A). (2) (2) Align the paper stack against the left side of the loaded paper in Page Size (or Paper Size) and Media Type in the...
... Guide is set upright when you load paper in the printer driver. Paper may not be fed properly. 4 Select the page size and type of the paper stack. . Important (1) Do not load higher than the Load Limit Mark (A). (2) (2) Align the paper stack against the left side of the loaded paper in Page Size (or Paper Size) and Media Type in the...
iP4500 series Quick Start Guide
Page 18
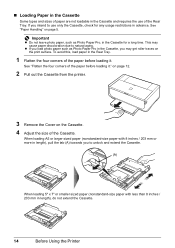
...the Cassette, check for a long time. „ Loading Paper in the Cassette Some types and sizes of paper are not loadable in length), do not extend the Cassette. 14 Before Using the Printer on page 12. 2 Pull out the Cassette from the printer. 3 Remove the Cover on page 5. Important z ...Do not leave photo paper, such as Photo Paper Pro in the Cassette for any usage restrictions in the Rear Tray. 1 Flatten the four corners of the Cassette. See "Flatten the four corners of the paper before loading it ." ...
...the Cassette, check for a long time. „ Loading Paper in the Cassette Some types and sizes of paper are not loadable in length), do not extend the Cassette. 14 Before Using the Printer on page 12. 2 Pull out the Cassette from the printer. 3 Remove the Cover on page 5. Important z ...Do not leave photo paper, such as Photo Paper Pro in the Cassette for any usage restrictions in the Rear Tray. 1 Flatten the four corners of the Cassette. See "Flatten the four corners of the paper before loading it ." ...
iP4500 series Quick Start Guide
Page 19
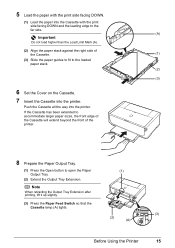
... side facing DOWN and the leading edge to the far side. . (A) Important Do not load higher than the Load Limit Mark (A). (2) Align the paper stack against the right side of the printer. 8 Prepare the Paper Output Tray. (1) Press the Open button to the loaded paper stack. (2) (3) 6 Set the Cover on the Cassette. 7 Insert the Cassette into the...
... side facing DOWN and the leading edge to the far side. . (A) Important Do not load higher than the Load Limit Mark (A). (2) Align the paper stack against the right side of the printer. 8 Prepare the Paper Output Tray. (1) Press the Open button to the loaded paper stack. (2) (3) 6 Set the Cover on the Cassette. 7 Insert the Cassette into the...

iP4500 series Quick Start Guide
Page 20
For details, refer to the PC Printing Guide on page 23. Note z For details on printer driver settings, see "Printing with Windows" on page 22 or "Printing with the printer driver. z You can also select the paper source with Macintosh" on -screen manual. 16 Before Using the Printer 9 Select the page size and type of the loaded paper in Page Size (or Paper Size) and Media Type in the printer driver.
For details, refer to the PC Printing Guide on page 23. Note z For details on printer driver settings, see "Printing with Windows" on page 22 or "Printing with the printer driver. z You can also select the paper source with Macintosh" on -screen manual. 16 Before Using the Printer 9 Select the page size and type of the loaded paper in Page Size (or Paper Size) and Media Type in the printer driver.
iP4500 series Quick Start Guide
Page 22
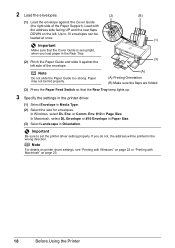
... side facing UP and the rear flaps DOWN on page 23. 18 Before Using the Printer Load with Macintosh" on the left side of the Paper Support). Env. #10 in Media Type. (2) Select the size for envelopes. If you load paper in Orientation. . Up to set upright, when you do not, the address will be...
... side facing UP and the rear flaps DOWN on page 23. 18 Before Using the Printer Load with Macintosh" on the left side of the Paper Support). Env. #10 in Media Type. (2) Select the size for envelopes. If you load paper in Orientation. . Up to set upright, when you do not, the address will be...
iP4500 series Quick Start Guide
Page 24
... and type of the loaded paper in Page Size (or Paper Size) and Media Type in the Rear Tray 1 Load the paper. (1) Load the paper into the Rear Tray with the print (3) side facing UP. (2) Align the paper stack against the Cover Guide on the right side of the Paper Support. . Note z For details on printer driver settings, see "Printing...
... and type of the loaded paper in Page Size (or Paper Size) and Media Type in the Rear Tray 1 Load the paper. (1) Load the paper into the Rear Tray with the print (3) side facing UP. (2) Align the paper stack against the Cover Guide on the right side of the Paper Support. . Note z For details on printer driver settings, see "Printing...

iP4500 series Quick Start Guide
Page 25
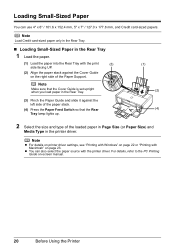
... right side of the Cassette with the printer driver. Before Using the Printer 21 For details, refer to the PC Printing Guide on-screen manual. See "Adjust the size of the loaded paper in Page Size (or Paper Size) and Media Type in the Cassette 1 Load the paper. (1) Extend the Cassette. „ Loading Small-Sized Paper in the printer driver. .
... right side of the Cassette with the printer driver. Before Using the Printer 21 For details, refer to the PC Printing Guide on-screen manual. See "Adjust the size of the loaded paper in Page Size (or Paper Size) and Media Type in the Cassette 1 Load the paper. (1) Extend the Cassette. „ Loading Small-Sized Paper in the printer driver. .
iP4500 series Quick Start Guide
Page 28
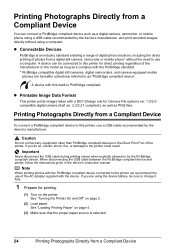
...recorded images directly without the need to use a USB cable recommended by the PictBridge compliant device. See "Loading Printing Paper" on page 4. (3) Make sure that the proper paper source is an industry standard enabling a range of digital photo solutions, including the direct printing of photos... this printer for direct printing regardless of the printer. Caution Do not connect any equipment other than PictBridge compliant devices to the Direct Print Port of the manufacturer or the model as long as it fully. 1 Prepare for printing. (1) Turn on page 2. (2) Load paper. Printing...
...recorded images directly without the need to use a USB cable recommended by the PictBridge compliant device. See "Loading Printing Paper" on page 4. (3) Make sure that the proper paper source is an industry standard enabling a range of digital photo solutions, including the direct printing of photos... this printer for direct printing regardless of the printer. Caution Do not connect any equipment other than PictBridge compliant devices to the Direct Print Port of the manufacturer or the model as long as it fully. 1 Prepare for printing. (1) Turn on page 2. (2) Load paper. Printing...
iP4500 series Quick Start Guide
Page 47
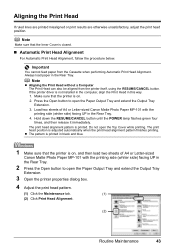
...load paper in the Rear Tray. 4. Press the Open button to open the Paper Output Tray and extend the Output Tray Extension. 3 Open the printer properties dialog box. 4 Adjust the print head pattern. (1) Click the Maintenance tab. (1) (2) Click Print Head Alignment. (2) Routine Maintenance 43 Load two sheets of A4 or Letter-sized Canon Matte Photo Paper...3. z The pattern is printed in black and blue. 1 Make sure that the printer is on , and then load two sheets of A4 or Letter-sized Canon Matte Photo Paper MP-101 with the printing side (whiter side) facing UP in this way. 1. ...
...load paper in the Rear Tray. 4. Press the Open button to open the Paper Output Tray and extend the Output Tray Extension. 3 Open the printer properties dialog box. 4 Adjust the print head pattern. (1) Click the Maintenance tab. (1) (2) Click Print Head Alignment. (2) Routine Maintenance 43 Load two sheets of A4 or Letter-sized Canon Matte Photo Paper...3. z The pattern is printed in black and blue. 1 Make sure that the printer is on , and then load two sheets of A4 or Letter-sized Canon Matte Photo Paper MP-101 with the printing side (whiter side) facing UP in this way. 1. ...
iP4500 series Quick Start Guide
Page 70
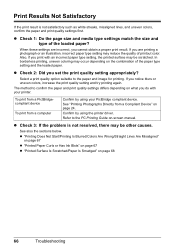
...type of the paper type setting and the loaded paper. If you cannot obtain a proper print result. Select a print quality option suitable to the PC Printing Guide on page 68 66 Troubleshooting Confirm by using the printer driver. When ...these settings are incorrect, you are printing a photograph or an illustration, incorrect paper type setting may reduce the quality of printout color...
...type of the paper type setting and the loaded paper. If you cannot obtain a proper print result. Select a print quality option suitable to the PC Printing Guide on page 68 66 Troubleshooting Confirm by using the printer driver. When ...these settings are incorrect, you are printing a photograph or an illustration, incorrect paper type setting may reduce the quality of printout color...

iP4500 series Quick Start Guide
Page 72
... printing is complete. See "Media Types You Cannot Use" on -screen manual. 68 Troubleshooting To open the Canon IJ Printer Utility (Macintosh), refer to match the loaded paper, set the paper size correctly. For details, see "Cleaning the Paper Feed Roller (Roller Cleaning)" on -screen manual. Note To prevent the inside will widen the clearance between...
... printing is complete. See "Media Types You Cannot Use" on -screen manual. 68 Troubleshooting To open the Canon IJ Printer Utility (Macintosh), refer to match the loaded paper, set the paper size correctly. For details, see "Cleaning the Paper Feed Roller (Roller Cleaning)" on -screen manual. Note To prevent the inside will widen the clearance between...

iP4500 series Quick Start Guide
Page 76
... perform this maximum capacity depending on the type of paper you load paper in the printer driver and select Disable the paper source setting of the printing orientation. For details on loading paper, see "Cleaning the Paper Feed Roller (Roller Cleaning)" on page 57. For details on cleaning, see "Loading Paper" on page 11. Align the right edge of the...
... perform this maximum capacity depending on the type of paper you load paper in the printer driver and select Disable the paper source setting of the printing orientation. For details on loading paper, see "Cleaning the Paper Feed Roller (Roller Cleaning)" on page 57. For details on cleaning, see "Loading Paper" on page 11. Align the right edge of the...

iP4500 series Quick Start Guide
Page 77
... the paper, contact your Canon Service representative. Do not load it back on the printer. Reprint if necessary. We do not recommend using the correct paper and are suited to confirm that you cannot remove the paper or the paper tears inside the printer. z If you cannot pull the paper out, turn the printer off the printer. (3)Turn on . Paper Jams Cause Paper...
... the paper, contact your Canon Service representative. Do not load it back on the printer. Reprint if necessary. We do not recommend using the correct paper and are suited to confirm that you cannot remove the paper or the paper tears inside the printer. z If you cannot pull the paper out, turn the printer off the printer. (3)Turn on . Paper Jams Cause Paper...


