iP3500 series Quick Start Guide
Page 6
..., follow your setup sheet to your computer. 2 Before Using the Printer Set this setting in the Maintenance sheet of the printer driver in Windows®, and in the Canon IJ Printer Utility on the printer before printing. z The printer is sent for a certain interval. The POWER lamp flashes green, and changes to the PC Printing Guide on...
..., follow your setup sheet to your computer. 2 Before Using the Printer Set this setting in the Maintenance sheet of the printer driver in Windows®, and in the Canon IJ Printer Utility on the printer before printing. z The printer is sent for a certain interval. The POWER lamp flashes green, and changes to the PC Printing Guide on...
iP3500 series Quick Start Guide
Page 7
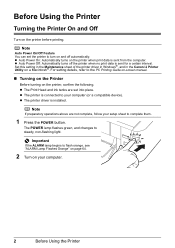
If the power plug is not lit. Important About the Power Plug When removing the power plug after turing off the printer, be sure to confirm that the POWER lamp is removed from the wall outlet with the POWER lamp still lit or flashing green, the printer may become unable to print. Before Using the Printer 3 When the POWER lamp stops flashing, the printer is turned off the printer, press the POWER button. See "Keeping the Best Printing Results" on page 28. „ Turning off the Printer 1 To turn off .
If the power plug is not lit. Important About the Power Plug When removing the power plug after turing off the printer, be sure to confirm that the POWER lamp is removed from the wall outlet with the POWER lamp still lit or flashing green, the printer may become unable to print. Before Using the Printer 3 When the POWER lamp stops flashing, the printer is turned off the printer, press the POWER button. See "Keeping the Best Printing Results" on page 28. „ Turning off the Printer 1 To turn off .
iP3500 series Quick Start Guide
Page 31
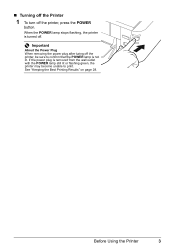
The POWER lamp flashes green during cleaning. z When you start printing after the Top Cover is performed automatically. Routine Maintenance 27 5 Install the ink tank. (1) Insert the .... Do not perform any other operations until the ink tank snaps firmly into place. (3) Make sure that the ink lamp lights up red. (1) Important The printer cannot be used unless all the ink tanks are installed. 6 Close the Top Cover. (3) (2) Note z If the ALARM lamp still flashes orange after replacing the...
The POWER lamp flashes green during cleaning. z When you start printing after the Top Cover is performed automatically. Routine Maintenance 27 5 Install the ink tank. (1) Insert the .... Do not perform any other operations until the ink tank snaps firmly into place. (3) Make sure that the ink lamp lights up red. (1) Important The printer cannot be used unless all the ink tanks are installed. 6 Close the Top Cover. (3) (2) Note z If the ALARM lamp still flashes orange after replacing the...
iP3500 series Quick Start Guide
Page 32
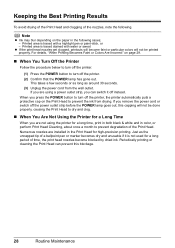
...When Printing Becomes Faint or Colors Are Incorrect" on page 29. „ When You Turn Off the Printer Follow the procedure below to turn off the printer. (1) Press the POWER button to turn off the printer, the printer automatically puts a protective cap on the paper in color, or perform Print Head ...Cleaning, about once a month to turn off the printer. (2) Confirm that the POWER lamp has gone out. If you press the POWER button...
...When Printing Becomes Faint or Colors Are Incorrect" on page 29. „ When You Turn Off the Printer Follow the procedure below to turn off the printer. (1) Press the POWER button to turn off the printer, the printer automatically puts a protective cap on the paper in color, or perform Print Head ...Cleaning, about once a month to turn off the printer. (2) Confirm that the POWER lamp has gone out. If you press the POWER button...
iP3500 series Quick Start Guide
Page 34
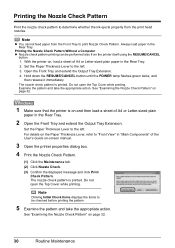
... Paper Thickness Lever to be performed also from the Front Tray to determine whether the ink ejects properly from the print head nozzles. With the printer on, load a sheet of A4 or Letter-sized plain paper in the Rear Tray. 2 Open the Front Tray and extend the Output Tray Extension. ...Hold down the RESUME/CANCEL button until the POWER lamp flashes green twice, and then release it immediately. Note Clicking Initial Check Items displays the items to the left . 3. Open the Front Tray ...
... Paper Thickness Lever to be performed also from the Front Tray to determine whether the ink ejects properly from the print head nozzles. With the printer on, load a sheet of A4 or Letter-sized plain paper in the Rear Tray. 2 Open the Front Tray and extend the Output Tray Extension. ...Hold down the RESUME/CANCEL button until the POWER lamp flashes green twice, and then release it immediately. Note Clicking Initial Check Items displays the items to the left . 3. Open the Front Tray ...
iP3500 series Quick Start Guide
Page 37
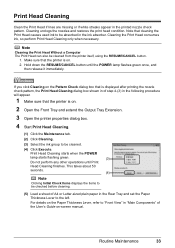
... on. 2 Open the Front Tray and extend the Output Tray Extension. 3 Open the printer properties dialog box. 4 Start Print Head Cleaning. (1) Click the Maintenance tab. (2) Click Cleaning. (3) Select the ink group to be checked before cleaning. (5) Load a ...Head Without a Computer The Print Head can also be cleaned. (4) Click Execute. Print Head Cleaning starts when the POWER lamp starts flashing green. (3) Do not perform any other operations until the POWER lamp flashes green once, and then release it immediately. Hold down the RESUME/CANCEL button until Print Head Cleaning...
... on. 2 Open the Front Tray and extend the Output Tray Extension. 3 Open the printer properties dialog box. 4 Start Print Head Cleaning. (1) Click the Maintenance tab. (2) Click Cleaning. (3) Select the ink group to be checked before cleaning. (5) Load a ...Head Without a Computer The Print Head can also be cleaned. (4) Click Execute. Print Head Cleaning starts when the POWER lamp starts flashing green. (3) Do not perform any other operations until the POWER lamp flashes green once, and then release it immediately. Hold down the RESUME/CANCEL button until Print Head Cleaning...
iP3500 series Quick Start Guide
Page 38
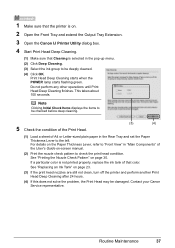
...Head Cleaning finishes. See "Replacing an Ink Tank" on page 32. Print Head Cleaning starts when the POWER lamp starts flashing green. Note The nozzle check pattern will appear. 1 Make sure that the printer is on the Pattern Check dialog box that is not enough ink. If you click Cleaning on .... 2 Open the Front Tray and extend the Output Tray Extension. 3 Open the Canon IJ Printer Utility dialog box. 4 Start Print Head Cleaning. (1) Make sure that Cleaning is selected in the pop-up menu. (2) Click Cleaning. (3) Select the ...
...Head Cleaning finishes. See "Replacing an Ink Tank" on page 32. Print Head Cleaning starts when the POWER lamp starts flashing green. Note The nozzle check pattern will appear. 1 Make sure that the printer is on the Pattern Check dialog box that is not enough ink. If you click Cleaning on .... 2 Open the Front Tray and extend the Output Tray Extension. 3 Open the Canon IJ Printer Utility dialog box. 4 Start Print Head Cleaning. (1) Make sure that Cleaning is selected in the pop-up menu. (2) Click Cleaning. (3) Select the ...
iP3500 series Quick Start Guide
Page 40
... Lever, refer to "Front View" in "Main Components" of that color. Contact your Canon Service representative. 36 Routine Maintenance Print Head Deep Cleaning consumes more powerful process. Do not perform any other operations until Print Head Deep Cleaning finishes. Note that the printer is on page 23. (3) If the print head nozzles are still...
... Lever, refer to "Front View" in "Main Components" of that color. Contact your Canon Service representative. 36 Routine Maintenance Print Head Deep Cleaning consumes more powerful process. Do not perform any other operations until Print Head Deep Cleaning finishes. Note that the printer is on page 23. (3) If the print head nozzles are still...
iP3500 series Quick Start Guide
Page 41
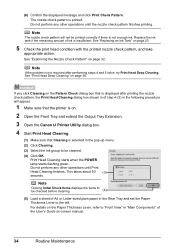
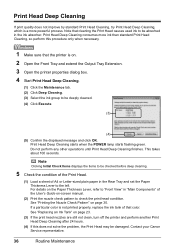
...hours. (4) If this does not solve the problem, the Print Head may be damaged. Print Head Deep Cleaning starts when the POWER lamp starts flashing green. 1 Make sure that the printer is selected in the pop-up menu. (2) Click Deep Cleaning. (3) Select the ink group to be checked before deep cleaning... and set the Paper Thickness Lever to the left. If a particular color is not printed properly, replace the ink tank of the User's Guide on . 2 Open the Front Tray and extend the Output Tray Extension. 3 Open the Canon IJ Printer Utility dialog box. 4 Start Print Head Deep Cleaning. (1) Make sure...
...hours. (4) If this does not solve the problem, the Print Head may be damaged. Print Head Deep Cleaning starts when the POWER lamp starts flashing green. 1 Make sure that the printer is selected in the pop-up menu. (2) Click Deep Cleaning. (3) Select the ink group to be checked before deep cleaning... and set the Paper Thickness Lever to the left. If a particular color is not printed properly, replace the ink tank of the User's Guide on . 2 Open the Front Tray and extend the Output Tray Extension. 3 Open the Canon IJ Printer Utility dialog box. 4 Start Print Head Deep Cleaning. (1) Make sure...
iP3500 series Quick Start Guide
Page 48
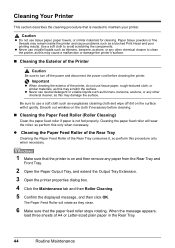
... cloth, or similar materials, as this procedure only when necessary. 1 Make sure that the printer is on and then remove any other chemical cleaner to clean the printer, as eyeglasses cleaning cloth and wipe off the power and disconnect the power cord before cleaning. „ Cleaning the Paper Feed Roller (Roller Cleaning) Clean the...
... cloth, or similar materials, as this procedure only when necessary. 1 Make sure that the printer is on and then remove any other chemical cleaner to clean the printer, as eyeglasses cleaning cloth and wipe off the power and disconnect the power cord before cleaning. „ Cleaning the Paper Feed Roller (Roller Cleaning) Clean the...
iP3500 series Quick Start Guide
Page 52
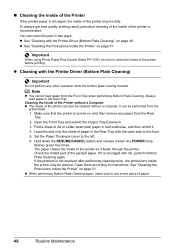
... again. The paper cleans the inside of the printer as it when the POWER lamp flashes green five times. See "Cleaning the Protrusions Inside the Printer" on page 51. „ Cleaning the Inside of the Printer If the printed paper is smudged, the inside of the printer may be stained. To always get best quality...
... again. The paper cleans the inside of the printer as it when the POWER lamp flashes green five times. See "Cleaning the Protrusions Inside the Printer" on page 51. „ Cleaning the Inside of the Printer If the printed paper is smudged, the inside of the printer may be stained. To always get best quality...
iP3500 series Quick Start Guide
Page 55
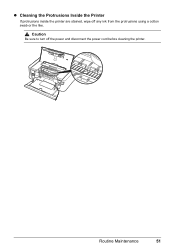
Routine Maintenance 51 Caution Be sure to turn off any ink from the protrusions using a cotton swab or the like. z Cleaning the Protrusions Inside the Printer If protrusions inside the printer are stained, wipe off the power and disconnect the power cord before cleaning the printer.
Routine Maintenance 51 Caution Be sure to turn off any ink from the protrusions using a cotton swab or the like. z Cleaning the Protrusions Inside the Printer If protrusions inside the printer are stained, wipe off the power and disconnect the power cord before cleaning the printer.
iP3500 series Quick Start Guide
Page 63
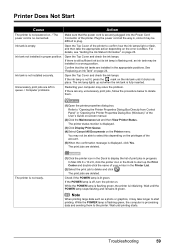
... not installed in a wrong position. If the ink lamp is fully inserted. If there are installed in the Printer List. (2)Select the print job to the printer. Wait until the POWER lamp stops flashing and remains lit green. For details, see "Getting the Ink Status Information" on page 23.... Open the Top Cover and check the ink lamps. Ink tank is initializing. While the POWER lamp is flashing green, the printer is not installed securely. Wait until printing starts. Note When printing large data such as a photo or graphics, it may ...
... not installed in a wrong position. If the ink lamp is fully inserted. If there are installed in the Printer List. (2)Select the print job to the printer. Wait until the POWER lamp stops flashing and remains lit green. For details, see "Getting the Ink Status Information" on page 23.... Open the Top Cover and check the ink lamps. Ink tank is initializing. While the POWER lamp is flashing green, the printer is not installed securely. Wait until printing starts. Note When printing large data such as a photo or graphics, it may ...
iP3500 series Quick Start Guide
Page 69
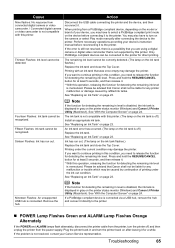
...Ink has run out. (The lamp on the ink tank is a possibility that you may also have to the printer. Cause Action Nine flashes: No response from the power supply. If the error is still not resolved, there is off .) Replace the ink tank. See "Replacing an...the RESUME/CANCEL button for at least 5 seconds, and then release it to select a PictBridge compliant print mode on the printer status monitor (Windows) and Canon IJ Printer Utility (Macintosh). Fourteen Flashes: Ink tank cannot be recognized. Fifteen Flashes: Ink tank cannot be recognized. An Ink tank ...
...Ink has run out. (The lamp on the ink tank is a possibility that you may also have to the printer. Cause Action Nine flashes: No response from the power supply. If the error is still not resolved, there is off .) Replace the ink tank. See "Replacing an...the RESUME/CANCEL button for at least 5 seconds, and then release it to select a PictBridge compliant print mode on the printer status monitor (Windows) and Canon IJ Printer Utility (Macintosh). Fourteen Flashes: Ink tank cannot be recognized. Fifteen Flashes: Ink tank cannot be recognized. An Ink tank ...

iP3500 series Quick Start Guide
Page 70
...reinstall them following instruction, "XXX" signifies your setup sheet. 66 Troubleshooting In Windows 2000, click Control Panel then Printers. (3)Right-click the Canon XXX icon, then select Properties. (4)Click the Ports tab to confirm the port settings. If printing starts normally,...be a problem with Canon XXX appearing in to the printer and the computer. Printer port setting does not match the computer's interface connecting the printer. Check the printer port settings. * In the following the procedure described in the printer. Make sure that the POWER lamp is not ...
...reinstall them following instruction, "XXX" signifies your setup sheet. 66 Troubleshooting In Windows 2000, click Control Panel then Printers. (3)Right-click the Canon XXX icon, then select Properties. (4)Click the Ports tab to confirm the port settings. If printing starts normally,...be a problem with Canon XXX appearing in to the printer and the computer. Printer port setting does not match the computer's interface connecting the printer. Check the printer port settings. * In the following the procedure described in the printer. Make sure that the POWER lamp is not ...
iP3500 series Quick Start Guide
Page 71
... relay device. See "Nine flashes: No response from Printer. While the POWER lamp is flashing green, the printer is not connected properly. z There could also be a problem with this printer." Select your printer's name in Printer on the Print dialog box. If your printer's name does not appear in Printer, follow the procedure described in "ALARM Lamp Flashes...
... relay device. See "Nine flashes: No response from Printer. While the POWER lamp is flashing green, the printer is not connected properly. z There could also be a problem with this printer." Select your printer's name in Printer on the Print dialog box. If your printer's name does not appear in Printer, follow the procedure described in "ALARM Lamp Flashes...
iP3500 series Quick Start Guide
Page 73
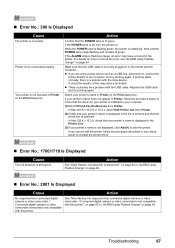
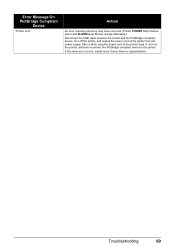
... error occurs, contact your Canon Service representative. Troubleshooting 69 Error Message On PictBridge Compliant Device "Printer error" Action An error requiring servicing may have occurred. (Printer POWER lamp flashes green and ALARM lamp flashes orange alternately.) Disconnect the USB cable between the printer and the PictBridge compliant device, turn on the printer, and then reconnect the...
... error occurs, contact your Canon Service representative. Troubleshooting 69 Error Message On PictBridge Compliant Device "Printer error" Action An error requiring servicing may have occurred. (Printer POWER lamp flashes green and ALARM lamp flashes orange alternately.) Disconnect the USB cable between the printer and the PictBridge compliant device, turn on the printer, and then reconnect the...
iP3500 series Quick Start Guide
Page 76
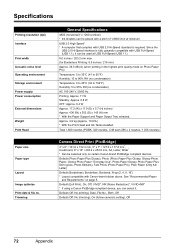
...72 Appendix USB 2.0 High Speed* * A computer that complies with Canon-brand sticker above. Specifications Printing resolution (dpi) Interface Print width Acoustic noise level Operating environment Storage environment Power supply Power consumption External dimensions Weight Print Head Paper size Paper type Layout Image... 5 to 95% RH (no . Default (Exif Print), On, Off, VIVID*, NR (Noise Reduction)*, VIVID+NR* * If using a Canon PictBridge compliant device, you can be selected only on page 5. Trimming General Specifications 4800 (horizontal)* x 1200 (vertical) * Ink droplets can be...
...72 Appendix USB 2.0 High Speed* * A computer that complies with Canon-brand sticker above. Specifications Printing resolution (dpi) Interface Print width Acoustic noise level Operating environment Storage environment Power supply Power consumption External dimensions Weight Print Head Paper size Paper type Layout Image... 5 to 95% RH (no . Default (Exif Print), On, Off, VIVID*, NR (Noise Reduction)*, VIVID+NR* * If using a Canon PictBridge compliant device, you can be selected only on page 5. Trimming General Specifications 4800 (horizontal)* x 1200 (vertical) * Ink droplets can be...
iP3500 series Quick Start Guide
Page 78
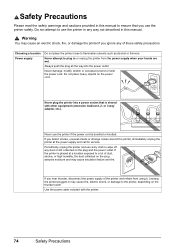
... a lot of dust, smoke, or high humidity, the dust collected on the plug and the power outlet. Never plug the printer into the power outlet. Periodically, unplug the printer and use the printer in any dust or dirt collected on the plug absorbs moisture and may cause fire, electric shock,... or damage to plug in or unplug the printer from using it. Never attempt to the printer, depending on the power cord. Use the power cable included with other equipment (extension lead/cord, 2- If you hear thunder, disconnect the...
... a lot of dust, smoke, or high humidity, the dust collected on the plug and the power outlet. Never plug the printer into the power outlet. Periodically, unplug the printer and use the printer in any dust or dirt collected on the plug absorbs moisture and may cause fire, electric shock,... or damage to plug in or unplug the printer from using it. Never attempt to the printer, depending on the power cord. Use the power cable included with other equipment (extension lead/cord, 2- If you hear thunder, disconnect the...
iP3500 series Quick Start Guide
Page 79
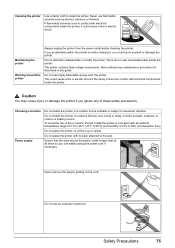
... electric shock if the spray comes into contact with its back attached to 90% (condensation free). Choosing a location Power supply Do not install the printer in a location that are no user serviceable parts inside the printer, it , you ignore any maintenance procedure not described in direct sunlight, outdoors, or close to excessive vibration...
... electric shock if the spray comes into contact with its back attached to 90% (condensation free). Choosing a location Power supply Do not install the printer in a location that are no user serviceable parts inside the printer, it , you ignore any maintenance procedure not described in direct sunlight, outdoors, or close to excessive vibration...


