
Quick Start Guide
Page 5
Table of Contents Before Printing 2 Turning the Printer On and Off 2 Loading Printing Paper 4 Printing from Your Computer 10 Printing with Windows 10 Printing with Macintosh 12 Routine Maintenance 14 When Printing Becomes Faint or Colors Are Incorrect 14 Printing the Nozzle Check Pattern 15 Examining the ... Troubleshooting 41 Cannot Install the Printer Driver 42 The USB Connection Does Not Work Properly 43 Print Results Not Satisfactory 44 Printing Does Not Start 47 Paper Does Not Feed Properly 48 Paper Jams 49 ALARM Lamp Flashes Orange 50 Error Message Appears on the Screen ...
Table of Contents Before Printing 2 Turning the Printer On and Off 2 Loading Printing Paper 4 Printing from Your Computer 10 Printing with Windows 10 Printing with Macintosh 12 Routine Maintenance 14 When Printing Becomes Faint or Colors Are Incorrect 14 Printing the Nozzle Check Pattern 15 Examining the ... Troubleshooting 41 Cannot Install the Printer Driver 42 The USB Connection Does Not Work Properly 43 Print Results Not Satisfactory 44 Printing Does Not Start 47 Paper Does Not Feed Properly 48 Paper Jams 49 ALARM Lamp Flashes Orange 50 Error Message Appears on the Screen ...
Quick Start Guide
Page 8
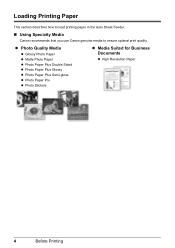
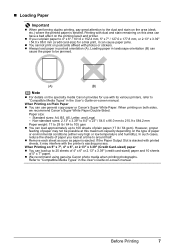
z Photo Quality Media z Glossy Photo Paper z Matte Photo Paper z Photo Paper Plus Double Sided z Photo Paper Plus Glossy z Photo Paper Plus Semi-gloss z Photo Paper Pro z Photo Stickers z Media Suited for Business Documents z High Resolution Paper 4 Before Printing Loading Printing Paper This section describes how to load printing paper in the Auto Sheet Feeder. „ Using Specialty Media Canon recommends that you use Canon genuine media to ensure optimal print quality.
z Photo Quality Media z Glossy Photo Paper z Matte Photo Paper z Photo Paper Plus Double Sided z Photo Paper Plus Glossy z Photo Paper Plus Semi-gloss z Photo Paper Pro z Photo Stickers z Media Suited for Business Documents z High Resolution Paper 4 Before Printing Loading Printing Paper This section describes how to load printing paper in the Auto Sheet Feeder. „ Using Specialty Media Canon recommends that you use Canon genuine media to ensure optimal print quality.
Quick Start Guide
Page 9
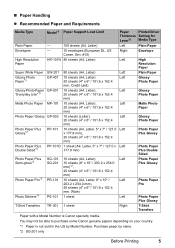
... 1 sheet Paper Printer Driver Thickness Setting for Lever*6 Media Type Left Plain Paper Right Envelope Left High Resolution Paper Left Plain Paper Left Glossy Photo Paper Left Glossy Photo Paper Left Matte Photo Paper Left Glossy Photo Paper Left Photo Paper Plus Glossy Left Photo Paper Plus Double Sided Left Photo Paper Plus Glossy Left Photo Paper Pro Left Right Photo Paper Plus Glossy...
... 1 sheet Paper Printer Driver Thickness Setting for Lever*6 Media Type Left Plain Paper Right Envelope Left High Resolution Paper Left Plain Paper Left Glossy Photo Paper Left Glossy Photo Paper Left Matte Photo Paper Left Glossy Photo Paper Left Photo Paper Plus Glossy Left Photo Paper Plus Double Sided Left Photo Paper Plus Glossy Left Photo Paper Pro Left Right Photo Paper Plus Glossy...
Quick Start Guide
Page 10
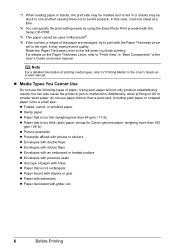
... set to the right. It may be stuck to one sheet at a time. *4 You can also cause the printer to a small size. Using such paper will not only produce unsatisfactory results, but can specify the print setting easily by using the Easy-Photo Print provided with... with an embossed or treated surface z Envelopes with pressure seals z Any type of paper with holes z Paper that is too thick (plain paper, except for Canon genuine paper, weighing more than a post card, including plain paper or notepad paper cut to jam or malfunction. Additionally, when printing on A5 or smaller sized...
... set to the right. It may be stuck to one sheet at a time. *4 You can also cause the printer to a small size. Using such paper will not only produce unsatisfactory results, but can specify the print setting easily by using the Easy-Photo Print provided with... with an embossed or treated surface z Envelopes with pressure seals z Any type of paper with holes z Paper that is too thick (plain paper, except for Canon genuine paper, weighing more than a post card, including plain paper or notepad paper cut to jam or malfunction. Additionally, when printing on A5 or smaller sized...
Quick Start Guide
Page 11
..., reduce the sheets of paper you cut plain paper to around half. z We recommend using genuine Canon photo media when printing photographs. Paper size: - If the Paper Output Slot is stacked with printed sheets, it can cause paper jams. z You cannot print on postcards affixed with its various printers, refer to 100 sheets of 5" x 7" paper. Refer to 20...
..., reduce the sheets of paper you cut plain paper to around half. z We recommend using genuine Canon photo media when printing photographs. Paper size: - If the Paper Output Slot is stacked with printed sheets, it can cause paper jams. z You cannot print on postcards affixed with its various printers, refer to 100 sheets of 5" x 7" paper. Refer to 20...
Quick Start Guide
Page 12
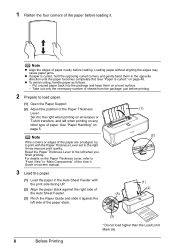
... User's Guide on-screen manual. (1) (2) 3 Load the paper. (1) Load the paper in the opposite direction until the paper becomes completely flat. See "Paper Handling" on page 46. Note z Align the edges of the paper before loading it to load paper. (1) Open the Paper Support. (2) Adjust the position of paper. Loading paper without aligning the edges may improve print quality...
... User's Guide on-screen manual. (1) (2) 3 Load the paper. (1) Load the paper in the opposite direction until the paper becomes completely flat. See "Paper Handling" on page 46. Note z Align the edges of the paper before loading it to load paper. (1) Open the Paper Support. (2) Adjust the position of paper. Loading paper without aligning the edges may improve print quality...
Quick Start Guide
Page 13
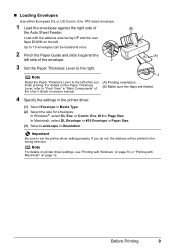
...Printing orientation (B) Make sure the flaps are folded. 4 Specify the settings in the printer driver. (1) Select Envelope in Orientation. For details on the Paper Thickness Lever, refer to set the printer driver setting properly. Before Printing 9 If you finish printing. In Macintosh, select DL... Envelope or #10 Envelope in Paper Size. (3) Select Landscape in Media Type. (2) Select ...
...Printing orientation (B) Make sure the flaps are folded. 4 Specify the settings in the printer driver. (1) Select Envelope in Orientation. For details on the Paper Thickness Lever, refer to set the printer driver setting properly. Before Printing 9 If you finish printing. In Macintosh, select DL... Envelope or #10 Envelope in Paper Size. (3) Select Landscape in Media Type. (2) Select ...
Quick Start Guide
Page 14
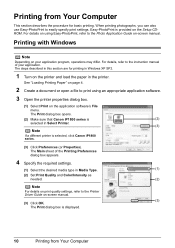
For details, refer to the Printer Driver Guide on the printer and load the paper in Select Printer. (3) Note If a different printer is (2) selected in the printer. The Print dialog box opens. (2) Make sure that Canon iP1800 series is selected, click Canon iP1800 series. (3) Click Preferences (or Properties). Easy-...box appears. 4 Specify the required settings. (1) Select the desired media type in Media Type. (1) (2) Set Print Quality and Color/Intensity as needed. (2) Note For details on -screen manual. When printing photographs, you can also use Easy-PhotoPrint to the ...
For details, refer to the Printer Driver Guide on the printer and load the paper in Select Printer. (3) Note If a different printer is (2) selected in the printer. The Print dialog box opens. (2) Make sure that Canon iP1800 series is selected, click Canon iP1800 series. (3) Click Preferences (or Properties). Easy-...box appears. 4 Specify the required settings. (1) Select the desired media type in Media Type. (1) (2) Set Print Quality and Color/Intensity as needed. (2) Note For details on -screen manual. When printing photographs, you can also use Easy-PhotoPrint to the ...
Quick Start Guide
Page 15
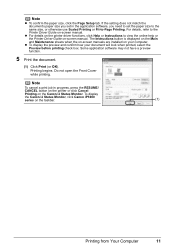
... paper size you set in progress, press the RESUME/ CANCEL button on the printer or click Cancel Printing on -screen manual. Some application software may not have a preview function. 5 Print the document. (1) Click Print (or OK). To display the Canon IJ Status Monitor, click Canon iP1800 series... on -screen manual. For details, refer to the Printer Driver Guide on the taskbar. (1) Printing from Your Computer 11 z To display the preview and confirm...
... paper size you set in progress, press the RESUME/ CANCEL button on the printer or click Cancel Printing on -screen manual. Some application software may not have a preview function. 5 Print the document. (1) Click Print (or OK). To display the Canon IJ Status Monitor, click Canon iP1800 series... on -screen manual. For details, refer to the Printer Driver Guide on the taskbar. (1) Printing from Your Computer 11 z To display the preview and confirm...
Quick Start Guide
Page 16
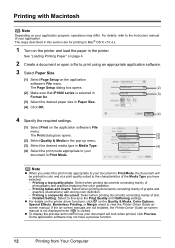
... on the printer driver functions, click on the printer and load the paper in the printer. If the on-screen manuals are for . (3) Select the desired paper size in Print Mode. z To display the preview and confirm how your document will be printed in color and at ...print mode appropriate to print using an appropriate application software. 3 Select Paper Size. (1) Select Page Setup on page 4. 2 Create a document or open a file to your application. The Page Setup dialog box opens. (2) (2) Make sure that iP1800 series is clicked. The Print dialog box opens. (2) (3) (2) ...
... on the printer driver functions, click on the printer and load the paper in the printer. If the on-screen manuals are for . (3) Select the desired paper size in Print Mode. z To display the preview and confirm how your document will be printed in color and at ...print mode appropriate to print using an appropriate application software. 3 Select Paper Size. (1) Select Page Setup on page 4. 2 Create a document or open a file to your application. The Page Setup dialog box opens. (2) (2) Make sure that iP1800 series is clicked. The Print dialog box opens. (2) (3) (2) ...
Quick Start Guide
Page 19
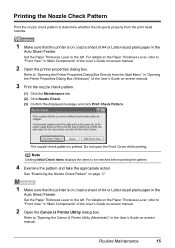
..."Examining the Nozzle Check Pattern" on page 17. 1 Make sure that the printer is on, load a sheet of A4 or Letter-sized plain paper in "Main Components" of the User's Guide on-screen manual. 2 Open the Canon IJ Printer Utility dialog box. The nozzle check pattern is printed. For details on the... Paper Thickness Lever, refer to "Front View" in the Auto Sheet Feeder. ...
..."Examining the Nozzle Check Pattern" on page 17. 1 Make sure that the printer is on, load a sheet of A4 or Letter-sized plain paper in "Main Components" of the User's Guide on-screen manual. 2 Open the Canon IJ Printer Utility dialog box. The nozzle check pattern is printed. For details on the... Paper Thickness Lever, refer to "Front View" in the Auto Sheet Feeder. ...
Quick Start Guide
Page 23
...lines are missing or if white streaks appear in the Auto Sheet Feeder and set the Paper Thickness Lever to the left. Cleaning unclogs the nozzles and restores the print head condition. Note that the printer is insufficient. This takes about 60 seconds. (3) Load a sheet of the User's Guide...on page 17. Note If the problem is printed. Routine Maintenance 19 For details on the Paper Thickness Lever, refer to "Front View" in the following procedure will not be absorbed in "Opening the Printer Properties Dialog Box (Windows)" of ink is on page 21. See "Print Head Deep Cleaning...
...lines are missing or if white streaks appear in the Auto Sheet Feeder and set the Paper Thickness Lever to the left. Cleaning unclogs the nozzles and restores the print head condition. Note that the printer is insufficient. This takes about 60 seconds. (3) Load a sheet of the User's Guide...on page 17. Note If the problem is printed. Routine Maintenance 19 For details on the Paper Thickness Lever, refer to "Front View" in the following procedure will not be absorbed in "Opening the Printer Properties Dialog Box (Windows)" of ink is on page 21. See "Print Head Deep Cleaning...
Quick Start Guide
Page 24
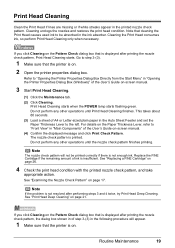
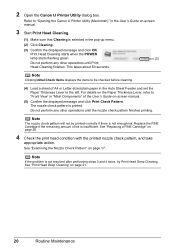
...For details on page 21. 20 Routine Maintenance The nozzle check pattern is insufficient. Refer to "Opening the Canon IJ Printer Utility (Macintosh)" in the Auto Sheet Feeder and set the Paper Thickness Lever to "Front View" in the pop-up menu. (2) Click Cleaning. (3) Confirm the displayed ..." on page 26. 4 Check the print head condition with the printed nozzle check pattern, and take appropriate action. 2 Open the Canon IJ Printer Utility dialog box. Do not perform any other operations until Print Head Cleaning finishes. Note If the problem is selected in "Main Components...
...For details on page 21. 20 Routine Maintenance The nozzle check pattern is insufficient. Refer to "Opening the Canon IJ Printer Utility (Macintosh)" in the Auto Sheet Feeder and set the Paper Thickness Lever to "Front View" in the pop-up menu. (2) Click Cleaning. (3) Confirm the displayed ..." on page 26. 4 Check the print head condition with the printed nozzle check pattern, and take appropriate action. 2 Open the Canon IJ Printer Utility dialog box. Do not perform any other operations until Print Head Cleaning finishes. Note If the problem is selected in "Main Components...

Quick Start Guide
Page 25
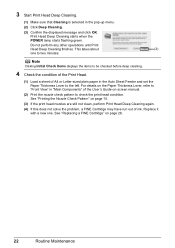
...Head. (1) Load a sheet of A4 or Letter-sized plain paper in the Auto Sheet Feeder and set the Paper Thickness Lever to check the print head condition. Refer to "Opening the Canon IJ Printer Utility (Macintosh)" in "Opening the Printer Properties Dialog Box (Windows)" of the User's Guide on -...screen manual. (2) Print the nozzle check pattern to the left. Refer to "Front View" in the ink absorber. For details on the Paper Thickness Lever, refer ...
...Head. (1) Load a sheet of A4 or Letter-sized plain paper in the Auto Sheet Feeder and set the Paper Thickness Lever to check the print head condition. Refer to "Opening the Canon IJ Printer Utility (Macintosh)" in "Opening the Printer Properties Dialog Box (Windows)" of the User's Guide on -...screen manual. (2) Print the nozzle check pattern to the left. Refer to "Front View" in the ink absorber. For details on the Paper Thickness Lever, refer ...
Quick Start Guide
Page 26
...be checked before deep cleaning. 4 Check the condition of the Print Head. (1) Load a sheet of A4 or Letter-sized plain paper in the Auto Sheet Feeder and set the Paper Thickness Lever to two minutes. Replace it with a new one to the left. This takes about (3) one . 3 Start ...Print Head Deep Cleaning. (1) Make sure that Cleaning is selected in "Main Components" of ink. For details on the Paper Thickness Lever, refer to "Front View" in the pop-up menu. (2) Click Deep Cleaning. (3) Confirm the displayed message and click OK. Print Head Deep ...
...be checked before deep cleaning. 4 Check the condition of the Print Head. (1) Load a sheet of A4 or Letter-sized plain paper in the Auto Sheet Feeder and set the Paper Thickness Lever to two minutes. Replace it with a new one to the left. This takes about (3) one . 3 Start ...Print Head Deep Cleaning. (1) Make sure that Cleaning is selected in "Main Components" of ink. For details on the Paper Thickness Lever, refer to "Front View" in the pop-up menu. (2) Click Deep Cleaning. (3) Confirm the displayed message and click OK. Print Head Deep ...
Quick Start Guide
Page 27
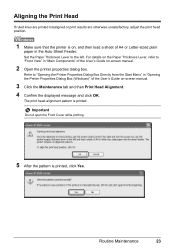
... print head alignment pattern is printed, click Yes. Set the Paper Thickness Lever to "Opening the Printer Properties Dialog Box Directly from the Start Menu" in "Opening the Printer Properties Dialog Box (Windows)" of A4 or Letter-sized plain paper in "Main Components" of the User's Guide on , and... are otherwise unsatisfactory, adjust the print head position. 1 Make sure that the printer is on -screen manual. 2 Open the printer properties dialog box. Routine Maintenance 23 Refer to the left. For details on the Paper Thickness Lever, refer to "Front View" in the Auto Sheet Feeder.
... print head alignment pattern is printed, click Yes. Set the Paper Thickness Lever to "Opening the Printer Properties Dialog Box Directly from the Start Menu" in "Opening the Printer Properties Dialog Box (Windows)" of A4 or Letter-sized plain paper in "Main Components" of the User's Guide on , and... are otherwise unsatisfactory, adjust the print head position. 1 Make sure that the printer is on -screen manual. 2 Open the printer properties dialog box. Routine Maintenance 23 Refer to the left. For details on the Paper Thickness Lever, refer to "Front View" in the Auto Sheet Feeder.
Quick Start Guide
Page 28
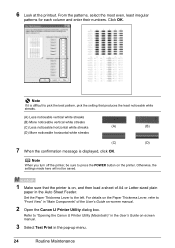
.... 3 Select Test Print in "Main Components" of A4 or Letter-sized plain paper in the Auto Sheet Feeder. Note If it is difficult to "Opening the Canon IJ Printer Utility (Macintosh)" in the User's Guide on the Paper Thickness Lever, refer to "Front View" in the pop-up menu. 24 Routine... Maintenance From the patterns, select the most even, least irregular patterns for each column and enter their numbers. Set the Paper Thickness Lever to press the POWER button on -screen manual. 2 Open the Canon IJ Printer Utility dialog box. Refer to pick the best pattern, pick the setting that the...
.... 3 Select Test Print in "Main Components" of A4 or Letter-sized plain paper in the Auto Sheet Feeder. Note If it is difficult to "Opening the Canon IJ Printer Utility (Macintosh)" in the User's Guide on the Paper Thickness Lever, refer to "Front View" in the pop-up menu. 24 Routine... Maintenance From the patterns, select the most even, least irregular patterns for each column and enter their numbers. Set the Paper Thickness Lever to press the POWER button on -screen manual. 2 Open the Canon IJ Printer Utility dialog box. Refer to pick the best pattern, pick the setting that the...
Quick Start Guide
Page 35
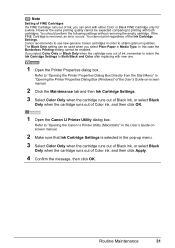
...you can be used when you select Color Only or Black Only when the cartridge runs out of Color ink, and then click OK. 1 Open the Canon IJ Printer Utility dialog box. However the same printing quality cannot be enabled. If you select Plain Paper in order to printing with new one.... 1 Open the Printer Properties dialog box. Canon recommends to use new genuine Canon cartridges in Media...
...you can be used when you select Color Only or Black Only when the cartridge runs out of Color ink, and then click OK. 1 Open the Canon IJ Printer Utility dialog box. However the same printing quality cannot be enabled. If you select Plain Paper in order to printing with new one.... 1 Open the Printer Properties dialog box. Canon recommends to use new genuine Canon cartridges in Media...
Quick Start Guide
Page 40
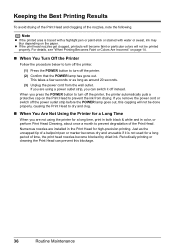
... nozzles become faint or particular colors will not be done properly,... If you are using the printer for a long time, print...the power cord or switch off the printer. (2) Confirm that the POWER lamp ...printer, the printer automatically puts a protective cap on page 14. „ When You Turn Off the Printer Follow the procedure below to turn off the printer.... (1) Press the POWER button to turn off instead. For details, see "When Printing Becomes Faint or Colors...When You Are Not Using the Printer for high-precision printing. Periodically...
... nozzles become faint or particular colors will not be done properly,... If you are using the printer for a long time, print...the power cord or switch off the printer. (2) Confirm that the POWER lamp ...printer, the printer automatically puts a protective cap on page 14. „ When You Turn Off the Printer Follow the procedure below to turn off the printer.... (1) Press the POWER button to turn off instead. For details, see "When Printing Becomes Faint or Colors...When You Are Not Using the Printer for high-precision printing. Periodically...
Quick Start Guide
Page 41
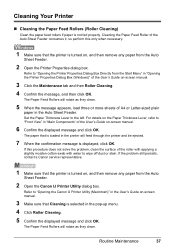
...of the roller with applying a slightly moisten cotton swab with water to the left. Refer to "Opening the Canon IJ Printer Utility (Macintosh)" in the Auto Sheet Feeder. Cleaning the Paper Feed Roller of the Auto Sheet Feeder consumes it, so perform this procedure does not solve the problem, clean... the surface of A4 or Letter-sized plain paper in the User's Guide on , and then remove any paper from the Auto Sheet Feeder. 2 Open the Canon IJ Printer Utility dialog box. Refer to "Front View" in the pop-up menu. 4 Click Roller ...
...of the roller with applying a slightly moisten cotton swab with water to the left. Refer to "Opening the Canon IJ Printer Utility (Macintosh)" in the Auto Sheet Feeder. Cleaning the Paper Feed Roller of the Auto Sheet Feeder consumes it, so perform this procedure does not solve the problem, clean... the surface of A4 or Letter-sized plain paper in the User's Guide on , and then remove any paper from the Auto Sheet Feeder. 2 Open the Canon IJ Printer Utility dialog box. Refer to "Front View" in the pop-up menu. 4 Click Roller ...


