
Quick Start Guide
Page 5
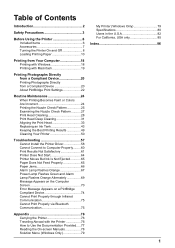
... Colors Are Incorrect 24 Printing the Nozzle Check Pattern 25 Examining the Nozzle Check Pattern ...........27 Print Head Cleaning 28 Print Head Deep Cleaning 31 Aligning the Print Head 33 Replacing an Ink Tank 43 Keeping the Best Printing Results 49 Cleaning Your Printer 50 Troubleshooting 57 Cannot Install the Printer Driver 58 Cannot Connect to Computer Properly.........60 Print Results Not Satisfactory 61 Printer Does Not Start 64 Printer Moves But Ink Is Not Ejected 65 Paper Does Not Feed Properly 65 Paper Jams 66 Alarm Lamp Flashes...
... Colors Are Incorrect 24 Printing the Nozzle Check Pattern 25 Examining the Nozzle Check Pattern ...........27 Print Head Cleaning 28 Print Head Deep Cleaning 31 Aligning the Print Head 33 Replacing an Ink Tank 43 Keeping the Best Printing Results 49 Cleaning Your Printer 50 Troubleshooting 57 Cannot Install the Printer Driver 58 Cannot Connect to Computer Properly.........60 Print Results Not Satisfactory 61 Printer Does Not Start 64 Printer Moves But Ink Is Not Ejected 65 Paper Does Not Feed Properly 65 Paper Jams 66 Alarm Lamp Flashes...
Quick Start Guide
Page 15
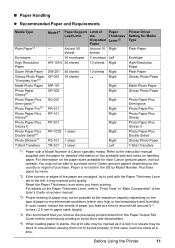
... Paper Paper Thickness Lever*2 - „ Paper Handling z Recommended Paper and Requirements Media Type Plain Paper*3 Envelopes High Resolution Paper Super White Paper Glossy Photo Paper "Everyday Use"*5 Matte Photo Paper Photo Paper Glossy*5 Photo Paper Plus Semi-gloss*5 Photo Paper Pro*5 Photo Paper Plus Glossy*5 Photo Paper Plus Glossy II Photo Paper Plus Double Sided*6 Photo Stickers*7 T-Shirt Transfers Model*1 Paper Support Load Limit Limit of purchase. Refer to purchase some Canon genuine papers depending on -screen manual. *3 Proper feeding of paper you load at a time...
... Paper Paper Thickness Lever*2 - „ Paper Handling z Recommended Paper and Requirements Media Type Plain Paper*3 Envelopes High Resolution Paper Super White Paper Glossy Photo Paper "Everyday Use"*5 Matte Photo Paper Photo Paper Glossy*5 Photo Paper Plus Semi-gloss*5 Photo Paper Pro*5 Photo Paper Plus Glossy*5 Photo Paper Plus Glossy II Photo Paper Plus Double Sided*6 Photo Stickers*7 T-Shirt Transfers Model*1 Paper Support Load Limit Limit of purchase. Refer to purchase some Canon genuine papers depending on -screen manual. *3 Proper feeding of paper you load at a time...
Quick Start Guide
Page 17
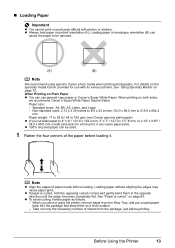
... and keep them in the opposite direction until the paper becomes completely flat. „ Loading Paper Important z You cannot print on page 63. When printing on Plain Paper z You can be jammed. (A) (B) Note We recommend using the printer, remove paper from the package, just before loading. Take out only the necessary number of paper neatly before printing. When Printing on both sides, we recommend Canon's Super White Paper Double-Sided. For details on a level surface...
... and keep them in the opposite direction until the paper becomes completely flat. „ Loading Paper Important z You cannot print on page 63. When printing on Plain Paper z You can be jammed. (A) (B) Note We recommend using the printer, remove paper from the package, just before loading. Take out only the necessary number of paper neatly before printing. When Printing on both sides, we recommend Canon's Super White Paper Double-Sided. For details on a level surface...
Quick Start Guide
Page 18
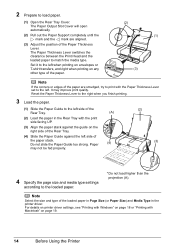
... media type. Reset the Paper Thickness Lever to the right when you finish printing. 3 Load the paper. (1) Slide the Paper Guide to the left side of the Rear Tray. (2) Load the paper in the printer driver. The Paper Output Slot Cover will open automatically. (2) Pull out the Paper Support completely until the mark and the mark are smudged, try to print with the Paper Thickness Lever set to the left . For details on printer driver settings, see "Printing with Windows" on page 18 or "Printing...
... media type. Reset the Paper Thickness Lever to the right when you finish printing. 3 Load the paper. (1) Slide the Paper Guide to the left side of the Rear Tray. (2) Load the paper in the printer driver. The Paper Output Slot Cover will open automatically. (2) Pull out the Paper Support completely until the mark and the mark are smudged, try to print with the Paper Thickness Lever set to the left . For details on printer driver settings, see "Printing with Windows" on page 18 or "Printing...
Quick Start Guide
Page 28
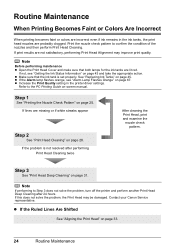
... your Canon Service representative. Note Before performing maintenance z Open the Print Head Cover and make sure that the ink tank is not resolved after 24 hours. Step 3 See "Print Head Deep Cleaning" on page 28. z If the Ruled Lines Are Shifted See "Aligning the Print Head" on page 45. See "Replacing Ink Tanks" on page 33. 24 Routine Maintenance If this does not solve the problem, the Print Head may improve print quality. z Increase the Print Quality setting in the ink tanks, the print head nozzles are missing...
... your Canon Service representative. Note Before performing maintenance z Open the Print Head Cover and make sure that the ink tank is not resolved after 24 hours. Step 3 See "Print Head Deep Cleaning" on page 28. z If the Ruled Lines Are Shifted See "Aligning the Print Head" on page 45. See "Replacing Ink Tanks" on page 33. 24 Routine Maintenance If this does not solve the problem, the Print Head may improve print quality. z Increase the Print Quality setting in the ink tanks, the print head nozzles are missing...
Quick Start Guide
Page 37
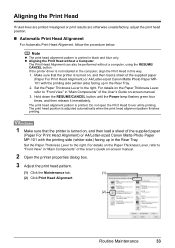
... Print Head in the Rear Tray. Set the Paper Thickness Lever to the right. Do not open the Print Head Cover while printing. Hold down the RESUME/CANCEL button until the Power lamp flashes green four times, and then release it immediately. The print head position is adjusted automatically when the print head alignment pattern finishes printing. 1 Make sure that the printer is turned on , and then load a sheet of the User's Guide on -screen manual. 2 Open the printer properties dialog box. 3 Adjust the print head pattern. (1) Click the Maintenance tab. (1) (2) Click Print Head...
... Print Head in the Rear Tray. Set the Paper Thickness Lever to the right. Do not open the Print Head Cover while printing. Hold down the RESUME/CANCEL button until the Power lamp flashes green four times, and then release it immediately. The print head position is adjusted automatically when the print head alignment pattern finishes printing. 1 Make sure that the printer is turned on , and then load a sheet of the User's Guide on -screen manual. 2 Open the printer properties dialog box. 3 Adjust the print head pattern. (1) Click the Maintenance tab. (1) (2) Click Print Head...

Quick Start Guide
Page 61
... Print Properly via Bluetooth Communication" on page 78. Troubleshooting 57 Take the appropriate action described in the User's Guide on-screen manual. z "Cannot Install the Printer Driver" on page 58 z "Cannot Connect to "Troubleshooting" in the message. The message may encounter when using your operating system. * When infrared communication is performed with the computer, the printer status monitor screen is displayed automatically. To handle problems using the printer. Troubleshooting This section describes troubleshooting tips for troubleshooting. Note...
... Print Properly via Bluetooth Communication" on page 78. Troubleshooting 57 Take the appropriate action described in the User's Guide on-screen manual. z "Cannot Install the Printer Driver" on page 58 z "Cannot Connect to "Troubleshooting" in the message. The message may encounter when using your operating system. * When infrared communication is performed with the computer, the printer status monitor screen is displayed automatically. To handle problems using the printer. Troubleshooting This section describes troubleshooting tips for troubleshooting. Note...
Quick Start Guide
Page 65
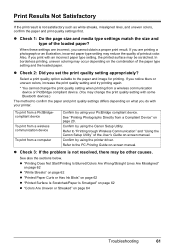
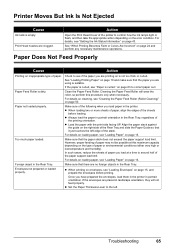
... method to the paper and image for printing. If you set the print quality setting appropriately? Refer to the PC Printing Guide on -screen manual. z Check 1: Do the page size and media type settings match the size and type of the User's Guide on -screen manual. z Check 2: Did you notice blurs or uneven colors, increase the print quality setting and try printing again. * You cannot change the print quality setting with your PictBridge compliant device. Refer to "Printing trough Wireless Communication" and "Using the Canon Setup Utility" of the loaded paper?
... method to the paper and image for printing. If you set the print quality setting appropriately? Refer to the PC Printing Guide on -screen manual. z Check 1: Do the page size and media type settings match the size and type of the User's Guide on -screen manual. z Check 2: Did you notice blurs or uneven colors, increase the print quality setting and try printing again. * You cannot change the print quality setting with your PictBridge compliant device. Refer to "Printing trough Wireless Communication" and "Using the Canon Setup Utility" of the loaded paper?

Quick Start Guide
Page 66
..., set the paper size correctly. Make sure to become smudged. If this procedure only when necessary. on -screen manual. 62 Troubleshooting When printing data with high color saturation such as photographs or images in the Rear Tray, the inside will wear the roller, so perform this does not solve the problem, see "Cleaning the Inside of the paper. For details, see "Manual Print Head Alignment" on the printable side. Ink tank is loaded...
..., set the paper size correctly. Make sure to become smudged. If this procedure only when necessary. on -screen manual. 62 Troubleshooting When printing data with high color saturation such as photographs or images in the Rear Tray, the inside will wear the roller, so perform this does not solve the problem, see "Cleaning the Inside of the paper. For details, see "Manual Print Head Alignment" on the printable side. Ink tank is loaded...
Quick Start Guide
Page 68
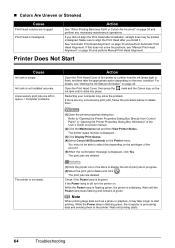
... them to the printer. Print Head is empty. Action Open the Print Head Cover of print jobs in queue. / Computer problems. The printer is displayed, click Yes. mark and the Canon logo on the Printer menu. Printer Does Not Start Cause Ink tank is misaligned. The printer status monitor is off, turn the printer on the error condition. If you did not align the Print Head after you install it. Note When printing large data such as a photo or graphics...
... them to the printer. Print Head is empty. Action Open the Print Head Cover of print jobs in queue. / Computer problems. The printer is displayed, click Yes. mark and the Canon logo on the Printer menu. Printer Does Not Start Cause Ink tank is misaligned. The printer status monitor is off, turn the printer on the error condition. If you did not align the Print Head after you install it. Note When printing large data such as a photo or graphics...
Quick Start Guide
Page 69
.... Cleaning the Paper Feed Roller will not feed properly. Too much paper loaded. Envelopes not prepared or loaded properly. For details, see "Loading Paper" on page 43. Paper Does Not Feed Properly Cause Action Printing on the type of the paper support load limit. Action Open the Print Head Cover of the stack. Make sure that it just touches the left . z When printing on the error condition. z Set the Paper Thickness Lever to the left edge of the printer to...
.... Cleaning the Paper Feed Roller will not feed properly. Too much paper loaded. Envelopes not prepared or loaded properly. For details, see "Loading Paper" on page 43. Paper Does Not Feed Properly Cause Action Printing on the type of the paper support load limit. Action Open the Print Head Cover of the stack. Make sure that it just touches the left . z When printing on the error condition. z Set the Paper Thickness Lever to the left edge of the printer to...
Quick Start Guide
Page 70
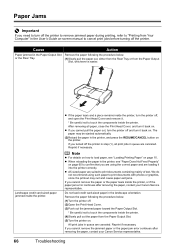
... ejected automatically. (2)Reload the paper in the printer, and press the RESUME/CANCEL button on . z When reloading the paper in the printer, see "Loading Printing Paper" on -screen manual to cancel print jobs before turning off the printer. Do not load credit card-sized paper in queue are canceled. All print jobs in queue are canceled. z If the paper tears and a piece remains inside the printer, turn the printer off . (2)Open the Print Head Cover. (3)Push out the jammed paper toward the Paper...
... ejected automatically. (2)Reload the paper in the printer, and press the RESUME/CANCEL button on . z When reloading the paper in the printer, see "Loading Printing Paper" on -screen manual to cancel print jobs before turning off the printer. Do not load credit card-sized paper in queue are canceled. All print jobs in queue are canceled. z If the paper tears and a piece remains inside the printer, turn the printer off . (2)Open the Print Head Cover. (3)Push out the jammed paper toward the Paper...

Quick Start Guide
Page 72
... ink tank is running low. z When the optional Bluetooth units BU-30 are as follows: z Paper of the battery, refer to strong light. Eleven flashes: Automatic Print Head Alignment failed. See "Printing the Nozzle Check Pattern" on page 36. z The Paper Output Slot is loaded in the Rear Tray. Press the RESUME/CANCEL button to strong light. For details on Manual Print Head Alignment, see "Manual Print Head Alignment" on page 25. An Ink tank error has occurred. (The lamp on screen manual. See "Getting the Ink Status...
... ink tank is running low. z When the optional Bluetooth units BU-30 are as follows: z Paper of the battery, refer to strong light. Eleven flashes: Automatic Print Head Alignment failed. See "Printing the Nozzle Check Pattern" on page 36. z The Paper Output Slot is loaded in the Rear Tray. Press the RESUME/CANCEL button to strong light. For details on Manual Print Head Alignment, see "Manual Print Head Alignment" on page 25. An Ink tank error has occurred. (The lamp on screen manual. See "Getting the Ink Status...
Quick Start Guide
Page 75
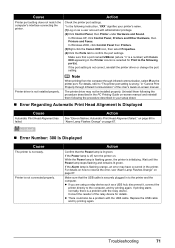
...turn the printer on -screen manual. Cause Action Printer port setting does not match the computer's interface connecting the printer. in to resolve the error, see "Alarm Lamp Flashes Orange" on page 67. Action Confirm that the USB cable is selected for details. While the Power lamp is flashing green, the printer is not installed properly. Check the printer port settings. * In the following instruction, "XXX" signifies your setup sheet. „ Error Regarding Automatic Print Head Alignment Is Displayed Cause Automatic Print Head Alignment has failed. Printer driver...
...turn the printer on -screen manual. Cause Action Printer port setting does not match the computer's interface connecting the printer. in to resolve the error, see "Alarm Lamp Flashes Orange" on page 67. Action Confirm that the USB cable is selected for details. While the Power lamp is flashing green, the printer is not installed properly. Check the printer port settings. * In the following instruction, "XXX" signifies your setup sheet. „ Error Regarding Automatic Print Head Alignment Is Displayed Cause Automatic Print Head Alignment has failed. Printer driver...
Quick Start Guide
Page 76
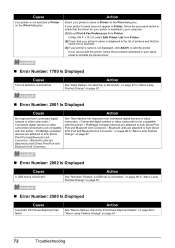
... Print Port and Bluetooth Unit Connector. In Mac OS X v.10.3.9, select Edit Printer List from Printer. on page 67 in "Alarm Lamp Flashes Orange" on the Print dialog box. on page 69 in "Alarm Lamp Flashes Orange" on the Print dialog box. Cause Your printer is not selected in Printer on page 67. „ Error Number: 2500 Is Displayed Cause Automatic Print Head Alignment has failed. Action Select your setup sheet to add the printer...
... Print Port and Bluetooth Unit Connector. In Mac OS X v.10.3.9, select Edit Printer List from Printer. on page 67 in "Alarm Lamp Flashes Orange" on the Print dialog box. on page 69 in "Alarm Lamp Flashes Orange" on the Print dialog box. Cause Your printer is not selected in Printer on page 67. „ Error Number: 2500 Is Displayed Cause Automatic Print Head Alignment has failed. Action Select your setup sheet to add the printer...

Quick Start Guide
Page 78
... the display on your PictBridge compliant device to resolve the error. An ink tank that are indicated on Canon-brand PictBridge compliant devices. Load paper in the Rear Tray, and select Continue* in "Alarm Lamp Flashes Orange" on page 67. Remove the jammed paper, load new paper, press the RESUME/CANCEL button on the printer. Close the Print Head Cover on the printer, and try printing again. For details on how to the right. Error Message...
... the display on your PictBridge compliant device to resolve the error. An ink tank that are indicated on Canon-brand PictBridge compliant devices. Load paper in the Rear Tray, and select Continue* in "Alarm Lamp Flashes Orange" on page 67. Remove the jammed paper, load new paper, press the RESUME/CANCEL button on the printer. Close the Print Head Cover on the printer, and try printing again. For details on how to the right. Error Message...
Quick Start Guide
Page 85
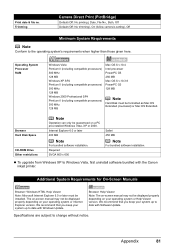
... printing), Date, File No., Both, Off Default (Off: No trimming), On (follow camera's setting), Off Minimum System Requirements Note Conform to change without notice. Additional System Requirements for On-Screen Manuals Browser: Windows HTML Help Viewer Note: Microsoft Internet Explorer 5.0 or later must be displayed properly depending on your system up to date with the Canon inkjet printer. We recommend that you keep your...
... printing), Date, File No., Both, Off Default (Off: No trimming), On (follow camera's setting), Off Minimum System Requirements Note Conform to change without notice. Additional System Requirements for On-Screen Manuals Browser: Windows HTML Help Viewer Note: Microsoft Internet Explorer 5.0 or later must be displayed properly depending on your system up to date with the Canon inkjet printer. We recommend that you keep your...
Quick Start Guide
Page 88
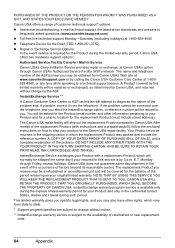
... must include street address). The replacement Product you . PURCHASER OF THE PRODUCT OR THE PERSON FOR WHOM IT WAS PURCHASED AS A GIFT, AND STATES YOUR EXCLUSIVE REMEDY. Canon USA offers a range of customer technical support* options: z Interactive troubleshooting, e-mail technical support, the latest driver downloads and answers to the Canon USA repair facility. InstantExchange Service exchanges your Product with instructions and a prepaid waybill...
... must include street address). The replacement Product you . PURCHASER OF THE PRODUCT OR THE PERSON FOR WHOM IT WAS PURCHASED AS A GIFT, AND STATES YOUR EXCLUSIVE REMEDY. Canon USA offers a range of customer technical support* options: z Interactive troubleshooting, e-mail technical support, the latest driver downloads and answers to the Canon USA repair facility. InstantExchange Service exchanges your Product with instructions and a prepaid waybill...
Easy Setup Instructions
Page 1
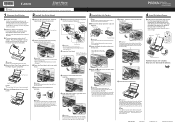
... the Print Head Lock Lever. a Open the Print Head Cover. Remove all the shipping tapes on yourself when handling these items. Important Make sure that the Paper Thickness Lever is in the Quick Start Guide. 1 Prepare the Printer 2 Install the Print Head 3 Install the Ink Tanks a Unpack the Printer. A USB cable is now complete. Align the with this has no effect on the printer flashes orange after it gently. Start Here Easy Setup Instructions Important When cleaning the exterior of the printer, use a soft...
... the Print Head Lock Lever. a Open the Print Head Cover. Remove all the shipping tapes on yourself when handling these items. Important Make sure that the Paper Thickness Lever is in the Quick Start Guide. 1 Prepare the Printer 2 Install the Print Head 3 Install the Ink Tanks a Unpack the Printer. A USB cable is now complete. Align the with this has no effect on the printer flashes orange after it gently. Start Here Easy Setup Instructions Important When cleaning the exterior of the printer, use a soft...
Easy Setup Instructions
Page 2
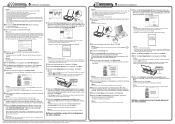
... Found New Hardware Wizard screen appears automatically, remove the USB cable connected to as an Administrator. • Quit all running applications before installation. • A message asking for your confirmation to restart your computer. The printer driver will take part in black and blue. • When Automatic Print Head Alignment cannot be executed properly, the Alarm lamp on -screen instructions to install the software. If you need to "Alarm Lamp Flashes Orange" in the U.S. Use Mac...
... Found New Hardware Wizard screen appears automatically, remove the USB cable connected to as an Administrator. • Quit all running applications before installation. • A message asking for your confirmation to restart your computer. The printer driver will take part in black and blue. • When Automatic Print Head Alignment cannot be executed properly, the Alarm lamp on -screen instructions to install the software. If you need to "Alarm Lamp Flashes Orange" in the U.S. Use Mac...


