
i960 Quick Start Guide
Page 6
...37 Printing Borderless Photographs with Windows 38 Printing Borderless Photographs with Macintosh 41 Printing Maintenance Replacing an Ink Tank 44 When Printing Becomes Faint or Colors are Incorrect 49 Printing the Nozzle Check Pattern 50 Print Head Cleaning 53 Print Head Deep Cleaning 55 Aligning the Print Head 57... the Screen 72 Cannot Print Properly from the Digital Camera 74 Appendix Installing the Printer Driver When Using Mac OS 9.x 76 User's Guide Table of Contents 77 Specifications 78 Safety Precautions 80 Regulatory Information 82 Canon Printer and Scanner Limited ...
...37 Printing Borderless Photographs with Windows 38 Printing Borderless Photographs with Macintosh 41 Printing Maintenance Replacing an Ink Tank 44 When Printing Becomes Faint or Colors are Incorrect 49 Printing the Nozzle Check Pattern 50 Print Head Cleaning 53 Print Head Deep Cleaning 55 Aligning the Print Head 57... the Screen 72 Cannot Print Properly from the Digital Camera 74 Appendix Installing the Printer Driver When Using Mac OS 9.x 76 User's Guide Table of Contents 77 Specifications 78 Safety Precautions 80 Regulatory Information 82 Canon Printer and Scanner Limited ...

i960 Quick Start Guide
Page 22
... The images taken with an Exif 2.2 compatible digital camera may not be printed (excluding the index print). - Disconnect the cable from the printer. 3. Images will be index printed. - Maintenance* * The print head cannot be sure to unplug the cable connecting to hold the connector by ...or in the index display mode. - You can make a standard print from the Digital Camera" on the digital camera. For print error messages, refer to the computer, then align the print head. Advanced Printing Note z For the digital camera operation and troubleshooting, refer to your ...
... The images taken with an Exif 2.2 compatible digital camera may not be printed (excluding the index print). - Disconnect the cable from the printer. 3. Images will be index printed. - Maintenance* * The print head cannot be sure to unplug the cable connecting to hold the connector by ...or in the index display mode. - You can make a standard print from the Digital Camera" on the digital camera. For print error messages, refer to the computer, then align the print head. Advanced Printing Note z For the digital camera operation and troubleshooting, refer to your ...
i960 Quick Start Guide
Page 31
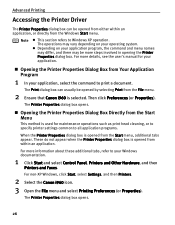
... your operating system. For non-XP Windows, click Start, select Settings, and then Printers. 2 Select the Canon i960 icon. 3 Open the File menu and select Printing Preferences (or Properties). For more information about these additional tabs, refer to your application program, the command and...Depending on your application, select the command to print a document. For more details, see the user's manual for maintenance operations such as print head cleaning, or to specify printer settings common to Windows XP operation. The Print dialog box can be more steps involved in opening...
... your operating system. For non-XP Windows, click Start, select Settings, and then Printers. 2 Select the Canon i960 icon. 3 Open the File menu and select Printing Preferences (or Properties). For more information about these additional tabs, refer to your application program, the command and...Depending on your application, select the command to print a document. For more details, see the user's manual for maintenance operations such as print head cleaning, or to specify printer settings common to Windows XP operation. The Print dialog box can be more steps involved in opening...

i960 Quick Start Guide
Page 52
... tank. (1) Unpack the new ink tank and pull off the orange tape. (2) Remove the orange protective cap from the bottom of ink, replace it . 47 Printing Maintenance „ Replacing Ink Tanks When an ink tank runs out of the ink tank and discard it using the following steps. 1 Ensure that the... printer is on, and then open the front cover. remove only the ink tank. The print head holder moves to the center. 2 Remove the empty ink tank. (1) Push the tab and remove the ink tank. Do not touch the lock lever;
... tank. (1) Unpack the new ink tank and pull off the orange tape. (2) Remove the orange protective cap from the bottom of ink, replace it . 47 Printing Maintenance „ Replacing Ink Tanks When an ink tank runs out of the ink tank and discard it using the following steps. 1 Ensure that the... printer is on, and then open the front cover. remove only the ink tank. The print head holder moves to the center. 2 Remove the empty ink tank. (1) Push the tab and remove the ink tank. Do not touch the lock lever;

i960 Quick Start Guide
Page 53
... used, do not touch the open . Color ink is consumed in the open ink port. 4 Insert the ink tank. (1) Insert the ink tank into the print head holder. (2) Press on the "PUSH" mark until the ink tank snaps firmly into place. 5 Close the front cover. The ink tank installation process is specified... a new one immediately. z When an ink tank runs out of ink tanks as this may cause the ink to maintain the printer's capabilities. The print head holder moves to dry out and the printer may not be ejected correctly. If there remains a part of its first use an ink tank within ...
... used, do not touch the open . Color ink is consumed in the open ink port. 4 Insert the ink tank. (1) Insert the ink tank into the print head holder. (2) Press on the "PUSH" mark until the ink tank snaps firmly into place. 5 Close the front cover. The ink tank installation process is specified... a new one immediately. z When an ink tank runs out of ink tanks as this may cause the ink to maintain the printer's capabilities. The print head holder moves to dry out and the printer may not be ejected correctly. If there remains a part of its first use an ink tank within ...
i960 Quick Start Guide
Page 54
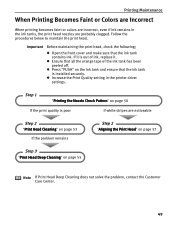
... and make sure that the ink tank is installed securely. z Increase the Print Quality setting in the ink tanks, the print head nozzles are noticeable Step 2 "Print Head Cleaning" on page 53 If the problem remains Step 2 "Aligning the Print Head" on page 57 Step 3 "Print Head Deep Cleaning" on the ink tank and ensure that the ink tank...
... and make sure that the ink tank is installed securely. z Increase the Print Quality setting in the ink tanks, the print head nozzles are noticeable Step 2 "Print Head Cleaning" on page 53 If the problem remains Step 2 "Aligning the Print Head" on page 57 Step 3 "Print Head Deep Cleaning" on the ink tank and ensure that the ink tank...

i960 Quick Start Guide
Page 55
...Examining the Nozzle Check Pattern" on , load a sheet of Letter-sized paper in the printer. Printing Maintenance Printing the Nozzle Check Pattern Print the nozzle check pattern to verify print head alignment. Hold the RESUME/CANCEL button until the POWER lamp flashes twice. 1 With the printer ... (2) Click Nozzle Check. (3) When the confirmation message is displayed, click OK. See "Opening the Printer Properties Dialog Box Directly from the print head nozzles, and to determine whether the ink ejects properly from the Start Menu" on , load a sheet of Letter-sized paper in the printer...
...Examining the Nozzle Check Pattern" on , load a sheet of Letter-sized paper in the printer. Printing Maintenance Printing the Nozzle Check Pattern Print the nozzle check pattern to verify print head alignment. Hold the RESUME/CANCEL button until the POWER lamp flashes twice. 1 With the printer ... (2) Click Nozzle Check. (3) When the confirmation message is displayed, click OK. See "Opening the Printer Properties Dialog Box Directly from the print head nozzles, and to determine whether the ink ejects properly from the Start Menu" on , load a sheet of Letter-sized paper in the printer...

i960 Quick Start Guide
Page 57
... remaining amount of ink is insufficient. (1) (2) (1) White stripes in these patterns indicates that the print head requires alignment. See "Aligning the Print Head" on page 53. (2) Unevenness in this pattern require runing print head cleaning procedure. See "Print Head Cleaning" on page 57. 52 Printing Maintenance „ Examining the Nozzle Check Pattern The nozzle check pattern should appear as...
... remaining amount of ink is insufficient. (1) (2) (1) White stripes in these patterns indicates that the print head requires alignment. See "Aligning the Print Head" on page 53. (2) Unevenness in this pattern require runing print head cleaning procedure. See "Print Head Cleaning" on page 57. 52 Printing Maintenance „ Examining the Nozzle Check Pattern The nozzle check pattern should appear as...

i960 Quick Start Guide
Page 58
... Printer Properties dialog box. Cleaning the print head consumes ink, so perform print head cleaning only when necessary. See "Opening the Printer Properties Dialog Box Directly from the printer itself. Print Head Cleaning Printing Maintenance Clean the print head if you suspect that the printer is displayed, click OK. 53 Note The print head can also be cleaned from the Start...
... Printer Properties dialog box. Cleaning the print head consumes ink, so perform print head cleaning only when necessary. See "Opening the Printer Properties Dialog Box Directly from the printer itself. Print Head Cleaning Printing Maintenance Clean the print head if you suspect that the printer is displayed, click OK. 53 Note The print head can also be cleaned from the Start...

i960 Quick Start Guide
Page 59
... printer driver was installed, then the Applications folder, and then the Utilities folder. (2) Double-click the Print Center icon. (3) Select i960 from the Name list and click Configure. (4) Select i960 from the Product list and click Select. 3 Start Print Head Cleaning. (1) Select Cleaning from the pull-down menu. (2) Click Cleaning. (3) When the confirmation message is...
... printer driver was installed, then the Applications folder, and then the Utilities folder. (2) Double-click the Print Center icon. (3) Select i960 from the Name list and click Configure. (4) Select i960 from the Product list and click Select. 3 Start Print Head Cleaning. (1) Select Cleaning from the pull-down menu. (2) Click Cleaning. (3) When the confirmation message is...

i960 Quick Start Guide
Page 60
Print Head Deep Cleaning Printing Maintenance If print quality does not improve by standard print head cleaning, try performing print head deep cleaning, which is completed. Print head deep cleaning consumes ink, so perform this procedure only when necessary. 1 Ensure that the printer is on page 26. 3 Start Print Head Deep Cleaning. (1) Click...2 Open the Printer Properties dialog box. Do not perform any other operation until the print head deep cleaning is a more powerful process. Print head deep cleaning starts when the POWER lamp starts blinking. This takes about one minute. 55
Print Head Deep Cleaning Printing Maintenance If print quality does not improve by standard print head cleaning, try performing print head deep cleaning, which is completed. Print head deep cleaning consumes ink, so perform this procedure only when necessary. 1 Ensure that the printer is on page 26. 3 Start Print Head Deep Cleaning. (1) Click...2 Open the Printer Properties dialog box. Do not perform any other operation until the print head deep cleaning is a more powerful process. Print head deep cleaning starts when the POWER lamp starts blinking. This takes about one minute. 55

i960 Quick Start Guide
Page 61
... the printer driver was installed, the Applications folder, and then the Utilities folder. (2) Double-click the Print Center icon. (3) Select i960 from the Name list and click Configure. (4) Select i960 from the Product list and click Select. 3 Start Print Head Deep Cleaning. (1) Select Cleaning from the pull-down menu. (2) Click Deep Cleaning. (3) When the confirmation...
... the printer driver was installed, the Applications folder, and then the Utilities folder. (2) Double-click the Print Center icon. (3) Select i960 from the Name list and click Configure. (4) Select i960 from the Product list and click Select. 3 Start Print Head Deep Cleaning. (1) Select Cleaning from the pull-down menu. (2) Click Deep Cleaning. (3) When the confirmation...

i960 Quick Start Guide
Page 62
... 57 This section deals with the manual print head alignment that the ink tanks are correctly installed. 1 With the printer on, load a sheet of Letter-sized papers in the color registration. Note Ensure that allows you to print without shifts in the printer. 2 Open ...the Printer Properties dialog box. See "Opening the Printer Properties Dialog Box Directly from the Start Menu" on simple (semi-automatic) print head alignment, refer to the Easy Setup Instructions. Aligning the Print Head Printing Maintenance Aligning the print head ...
... 57 This section deals with the manual print head alignment that the ink tanks are correctly installed. 1 With the printer on, load a sheet of Letter-sized papers in the color registration. Note Ensure that allows you to print without shifts in the printer. 2 Open ...the Printer Properties dialog box. See "Opening the Printer Properties Dialog Box Directly from the Start Menu" on simple (semi-automatic) print head alignment, refer to the Easy Setup Instructions. Aligning the Print Head Printing Maintenance Aligning the print head ...

i960 Quick Start Guide
Page 63
When the confirmation message is displayed, click OK. (4) Click Print Head Alignment. (5) When the confirmation message is displayed, click OK. (6) After the pattern is printed, click Yes. 58 Printing Maintenance (3) Select Align heads manually check box, and then click Send.
When the confirmation message is displayed, click OK. (4) Click Print Head Alignment. (5) When the confirmation message is displayed, click OK. (6) After the pattern is printed, click Yes. 58 Printing Maintenance (3) Select Align heads manually check box, and then click Send.

i960 Quick Start Guide
Page 64
Printing Maintenance (1) Look at the print out. From the patterns, select the most even, least irregular patterns and enter their numbers. (2) Enter the numbers. (3) Click OK. (4) Click OK. 59 4 Align the Print Head.
Printing Maintenance (1) Look at the print out. From the patterns, select the most even, least irregular patterns and enter their numbers. (2) Enter the numbers. (3) Click OK. (4) Click OK. 59 4 Align the Print Head.

i960 Quick Start Guide
Page 65
...displayed, click OK. 60 When the confirmation messages is dispayed, click OK. (3) Select Test Print from the pull-down menu. (2) Select Align heads manually check box, and then click Send. Printing Maintenance 1 With the printer on, load a sheet of Letter-sized paper in the printer... the Applications folder, and then the Utilities folder. (2) Double-click the Print Center icon. (3) Select i960 from the Name list and click Configure. (4) Select i960 from the Product list and click Select. 3 Print the pattern. (1) Select Custom Settings from the pulldown menu. (4) Click Print Head Alignment.
...displayed, click OK. 60 When the confirmation messages is dispayed, click OK. (3) Select Test Print from the pull-down menu. (2) Select Align heads manually check box, and then click Send. Printing Maintenance 1 With the printer on, load a sheet of Letter-sized paper in the printer... the Applications folder, and then the Utilities folder. (2) Double-click the Print Center icon. (3) Select i960 from the Name list and click Configure. (4) Select i960 from the Product list and click Select. 3 Print the pattern. (1) Select Custom Settings from the pulldown menu. (4) Click Print Head Alignment.

i960 Quick Start Guide
Page 66
From the patterns, select the most even, least irregular patterns and enter their numbers. (2) Enter the numbers. (3) Click Send. (4) Click Quit. 61 Printing Maintenance (1) Look at the print out. 4 Align the Print Head.
From the patterns, select the most even, least irregular patterns and enter their numbers. (2) Enter the numbers. (3) Click Send. (4) Click Quit. 61 Printing Maintenance (1) Look at the print out. 4 Align the Print Head.

i960 Quick Start Guide
Page 69
...check pattern to check for higher print quality. 1. Print Quality not set the Print Quality setting to set properly In the Print dialog box, Select Quality & Media from the nozzle check pattern, clean the print head. See "Aligning the Print Head" on page 44. Media not loaded with the correct print side facing up. If a ...is not seated properly/Ink tank is empty Try This Check that the ink tanks are in the print head and reseat them if necessary. Check to the Fine end. 64 the print-side up menu, and then confirm that the Media Type selected matches the paper loaded. Be ...
...check pattern to check for higher print quality. 1. Print Quality not set the Print Quality setting to set properly In the Print dialog box, Select Quality & Media from the nozzle check pattern, clean the print head. See "Aligning the Print Head" on page 44. Media not loaded with the correct print side facing up. If a ...is not seated properly/Ink tank is empty Try This Check that the ink tanks are in the print head and reseat them if necessary. Check to the Fine end. 64 the print-side up menu, and then confirm that the Media Type selected matches the paper loaded. Be ...

i960 Quick Start Guide
Page 71
...Opening the Printer Properties Dialog Box Directly from the Go menu. 2. Click Yes when the confirmation message appears. The print job is any. The print head tends to End of Job 1. Click the Maintenance tab and then Start Status Monitor. 3. Note In Windows Me, ...Windows 98 Click to select an undesired document and select Purge Print Documents in the Printer menu. 5. Cannot Print to overheat when printing continuously for long periods of time. Double-click i960...
...Opening the Printer Properties Dialog Box Directly from the Go menu. 2. Click Yes when the confirmation message appears. The print job is any. The print head tends to End of Job 1. Click the Maintenance tab and then Start Status Monitor. 3. Note In Windows Me, ...Windows 98 Click to select an undesired document and select Purge Print Documents in the Printer menu. 5. Cannot Print to overheat when printing continuously for long periods of time. Double-click i960...

i960 Quick Start Guide
Page 75
... that this error still remains, the print head may need to correct the error. Print head not installed / Print head not installed correctly / Defective print head Install the print head. If this tank is nearly full. Press the RESUME/CANCEL button to resume printing with an empty ink tank. Troubleshooting ...printer Disconnect the camera cable, press the printer's RESUME/CANCEL button and reconnect the cable. After reinstalling the print head, you continue printing with this printer. Count the flashes and take the appropriate action to realign it with this printer. 70 ...
... that this error still remains, the print head may need to correct the error. Print head not installed / Print head not installed correctly / Defective print head Install the print head. If this tank is nearly full. Press the RESUME/CANCEL button to resume printing with an empty ink tank. Troubleshooting ...printer Disconnect the camera cable, press the printer's RESUME/CANCEL button and reconnect the cable. After reinstalling the print head, you continue printing with this printer. Count the flashes and take the appropriate action to realign it with this printer. 70 ...


