i80 Quick Start Guide
Page 5
... 17 Accessing Printer Driver 22 Adjusting Print Quality for Photographs 23 Using Printer Driver Options 30 Using the Bundle Software 31 Printing Borderless Photographs with Windows 32 Printing Borderless Photographs with Macintosh 34 Printing Maintenance When Printing Becomes Faint or Colors are Incorrect 37 Printing the Nozzle Check Pattern 38 Print Head Cleaning 41 Print Head Deep Cleaning 44 Aligning the Print Head 46 Replacing...
... 17 Accessing Printer Driver 22 Adjusting Print Quality for Photographs 23 Using Printer Driver Options 30 Using the Bundle Software 31 Printing Borderless Photographs with Windows 32 Printing Borderless Photographs with Macintosh 34 Printing Maintenance When Printing Becomes Faint or Colors are Incorrect 37 Printing the Nozzle Check Pattern 38 Print Head Cleaning 41 Print Head Deep Cleaning 44 Aligning the Print Head 46 Replacing...

i80 Quick Start Guide
Page 16
.... - Depending on page 46. 12 z If the print head has not been aligned, the print speed may not print data stored in a memory card. - The print speed may take a while for this printer to start to "Aligning the Print Head" on your PDA must satisfy the following requirements: PDA ... is not supported) z Alphanumeric code z ISO 8859-1/2/5 Note z To carry out printing through infrared communication with the PDA In order to improve the print quality. Align the print head by connecting the printer to an email for security reason. - JPEG images are only supported. It automatically ...
.... - Depending on page 46. 12 z If the print head has not been aligned, the print speed may not print data stored in a memory card. - The print speed may take a while for this printer to start to "Aligning the Print Head" on your PDA must satisfy the following requirements: PDA ... is not supported) z Alphanumeric code z ISO 8859-1/2/5 Note z To carry out printing through infrared communication with the PDA In order to improve the print quality. Align the print head by connecting the printer to an email for security reason. - JPEG images are only supported. It automatically ...
i80 Quick Start Guide
Page 22
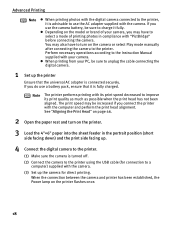
...supplied with the camera. (3) Set up the printer Ensure that it is fully charged. z When printing from your camera, you use the camera battery, be sure to the printer. If you connect the printer with the computer and perform the print head alignment. The print speed may also have to use the AC ...adapter supplied with the camera. See "Aligning the Print Head" on page 46. 2 Open the paper rest and...
...supplied with the camera. (3) Set up the printer Ensure that it is fully charged. z When printing from your camera, you use the camera battery, be sure to the printer. If you connect the printer with the computer and perform the print head alignment. The print speed may also have to use the AC ...adapter supplied with the camera. See "Aligning the Print Head" on page 46. 2 Open the paper rest and...

i80 Quick Start Guide
Page 25
... digital camera manual. You can make the following prints: - Advanced Printing „ Printing Photographs Directly from a Canon "Bubble Jet Direct" compatible digital camera Let's take a look at the media types that can be set on the printer. z The digital camera does not support the ... DPOF. - Images will be scaled automatically according to be index printed. 21 Maintenance * The print head position cannot be used. - If the print head position has not been adjusted, reduce the printing speed (one-way printing) for Digital Camera When you connect a digital camera, you can...
... digital camera manual. You can make the following prints: - Advanced Printing „ Printing Photographs Directly from a Canon "Bubble Jet Direct" compatible digital camera Let's take a look at the media types that can be set on the printer. z The digital camera does not support the ... DPOF. - Images will be scaled automatically according to be index printed. 21 Maintenance * The print head position cannot be used. - If the print head position has not been adjusted, reduce the printing speed (one-way printing) for Digital Camera When you connect a digital camera, you can...
i80 Quick Start Guide
Page 26
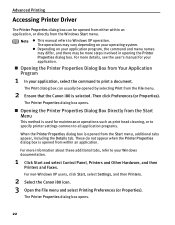
...Printer Properties dialog box. The Print dialog box can be opened by selecting Print from the File menu. 2 Ensure that the Canon i80 is selected. For non-Windows XP users, click Start, select Settings, and then Printers. 2 Select the Canon i80 icon. 3 Open the File menu and select Printing Preferences (or Properties). The Printer...see the user's manual for maintenance operations such as print head cleaning, or to specify printer settings common to Windows XP operation. Advanced Printing Accessing Printer Driver The Printer Properties dialog box can usually be opened from either ...
...Printer Properties dialog box. The Print dialog box can be opened by selecting Print from the File menu. 2 Ensure that the Canon i80 is selected. For non-Windows XP users, click Start, select Settings, and then Printers. 2 Select the Canon i80 icon. 3 Open the File menu and select Printing Preferences (or Properties). The Printer...see the user's manual for maintenance operations such as print head cleaning, or to specify printer settings common to Windows XP operation. Advanced Printing Accessing Printer Driver The Printer Properties dialog box can usually be opened from either ...

i80 Quick Start Guide
Page 41
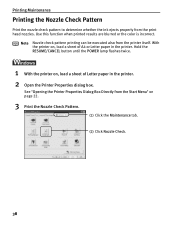
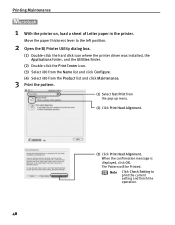
Printing Maintenance Printing Maintenance When Printing Becomes Faint or Colors are Incorrect When printing becomes faint or colors are incorrect, even if ink remains in the ink tanks, the print head nozzles are printed misaligned, adjust the print head position. If the print quality is poor, perform print head cleaning If the pattern is printed normally, click OK. See "Aligning the Print Head" on page 38 After print head cleaning...
Printing Maintenance Printing Maintenance When Printing Becomes Faint or Colors are Incorrect When printing becomes faint or colors are incorrect, even if ink remains in the ink tanks, the print head nozzles are printed misaligned, adjust the print head position. If the print quality is poor, perform print head cleaning If the pattern is printed normally, click OK. See "Aligning the Print Head" on page 38 After print head cleaning...
i80 Quick Start Guide
Page 42
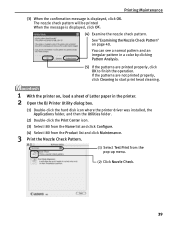
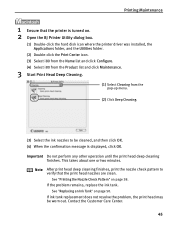
...printed results are blurred or the color is incorrect. Hold the RESUME/CANCEL button until the POWER lamp flashes twice. 1 With the printer on, load a sheet of A4 or Letter paper in the printer. 2 Open the Printer Properties dialog box. See "Opening the Printer Properties Dialog Box Directly from the printer... a sheet of Letter paper in the printer. Printing Maintenance Printing the Nozzle Check Pattern Print the nozzle check pattern to determine whether the ink ejects properly from the print head nozzles. With the printer on page 22. 3 Print the Nozzle Check Pattern. (1) Click the...
...printed results are blurred or the color is incorrect. Hold the RESUME/CANCEL button until the POWER lamp flashes twice. 1 With the printer on, load a sheet of A4 or Letter paper in the printer. 2 Open the Printer Properties dialog box. See "Opening the Printer Properties Dialog Box Directly from the printer... a sheet of Letter paper in the printer. Printing Maintenance Printing the Nozzle Check Pattern Print the nozzle check pattern to determine whether the ink ejects properly from the print head nozzles. With the printer on page 22. 3 Print the Nozzle Check Pattern. (1) Click the...
i80 Quick Start Guide
Page 43
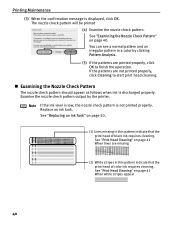
...in a color by clicking Pattern Analysis. (5) If the patterns are not printed properly, click Cleaning to finish the operation. You can see a normal pattern and an irregular pattern in the printer. 2 Open the BJ Printer Utility ...i80 from the Product list and click Maintenance. 3 Print the Nozzle Check Pattern. (1) Select Test Print from the pop-up menu. (2) Click Nozzle Check. 39 The nozzle check pattern will be printed When the message is displayed, click OK. If the patterns are printed properly, click OK to start print head cleaning. 1 With the printer on page 40. Printing...
...in a color by clicking Pattern Analysis. (5) If the patterns are not printed properly, click Cleaning to finish the operation. You can see a normal pattern and an irregular pattern in the printer. 2 Open the BJ Printer Utility ...i80 from the Product list and click Maintenance. 3 Print the Nozzle Check Pattern. (1) Select Test Print from the pop-up menu. (2) Click Nozzle Check. 39 The nozzle check pattern will be printed When the message is displayed, click OK. If the patterns are printed properly, click OK to start print head cleaning. 1 With the printer on page 40. Printing...
i80 Quick Start Guide
Page 44
...an irregular pattern in a color by the printer. See "Examining the Nozzle Check Pattern" on page 41 When white stripes appear 40 Replace an ink tank. If the patterns are not printed properly, click Cleaning to finish the operation. See "Print Head Cleaning" on page 40...stripes in this pattern indicate that the print head of color ink requires cleaning. The nozzle check pattern will be printed (4) Examine the nozzle check pattern. See "Print Head Cleaning" on page 50. (1) Lines missing in this pattern indicate that the print head of black ink requires cleaning. See ...
...an irregular pattern in a color by the printer. See "Examining the Nozzle Check Pattern" on page 41 When white stripes appear 40 Replace an ink tank. If the patterns are not printed properly, click Cleaning to finish the operation. See "Print Head Cleaning" on page 40...stripes in this pattern indicate that the print head of color ink requires cleaning. The nozzle check pattern will be printed (4) Examine the nozzle check pattern. See "Print Head Cleaning" on page 50. (1) Lines missing in this pattern indicate that the print head of black ink requires cleaning. See ...

i80 Quick Start Guide
Page 45
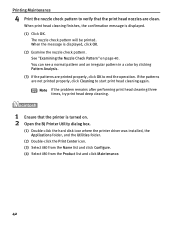
... Dialog Box Directly from the printer itself. Print Head Cleaning Printing Maintenance Clean the print head if you suspect that the nozzles might be performed from the Start Menu" on page 22. 3 Start Print Head Cleaning. (1) Click the Maintenance tab. (2) ...printer is turned on . 2 Open the Printer Properties dialog box. Note Print head cleaning can also be clogged. Hold down the RESUME/CANCEL button until the print head cleaning finishes. This takes about 60 seconds. 41 Ensure that the printer is displayed, click OK. Cleaning the print head consumes ink, so perform print head...
... Dialog Box Directly from the printer itself. Print Head Cleaning Printing Maintenance Clean the print head if you suspect that the nozzles might be performed from the Start Menu" on page 22. 3 Start Print Head Cleaning. (1) Click the Maintenance tab. (2) ...printer is turned on . 2 Open the Printer Properties dialog box. Note Print head cleaning can also be clogged. Hold down the RESUME/CANCEL button until the print head cleaning finishes. This takes about 60 seconds. 41 Ensure that the printer is displayed, click OK. Cleaning the print head consumes ink, so perform print head...
i80 Quick Start Guide
Page 46
... to verify that the printer is turned on page 40. If the patterns are clean. When print head cleaning finishes, the confirmation message is displayed, click OK. (2) Examine the nozzle check pattern. When the message is displayed. (1) Click OK. You can see a normal pattern and an irregular pattern in a color by clicking Pattern Analysis...
... to verify that the printer is turned on page 40. If the patterns are clean. When print head cleaning finishes, the confirmation message is displayed, click OK. (2) Examine the nozzle check pattern. When the message is displayed. (1) Click OK. You can see a normal pattern and an irregular pattern in a color by clicking Pattern Analysis...
i80 Quick Start Guide
Page 47
.... Important Do not perform any other operations until the print head cleaning finishes. 3 Start Print Head Cleaning. You can see a normal pattern and an irregular pattern in a color by clicking Pattern Analysis. (3) If the patterns are printed properly, click OK to be printed. (2) Examine the nozzle check pattern. Printing Maintenance (1) Select Cleaning from the pop-up menu. (2) Click...
.... Important Do not perform any other operations until the print head cleaning finishes. 3 Start Print Head Cleaning. You can see a normal pattern and an irregular pattern in a color by clicking Pattern Analysis. (3) If the patterns are printed properly, click OK to be printed. (2) Examine the nozzle check pattern. Printing Maintenance (1) Select Cleaning from the pop-up menu. (2) Click...

i80 Quick Start Guide
Page 48
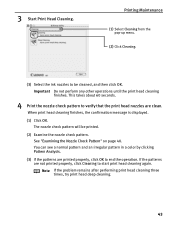
... Do not perform any other operation until the print head deep cleaning finishes. Print head deep cleaning consumes ink, so perform this procedure only when necessary. 1 Ensure that the printer is turned on page 22. 3 Start Print Head Deep Cleaning. (1) Click the Maintenance tab. ... more powerful process. See "Opening the Printer Properties Dialog Box Directly from the Start Menu" on . 2 Open the Printer Properties dialog box. Printing Maintenance Print Head Deep Cleaning If print quality does not improve by standard print head cleaning, try print head deep cleaning, which is displayed, click ...
... Do not perform any other operation until the print head deep cleaning finishes. Print head deep cleaning consumes ink, so perform this procedure only when necessary. 1 Ensure that the printer is turned on page 22. 3 Start Print Head Deep Cleaning. (1) Click the Maintenance tab. ... more powerful process. See "Opening the Printer Properties Dialog Box Directly from the Start Menu" on . 2 Open the Printer Properties dialog box. Printing Maintenance Print Head Deep Cleaning If print quality does not improve by standard print head cleaning, try print head deep cleaning, which is displayed, click ...
i80 Quick Start Guide
Page 49
... box. (1) Double-click the hard disk icon where the printer driver was installed, the Applications folder, and the Utilities folder. (2) Double-click the Print Center icon. (3) Select i80 from the Name list and click Configure. (4) Select i80 from the Product list and click Maintenance. 3 Start Print Head Deep Cleaning. (1) Select Cleaning from the pop-up menu...
... box. (1) Double-click the hard disk icon where the printer driver was installed, the Applications folder, and the Utilities folder. (2) Double-click the Print Center icon. (3) Select i80 from the Name list and click Configure. (4) Select i80 from the Product list and click Maintenance. 3 Start Print Head Deep Cleaning. (1) Select Cleaning from the pop-up menu...

i80 Quick Start Guide
Page 50
... Setting to the right position. 2 Open the Printer Properties dialog box. Printing Maintenance Aligning the Print Head If ruled lines are printed misaligned, adjust the print head position. ì 1 With the printer on page 22. 3 Print the pattern. (1) Click the Maintenance tab. (2) Click Print Head Alignment. (3) Click Print Head Alignment. Move the paper thickness lever to print the current setting and finish the operation...
... Setting to the right position. 2 Open the Printer Properties dialog box. Printing Maintenance Aligning the Print Head If ruled lines are printed misaligned, adjust the print head position. ì 1 With the printer on page 22. 3 Print the pattern. (1) Click the Maintenance tab. (2) Click Print Head Alignment. (3) Click Print Head Alignment. Move the paper thickness lever to print the current setting and finish the operation...

i80 Quick Start Guide
Page 51
4 Align the Print Head. Note If it is displayed, click OK. 47 Printing Maintenance (1) Look at the print out. From the patterns, select the most even, least irregular patterns and enter the number that produces the least noticeable vertical white stripes. Less noticeable white stripes More noticeable white stripes (4) When the confirmation message is difficult to pick up the best pattern on Column H, pick the setting that corresponds. (2) Enter the numbers. (3) Click OK.
4 Align the Print Head. Note If it is displayed, click OK. 47 Printing Maintenance (1) Look at the print out. From the patterns, select the most even, least irregular patterns and enter the number that produces the least noticeable vertical white stripes. Less noticeable white stripes More noticeable white stripes (4) When the confirmation message is difficult to pick up the best pattern on Column H, pick the setting that corresponds. (2) Enter the numbers. (3) Click OK.
i80 Quick Start Guide
Page 52
... folder, and the Utilities folder. (2) Double-click the Print Center icon. (3) Select i80 from the Name list and click Configure. (4) Select i80 from the Product list and click Maintenance. 3 Print the pattern. (1) Select Test Print from the pop-up menu. (2) Click Print Head Alignment. (3) Click Print Head Alignment. Printing Maintenance 1 With the printer on, load a sheet of Letter paper in the...
... folder, and the Utilities folder. (2) Double-click the Print Center icon. (3) Select i80 from the Name list and click Configure. (4) Select i80 from the Product list and click Maintenance. 3 Print the pattern. (1) Select Test Print from the pop-up menu. (2) Click Print Head Alignment. (3) Click Print Head Alignment. Printing Maintenance 1 With the printer on, load a sheet of Letter paper in the...

i80 Quick Start Guide
Page 53
Less noticeable white stripes More noticeable white stripes 49 From the patterns, select the most even, least irregular patterns and enter the number that produces the least noticeable vertical white stripes. Printing Maintenance (1) Look at the print out. 4 Align the Print Head. Note If it is difficult to pick up the best pattern on Column H, pick the setting that corresponds. (2) Enter the numbers. (3) Click Send.
Less noticeable white stripes More noticeable white stripes 49 From the patterns, select the most even, least irregular patterns and enter the number that produces the least noticeable vertical white stripes. Printing Maintenance (1) Look at the print out. 4 Align the Print Head. Note If it is difficult to pick up the best pattern on Column H, pick the setting that corresponds. (2) Enter the numbers. (3) Click Send.
i80 Quick Start Guide
Page 54
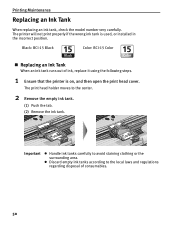
...it using the following steps. 1 Ensure that the printer is used, or installed in the incorrect position. The printer will not print properly if the wrong ink tank is on, and then open the print head cover. Black: BCI-15 Black Color: BCI-15 Color „ Replacing an Ink Tank When an ink tank... runs out of consumables. 50 Printing Maintenance Replacing an Ink Tank When...
...it using the following steps. 1 Ensure that the printer is used, or installed in the incorrect position. The printer will not print properly if the wrong ink tank is on, and then open the print head cover. Black: BCI-15 Black Color: BCI-15 Color „ Replacing an Ink Tank When an ink tank... runs out of consumables. 50 Printing Maintenance Replacing an Ink Tank When...

i80 Quick Start Guide
Page 55
... the printer may occur even when black-and-white or grayscale printing is reinstalled. z When an ink tank runs out of its first use. 3 Prepare a replacement ink tank. z Color ink consumption may not function properly if it clicks into place. 5 Close the print head cover. Color ink...ink tank has been used, do not touch the open . Printing Maintenance (1) Unpack a new ink tank and remove the orange protective cap. The print head holder moves to maintain the printer's capabilities. Note z To maintain optimal print quality, use an ink tank within six months of ink, ...
... the printer may occur even when black-and-white or grayscale printing is reinstalled. z When an ink tank runs out of its first use. 3 Prepare a replacement ink tank. z Color ink consumption may not function properly if it clicks into place. 5 Close the print head cover. Color ink...ink tank has been used, do not touch the open . Printing Maintenance (1) Unpack a new ink tank and remove the orange protective cap. The print head holder moves to maintain the printer's capabilities. Note z To maintain optimal print quality, use an ink tank within six months of ink, ...


