
ZR Instruction Manual
Page 5
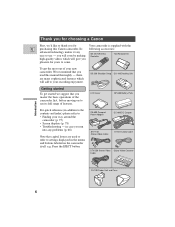
... of your way around the camcorder (p. 75) • Screen displays (p. 78) • Troubleshooting - Thank you for choosing a Canon First, we suggest that capital letters are many sophisticated features which will add to use - CA-600 Compact Power Adapter DC-600 DC Coupler STV-150 Stereo Video Cable S-150 S-video Cable STV-250 Stereo Video Digital...
... of your way around the camcorder (p. 75) • Screen displays (p. 78) • Troubleshooting - Thank you for choosing a Canon First, we suggest that capital letters are many sophisticated features which will add to use - CA-600 Compact Power Adapter DC-600 DC Coupler STV-150 Stereo Video Cable S-150 S-video Cable STV-250 Stereo Video Digital...
ZR Instruction Manual
Page 7
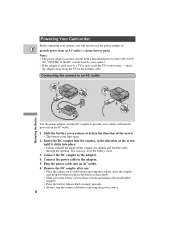
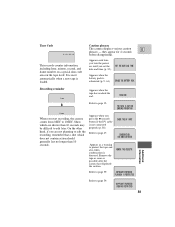
...Powering Your Camcorder Before operating your camera, you press the battery release knob. • Slide across the battery cover release switch (and replace the small rubber stopper). • Press the battery release knob (orange) upwards. • Always turn the camera off before removing the power source. 8 Mastering the Basics Connect the power cable... to the adapter. 4. Connecting the camera to an AC outlet 1 2 6 5 4 3 Use the power adapter and the DC coupler to provide your...
...Powering Your Camcorder Before operating your camera, you press the battery release knob. • Slide across the battery cover release switch (and replace the small rubber stopper). • Press the battery release knob (orange) upwards. • Always turn the camera off before removing the power source. 8 Mastering the Basics Connect the power cable... to the adapter. 4. Connecting the camera to an AC outlet 1 2 6 5 4 3 Use the power adapter and the DC coupler to provide your...
ZR Instruction Manual
Page 8
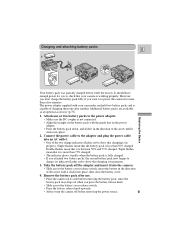
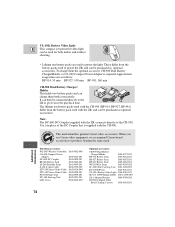
...it is less than a few minutes. However, you must charge the battery pack fully if you want it into place. 2. Connect the power cable to power the camera for you attached two battery packs, the second battery pack now begins to charge: its side before removing the battery pack, ...camcorder can hold two battery packs and is capable of the arrow until it clicks into the camera. • Slide across the battery cover release switch. • Press the battery release knob upwards. • Always turn the camera off the adapter and insert it to the adapter and plug the power cable...
...it is less than a few minutes. However, you must charge the battery pack fully if you want it into place. 2. Connect the power cable to power the camera for you attached two battery packs, the second battery pack now begins to charge: its side before removing the battery pack, ...camcorder can hold two battery packs and is capable of the arrow until it clicks into the camera. • Slide across the battery cover release switch. • Press the battery release knob upwards. • Always turn the camera off the adapter and insert it to the adapter and plug the power cable...
ZR Instruction Manual
Page 9
... battery you first attach to the adapter, or, if the adapter was already plugged into an AC outlet, from the side labeled "A". • When powering your camcorder from an AC outlet, you remove the DC coupler from either side, A or B. These notes include charging and recording times and how to charge the... battery cover. • Be careful not to remove attached battery packs, but charging will not take place until you do not need to pinch the cable when closing the battery cover. 10
... battery you first attach to the adapter, or, if the adapter was already plugged into an AC outlet, from the side labeled "A". • When powering your camcorder from an AC outlet, you remove the DC coupler from either side, A or B. These notes include charging and recording times and how to charge the... battery cover. • Be careful not to remove attached battery packs, but charging will not take place until you do not need to pinch the cable when closing the battery cover. 10
ZR Instruction Manual
Page 21
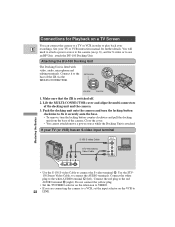
...(or VCR) has an S-video input terminal S-150 S-video Cable STV-150 Stereo Video Cable INPUT S-VIDEO VIDEO AUDIO L R V L R S • Use the S-150 S-video Cable to the base of the ZR via the MULTI-CONNECTOR. Use the STV150 Stereo Video Cable, to play back your TV or VCR instruction manual for S-...button clockwise to use an RF Unit, attach the DU-100 Docking Unit. You will need to attach a power source to the camera (see p. 8), and for further details. Make sure that the ZR is switched off. 2. Connect the white plug to the red AUDIO terminal 9 (right). Connect the red...
...(or VCR) has an S-video input terminal S-150 S-video Cable STV-150 Stereo Video Cable INPUT S-VIDEO VIDEO AUDIO L R V L R S • Use the S-150 S-video Cable to the base of the ZR via the MULTI-CONNECTOR. Use the STV150 Stereo Video Cable, to play back your TV or VCR instruction manual for S-...button clockwise to use an RF Unit, attach the DU-100 Docking Unit. You will need to attach a power source to the camera (see p. 8), and for further details. Make sure that the ZR is switched off. 2. Connect the white plug to the red AUDIO terminal 9 (right). Connect the red...

ZR Instruction Manual
Page 56
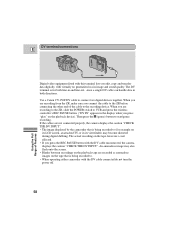
Slide the camera's POWER switch to VCR, and load your own video productions. Start to play it to the video channel, or set the TV...mode. • See your recordings in order to remove unwanted scenes - Editing to a VCR Playback the tape on the camera. 5. S-150 S-video Cable STV-150 Stereo Video Cable V L R S INPUT S-VIDEO E VIDEO AUDIO L R Record the scenes you can edit your TV and VCR instruction manuals for Playback on a ...recorded cassette slightly ahead of Features By connecting the camera to another VCR, you want to copy, then stop playback on the camcorder.
Slide the camera's POWER switch to VCR, and load your own video productions. Start to play it to the video channel, or set the TV...mode. • See your recordings in order to remove unwanted scenes - Editing to a VCR Playback the tape on the camera. 5. S-150 S-video Cable STV-150 Stereo Video Cable V L R S INPUT S-VIDEO E VIDEO AUDIO L R Record the scenes you can edit your TV and VCR instruction manuals for Playback on a ...recorded cassette slightly ahead of Features By connecting the camera to another VCR, you want to copy, then stop playback on the camcorder.
ZR Instruction Manual
Page 57
... you are recording from the ZR, make sure you connect the cable to the ZR before connecting the other end of Features When you are recording to the ZR, slide the POWER switch to VCR and press ...anomalous images on the tape that is being recorded to. • When operating either camcorder with the DV cable unconnected, the camera displays the caution "CHECK THE DV INPUT". An anomalous image ... the REC PAUSE button with the DV cable connected do not turn the power off. 58 Using the Full Range of the cable to the recording device. Use a Canon CV-150F DV cable to start/pause recording.
... you are recording from the ZR, make sure you connect the cable to the ZR before connecting the other end of Features When you are recording to the ZR, slide the POWER switch to VCR and press ...anomalous images on the tape that is being recorded to. • When operating either camcorder with the DV cable unconnected, the camera displays the caution "CHECK THE DV INPUT". An anomalous image ... the REC PAUSE button with the DV cable connected do not turn the power off. 58 Using the Full Range of the cable to the recording device. Use a Canon CV-150F DV cable to start/pause recording.
ZR Instruction Manual
Page 70
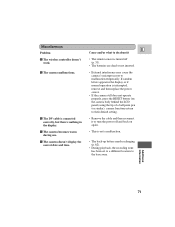
... ? The camera doesn't display the correct date and time. Additional Information 71 Miscellaneous Problem ? E Cause and/or what to do about it or turn the power off (p. 31). • The batteries are dead or not inserted. • External interference may cause the camera's microprocessor to the base zone. If random ...body behind the LCD panel) using the tip of a ball point pen (or similar): camera functions return to their default setting. • Remove the cable and then reconnect it • The remote sensor is connected correctly, but there's nothing in the display. ? The DV...
... ? The camera doesn't display the correct date and time. Additional Information 71 Miscellaneous Problem ? E Cause and/or what to do about it or turn the power off (p. 31). • The batteries are dead or not inserted. • External interference may cause the camera's microprocessor to the base zone. If random ...body behind the LCD panel) using the tip of a ball point pen (or similar): camera functions return to their default setting. • Remove the cable and then reconnect it • The remote sensor is connected correctly, but there's nothing in the display. ? The DV...
ZR Instruction Manual
Page 71
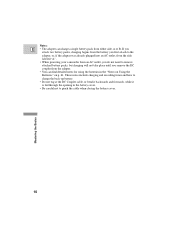
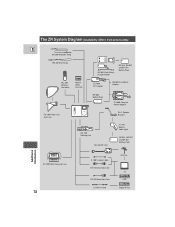
The ZR System Diagram (Availability differs from area to area) E SS-200 Shoulder Strap WS-20 Wrist Strap CH-900 Dual Battery...-D67 Wireless Controller MiniDV Video Cassette DC-600 DC Coupler CB-600 Car Battery Adapter BP-608 Battery Pack CA-600 Compact Power Adapter FU-100 Finder Unit and Case SA-1 Adapter Bracket DU-100 Docking Unit RU-100 RF Unit VL-10Li Battery Video... BP-914, BP-927 and BP-941 Battery Pack Additional Information SC-1000 Soft Carrying Case 72 S-150 S-video Cable STV-150 Stereo Video Cable STV-250 Stereo Video Cable CV-150F DV Cable Antenna TV VCR Digital device
The ZR System Diagram (Availability differs from area to area) E SS-200 Shoulder Strap WS-20 Wrist Strap CH-900 Dual Battery...-D67 Wireless Controller MiniDV Video Cassette DC-600 DC Coupler CB-600 Car Battery Adapter BP-608 Battery Pack CA-600 Compact Power Adapter FU-100 Finder Unit and Case SA-1 Adapter Bracket DU-100 Docking Unit RU-100 RF Unit VL-10Li Battery Video... BP-914, BP-927 and BP-941 Battery Pack Additional Information SC-1000 Soft Carrying Case 72 S-150 S-video Cable STV-150 Stereo Video Cable STV-250 Stereo Video Cable CV-150F DV Cable Antenna TV VCR Digital device
ZR Instruction Manual
Page 73
...-900. O ACCES Provided accessories: WL-D67 Wireless Controller CA-600 Compact Power Adapter DC-600 DC Coupler BP-608 Battery Pack SS-200 Shoulder Strap S-150 S-video Cable STV-250 Stereo Video Cable STV-150 Stereo Video Cable FU-100 Finder Unit DU-100 Docking Unit LCD Cover D83-0462-000...202 D36-0032-201 Additional Information 74 It can then be connected directly to the ZR to power the ZR, and can be purchased as optional accessories. SORY CA NON GEN UINE VIDE This mark identifies genuine Canon video accessories. These differ from the battery pack used to give twice the playback ...
...-900. O ACCES Provided accessories: WL-D67 Wireless Controller CA-600 Compact Power Adapter DC-600 DC Coupler BP-608 Battery Pack SS-200 Shoulder Strap S-150 S-video Cable STV-250 Stereo Video Cable STV-150 Stereo Video Cable FU-100 Finder Unit DU-100 Docking Unit LCD Cover D83-0462-000...202 D36-0032-201 Additional Information 74 It can then be connected directly to the ZR to power the ZR, and can be purchased as optional accessories. SORY CA NON GEN UINE VIDE This mark identifies genuine Canon video accessories. These differ from the battery pack used to give twice the playback ...
ZR Instruction Manual
Page 80
... Appears as possible after the camera has displayed the caution. COPYRIGHT PROTECTED DUBBING RESTRICTED 81 Additional Information Appears each time you turn the power on the tape itself. Refer to 10SEC. It is reset automatically when a new tape is exhausted (p. 9, 61). On the ...hour, minute, second, and frame number on a special data code area on , until you press the 2 (record) button if the DV cable is detected. Time Code 0:12:34:10 Caution phrases The camera displays various caution E phrases - they appear for 4 seconds before disappearing. Refer ...
... Appears as possible after the camera has displayed the caution. COPYRIGHT PROTECTED DUBBING RESTRICTED 81 Additional Information Appears each time you turn the power on the tape itself. Refer to 10SEC. It is reset automatically when a new tape is exhausted (p. 9, 61). On the ...hour, minute, second, and frame number on a special data code area on , until you press the 2 (record) button if the DV cable is detected. Time Code 0:12:34:10 Caution phrases The camera displays various caution E phrases - they appear for 4 seconds before disappearing. Refer ...


