Console Software Operations Manual
Page 2
...Canon camcorder compatible with CONSOLE iii Required Accessories iii System Requirements iii Preparation (Installation, Connection, Launch, Activation) Installing the Software and the Designated Drivers 1-1 Installing the AV/C Camera Storage Subunit-WIA Driver 1-2 Connecting the Camcorder 1-3 Connecting the Camcorder... Bar ...2-1 Camcorder Status 2-2 Toolbar...2-2 Workspace 2-3 Camcorder Screen 2-3 [Option settings] and [Performance check] Video Folder and Recording Settings 3-1 [General] Tab ...3-1 [DV Rec] Tab ...3-2 [HDV Rec] Tab...3-2 [Performance check 3-3 Camera and Picture ...
...Canon camcorder compatible with CONSOLE iii Required Accessories iii System Requirements iii Preparation (Installation, Connection, Launch, Activation) Installing the Software and the Designated Drivers 1-1 Installing the AV/C Camera Storage Subunit-WIA Driver 1-2 Connecting the Camcorder 1-3 Connecting the Camcorder... Bar ...2-1 Camcorder Status 2-2 Toolbar...2-2 Workspace 2-3 Camcorder Screen 2-3 [Option settings] and [Performance check] Video Folder and Recording Settings 3-1 [General] Tab ...3-1 [DV Rec] Tab ...3-2 [HDV Rec] Tab...3-2 [Performance check 3-3 Camera and Picture ...
Console Software Operations Manual
Page 4
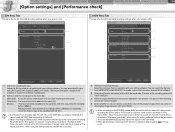
... image using a waveform monitor and a vector scope. • Compare the camcorder image and the recorded image by connecting the camcorder using an IEEE1394 (DV) cable. When the camcorder is available for directly controlling the camcorder. - Handle and grip zoom lever - Camcorder XL H1 XL2 Mode EXT.CONT. Camera Custom Preset Settings × Saving the Custom...
... image using a waveform monitor and a vector scope. • Compare the camcorder image and the recorded image by connecting the camcorder using an IEEE1394 (DV) cable. When the camcorder is available for directly controlling the camcorder. - Handle and grip zoom lever - Camcorder XL H1 XL2 Mode EXT.CONT. Camera Custom Preset Settings × Saving the Custom...
Console Software Operations Manual
Page 8
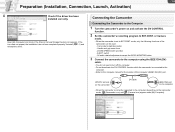
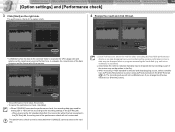
...Camcorder Connecting the Camcorder to the Computer 1 Turn the camcorder's power on and activate the DV CONTROL function. 2 Set the camcorder's recording program to the computer manual for AUDIO MONITOR button 3 Connect the camcorder... function while the camcorder is correctly connected to EXT.CONT. HDV/DV terminal on the camcorder DV cable IEEE1394 port on the camcorder mode, (Camcorder icon) and (Camera icon) appear under...grip zoom lever - or Camera mode. • When the camcorder is set to the computer, depending on the computer • When the camcorder is connected to the ...
...Camcorder Connecting the Camcorder to the Computer 1 Turn the camcorder's power on and activate the DV CONTROL function. 2 Set the camcorder's recording program to the computer manual for AUDIO MONITOR button 3 Connect the camcorder... function while the camcorder is correctly connected to EXT.CONT. HDV/DV terminal on the camcorder DV cable IEEE1394 port on the camcorder mode, (Camcorder icon) and (Camera icon) appear under...grip zoom lever - or Camera mode. • When the camcorder is set to the computer, depending on the computer • When the camcorder is connected to the ...
Console Software Operations Manual
Page 17
...color of the software or consult the software manufacturer. 2 Select a mode for the HDV standard recording settings when you record in HDV. 11 1 2 22 3 4 1 Select the recording file type. For details, refer to the camcorder. When [All pictures] or [I picture and P picture] is selected..., data dropping ( 5-5) may occur. CONSOLE Windows [Option settings] and [Performance check] Camera and Picture ...
...color of the software or consult the software manufacturer. 2 Select a mode for the HDV standard recording settings when you record in HDV. 11 1 2 22 3 4 1 Select the recording file type. For details, refer to the camcorder. When [All pictures] or [I picture and P picture] is selected..., data dropping ( 5-5) may occur. CONSOLE Windows [Option settings] and [Performance check] Camera and Picture ...
Console Software Operations Manual
Page 19
... When CONSOLE executes the performance check, the recording data type used for writing (DV or HDV) will not be executed. When receiving the DV standard data from the camcorder while [Frame] is selected and data dropping occurs, select a smaller size at [Preview ...Resolution] or [I picture only] at [Preview picture] in the [DV Rec] tab. - The performance check cannot be dropped when a program accessing the hard disk (e.g. CONSOLE Windows [Option settings] and [Performance check] Camera...
... When CONSOLE executes the performance check, the recording data type used for writing (DV or HDV) will not be executed. When receiving the DV standard data from the camcorder while [Frame] is selected and data dropping occurs, select a smaller size at [Preview ...Resolution] or [I picture only] at [Preview picture] in the [DV Rec] tab. - The performance check cannot be dropped when a program accessing the hard disk (e.g. CONSOLE Windows [Option settings] and [Performance check] Camera...
Console Software Operations Manual
Page 21
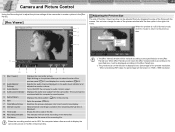
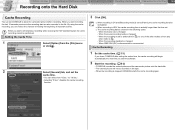
... Picture Control Recording onto the Hard Disk Playback the Recorded Files 4-1 Camera and Picture Control Using the Recording tool to adjust the picture settings of the camcorder to create a picture in the [Rec Panel]. [Rec Viewer] 1 2 3 Adjusting the Preview Size The size of the [Rec Viewer] window can... the file name of the preview resolution. - When [Interval recording] is selected, the remaining interval time is set to HDV, the computer takes a few seconds to display the camcorder picture in [Full Screen] mode, click the mouse to return to the specified size or the [Rec Panel] size....
... Picture Control Recording onto the Hard Disk Playback the Recorded Files 4-1 Camera and Picture Control Using the Recording tool to adjust the picture settings of the camcorder to create a picture in the [Rec Panel]. [Rec Viewer] 1 2 3 Adjusting the Preview Size The size of the [Rec Viewer] window can... the file name of the preview resolution. - When [Interval recording] is selected, the remaining interval time is set to HDV, the computer takes a few seconds to display the camcorder picture in [Full Screen] mode, click the mouse to return to the specified size or the [Rec Panel] size....

Console Software Operations Manual
Page 34
... the different Custom Preset settings. The setting of the selected image to be displayed on the camcorder screen. The images used for the first time in DV and HDV mode, the color bars will be displayed. [Original]: [Image File]: [Play Viewer]: Applies...is captured separately by clicking the button again. CONSOLE Windows [Option settings] and [Performance check] Camera and Picture Control Recording onto the Hard Disk Playback the Recorded Files Camera and Picture Control 4-14 Preset Variation Clicking on the candidate image highlights the corresponding setting. redisplays...
... the different Custom Preset settings. The setting of the selected image to be displayed on the camcorder screen. The images used for the first time in DV and HDV mode, the color bars will be displayed. [Original]: [Image File]: [Play Viewer]: Applies...is captured separately by clicking the button again. CONSOLE Windows [Option settings] and [Performance check] Camera and Picture Control Recording onto the Hard Disk Playback the Recorded Files Camera and Picture Control 4-14 Preset Variation Clicking on the candidate image highlights the corresponding setting. redisplays...

Console Software Operations Manual
Page 36
... magnifying the viewfinder image by -frame image will start /stop may occur. as well. editing software) is located. - Standard DV HDV File Type AVI-Type1 AVI-Type2 MXF MPEG2TS MPEG2ES Creating WAV audio file for recording to a single file depends on the settings of the... recording function, the recorded frame-by pressing the EVF MAGNIFYING button, the beginning of the camcorder and CONSOLE. Data may be lost. - CONSOLE Windows [Option settings] and [Performance check] Camera and Picture Control Recording onto the Hard Disk Playback the Recorded Files 5-1 Recording onto the...
... magnifying the viewfinder image by -frame image will start /stop may occur. as well. editing software) is located. - Standard DV HDV File Type AVI-Type1 AVI-Type2 MXF MPEG2TS MPEG2ES Creating WAV audio file for recording to a single file depends on the settings of the... recording function, the recorded frame-by pressing the EVF MAGNIFYING button, the beginning of the camcorder and CONSOLE. Data may be lost. - CONSOLE Windows [Option settings] and [Performance check] Camera and Picture Control Recording onto the Hard Disk Playback the Recorded Files 5-1 Recording onto the...
Console Software Operations Manual
Page 37
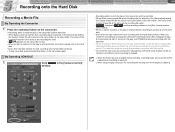
...8226; Even when the tape reaches the end, recording onto the hard disk continues. By Operating CONSOLE 1 Click in the [Camera Control] window. • Recording starts on both the tape in the camcorder and the hard disk. • When [Save custom preset file when recording start] is selected in the [General] tab...the recording file name. • changes to record on the tape, and CONSOLE will keep recording onto the hard disk. • When recording in HDV standard on the tape and hard disk, a new file will be saved in the same folder as another file in the [Rec Viewer] window ...
...8226; Even when the tape reaches the end, recording onto the hard disk continues. By Operating CONSOLE 1 Click in the [Camera Control] window. • Recording starts on both the tape in the camcorder and the hard disk. • When [Save custom preset file when recording start] is selected in the [General] tab...the recording file name. • changes to record on the tape, and CONSOLE will keep recording onto the hard disk. • When recording in HDV standard on the tape and hard disk, a new file will be saved in the same folder as another file in the [Rec Viewer] window ...
Console Software Operations Manual
Page 38
... Start the recording. ( 5-2) • CONSOLE records the cached picture and the camcorder picture onto the hard disk. • The cached picture will not be performed....10 seconds previous to [Frame], the cache recording function is disabled. When recording in HDV, the cache recording time is actually longer than the time set. The cache recording ... stopped, CONSOLE starts the cache recording again. CONSOLE Windows [Option settings] and [Performance check] Camera and Picture Control Recording onto the Hard Disk Playback the Recorded Files 5-3 Recording onto the Hard Disk...
... Start the recording. ( 5-2) • CONSOLE records the cached picture and the camcorder picture onto the hard disk. • The cached picture will not be performed....10 seconds previous to [Frame], the cache recording function is disabled. When recording in HDV, the cache recording time is actually longer than the time set. The cache recording ... stopped, CONSOLE starts the cache recording again. CONSOLE Windows [Option settings] and [Performance check] Camera and Picture Control Recording onto the Hard Disk Playback the Recorded Files 5-3 Recording onto the Hard Disk...
Console Software Operations Manual
Page 39
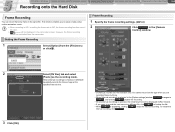
...• If you to easily create a stop motion animation movie. When recording in HDV or setting the frame rate to 24F, the frame recording function cannot be used. [ ]...from the [File] menu or click . Setting the Frame Recording 1 Select [Option] from the camcorder. however, the frame recording cannot be displayed in the same file. When [Interval recording] is ...records onto the hard disk only. CONSOLE Windows [Option settings] and [Performance check] Camera and Picture Control Recording onto the Hard Disk Playback the Recorded Files 5-4 Recording onto ...
...• If you to easily create a stop motion animation movie. When recording in HDV or setting the frame rate to 24F, the frame recording function cannot be used. [ ]...from the [File] menu or click . Setting the Frame Recording 1 Select [Option] from the camcorder. however, the frame recording cannot be displayed in the same file. When [Interval recording] is ...records onto the hard disk only. CONSOLE Windows [Option settings] and [Performance check] Camera and Picture Control Recording onto the Hard Disk Playback the Recorded Files 5-4 Recording onto ...
Console Software Operations Manual
Page 40
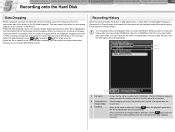
...data droppings occurred in a file will be written to dropping from a few seconds. • When the file is played back from the camcorder may happen also when the processing capacity of the computer is created after recording, you can check the file name, recording date, file ...History When you have closed CONSOLE, open the "CONSOLE.LOG" file in the [Camera Control] window. If data dropping occurred, the position and number of dropped data are displayed. Dropping one block in HDV recording corresponds to the file (data dropping). The recording history will be displayed ...
...data droppings occurred in a file will be written to dropping from a few seconds. • When the file is played back from the camcorder may happen also when the processing capacity of the computer is created after recording, you can check the file name, recording date, file ...History When you have closed CONSOLE, open the "CONSOLE.LOG" file in the [Camera Control] window. If data dropping occurred, the position and number of dropped data are displayed. Dropping one block in HDV recording corresponds to the file (data dropping). The recording history will be displayed ...
Console Software Operations Manual
Page 42
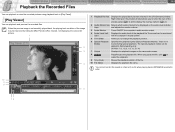
...Displays the playback images on channel 3 and 4 when playing back a MPEG2ES recorded in HDV. 10 9 8 5 76 Right clicking on the audio level indicator tings and adjusts... file.The sound can be improved by hiding the [Rec Panel] or [Rec Viewer], not displaying the camcorder picture. 1 2 3 4 1 Playback Preview Displays the played back pictures selected in [Play Panel]. [...is no Modes sound during special playback. CONSOLE Windows [Option settings] and [Performance check] Camera and Picture Control Recording onto the Hard Disk Playback the Recorded Files 6-1 Playback the Recorded Files...
...Displays the playback images on channel 3 and 4 when playing back a MPEG2ES recorded in HDV. 10 9 8 5 76 Right clicking on the audio level indicator tings and adjusts... file.The sound can be improved by hiding the [Rec Panel] or [Rec Viewer], not displaying the camcorder picture. 1 2 3 4 1 Playback Preview Displays the played back pictures selected in [Play Panel]. [...is no Modes sound during special playback. CONSOLE Windows [Option settings] and [Performance check] Camera and Picture Control Recording onto the Hard Disk Playback the Recorded Files 6-1 Playback the Recorded Files...
Console Software Operations Manual
Page 43
...XL H1: If you cannot adjust the picture frame by dragging the slider with the computer's sound system. - Unable to EXT.CONT. When using XL2: Only video in DV standard is displayed on the keyboard after moving the slider with the mouse allows you to finely adjust the position of an HDV...- CONSOLE Windows [Option settings] and [Performance check] Camera and Picture Control Recording onto the Hard Disk Playback the Recorded Files 6-2 Playback the Recorded Files Output to the Camcorder Time Slider By connecting the camcorder to use the special playback modes. - By clicking ...
...XL H1: If you cannot adjust the picture frame by dragging the slider with the computer's sound system. - Unable to EXT.CONT. When using XL2: Only video in DV standard is displayed on the keyboard after moving the slider with the mouse allows you to finely adjust the position of an HDV...- CONSOLE Windows [Option settings] and [Performance check] Camera and Picture Control Recording onto the Hard Disk Playback the Recorded Files 6-2 Playback the Recorded Files Output to the Camcorder Time Slider By connecting the camcorder to use the special playback modes. - By clicking ...
XL H1 Instruction Manual
Page 6
About the HD/HDV and SD/DV Specifications Throughout the manual we will be set to HD (high definition) or SD (standard definition) specifications. Camera Section HD/SD Recorder Section HDV/DV HD/SD SDI Terminal HD/SD HDV/DV Terminal HDV/DV Playback Signal HDV/DV 6 The recording standard on the tape will distinguish between the video signal standards used by the camera section of the XL H1, and the recording standards used by the recorder section of the XL H1. The video signal can be HDV (high definition) or DV, respectively.
About the HD/HDV and SD/DV Specifications Throughout the manual we will be set to HD (high definition) or SD (standard definition) specifications. Camera Section HD/SD Recorder Section HDV/DV HD/SD SDI Terminal HD/SD HDV/DV Terminal HDV/DV Playback Signal HDV/DV 6 The recording standard on the tape will distinguish between the video signal standards used by the camera section of the XL H1, and the recording standards used by the recorder section of the XL H1. The video signal can be HDV (high definition) or DV, respectively.
XL H1 Instruction Manual
Page 34
...SUPER FINE, FINE, NORMAL 114 L 1440x1080, S 640x480 114 OFF, ON, ON+CP DATA 88, 117 RESET, CONTINUOUS 115 HDV 2CH, 4CH 63 DV 48kHz 2CH, 32kHz 2CH, 32kHz 4CH OFF, -12dB, -20dB 93 NORMAL, LINE OUT 67 ON ...LED ON/OFF CHAR. Setting Options SP, LP 96 INT. REC DV CONTROL IRIS DIAL *Only in Standard Definition (SD). AUDIO MODE 1kHz TONE AUD.M.SET WIND SCREEN R-XLR GAINUP DISPLAY SETUP/ AUDIO LOCK* EVF SETUP .... GUIDE INFO UB DISPLAY CUSTOM KEY 1 CUSTOM KEY 2 WL. CAMERA MENU Submenu RECORDING SETUP Menu Item REC MODE* UB REC UB SELECT IMG QUALITY IMAGE SIZE STILL I.
...SUPER FINE, FINE, NORMAL 114 L 1440x1080, S 640x480 114 OFF, ON, ON+CP DATA 88, 117 RESET, CONTINUOUS 115 HDV 2CH, 4CH 63 DV 48kHz 2CH, 32kHz 2CH, 32kHz 4CH OFF, -12dB, -20dB 93 NORMAL, LINE OUT 67 ON ...LED ON/OFF CHAR. Setting Options SP, LP 96 INT. REC DV CONTROL IRIS DIAL *Only in Standard Definition (SD). AUDIO MODE 1kHz TONE AUD.M.SET WIND SCREEN R-XLR GAINUP DISPLAY SETUP/ AUDIO LOCK* EVF SETUP .... GUIDE INFO UB DISPLAY CUSTOM KEY 1 CUSTOM KEY 2 WL. CAMERA MENU Submenu RECORDING SETUP Menu Item REC MODE* UB REC UB SELECT IMG QUALITY IMAGE SIZE STILL I.
XL H1 Instruction Manual
Page 43
... the exposure lock and color bars settings. However, you can activate or deactivate the camcorder's automatic shut-off (VCR STOP) can adjust the camera section without any operation, the camcorder will retain camera settings such as aperture and shutter speed. MENU ( 31) SYSTEM/ POWER SAVE••&#...submenu. Even if the power save mode (VCR STOP) after 3 minutes in HDV and DV standards on . This mode, where only the VCR is set to the camera and VCR sections while maintaining the camera settings. The end search, date search and index search functions may not work ...
... the exposure lock and color bars settings. However, you can activate or deactivate the camcorder's automatic shut-off (VCR STOP) can adjust the camera section without any operation, the camcorder will retain camera settings such as aperture and shutter speed. MENU ( 31) SYSTEM/ POWER SAVE••&#...submenu. Even if the power save mode (VCR STOP) after 3 minutes in HDV and DV standards on . This mode, where only the VCR is set to the camera and VCR sections while maintaining the camera settings. The end search, date search and index search functions may not work ...
XL H1 Instruction Manual
Page 47
If you set the [LED ON/OFF] option in the [SYSTEM/ ] submenu to [ON], the MODE SELECT switch will light on the tape in blue when you set the MODE SELECT switch to use the camcorder as a high-definition (HD) camera. • SD 16:9, SD 4:3: To record on in DV standard or to HD. 47 Recording Selecting the Signal Standard (HD/SD) E MODE SELECT switch Set the MODE SELECT switch to the desired position. • HD: To record on the tape in HDV standard or to use the camcorder as a standard-definition (SD) camera. Select the aspect ratio as desired.
If you set the [LED ON/OFF] option in the [SYSTEM/ ] submenu to [ON], the MODE SELECT switch will light on the tape in blue when you set the MODE SELECT switch to use the camcorder as a high-definition (HD) camera. • SD 16:9, SD 4:3: To record on in DV standard or to HD. 47 Recording Selecting the Signal Standard (HD/SD) E MODE SELECT switch Set the MODE SELECT switch to the desired position. • HD: To record on the tape in HDV standard or to use the camcorder as a standard-definition (SD) camera. Select the aspect ratio as desired.
XL H1 Instruction Manual
Page 54
..."MF". The selected speed appears next to M. You can also select the speed at which the camcorder returns to SET. The focus preset speed currently selected appears. 3. Adjust the focus with the focus...the preset focus setting. Setting the Focus Preset Speed MENU ( 31) CAMERA SETUP F SPEED PSET• HIGH Open the menu and select [CAMERA SETUP]. Peaking While recording or in record pause, press the EVF PEAKING...but the magnified picture will be output as is to the HD/SD SDI terminal and the HDV/DV terminal. The Magnifying function will be emphasized. • Press the button ...
..."MF". The selected speed appears next to M. You can also select the speed at which the camcorder returns to SET. The focus preset speed currently selected appears. 3. Adjust the focus with the focus...the preset focus setting. Setting the Focus Preset Speed MENU ( 31) CAMERA SETUP F SPEED PSET• HIGH Open the menu and select [CAMERA SETUP]. Peaking While recording or in record pause, press the EVF PEAKING...but the magnified picture will be output as is to the HD/SD SDI terminal and the HDV/DV terminal. The Magnifying function will be emphasized. • Press the button ...
XL H1 Instruction Manual
Page 56
While recording, if the HDV/DV terminal is set to 60 fps interlaced using the 2:3:3:2 pulldown method. This 24F mode is ideal for 24F (camera) A B C D E F G H playback on the recording mode: HD 60i, 30F, 24F (2:3 pulldown-converted) SD 60i, 30F, 24F (2:3 pulldown-converted or 2:3:3:2... fps interlaced mode, the same as TV signals. 30F Mode Records in 30 fps progressive mode and outputs signals converted into 60 fps interlaced. 30F (camera) A B C D E F G H I J 60i (tape) a a b b c c d d e e f f g g h h i i j j 24F Mode HD Records in 24 fps progressive mode. This 24F mode is suited ...
While recording, if the HDV/DV terminal is set to 60 fps interlaced using the 2:3:3:2 pulldown method. This 24F mode is ideal for 24F (camera) A B C D E F G H playback on the recording mode: HD 60i, 30F, 24F (2:3 pulldown-converted) SD 60i, 30F, 24F (2:3 pulldown-converted or 2:3:3:2... fps interlaced mode, the same as TV signals. 30F Mode Records in 30 fps progressive mode and outputs signals converted into 60 fps interlaced. 30F (camera) A B C D E F G H I J 60i (tape) a a b b c c d d e e f f g g h h i i j j 24F Mode HD Records in 24 fps progressive mode. This 24F mode is suited ...

