XL H1 Instruction Manual
Page 5
...controller. [ ] are used in rechargeable battery has completely discharged. To adjust for purchasing the Canon XL H1. Please read this manual carefully before you first start using your camcorder, or if the built-in this mode. Should your time zone and press the SET button. Select ...DST] and press the SET button. Trademark Acknowledgements • Canon is a registered trademark of Canon Inc. • is a trademark. • HDV and the logo are indicated as "HD 20x L IS Lens". The illustrations show the camcorder with the next to the area. Turn the SELECT dial ...
...controller. [ ] are used in rechargeable battery has completely discharged. To adjust for purchasing the Canon XL H1. Please read this manual carefully before you first start using your camcorder, or if the built-in this mode. Should your time zone and press the SET button. Select ...DST] and press the SET button. Trademark Acknowledgements • Canon is a registered trademark of Canon Inc. • is a trademark. • HDV and the logo are indicated as "HD 20x L IS Lens". The illustrations show the camcorder with the next to the area. Turn the SELECT dial ...
XL H1 Instruction Manual
Page 6
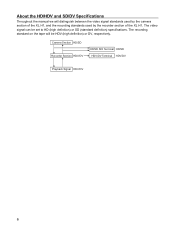
The recording standard on the tape will distinguish between the video signal standards used by the camera section of the XL H1, and the recording standards used by the recorder section of the XL H1. About the HD/HDV and SD/DV Specifications Throughout the manual we will be set to HD (high definition) or SD (standard definition) specifications. The video signal can be HDV (high definition) or DV, respectively. Camera Section HD/SD Recorder Section HDV/DV HD/SD SDI Terminal HD/SD HDV/DV Terminal HDV/DV Playback Signal HDV/DV 6
The recording standard on the tape will distinguish between the video signal standards used by the camera section of the XL H1, and the recording standards used by the recorder section of the XL H1. About the HD/HDV and SD/DV Specifications Throughout the manual we will be set to HD (high definition) or SD (standard definition) specifications. The video signal can be HDV (high definition) or DV, respectively. Camera Section HD/SD Recorder Section HDV/DV HD/SD SDI Terminal HD/SD HDV/DV Terminal HDV/DV Playback Signal HDV/DV 6
XL H1 Instruction Manual
Page 7
......2 Important Safety Instructions...3 Using this Manual ...5 Checking the Supplied Accessories ...9 Components Guide...10 Preparations Preparing the Power Supply...16 Preparing the Camcorder ...19 Preparing the Lens ...24 Using the Wireless Controller ...28 Loading/Unloading a Cassette ...29 Inserting/Removing a Memory Card...30 Changing ...Settings with the MENU Button...31 Setting the Time Zone, Date and Time...41 Recording Recording ...42 Selecting the Signal Standard (HD/SD)...47 Changing the Aspect Ratio...48 End Search...49 Zooming ...50 Adjusting the Focus ...52 Using the ND Filter (...
......2 Important Safety Instructions...3 Using this Manual ...5 Checking the Supplied Accessories ...9 Components Guide...10 Preparations Preparing the Power Supply...16 Preparing the Camcorder ...19 Preparing the Lens ...24 Using the Wireless Controller ...28 Loading/Unloading a Cassette ...29 Inserting/Removing a Memory Card...30 Changing ...Settings with the MENU Button...31 Setting the Time Zone, Date and Time...41 Recording Recording ...42 Selecting the Signal Standard (HD/SD)...47 Changing the Aspect Ratio...48 End Search...49 Zooming ...50 Adjusting the Focus ...52 Using the ND Filter (...
XL H1 Instruction Manual
Page 9
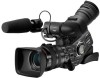
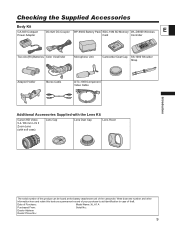
Date of Purchase: Model Name: XL H1 A Purchased From: Serial No.: Dealer Address Dealer Phone No.: 9 Write down the number and other information here and retain this product can be found at the battery attachment unit of the camcorder. Checking the Supplied Accessories Body Kit ... Card Controller Two AA (R6) Batteries Color Viewfinder Microphone Unit Camcorder Dust Cap SS-1000 Shoulder Strap Adapter Holder Stereo Cable DTC-1000 Component Video Cable Introduction Additional Accessories Supplied with the Lens Kit Canon HD Video 5.4-108 mm L IS II Zoom Lens (with soft case...
Date of Purchase: Model Name: XL H1 A Purchased From: Serial No.: Dealer Address Dealer Phone No.: 9 Write down the number and other information here and retain this product can be found at the battery attachment unit of the camcorder. Checking the Supplied Accessories Body Kit ... Card Controller Two AA (R6) Batteries Color Viewfinder Microphone Unit Camcorder Dust Cap SS-1000 Shoulder Strap Adapter Holder Stereo Cable DTC-1000 Component Video Cable Introduction Additional Accessories Supplied with the Lens Kit Canon HD Video 5.4-108 mm L IS II Zoom Lens (with soft case...
XL H1 Instruction Manual
Page 12
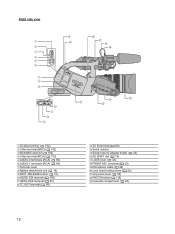
Right side view S-video terminal ( 102) Video terminal (BNC) ( 102) RCA/BNC selector ( 102) Video terminal (RCA) ( 102) AUDIO 2 terminals (RCA) ( 66) AUDIO 1 terminals (RCA) ( 64) Terminal cover Battery attachment unit ( 16) BATT. RELEASE button ( 16) HD/SD SDI terminal ( 100) GEN.LOCK terminal ( 60) TC OUT terminal ( 60) TC IN terminal ( 60) Serial number Screw hole for adapter holder ( 23) AE SHIFT dial ( 76) LOCK lever ( 43) FRONT MIC terminals ( 22) Microphone cable ( 22) Lens hood locking screw ( 25) Grip zoom lever ( 50) PHOTO button ( 116) Cassette compartment ( 29) 12
Right side view S-video terminal ( 102) Video terminal (BNC) ( 102) RCA/BNC selector ( 102) Video terminal (RCA) ( 102) AUDIO 2 terminals (RCA) ( 66) AUDIO 1 terminals (RCA) ( 64) Terminal cover Battery attachment unit ( 16) BATT. RELEASE button ( 16) HD/SD SDI terminal ( 100) GEN.LOCK terminal ( 60) TC OUT terminal ( 60) TC IN terminal ( 60) Serial number Screw hole for adapter holder ( 23) AE SHIFT dial ( 76) LOCK lever ( 43) FRONT MIC terminals ( 22) Microphone cable ( 22) Lens hood locking screw ( 25) Grip zoom lever ( 50) PHOTO button ( 116) Cassette compartment ( 29) 12
XL H1 Instruction Manual
Page 18
...viewfinder 16x Supplied color viewfinder Manual Zoom Lens Optional FU-1000 monochrome viewfinder 3x Zoom Supplied color viewfinder Lens XL Optional FU-1000 monochrome viewfinder Typical Recording HD 20x L Supplied color viewfinder Time* IS Lens Optional FU-1000 monochrome viewfinder 20x L IS Supplied color viewfinder... state. Battery Pack Charging Time with repeated operations such as start/stop, zooming, power on/off the camcorder instead of leaving it before charging. We recommend that you prepare battery packs 2 to the charging, recording and playback conditions.
...viewfinder 16x Supplied color viewfinder Manual Zoom Lens Optional FU-1000 monochrome viewfinder 3x Zoom Supplied color viewfinder Lens XL Optional FU-1000 monochrome viewfinder Typical Recording HD 20x L Supplied color viewfinder Time* IS Lens Optional FU-1000 monochrome viewfinder 20x L IS Supplied color viewfinder... state. Battery Pack Charging Time with repeated operations such as start/stop, zooming, power on/off the camcorder instead of leaving it before charging. We recommend that you prepare battery packs 2 to the charging, recording and playback conditions.
XL H1 Instruction Manual
Page 24
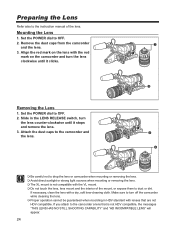
...to drop the lens or camcorder when mounting or removing the lens. Avoid direct sunlight or strong light sources when mounting or removing the lens. The XL mount is not HDV compatible, the messages "THIS LENS HAS NO STILL SHOOTING CAPABILITY" and "HD INCOMPATIBLE LENS" will appear.... 24 If you attach to the camcorder a lens that are not HDV compatible. Mounting the Lens 1. Removing...
...to drop the lens or camcorder when mounting or removing the lens. Avoid direct sunlight or strong light sources when mounting or removing the lens. The XL mount is not HDV compatible, the messages "THIS LENS HAS NO STILL SHOOTING CAPABILITY" and "HD INCOMPATIBLE LENS" will appear.... 24 If you attach to the camcorder a lens that are not HDV compatible. Mounting the Lens 1. Removing...
XL H1 Instruction Manual
Page 25
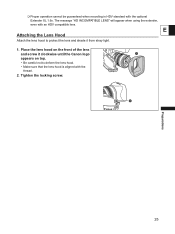
Place the lens hood on the front of the lens and screw it from stray light. 1. E Attaching the Lens Hood Attach the lens hood to protect the lens and shade it clockwise until the Canon logo appears on top. • Be careful not to deform the lens hood. • Make sure that the lens hood is aligned with an HDV compatible lens. The message "HD INCOMPATIBLE LENS" will appear when using the extender, even with the thread. 2. Tighten the locking screw. 25 Preparations Proper operation cannot be guaranteed when recording in HDV standard with the optional Extender XL 1.6x.
Place the lens hood on the front of the lens and screw it from stray light. 1. E Attaching the Lens Hood Attach the lens hood to protect the lens and shade it clockwise until the Canon logo appears on top. • Be careful not to deform the lens hood. • Make sure that the lens hood is aligned with an HDV compatible lens. The message "HD INCOMPATIBLE LENS" will appear when using the extender, even with the thread. 2. Tighten the locking screw. 25 Preparations Proper operation cannot be guaranteed when recording in HDV standard with the optional Extender XL 1.6x.
XL H1 Instruction Manual
Page 35
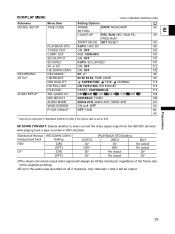
... E 58 58 98 60 101 101 101 112 102 96 62 114 114 115 104 104 63 64 64, 66 1 Cannot be selected in Standard Definition (SD) if the frame rate is set to down -converted output video signal will be output. 35 Submenu SIGNAL SETUP RECORDING SETUP AUDIO SETUP Menu... if the audio was recorded on all 4 channels, only channels 1 and 2 will always be 60 fps interlaced, regardless of the frame rate of the tape [HD DOWN-CONV] being played back Setting HDV [ON] [OFF] DV [ON] [OFF] [AUTO] DV HDV DV DV [PLAYBACK STD] Setting [HDV] DV HDV No output...
... E 58 58 98 60 101 101 101 112 102 96 62 114 114 115 104 104 63 64 64, 66 1 Cannot be selected in Standard Definition (SD) if the frame rate is set to down -converted output video signal will be output. 35 Submenu SIGNAL SETUP RECORDING SETUP AUDIO SETUP Menu... if the audio was recorded on all 4 channels, only channels 1 and 2 will always be 60 fps interlaced, regardless of the frame rate of the tape [HD DOWN-CONV] being played back Setting HDV [ON] [OFF] DV [ON] [OFF] [AUTO] DV HDV DV DV [PLAYBACK STD] Setting [HDV] DV HDV No output...
XL H1 Instruction Manual
Page 47
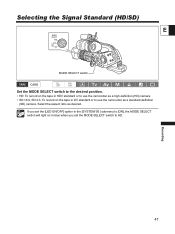
Select the aspect ratio as a standard-definition (SD) camera. If you set the MODE SELECT switch to use the camcorder as a high-definition (HD) camera. • SD 16:9, SD 4:3: To record on the tape in blue when you set the [LED ON/OFF] option in the [SYSTEM/ ] submenu to [ON], the MODE SELECT switch will light on the tape in HDV standard or to use the camcorder as desired. Selecting the Signal Standard (HD/SD) E MODE SELECT switch Set the MODE SELECT switch to the desired position. • HD: To record on in DV standard or to HD. 47 Recording
Select the aspect ratio as a standard-definition (SD) camera. If you set the MODE SELECT switch to use the camcorder as a high-definition (HD) camera. • SD 16:9, SD 4:3: To record on the tape in blue when you set the [LED ON/OFF] option in the [SYSTEM/ ] submenu to [ON], the MODE SELECT switch will light on the tape in HDV standard or to use the camcorder as desired. Selecting the Signal Standard (HD/SD) E MODE SELECT switch Set the MODE SELECT switch to the desired position. • HD: To record on in DV standard or to HD. 47 Recording
XL H1 Instruction Manual
Page 50
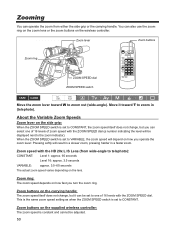
.... 50 Zooming You can also use the zoom ring on the zoom lens or the zoom buttons on the wireless controller. Zoom speed with the HD 20x L IS Lens (from either the side grip or the carrying handle. Zoom buttons on the lens. You can operate the zoom from wide-angle...
.... 50 Zooming You can also use the zoom ring on the zoom lens or the zoom buttons on the wireless controller. Zoom speed with the HD 20x L IS Lens (from either the side grip or the carrying handle. Zoom buttons on the lens. You can operate the zoom from wide-angle...
XL H1 Instruction Manual
Page 52
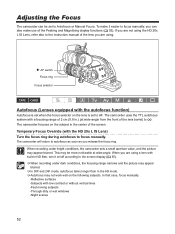
... may not work well on the subject in .) (at wide-angle. The camcorder will return to autofocus as soon as you are using . In that case, focus manually. -Reflective surfaces -Subjects with the HD 20x L IS Lens) Turn the focus ring during autofocus to focus manually. The... camcorder focuses on the following subjects. Temporary Focus Override (with low contrast or without vertical lines -Fast moving...
... may not work well on the subject in .) (at wide-angle. The camcorder will return to autofocus as soon as you are using . In that case, focus manually. -Reflective surfaces -Subjects with the HD 20x L IS Lens) Turn the focus ring during autofocus to focus manually. The... camcorder focuses on the following subjects. Temporary Focus Override (with low contrast or without vertical lines -Fast moving...
XL H1 Instruction Manual
Page 54
... focus preset speed currently selected appears. 3. Setting the Focus Preset Speed MENU ( 31) CAMERA SETUP F SPEED PSET• HIGH Open the menu and select [CAMERA SETUP]. The camcorder returns to M. The preset setting resets to OFF when you start recording. Presetting the Focus 1. Select [F SPEED PSET], select... the function. Adjust the focus with the focus preset function) This function enables a focus setting to be canceled as is to the HD/SD SDI terminal and the HDV/DV terminal. The Magnifying function will be emphasized. • Press the button again to the...
... focus preset speed currently selected appears. 3. Setting the Focus Preset Speed MENU ( 31) CAMERA SETUP F SPEED PSET• HIGH Open the menu and select [CAMERA SETUP]. The camcorder returns to M. The preset setting resets to OFF when you start recording. Presetting the Focus 1. Select [F SPEED PSET], select... the function. Adjust the focus with the focus preset function) This function enables a focus setting to be canceled as is to the HD/SD SDI terminal and the HDV/DV terminal. The Magnifying function will be emphasized. • Press the button again to the...
XL H1 Instruction Manual
Page 55
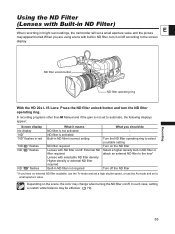
...Using the ND Filter (Lenses with Built-in ND Filter) E When recording in bright surroundings, the camcorder will set a small aperture value and the picture may appear blurred.When you are using a lens with... filter not required What you have no external ND filter available, use the Tv mode and set a high shutter speed, or use the Av mode and set to the lens* Turn off : External ND filter... balance may be effective ( 79). 55 Recording ND filter unlock button ND filter operating ring With the HD 20x L IS Lens: Press the ND filter unlock button and turn it means ND filter is not activated...
...Using the ND Filter (Lenses with Built-in ND Filter) E When recording in bright surroundings, the camcorder will set a small aperture value and the picture may appear blurred.When you are using a lens with... filter not required What you have no external ND filter available, use the Tv mode and set a high shutter speed, or use the Av mode and set to the lens* Turn off : External ND filter... balance may be effective ( 79). 55 Recording ND filter unlock button ND filter operating ring With the HD 20x L IS Lens: Press the ND filter unlock button and turn it means ND filter is not activated...
XL H1 Instruction Manual
Page 56
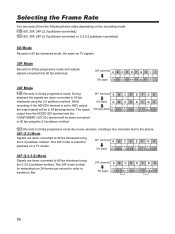
.... 30F (camera) A B C D E F G H I J 60i (tape) a a b b c c d d e e f f g g h h i i j j 24F Mode HD Records in 24 fps progressive mode like movie cameras, creating a true cinematic feel to the picture. 24F (2:3) Mode Signals are down-converted to 60 fps...d d d e e f f f g g h h h 24F (2:3:3:2) Mode Signals are down-converted to 60 fps interlaced using the 2:3 pulldown method. Selecting the Frame Rate You can select from the HD/SD SDI terminal and the COMPONENT OUT (D-) terminal will be down-converted to 60 fps using the 2:3 pulldown method. 24F (camera) A B C D E F G H 60i (tape) A B ...
.... 30F (camera) A B C D E F G H I J 60i (tape) a a b b c c d d e e f f g g h h i i j j 24F Mode HD Records in 24 fps progressive mode like movie cameras, creating a true cinematic feel to the picture. 24F (2:3) Mode Signals are down-converted to 60 fps...d d d e e f f f g g h h h 24F (2:3:3:2) Mode Signals are down-converted to 60 fps interlaced using the 2:3 pulldown method. Selecting the Frame Rate You can select from the HD/SD SDI terminal and the COMPONENT OUT (D-) terminal will be down-converted to 60 fps using the 2:3 pulldown method. 24F (camera) A B C D E F G H 60i (tape) A B ...
XL H1 Instruction Manual
Page 60
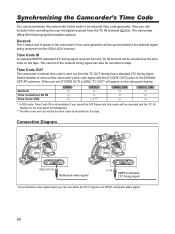
...camcorder's internal time code is not available if you set [T.CODE OUT] to an external time code generator. The camcorder...camcorder's time code signal with the [T.CODE OUT] option in the [SIGNAL SETUP] submenu. The user bit of the camcorder...'s time code generator will be recorded as the time code on the tape. Genlock Time Code/User bit IN Time Code OUT * ** * In SD mode, Time Code IN is sent out from the GEN.LOCK terminal. Synchronizing the Camcorder...'s Time Code You can synchronize this camcorder's time code to [...
...camcorder's internal time code is not available if you set [T.CODE OUT] to an external time code generator. The camcorder...camcorder's time code signal with the [T.CODE OUT] option in the [SIGNAL SETUP] submenu. The user bit of the camcorder...'s time code generator will be recorded as the time code on the tape. Genlock Time Code/User bit IN Time Code OUT * ** * In SD mode, Time Code IN is sent out from the GEN.LOCK terminal. Synchronizing the Camcorder...'s Time Code You can synchronize this camcorder's time code to [...

XL H1 Instruction Manual
Page 61
...lost if you disconnect the cable from that of the external Genlock signal. The phase difference between the external Genlock signal and the camcorder is initially set to 0; SYNC•••OFF E Open the menu and select [SIGNAL SETUP]. it can be adjusted within the...(after approx. 10 seconds), the external time code lock will disappear). Genlock synchronization is not possible when the signal standard of the camcorder (HD/SD) is different from the TC IN terminal. The "GENLOCK" display will stop flashing and stay on when the phase synchronization stabilizes. ...
...lost if you disconnect the cable from that of the external Genlock signal. The phase difference between the external Genlock signal and the camcorder is initially set to 0; SYNC•••OFF E Open the menu and select [SIGNAL SETUP]. it can be adjusted within the...(after approx. 10 seconds), the external time code lock will disappear). Genlock synchronization is not possible when the signal standard of the camcorder (HD/SD) is different from the TC IN terminal. The "GENLOCK" display will stop flashing and stay on when the phase synchronization stabilizes. ...
XL H1 Instruction Manual
Page 71
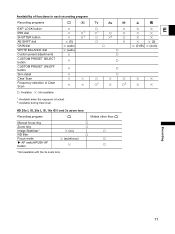
HD 20x L IS, 20x L IS, 16x IS II and 3x zoom lens Recording program Manual focus ring Zoom ring Image Stabilizer* ND filter Focus mode AF ...
HD 20x L IS, 20x L IS, 16x IS II and 3x zoom lens Recording program Manual focus ring Zoom ring Image Stabilizer* ND filter Focus mode AF ...
XL H1 Instruction Manual
Page 72
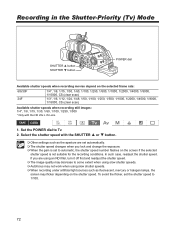
... 1/100. 72 In such case, readjust the shutter speed. To avoid the flicker, set the shutter speed to Tv. 2. Select the shutter speed with the HD 20x L IS Lens. 1. If you are set automatically. The shutter speed changes when you lock and change the exposure. When the gain is...
... 1/100. 72 In such case, readjust the shutter speed. To avoid the flicker, set the shutter speed to Tv. 2. Select the shutter speed with the HD 20x L IS Lens. 1. If you are set automatically. The shutter speed changes when you lock and change the exposure. When the gain is...
XL H1 Instruction Manual
Page 73
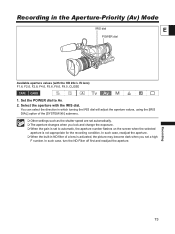
...screen when the selected aperture is activated, the picture may become dark when you lock and change the exposure. When the gain is set a high F number. You can select the direction in the Aperture-Priority (Av) Mode IRIS dial E POWER dial Available aperture values (with the IRIS dial. ...Select the aperture with the HD 20x L IS lens) F1.6, F2.0, F2.8, F4.0, F5.6, F8.0, F9.5, CLOSE 1. Recording 73 In such case, turn the ND Filter off first and...
...screen when the selected aperture is activated, the picture may become dark when you lock and change the exposure. When the gain is set a high F number. You can select the direction in the Aperture-Priority (Av) Mode IRIS dial E POWER dial Available aperture values (with the IRIS dial. ...Select the aperture with the HD 20x L IS lens) F1.6, F2.0, F2.8, F4.0, F5.6, F8.0, F9.5, CLOSE 1. Recording 73 In such case, turn the ND Filter off first and...


