Console Software Operations Manual
Page 1
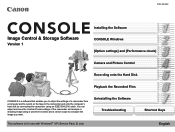
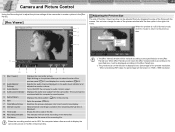
...settings] and [Performance check] Camera and Picture Control Recording onto the Hard Disk Playback the Recorded Files CONSOLE is for use with Windows® XP (Service Pack 2) only. PUB. You can adjust and save the Custom Preset settings of a camcorder from a computer and to ...compose the image you want. Shortcut Keys English Uninstalling the Software Troubleshooting This software is a software that enables you to adjust the settings of the camcorder and analyze a shooting image using a waveform ...
...settings] and [Performance check] Camera and Picture Control Recording onto the Hard Disk Playback the Recorded Files CONSOLE is for use with Windows® XP (Service Pack 2) only. PUB. You can adjust and save the Custom Preset settings of a camcorder from a computer and to ...compose the image you want. Shortcut Keys English Uninstalling the Software Troubleshooting This software is a software that enables you to adjust the settings of the camcorder and analyze a shooting image using a waveform ...
Console Software Operations Manual
Page 2
Contents Read This First Canon camcorder compatible with CONSOLE iii Required Accessories iii System Requirements iii Preparation (Installation, Connection, Launch, Activation) Installing the Software and the Designated Drivers 1-1 Installing the AV/C Camera Storage Subunit-WIA Driver 1-2 Connecting the Camcorder 1-3 Connecting the Camcorder to the Computer 1-3 Launching CONSOLE 1-4 Changing the Software Event Setting 1-4 Starting the Application 1-4 Activation...
Contents Read This First Canon camcorder compatible with CONSOLE iii Required Accessories iii System Requirements iii Preparation (Installation, Connection, Launch, Activation) Installing the Software and the Designated Drivers 1-1 Installing the AV/C Camera Storage Subunit-WIA Driver 1-2 Connecting the Camcorder 1-3 Connecting the Camcorder to the Computer 1-3 Launching CONSOLE 1-4 Changing the Software Event Setting 1-4 Starting the Application 1-4 Activation...
Console Software Operations Manual
Page 4
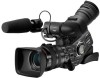
... onto the computer's hard disk. • Output the image recorded on the hard disk to adjust the settings of the camcorder can start /stop button - Camcorder XL H1 XL2 Mode EXT.CONT. EJECT switch - Camera EXT.CONT. mode ( ): This mode is CONSOLE? You do not use editing software that supports the 24F frame rate. „...
... onto the computer's hard disk. • Output the image recorded on the hard disk to adjust the settings of the camcorder can start /stop button - Camcorder XL H1 XL2 Mode EXT.CONT. EJECT switch - Camera EXT.CONT. mode ( ): This mode is CONSOLE? You do not use editing software that supports the 24F frame rate. „...
Console Software Operations Manual
Page 5
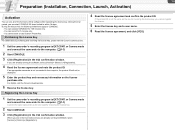
Chapter 1 Preparation (Installation, Connection, Launch, Activation) Installing the Software and the Designated Drivers 1-1 Installing the AV/C Camera Storage Subunit-WIA Driver 1-2 Connecting the Camcorder ...1-3 Connecting the Camcorder to the Computer 1-3 Launching CONSOLE ...1-4 Changing the Software Event Setting ...1-4 Starting the Application ...1-4 Activation...1-5 Purchasing the License Key...1-5 Registering the License Key ...1-5
Chapter 1 Preparation (Installation, Connection, Launch, Activation) Installing the Software and the Designated Drivers 1-1 Installing the AV/C Camera Storage Subunit-WIA Driver 1-2 Connecting the Camcorder ...1-3 Connecting the Camcorder to the Computer 1-3 Launching CONSOLE ...1-4 Changing the Software Event Setting ...1-4 Starting the Application ...1-4 Activation...1-5 Purchasing the License Key...1-5 Registering the License Key ...1-5
Console Software Operations Manual
Page 7
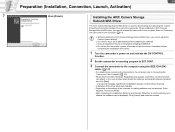
... this time] and click [Next]. 1-2 Preparation (Installation, Connection, Launch, Activation) 7 Click [Finish]. Installing the AV/C Camera Storage Subunit-WIA Driver The AV/C Camera Storage Subunit-WIA driver is used for downloading and uploading the Custom Preset file (Camcorder settings) from and to choose the software may be displayed. If a warning message regarding the...
... this time] and click [Next]. 1-2 Preparation (Installation, Connection, Launch, Activation) 7 Click [Finish]. Installing the AV/C Camera Storage Subunit-WIA Driver The AV/C Camera Storage Subunit-WIA driver is used for downloading and uploading the Custom Preset file (Camcorder settings) from and to choose the software may be displayed. If a warning message regarding the...
Console Software Operations Manual
Page 8
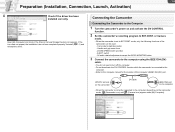
Connecting the Camcorder Connecting the Camcorder to the Computer 1 Turn the camcorder's power on the camcorder mode, (Camcorder icon) and (Camera icon) appear under [My Computer]. ZOOM SPEED switch and dial - EJECT switch - Uninstall ( 7-1) and reinstall the driver. or Camera mode. • When the camcorder is connected to the computer. • Refer to ...the computer's IEEE1394 (DV) port. Handle and grip zoom lever - All audio related adjustments except for the location of the camcorder can be used. - Open [My Computer] and check if the [Canon Camera Storage Device] icon appears.
Connecting the Camcorder Connecting the Camcorder to the Computer 1 Turn the camcorder's power on the camcorder mode, (Camcorder icon) and (Camera icon) appear under [My Computer]. ZOOM SPEED switch and dial - EJECT switch - Uninstall ( 7-1) and reinstall the driver. or Camera mode. • When the camcorder is connected to the computer. • Refer to ...the computer's IEEE1394 (DV) port. Handle and grip zoom lever - All audio related adjustments except for the location of the camcorder can be used. - Open [My Computer] and check if the [Canon Camera Storage Device] icon appears.
Console Software Operations Manual
Page 9
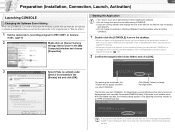
... the license. ( 1-5) 2 Confirm the target folder (video folder) and click [OK]. 3 Select [Take no action"). 1 Set the camcorder's recording program to EXT.CONT. Starting the Application You need to deactivate the Windows program that displays the time at the title bar... are displayed. Click on [Registration] when you proceed to register the license. • When the trial period is not installed on [Canon Camera Storage Device] icon in the [My Computer] window and choose [Properties]. 1-4 Preparation (Installation, Connection, Launch, Activation) Launching CONSOLE Changing...
... the license. ( 1-5) 2 Confirm the target folder (video folder) and click [OK]. 3 Select [Take no action"). 1 Set the camcorder's recording program to EXT.CONT. Starting the Application You need to deactivate the Windows program that displays the time at the title bar... are displayed. Click on [Registration] when you proceed to register the license. • When the trial period is not installed on [Canon Camera Storage Device] icon in the [My Computer] window and choose [Properties]. 1-4 Preparation (Installation, Connection, Launch, Activation) Launching CONSOLE Changing...
Console Software Operations Manual
Page 10
..., the following limitat1ions apply to the computer. ( 1-3) 2 Start CONSOLE. 3 Click [Registration] in the trial confirmation window. or Camera mode and connect the camcorder to CONSOLE. - If the product ID is not connected to EXT.CONT. You can record for receiving the license key. 2 Start...software after registering the license key. During the trial period, you are in the trial confirmation window. For details, visit the Canon's download site. 6 Receive the license key. 1-5 Preparation (Installation, Connection, Launch, Activation) Activation You can start CONSOLE 50 times ...
..., the following limitat1ions apply to the computer. ( 1-3) 2 Start CONSOLE. 3 Click [Registration] in the trial confirmation window. or Camera mode and connect the camcorder to CONSOLE. - If the product ID is not connected to EXT.CONT. You can record for receiving the license key. 2 Start...software after registering the license key. During the trial period, you are in the trial confirmation window. For details, visit the Canon's download site. 6 Receive the license key. 1-5 Preparation (Installation, Connection, Launch, Activation) Activation You can start CONSOLE 50 times ...
Console Software Operations Manual
Page 12
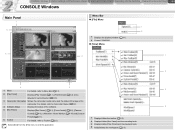
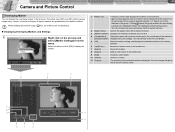
..., refer to Menu Bar ( 2-1). 3 2 [Play Panel] Displays [Play Viewer] ( 6-1), [File Browser] ( 6-3) and a Waveform Vector Monitor ( 4-10). 3 Camcorder Information Shows the camcorder model name and the status of the software. 4 5 [Rec Panel] Displays [Rec Viewer] ( 4-1), [Focus Assist] ( 4-6), [Camera Control] ( 4-6), a Waveform Vector Monitor ( 4-10) and [Custom 6 Toolbar Preset] ( 4-11). For details, refer to end the...
..., refer to Menu Bar ( 2-1). 3 2 [Play Panel] Displays [Play Viewer] ( 6-1), [File Browser] ( 6-3) and a Waveform Vector Monitor ( 4-10). 3 Camcorder Information Shows the camcorder model name and the status of the software. 4 5 [Rec Panel] Displays [Rec Viewer] ( 4-1), [Focus Assist] ( 4-6), [Camera Control] ( 4-6), a Waveform Vector Monitor ( 4-10) and [Custom 6 Toolbar Preset] ( 4-11). For details, refer to end the...
Console Software Operations Manual
Page 13
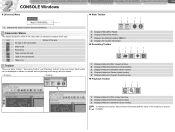
...Main Toolbar", "Recording Toolbar" and "Playback Toolbar" in the camcorder Status of the tape Stop mode Recording Tape reached the end Tape is write-protected. CONSOLE Windows [Option settings] and [Performance check] Camera and Picture Control Recording onto the Hard Disk Playback the Recorded... Files 2-2 CONSOLE Windows „ [Version] Menu 1 1 Displays the version and the license information. Icon No tape in the main panel. Camcorder Status This status shows the ...
...Main Toolbar", "Recording Toolbar" and "Playback Toolbar" in the camcorder Status of the tape Stop mode Recording Tape reached the end Tape is write-protected. CONSOLE Windows [Option settings] and [Performance check] Camera and Picture Control Recording onto the Hard Disk Playback the Recorded... Files 2-2 CONSOLE Windows „ [Version] Menu 1 1 Displays the version and the license information. Icon No tape in the main panel. Camcorder Status This status shows the ...
Console Software Operations Manual
Page 14
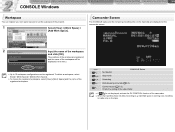
... of the registered workspace. hard disk space is running out), recording is not displayed, activate the DV CONTROL function of the camcorder. When the hard disk does not allow recording (e.g. Icon Not started Stop mode CONSOLE Status Recording Data dropping occurred ( 5-5). Cannot...setting of the video folder. If [ ] is made only on the camcorder screen. 2 Input the name of the workspace and click [OK]. CONSOLE Windows [Option settings] and [Performance check] Camera and Picture Control Recording onto the Hard Disk Playback the Recorded Files 2-3 CONSOLE Windows ...
... of the registered workspace. hard disk space is running out), recording is not displayed, activate the DV CONTROL function of the camcorder. When the hard disk does not allow recording (e.g. Icon Not started Stop mode CONSOLE Status Recording Data dropping occurred ( 5-5). Cannot...setting of the video folder. If [ ] is made only on the camcorder screen. 2 Input the name of the workspace and click [OK]. CONSOLE Windows [Option settings] and [Performance check] Camera and Picture Control Recording onto the Hard Disk Playback the Recorded Files 2-3 CONSOLE Windows ...
Console Software Operations Manual
Page 16
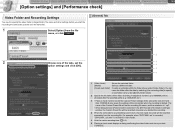
... [Video folder]. The name of the Custom Preset file will be recorded only when you started the recording. 4 When the camcorder's sound setting is started. CONSOLE Windows [Option settings] and [Performance check] Camera and Picture Control Recording onto the Hard Disk Playback the Recorded Files 3-1 [Option settings] and [Performance check] Video Folder...
... [Video folder]. The name of the Custom Preset file will be recorded only when you started the recording. 4 When the camcorder's sound setting is started. CONSOLE Windows [Option settings] and [Performance check] Camera and Picture Control Recording onto the Hard Disk Playback the Recorded Files 3-1 [Option settings] and [Performance check] Video Folder...
Console Software Operations Manual
Page 17
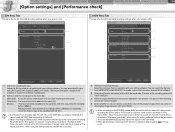
... "File Name_sub.WAV". When using the editing software, load all the sound files. The recorded [MPEG2ES] picture cannot be output to the camcorder. When [All pictures] or [I picture and P picture] is recorded and added to convert the color of the preview image appears odd,... the HDV standard data. Select the AVI type that is compatible with your editing software. CONSOLE Windows [Option settings] and [Performance check] Camera and Picture Control Recording onto the Hard Disk Playback the Recorded Files 3-2 [Option settings] and [Performance check] [DV Rec] Tab This tab...
... "File Name_sub.WAV". When using the editing software, load all the sound files. The recorded [MPEG2ES] picture cannot be output to the camcorder. When [All pictures] or [I picture and P picture] is recorded and added to convert the color of the preview image appears odd,... the HDV standard data. Select the AVI type that is compatible with your editing software. CONSOLE Windows [Option settings] and [Performance check] Camera and Picture Control Recording onto the Hard Disk Playback the Recorded Files 3-2 [Option settings] and [Performance check] [DV Rec] Tab This tab...
Console Software Operations Manual
Page 18
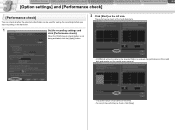
..., click the [Apply] button. 2 Click [Start] on the hard disk. 1 Set the recording settings and click [Performance check]. CONSOLE Windows [Option settings] and [Performance check] Camera and Picture Control Recording onto the Hard Disk Playback the Recorded Files 3-3 [Option settings] and [Performance check] [Performance check] You can check whether the selected...
..., click the [Apply] button. 2 Click [Start] on the hard disk. 1 Set the recording settings and click [Performance check]. CONSOLE Windows [Option settings] and [Performance check] Camera and Picture Control Recording onto the Hard Disk Playback the Recorded Files 3-3 [Option settings] and [Performance check] [Performance check] You can check whether the selected...
Console Software Operations Manual
Page 19
When receiving the DV standard data from the camcorder while [Frame] is selected in the [DV Rec] tab, the writing test of the performance check will be dropped when a program accessing the hard disk (e.g. CONSOLE Windows [Option settings] and [Performance check] Camera and Picture Control Recording onto the Hard Disk Playback the Recorded...
When receiving the DV standard data from the camcorder while [Frame] is selected in the [DV Rec] tab, the writing test of the performance check will be dropped when a program accessing the hard disk (e.g. CONSOLE Windows [Option settings] and [Performance check] Camera and Picture Control Recording onto the Hard Disk Playback the Recorded...
Console Software Operations Manual
Page 21
.... - Displays the audio level output from the camcorder. When the recording mode is displayed. CONSOLE Windows [Option settings] and [Performance check] Camera and Picture Control Recording onto the Hard Disk Playback the Recorded Files 4-1 Camera and Picture Control Using the Recording tool to adjust... the picture settings of the camcorder to the specified size or the [Rec Panel] ...
.... - Displays the audio level output from the camcorder. When the recording mode is displayed. CONSOLE Windows [Option settings] and [Performance check] Camera and Picture Control Recording onto the Hard Disk Playback the Recorded Files 4-1 Camera and Picture Control Using the Recording tool to adjust... the picture settings of the camcorder to the specified size or the [Rec Panel] ...
Console Software Operations Manual
Page 22
... coordinate of the marker is a group marker which contains several markers in the group. CONSOLE Windows [Option settings] and [Performance check] Camera and Picture Control Recording onto the Hard Disk Playback the Recorded Files 4-2 Camera and Picture Control Overlaying Marker You can change the group name and the marker name. 1 2 3 11 10 9 4 5 8 7 6
... coordinate of the marker is a group marker which contains several markers in the group. CONSOLE Windows [Option settings] and [Performance check] Camera and Picture Control Recording onto the Hard Disk Playback the Recorded Files 4-2 Camera and Picture Control Overlaying Marker You can change the group name and the marker name. 1 2 3 11 10 9 4 5 8 7 6
Console Software Operations Manual
Page 23
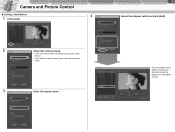
The new marker will be added; it appears as selected and will be displayed in the marker preview. CONSOLE Windows [Option settings] and [Performance check] Camera and Picture Control Recording onto the Hard Disk Playback the Recorded Files 4-3 Camera and Picture Control „ Adding a New Marker 1 Click [Add]. 4 Select the [Aspect ratio] and click [Add]. 2 Select the marker group. • If the new marker does not belong to any group, select [None]. • If you want to create a new group, enter the new group name. 3 Enter the marker name.
The new marker will be added; it appears as selected and will be displayed in the marker preview. CONSOLE Windows [Option settings] and [Performance check] Camera and Picture Control Recording onto the Hard Disk Playback the Recorded Files 4-3 Camera and Picture Control „ Adding a New Marker 1 Click [Add]. 4 Select the [Aspect ratio] and click [Add]. 2 Select the marker group. • If the new marker does not belong to any group, select [None]. • If you want to create a new group, enter the new group name. 3 Enter the marker name.
Console Software Operations Manual
Page 24
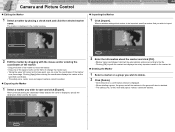
... the marker by placing a check mark and click the selected marker name. CONSOLE Windows [Option settings] and [Performance check] Camera and Picture Control Recording onto the Hard Disk Playback the Recorded Files 4-4 Camera and Picture Control „ Editing the Marker 1 Select a marker by dragging with the mouse and/or entering the coordinates...
... the marker by placing a check mark and click the selected marker name. CONSOLE Windows [Option settings] and [Performance check] Camera and Picture Control Recording onto the Hard Disk Playback the Recorded Files 4-4 Camera and Picture Control „ Editing the Marker 1 Select a marker by dragging with the mouse and/or entering the coordinates...
Console Software Operations Manual
Page 25
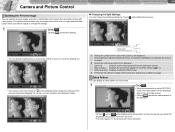
... picture horizontally and [Right] or [Left] splits the picture vertically. 2 Selects the reference picture to be displayed. [Camera]: Displays a still image captured from the camcorder picture. [Play Viewer]: Displays the picture that appears in the camcorder screen. • Clicking cancels the zebra pattern to be displayed. • Clicking next to while displaying the...
... picture horizontally and [Right] or [Left] splits the picture vertically. 2 Selects the reference picture to be displayed. [Camera]: Displays a still image captured from the camcorder picture. [Play Viewer]: Displays the picture that appears in the camcorder screen. • Clicking cancels the zebra pattern to be displayed. • Clicking next to while displaying the...


