
S820 User's Guide
Page 3
Table of Contents Using the Printer with a Network 62 Uninstalling Printer Drivers 66 Routine Maintenance 67 When to Replace Ink Tank and Maintain Print Head 68 Replacing an Ink Tank 69 Printing the Nozzle Check Pattern 74 Print Head Cleaning 78 Print Head Deep Cleaning 81 Cleaning the Printer 83 Transporting the Printer 85 Printing Media 89...-101 104 Photo Paper Pro PC-101S 107 Transparencies CF-102 109 T-Shirt Transfers TR-201 111 Banner Paper 113 Troubleshooting 116 Cannot Install the Printer Driver 117 Print Quality is Poor or Contains Errors 119 3
Table of Contents Using the Printer with a Network 62 Uninstalling Printer Drivers 66 Routine Maintenance 67 When to Replace Ink Tank and Maintain Print Head 68 Replacing an Ink Tank 69 Printing the Nozzle Check Pattern 74 Print Head Cleaning 78 Print Head Deep Cleaning 81 Cleaning the Printer 83 Transporting the Printer 85 Printing Media 89...-101 104 Photo Paper Pro PC-101S 107 Transparencies CF-102 109 T-Shirt Transfers TR-201 111 Banner Paper 113 Troubleshooting 116 Cannot Install the Printer Driver 117 Print Quality is Poor or Contains Errors 119 3

S820 User's Guide
Page 13
...parts may leak out and stain clothing or the surrounding area. If any ink, consult a doctor immediately. If a child ingests any foreign object (metal or liquid) falls into the printer, unplug the power cord and call for service. Ink may be very hot and could cause burns. 13 Safety Precautions s ...Working around the printer Never put your hands or fingers in the printer while it is printing. s Print heads and ink tanks For safety reasons store print heads and ink tanks out of the reach of flammable solvents (alcohol, thinners....
...parts may leak out and stain clothing or the surrounding area. If any ink, consult a doctor immediately. If a child ingests any foreign object (metal or liquid) falls into the printer, unplug the power cord and call for service. Ink may be very hot and could cause burns. 13 Safety Precautions s ...Working around the printer Never put your hands or fingers in the printer while it is printing. s Print heads and ink tanks For safety reasons store print heads and ink tanks out of the reach of flammable solvents (alcohol, thinners....

S820 User's Guide
Page 15
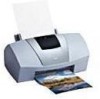
Paper feeds automatically, one sheet at a time. Paper Output Tray Printer Parts and Their Functions Paper Guide When loading paper, ensure the left edge just touches this guide. Paper Rest Sheet Feeder Load paper here. Front View 15 To move the paper guide, pinch the knob and slide in the appropriate direction. Front Cover Open to "Operation Panel." Front View Operation Panel For details, refer to replace the ink tanks or remove jammed paper.
Paper feeds automatically, one sheet at a time. Paper Output Tray Printer Parts and Their Functions Paper Guide When loading paper, ensure the left edge just touches this guide. Paper Rest Sheet Feeder Load paper here. Front View 15 To move the paper guide, pinch the knob and slide in the appropriate direction. Front Cover Open to "Operation Panel." Front View Operation Panel For details, refer to replace the ink tanks or remove jammed paper.

S820 User's Guide
Page 35
... on print head alignment, refer to Quick Start Guide. (4) Nozzle Check Prints the nozzle check pattern to change printer mode. (7) Quiet Mode Reduces the printing noise. Printer Properties Dialog Box Description 35 For details, refer to "Examining the Nozzle Check Pattern". (5) Power Off Click to... jobs. Click to start the BJ Status Monitor, to modify the printer mode. Change the settings in the Custom Setting dialog box and click Send to ensure the print head nozzles are ejecting ink normally. Printer Driver Functions (Windows) (3) Print Head Alignment Aligns the print head....
... on print head alignment, refer to Quick Start Guide. (4) Nozzle Check Prints the nozzle check pattern to change printer mode. (7) Quiet Mode Reduces the printing noise. Printer Properties Dialog Box Description 35 For details, refer to "Examining the Nozzle Check Pattern". (5) Power Off Click to... jobs. Click to start the BJ Status Monitor, to modify the printer mode. Change the settings in the Custom Setting dialog box and click Send to ensure the print head nozzles are ejecting ink normally. Printer Driver Functions (Windows) (3) Print Head Alignment Aligns the print head....

S820 User's Guide
Page 36
...ink is sent to check the status of the error and suggests an appropriate solution. When launched, the BJ Status Monitor appears as an icon on the Task Bar. 1 Click the Canon BJ Status Monitor icon on the Task Bar. If an error occurs, the status monitor indicates the nature of the printer.... The BJ Status Monitor appears. BJ Status Monitor Functions Printer Driver Functions (Windows) The BJ Status Monitor allows you to...
...ink is sent to check the status of the error and suggests an appropriate solution. When launched, the BJ Status Monitor appears as an icon on the Task Bar. 1 Click the Canon BJ Status Monitor icon on the Task Bar. If an error occurs, the status monitor indicates the nature of the printer.... The BJ Status Monitor appears. BJ Status Monitor Functions Printer Driver Functions (Windows) The BJ Status Monitor allows you to...

S820 User's Guide
Page 38
if the printer runs out of interest. BJ Status Monitor Functions 38 In Windows Me or Windows 98, click the Guide tab and follow the instructions on the topic of paper or ink is low. In such cases, take the appropriate action as described in the Printer Status tab. When paper has run out: When the ink level is automatically displayed when an error occurs, e.g. Printer Driver Functions (Windows) s When errors occur or ink runs low The BJ Status Monitor is low: Note ® For details on the BJ Status Monitor, select the Help menu and click on screen.
if the printer runs out of interest. BJ Status Monitor Functions 38 In Windows Me or Windows 98, click the Guide tab and follow the instructions on the topic of paper or ink is low. In such cases, take the appropriate action as described in the Printer Status tab. When paper has run out: When the ink level is automatically displayed when an error occurs, e.g. Printer Driver Functions (Windows) s When errors occur or ink runs low The BJ Status Monitor is low: Note ® For details on the BJ Status Monitor, select the Help menu and click on screen.

S820 User's Guide
Page 51
Printer Driver Functions (Macintosh) (2) Print Quality Move the slide bar to the left increases printing speed. (3) Halftoning Select either Dither or Diffusion ink dot configurations. Description of Print Settings 51 Moving the bar to the right enhances print quality, and moving it to adjust the balance between print quality and speed.
Printer Driver Functions (Macintosh) (2) Print Quality Move the slide bar to the left increases printing speed. (3) Halftoning Select either Dither or Diffusion ink dot configurations. Description of Print Settings 51 Moving the bar to the right enhances print quality, and moving it to adjust the balance between print quality and speed.

S820 User's Guide
Page 60
Displays information about the documents queued for printing. Displays the printer status. To change the print order, place the mouse pointer over the name of the Option dialog box. Note, however, that you can print the ... on what to the new position, then release. BJ Print Monitor 60 Click to pause printing of documents queued for printing. s BJ Print Monitor Functions Printer Driver Functions (Macintosh) ... Click to resume printing. ... The BJ Print Monitor allows you to cancel printing of a document already printing. Displays the...
Displays information about the documents queued for printing. Displays the printer status. To change the print order, place the mouse pointer over the name of the Option dialog box. Note, however, that you can print the ... on what to the new position, then release. BJ Print Monitor 60 Click to pause printing of documents queued for printing. s BJ Print Monitor Functions Printer Driver Functions (Macintosh) ... Click to resume printing. ... The BJ Print Monitor allows you to cancel printing of a document already printing. Displays the...

S820 User's Guide
Page 67
Routine Maintenance • When to Replace Ink Tank and Maintain Print Head • Replacing an Ink Tank • Printing the Nozzle Check Pattern • Print Head Cleaning • Print Head Deep Cleaning • Cleaning the Printer • Transporting the Printer Routine Maintenance 67
Routine Maintenance • When to Replace Ink Tank and Maintain Print Head • Replacing an Ink Tank • Printing the Nozzle Check Pattern • Print Head Cleaning • Print Head Deep Cleaning • Cleaning the Printer • Transporting the Printer Routine Maintenance 67
S820 User's Guide
Page 68
... empty, the BJ Status Monitor (Windows) or the BJ Print Monitor (Macintosh) will initially advise you of a low ink level. Contact a Canon service representative. When to flash four times. ¬ Replacing an Ink Tank If printing becomes faint or a specific colour is no longer printing, even though there is still enough...
... empty, the BJ Status Monitor (Windows) or the BJ Print Monitor (Macintosh) will initially advise you of a low ink level. Contact a Canon service representative. When to flash four times. ¬ Replacing an Ink Tank If printing becomes faint or a specific colour is no longer printing, even though there is still enough...

S820 User's Guide
Page 69
... in the incorrect position. The print head holder moves to ensure the best quality. 1 Ensure that the printer is on, and then open the front cover. Replacing an Ink Tank 69 Canon recommends using a refilled cartridge is used, or installed in the order indicated below. • Yellow: BCI... BCI-6PC Photo • Black: BCI-6BK Note ® Damage caused by the Canon warranty. Replacing an Ink Tank Routine Maintenance When replacing an ink tank, check the model number very carefully. The printer will not print properly if the wrong ink tank is not covered by using only original...
... in the incorrect position. The print head holder moves to ensure the best quality. 1 Ensure that the printer is on, and then open the front cover. Replacing an Ink Tank 69 Canon recommends using a refilled cartridge is used, or installed in the order indicated below. • Yellow: BCI... BCI-6PC Photo • Black: BCI-6BK Note ® Damage caused by the Canon warranty. Replacing an Ink Tank Routine Maintenance When replacing an ink tank, check the model number very carefully. The printer will not print properly if the wrong ink tank is not covered by using only original...

S820 User's Guide
Page 70
Routine Maintenance Do not touch the lock lever; Push the tab and remove the ink tank. remove only the ink tank. Important ® • Handle ink tanks carefully to avoid staining clothing or the surrounding area. • Discard empty ink tanks according to the local laws and regulations regarding disposal of consumables. Replacing an Ink Tank 70 2 Remove the empty ink tank.
Routine Maintenance Do not touch the lock lever; Push the tab and remove the ink tank. remove only the ink tank. Important ® • Handle ink tanks carefully to avoid staining clothing or the surrounding area. • Discard empty ink tanks according to the local laws and regulations regarding disposal of consumables. Replacing an Ink Tank 70 2 Remove the empty ink tank.

S820 User's Guide
Page 71
3 Unpack the new ink tank and pull off the orange tape. Routine Maintenance Replacing an Ink Tank 71
3 Unpack the new ink tank and pull off the orange tape. Routine Maintenance Replacing an Ink Tank 71

S820 User's Guide
Page 72
Ink may squirt out of the ink tank. Important ® • Do not re-attach the protective cap once you have removed it. • Once you have removed the protective cap, do not touch the open ink port. Never press here! Replacing an Ink Tank 72 Routine Maintenance 4 Remove the orange protective cap from the bottom of the tank.
Ink may squirt out of the ink tank. Important ® • Do not re-attach the protective cap once you have removed it. • Once you have removed the protective cap, do not touch the open ink port. Never press here! Replacing an Ink Tank 72 Routine Maintenance 4 Remove the orange protective cap from the bottom of the tank.

S820 User's Guide
Page 73
... installation process is now complete. ® • To maintain optimal print quality, use an ink tank within six months of first use. • Once an ink tank has been used, do not remove it from the printer and leave it out in the open and then reinstalled in the print head holder.... Replacing an Ink Tank 73 Press on the "PUSH" mark until the ink tank snaps firmly into place. The...
... installation process is now complete. ® • To maintain optimal print quality, use an ink tank within six months of first use. • Once an ink tank has been used, do not remove it from the printer and leave it out in the open and then reinstalled in the print head holder.... Replacing an Ink Tank 73 Press on the "PUSH" mark until the ink tank snaps firmly into place. The...

S820 User's Guide
Page 74
... click the Nozzle Check icon. 4 When the confirmation message is incorrect. Nozzle check pattern printing can be executed from the Windows and Macintosh printer drivers, or from the print head nozzles, and to verify print head alignment. Use this function when printed results are blurred or the colour is... Nozzle Check Pattern Printing the Nozzle Check Pattern 74 Printing the Nozzle Check Pattern Routine Maintenance Print the nozzle check pattern to determine whether the ink sprays normally from the printer itself.
... click the Nozzle Check icon. 4 When the confirmation message is incorrect. Nozzle check pattern printing can be executed from the Windows and Macintosh printer drivers, or from the print head nozzles, and to verify print head alignment. Use this function when printed results are blurred or the colour is... Nozzle Check Pattern Printing the Nozzle Check Pattern 74 Printing the Nozzle Check Pattern Routine Maintenance Print the nozzle check pattern to determine whether the ink sprays normally from the printer itself.

S820 User's Guide
Page 77
Examine the nozzle check pattern output by the printer. Lines missing here indicate the print head requires cleaning. Unevenness in these patterns indicates the print head requires alignment. Printing the Nozzle Check Pattern 77 Routine Maintenance s Examining the Nozzle Check Pattern The nozzle check pattern should appear as follows when ink is discharged properly.
Examine the nozzle check pattern output by the printer. Lines missing here indicate the print head requires cleaning. Unevenness in these patterns indicates the print head requires alignment. Printing the Nozzle Check Pattern 77 Routine Maintenance s Examining the Nozzle Check Pattern The nozzle check pattern should appear as follows when ink is discharged properly.

S820 User's Guide
Page 78
Print Head Cleaning Routine Maintenance Clean the print head if you suspect that the printer is on. 2 Open the Printer Properties Dialog Box. ¬ Opening the Printer Properties Dialog Box 3 Click the Maintenance tab and then click the Cleaning icon. 4 When the confirmation ... cleaning can be clogged. s Cleaning the Print Head from the Printer Drivers Windows 1 Ensure that the nozzles might be performed either from the printer drivers or from the printer itself. Note ® Cleaning the head consumes ink, so perform head cleaning only when necessary. Print Head Cleaning 78...
Print Head Cleaning Routine Maintenance Clean the print head if you suspect that the printer is on. 2 Open the Printer Properties Dialog Box. ¬ Opening the Printer Properties Dialog Box 3 Click the Maintenance tab and then click the Cleaning icon. 4 When the confirmation ... cleaning can be clogged. s Cleaning the Print Head from the Printer Drivers Windows 1 Ensure that the nozzles might be performed either from the printer drivers or from the printer itself. Note ® Cleaning the head consumes ink, so perform head cleaning only when necessary. Print Head Cleaning 78...

S820 User's Guide
Page 81
...by standard print head cleaning, try deep cleaning, which is displayed, click OK. Perform print head deep cleaning from the printer driver. Note ® Print head deep cleaning consumes more powerful process. Print Head Deep Cleaning 81 Windows 1 Ensure the... printer is on. 2 Open the Printer Properties dialog box. ¬ Opening the Printer Properties Dialog Box 3 Click the Maintenance tab and then click the Deep Cleaning icon. 4 When the confi...
...by standard print head cleaning, try deep cleaning, which is displayed, click OK. Perform print head deep cleaning from the printer driver. Note ® Print head deep cleaning consumes more powerful process. Print Head Deep Cleaning 81 Windows 1 Ensure the... printer is on. 2 Open the Printer Properties dialog box. ¬ Opening the Printer Properties Dialog Box 3 Click the Maintenance tab and then click the Deep Cleaning icon. 4 When the confi...

S820 User's Guide
Page 83
Cleaning the Printer 83 Caution ® Always ensure you unplug the printer before cleaning the printer to avoid an electric shock. When the accumulated debris becomes clearly visible, clean the printer by the following procedure. 1 Turn the printer off. 2 Ensure that the POWER lamp is off and unplug the printer. Cleaning the Printer Routine Maintenance During normal printing, ink and small scraps of paper accumulate in the printer.
Cleaning the Printer 83 Caution ® Always ensure you unplug the printer before cleaning the printer to avoid an electric shock. When the accumulated debris becomes clearly visible, clean the printer by the following procedure. 1 Turn the printer off. 2 Ensure that the POWER lamp is off and unplug the printer. Cleaning the Printer Routine Maintenance During normal printing, ink and small scraps of paper accumulate in the printer.


