
Photo Application Guide(Mac)
Page 2
Table of Contents Table of Contents Printing with ImageBrowser 4 Basic Operation Procedure 7 What are Canon Utilities 12 Starting ImageBrowser 13 Using ImageBrowser 15 Using the Browser window 16 Changing the Appearance of the Browser area 19 Organizing Images 22 Editing Image Using Image Viewer 26 Slide show ...30 Time Tunnel ...36 Adding ...Image Selected in the Browser Area from Other Applications 46 Importing Images 48 Importing images with the Automation wizard 49 Importing images using the Camera window 55 Using the Camera window 58 Setting up your Canon digital camera 66 2
Table of Contents Table of Contents Printing with ImageBrowser 4 Basic Operation Procedure 7 What are Canon Utilities 12 Starting ImageBrowser 13 Using ImageBrowser 15 Using the Browser window 16 Changing the Appearance of the Browser area 19 Organizing Images 22 Editing Image Using Image Viewer 26 Slide show ...30 Time Tunnel ...36 Adding ...Image Selected in the Browser Area from Other Applications 46 Importing Images 48 Importing images with the Automation wizard 49 Importing images using the Camera window 55 Using the Camera window 58 Setting up your Canon digital camera 66 2

Photo Application Guide(Mac)
Page 8
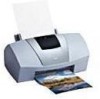
Import images stored in the memory card or or the digital camera into the Camera window. 2 Importing images Start ImageBrowser. The Automation wizard provides easy means of importing images. 8 ImageBrowser supports some simple image editing features.
Import images stored in the memory card or or the digital camera into the Camera window. 2 Importing images Start ImageBrowser. The Automation wizard provides easy means of importing images. 8 ImageBrowser supports some simple image editing features.

Photo Application Guide(Mac)
Page 9
3 Selecting a layout Select a layout you to use and specify the type, orientation, and size of paper. The wizard allows you want to easily choose the free layout option, the image index (list) format, or the perforated paper. * The windows shown above are from BJ S900. 9
3 Selecting a layout Select a layout you to use and specify the type, orientation, and size of paper. The wizard allows you want to easily choose the free layout option, the image index (list) format, or the perforated paper. * The windows shown above are from BJ S900. 9

Photo Application Guide(Mac)
Page 13
...supports the following image file types: Joint Photographic Experts Group (JPEG) Tagged Image File Format (TIFF) EXIF CIFF PICT Windows Bitmap (BMP) Automatic execution by double-clicking its automatic execution feature. At the same time, the Automation wizard starts. Importing... images with the Automation wizard Note ➤ The Canon ImageBrowser Auto Launch control panel allows you would for other applications. Starting ImageBrowser 13 Starting ImageBrowser ImageBrowser automatically starts through ...
...supports the following image file types: Joint Photographic Experts Group (JPEG) Tagged Image File Format (TIFF) EXIF CIFF PICT Windows Bitmap (BMP) Automatic execution by double-clicking its automatic execution feature. At the same time, the Automation wizard starts. Importing... images with the Automation wizard Note ➤ The Canon ImageBrowser Auto Launch control panel allows you would for other applications. Starting ImageBrowser 13 Starting ImageBrowser ImageBrowser automatically starts through ...

Photo Application Guide(Mac)
Page 14
.... Refer to Using the Browser window for more information on this window. When the Canon ImageBrowser alias icon is displayed as shown below. Canon ImageBrowser on the desktop Double-clicking the Canon ImageBrowser icon (alias) on the desktop will start ImageBrowser, and the initial window is not displayed on the desktop, open the ImageBrowser folder, in...
.... Refer to Using the Browser window for more information on this window. When the Canon ImageBrowser alias icon is displayed as shown below. Canon ImageBrowser on the desktop Double-clicking the Canon ImageBrowser icon (alias) on the desktop will start ImageBrowser, and the initial window is not displayed on the desktop, open the ImageBrowser folder, in...

Photo Application Guide(Mac)
Page 15
Using ImageBrowser This section provides an overview of ImageBrowser and its functions. • Using the Browser window • Changing the Appearance of the Browser area • Switching to the Preview Display • Changing Display Options • Organizing Images... • Deleting Image • Updating Information in the Browser Area • Editing Image Using Image Viewer • Cropping Image • Adjusting Image Colors • Saving Image after Processing • Slide show • Time Tunnel • Adding Sound to Image • Creating Image Files Attached to E-mail...
Using ImageBrowser This section provides an overview of ImageBrowser and its functions. • Using the Browser window • Changing the Appearance of the Browser area • Switching to the Preview Display • Changing Display Options • Organizing Images... • Deleting Image • Updating Information in the Browser Area • Editing Image Using Image Viewer • Cropping Image • Adjusting Image Colors • Saving Image after Processing • Slide show • Time Tunnel • Adding Sound to Image • Creating Image Files Attached to E-mail...

Photo Application Guide(Mac)
Page 16
Using the Browser window 16 Using the Browser window This section describes the names and functions of the areas and buttons in the Browser window, the main window of ImageBrowser. (1) Explorer View (2) Browser area (7) Thumbnails (3) Control panel (4) CANON CAMERA button (5) SELECT ALL button (6) The number of images contained in the folder is displayed.
Using the Browser window 16 Using the Browser window This section describes the names and functions of the areas and buttons in the Browser window, the main window of ImageBrowser. (1) Explorer View (2) Browser area (7) Thumbnails (3) Control panel (4) CANON CAMERA button (5) SELECT ALL button (6) The number of images contained in the folder is displayed.
Photo Application Guide(Mac)
Page 17
... in the selected folder in the hard drives. Using the Browser window 17 (1) Explorer View This view presents the names of your hard drives and the folders contained in the Explorer View. When your Canon digital camera is displayed. (7) Thumbnails Thumbnails are displayed. (2) Browser...to Changing the appearance of the Browser area. (3) Control panel This area contains several buttons to manipulate the images in the Browser window. (4) CANON CAMERA button Click this button selects all images in the Browser area. (6) The number of images contained in the folder is connected...
... in the selected folder in the hard drives. Using the Browser window 17 (1) Explorer View This view presents the names of your hard drives and the folders contained in the Explorer View. When your Canon digital camera is displayed. (7) Thumbnails Thumbnails are displayed. (2) Browser...to Changing the appearance of the Browser area. (3) Control panel This area contains several buttons to manipulate the images in the Browser window. (4) CANON CAMERA button Click this button selects all images in the Browser area. (6) The number of images contained in the folder is connected...

Photo Application Guide(Mac)
Page 18
... (image files) in the Browser area. (2) REDUCE button Click this button to display the selected image (thumbnail) in the Image viewer. Using the Browser window 18
... (image files) in the Browser area. (2) REDUCE button Click this button to display the selected image (thumbnail) in the Image viewer. Using the Browser window 18

Photo Application Guide(Mac)
Page 29
Saving Image after Processing The modified image file can be saved with a new name. Editing Image Using Image Viewer 29 SAVE button Clicking this button opens the Save File window. The iamge is saved as a new file. Type in a file name and specify the file type, and click the Save button.
Saving Image after Processing The modified image file can be saved with a new name. Editing Image Using Image Viewer 29 SAVE button Clicking this button opens the Save File window. The iamge is saved as a new file. Type in a file name and specify the file type, and click the Save button.

Photo Application Guide(Mac)
Page 30
Steps 1 Choose the Slide Show Options from the View menu. Slide show opens. The window containing options for a slide show 30 Slide show You can review sequentially the selected images in the Browser area as a slide show in full screen mode.
Steps 1 Choose the Slide Show Options from the View menu. Slide show opens. The window containing options for a slide show 30 Slide show You can review sequentially the selected images in the Browser area as a slide show in full screen mode.

Photo Application Guide(Mac)
Page 31
...endlessly, working as a screen saver. Slide show options closes to return to exit the slide show. 3 Specify effects for the slide show 31 The window for slide show . Repeat Continuously: When this option, specify the interval of image switching with a zigzag-shape boundary. 4 Click the OK button. ...next image. Wipe: The current image is pushed away in the specified direction to be replaced with the next image. The window allows you select this radio button is selected, the slide show is overwritten by the next image from the following options: Auto Play:...
...endlessly, working as a screen saver. Slide show options closes to return to exit the slide show. 3 Specify effects for the slide show 31 The window for slide show . Repeat Continuously: When this option, specify the interval of image switching with a zigzag-shape boundary. 4 Click the OK button. ...next image. Wipe: The current image is pushed away in the specified direction to be replaced with the next image. The window allows you select this radio button is selected, the slide show is overwritten by the next image from the following options: Auto Play:...

Photo Application Guide(Mac)
Page 36
... Browser area changes to the Time Tunnel display mode. Drag the slider in the floating pallet displayed to the right of the Time Tunnel window to zoom in/out of the time tunnel. Tool Panel Menu button Clicking this mode, the images contained in the selected folder appear in the... menu. Time Tunnel 36 In this button displays the popup menu in which you to change the appearance of the Time Tunnel window. Images are shown in the Time Tunnel window. When you were in front of the entrance to a time tunnel. Time Tunnel When you select the View Mode from the...
... Browser area changes to the Time Tunnel display mode. Drag the slider in the floating pallet displayed to the right of the Time Tunnel window to zoom in/out of the time tunnel. Tool Panel Menu button Clicking this mode, the images contained in the selected folder appear in the... menu. Time Tunnel 36 In this button displays the popup menu in which you to change the appearance of the Time Tunnel window. Images are shown in the Time Tunnel window. When you were in front of the entrance to a time tunnel. Time Tunnel When you select the View Mode from the...

Photo Application Guide(Mac)
Page 37
The Record panel is displayed over the Browser window. 3 Click the Record button to Image 37 The Record panel during recording is used for Recording 1 Select the image to which you to add sound (audio data) to add sound. 2 Select the Record from the Sound menu. The sound input device selected in the Sound Panel is as shown below. Adding Sound to start recording. Adding Sound to Image ImageBrowser enables you want to an image file. Steps for recording.
The Record panel is displayed over the Browser window. 3 Click the Record button to Image 37 The Record panel during recording is used for Recording 1 Select the image to which you to add sound (audio data) to add sound. 2 Select the Record from the Sound menu. The sound input device selected in the Sound Panel is as shown below. Adding Sound to start recording. Adding Sound to Image ImageBrowser enables you want to an image file. Steps for recording.

Photo Application Guide(Mac)
Page 46
Opening Image Selected in the Browser area using those programs. s Registering Application Programs Open the Preference window by selecting the Preference from Other Applications 46 Opening Image Selected in the Browser Area from Other Applications ImageBrowser allows you to register other application programs. You can start the registered application programs from ImageBrowser and open the images displayed in the Browser Area from the Edit menu.
Opening Image Selected in the Browser area using those programs. s Registering Application Programs Open the Preference window by selecting the Preference from Other Applications 46 Opening Image Selected in the Browser Area from Other Applications ImageBrowser allows you to register other application programs. You can start the registered application programs from ImageBrowser and open the images displayed in the Browser Area from the Edit menu.

Photo Application Guide(Mac)
Page 48
Importing Images This section describes the functionality of ImageBrowser to import/download images from your digital camera. • Importing images with the Automation wizard • Importing images using the Camera window • Using the Camera window • Setting up your Canon digital camera 48
Importing Images This section describes the functionality of ImageBrowser to import/download images from your digital camera. • Importing images with the Automation wizard • Importing images using the Camera window • Using the Camera window • Setting up your Canon digital camera 48

Photo Application Guide(Mac)
Page 51
Importing images with the Automation wizard 51 If you do not want to use the saved sequence of actions. Click the Cancel button to exit the Automation wizard and return to change button to the Browser window. s When the Automation wizard shows the previous settings Your settings in the ImageBrowser Automation wizard dialog box are saved. The next time the Automation wizard starts, the ImageBrowser Automation wizard dialog box shows the previous settings as shown below: Click the Start button to use the saved action sequence, click the Settings change the saved settings.
Importing images with the Automation wizard 51 If you do not want to use the saved sequence of actions. Click the Cancel button to exit the Automation wizard and return to change button to the Browser window. s When the Automation wizard shows the previous settings Your settings in the ImageBrowser Automation wizard dialog box are saved. The next time the Automation wizard starts, the ImageBrowser Automation wizard dialog box shows the previous settings as shown below: Click the Start button to use the saved action sequence, click the Settings change the saved settings.

Photo Application Guide(Mac)
Page 53
...). The Automation wizard starts downloading the selected images and saving them in the selected folder. Importing images with the Automation wizard. 3 Select a category of your Canon camera for more information on its use (for printing or for Email attachment). 4 Click the OK button. Refer to the documentation of images to view...
...). The Automation wizard starts downloading the selected images and saving them in the selected folder. Importing images with the Automation wizard. 3 Select a category of your Canon camera for more information on its use (for printing or for Email attachment). 4 Click the OK button. Refer to the documentation of images to view...

Photo Application Guide(Mac)
Page 54
... the Create Image for more information. 5 Click the OK button. If you click the Cancel button, the Automation wizard terminates to return to the Browser window with the Automation wizard 54 The Automation wizard terminates and the selected action is performed.
... the Create Image for more information. 5 Click the OK button. If you click the Cancel button, the Automation wizard terminates to return to the Browser window with the Automation wizard 54 The Automation wizard terminates and the selected action is performed.
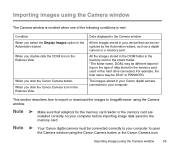
Photo Application Guide(Mac)
Page 55
... by the Automation wizard, such as a digital camera or a memory card. The images stored in your Canon digital camera connected to open the Camera window using the Canon Camera button or the Canon Camera icon. Note ➤ Make sure that can be different depending on your computer. When you click ...double-click the DCIM icon in the Explorer View. Importing images using the Camera window 55 When you click the Canon Camera icon in the Explorer View. Importing images using the Camera window The Camera window is invoked when one of data stored in the memory card used or the ...
... by the Automation wizard, such as a digital camera or a memory card. The images stored in your Canon digital camera connected to open the Camera window using the Canon Camera button or the Canon Camera icon. Note ➤ Make sure that can be different depending on your computer. When you click ...double-click the DCIM icon in the Explorer View. Importing images using the Camera window 55 When you click the Canon Camera icon in the Explorer View. Importing images using the Camera window The Camera window is invoked when one of data stored in the memory card used or the ...


