Photo Application Guide(Mac)
Page 94
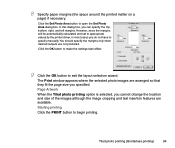
... top, bottom, right, and left margins. Page Artwork When the Tiled photo printing option is selected, you do not have to specify manually. Tiled photo printing (Borderless printing) 94 However, since the margins will be automatically calculated and set to begin printing. You should specify... margins (the space around the printed matter on a page) if necessary. Starting printing Click the PRINT button to appropriate values by the printer driver, in most cases you cannot change the location and size of the images although the image cropping and text insertion features are not ...
... top, bottom, right, and left margins. Page Artwork When the Tiled photo printing option is selected, you do not have to specify manually. Tiled photo printing (Borderless printing) 94 However, since the margins will be automatically calculated and set to begin printing. You should specify... margins (the space around the printed matter on a page) if necessary. Starting printing Click the PRINT button to appropriate values by the printer driver, in most cases you cannot change the location and size of the images although the image cropping and text insertion features are not ...

Photo Application Guide(Mac)
Page 95
Refer to quickly print images on the types of Canon perforated paper. See your printer manuals for more information. Canon perforated paper printing 95 Canon perforated paper printing • Selecting a layout • Starting printing The Canon perforated paper printing feature allows you to About Canon perforated paper for more information on Canon perforated paper. Note ➤ Some printer models may not support the printing on Canon perforated paper.
Refer to quickly print images on the types of Canon perforated paper. See your printer manuals for more information. Canon perforated paper printing 95 Canon perforated paper printing • Selecting a layout • Starting printing The Canon perforated paper printing feature allows you to About Canon perforated paper for more information on Canon perforated paper. Note ➤ Some printer models may not support the printing on Canon perforated paper.

S750 User's Guide
Page 2
Table of Contents Table of Contents Introduction ...4 How to Use This Manual 5 Safety Precautions 7 Printer Parts and Their Functions 13 Front View 14 Rear View ...15 Inside the Printer 16 Operation Panel 17 Printer Driver Functions (Windows 18 Opening the Printer Properties Dialog Box 19 Printer Properties Dialog Box Description 21 BJ Status Monitor Functions 35 Canceling a Print Job 38 Uninstalling Printer Drivers 39 Printer Driver Functions (Macintosh 40 Description of Print Settings 41 BJ Print Monitor 57 Canceling a Print Job 59 1
Table of Contents Table of Contents Introduction ...4 How to Use This Manual 5 Safety Precautions 7 Printer Parts and Their Functions 13 Front View 14 Rear View ...15 Inside the Printer 16 Operation Panel 17 Printer Driver Functions (Windows 18 Opening the Printer Properties Dialog Box 19 Printer Properties Dialog Box Description 21 BJ Status Monitor Functions 35 Canceling a Print Job 38 Uninstalling Printer Drivers 39 Printer Driver Functions (Macintosh 40 Description of Print Settings 41 BJ Print Monitor 57 Canceling a Print Job 59 1

S750 User's Guide
Page 8
...the power cord. 7 Safety Precautions Safety Precautions Please read the safety warnings and cautions provided in this manual to ensure that you ignore any way not described in or unplug the printer from the power supply when your hands are wet. Never damage, modify, stretch or excessively bend ... power cord. Warning ➤ You may cause an electric shock/fire or damage the printer if you use the printer in any of these safety precautions. ■ Choosing a location Do not place the printer close to flammable solvents such as alcohol or thinners. ■ Power supply Never attempt ...
...the power cord. 7 Safety Precautions Safety Precautions Please read the safety warnings and cautions provided in this manual to ensure that you ignore any way not described in or unplug the printer from the power supply when your hands are wet. Never damage, modify, stretch or excessively bend ... power cord. Warning ➤ You may cause an electric shock/fire or damage the printer if you use the printer in any of these safety precautions. ■ Choosing a location Do not place the printer close to flammable solvents such as alcohol or thinners. ■ Power supply Never attempt ...

S750 User's Guide
Page 20
... for your application. Note 2 Ensure that Canon S750 is generally used to print a document. Printer Driver Functions (Windows) Opening the Printer Properties Dialog Box The Printer Properties dialog box can usually be opened from... either within an application, or directly from the Windows Start menu. ■ Opening the Printer Properties dialog box from the File menu. For further details, see the user's manual for opening the Printer...
... for your application. Note 2 Ensure that Canon S750 is generally used to print a document. Printer Driver Functions (Windows) Opening the Printer Properties Dialog Box The Printer Properties dialog box can usually be opened from... either within an application, or directly from the Windows Start menu. ■ Opening the Printer Properties dialog box from the File menu. For further details, see the user's manual for opening the Printer...
S750 User's Guide
Page 24
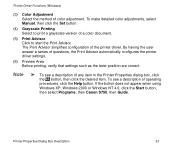
... XP, Windows 2000 or Windows NT 4.0, click the Start button, then select Programs, then Canon S750, then Guide. Note ➤ To see a description of any item in the Printer Properties dialog box, click the button, then click the desired item. To see a description of..., click the Help button. By having the user answer a series of a color document. (5) Print Advisor Click to start the Print Advisor. Printer Properties Dialog Box Description 23 To make detailed color adjustments, select Manual, then click the Set button. (4) Grayscale Printing Select to print a grayscale version...
... XP, Windows 2000 or Windows NT 4.0, click the Start button, then select Programs, then Canon S750, then Guide. Note ➤ To see a description of any item in the Printer Properties dialog box, click the button, then click the desired item. To see a description of..., click the Help button. By having the user answer a series of a color document. (5) Print Advisor Click to start the Print Advisor. Printer Properties Dialog Box Description 23 To make detailed color adjustments, select Manual, then click the Set button. (4) Grayscale Printing Select to print a grayscale version...

S750 User's Guide
Page 43
...in your application program. (1) (2) (3) (7) (10) (4) (8) (5) (6) (9) (1) Paper Size Select the size of Print Settings 42 To enter the size manually, select Custom 1 to Custom 3, then click Custom. (2) Banner Printing Select this check box when printing on banner paper. (3) Borderless Printing The image is printed ...all other media types, the print quality may decrease. Description of the paper for the print job from the drop-down menu. Printer Driver Functions (Macintosh) Page Setup Dialog Box The Page Setup dialog box contains settings for the printed page, such as the size...
...in your application program. (1) (2) (3) (7) (10) (4) (8) (5) (6) (9) (1) Paper Size Select the size of Print Settings 42 To enter the size manually, select Custom 1 to Custom 3, then click Custom. (2) Banner Printing Select this check box when printing on banner paper. (3) Borderless Printing The image is printed ...all other media types, the print quality may decrease. Description of the paper for the print job from the drop-down menu. Printer Driver Functions (Macintosh) Page Setup Dialog Box The Page Setup dialog box contains settings for the printed page, such as the size...

S750 User's Guide
Page 47
...(2) (1) Media Type Ensure this setting matches the type of media loaded in the printer. (2) Grayscale Printing Select to be used for your document and required print results. (4) Details Manually set the print quality and color settings in the Detailed Setting Dialog Box. (This option is only available if... Manual print mode is selected.) Description of Print Settings 46 Printer Driver Functions (Macintosh) Print Dialog Box ...
...(2) (1) Media Type Ensure this setting matches the type of media loaded in the printer. (2) Grayscale Printing Select to be used for your document and required print results. (4) Details Manually set the print quality and color settings in the Detailed Setting Dialog Box. (This option is only available if... Manual print mode is selected.) Description of Print Settings 46 Printer Driver Functions (Macintosh) Print Dialog Box ...

S750 User's Guide
Page 49
in the Print dialog box, then (2) (1) (3) (1) Panel display icons Click these icons to switch between panels in the Detailed Setting dialog box. Printer Driver Functions (Macintosh) Detailed Setting Dialog Box To open the Detailed Setting dialog box, select Manual click Details. Description of Print Settings 48
in the Print dialog box, then (2) (1) (3) (1) Panel display icons Click these icons to switch between panels in the Detailed Setting dialog box. Printer Driver Functions (Macintosh) Detailed Setting Dialog Box To open the Detailed Setting dialog box, select Manual click Details. Description of Print Settings 48
S750 User's Guide
Page 98
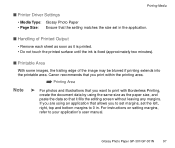
If you to set margins, set in . Canon recommends that you print within the printing area. ➡ Printing Area Note ➤ For photos and illustrations that you want... data so that it fills the editing screen without leaving any margins. Glossy Photo Paper GP-301/GP-301N 97 Printing Media ■ Printer Driver Settings • Media Type: Glossy Photo Paper • Page Size: Ensure that the setting matches the size set the left, ...image may be blurred if printing extends into the printable area. For instructions on setting margins, refer to your application's user manual.
If you to set margins, set in . Canon recommends that you print within the printing area. ➡ Printing Area Note ➤ For photos and illustrations that you want... data so that it fills the editing screen without leaving any margins. Glossy Photo Paper GP-301/GP-301N 97 Printing Media ■ Printer Driver Settings • Media Type: Glossy Photo Paper • Page Size: Ensure that the setting matches the size set the left, ...image may be blurred if printing extends into the printable area. For instructions on setting margins, refer to your application's user manual.

S750 User's Guide
Page 125
Print Quality is Poor or Contains Errors 124 Windows 1 Open the Printer Properties dialog box. 2 On the Main tab, click High for the Print Quality setting. Troubleshooting ■ In the printer driver settings, select a higher print quality setting. Macintosh 1 Open the Print dialog box. 2 For Print Mode, select Manual, then click Details. 3 Click the Quality icon, then drag the Print Quality slider to the Fine end.
Print Quality is Poor or Contains Errors 124 Windows 1 Open the Printer Properties dialog box. 2 On the Main tab, click High for the Print Quality setting. Troubleshooting ■ In the printer driver settings, select a higher print quality setting. Macintosh 1 Open the Print dialog box. 2 For Print Mode, select Manual, then click Details. 3 Click the Quality icon, then drag the Print Quality slider to the Fine end.

S750 User's Guide
Page 126
Windows 1 Open the Printer Properties dialog box. 2 On the Main tab, select Manual for example, photos or pictures with intense colors). ■ Reduce the Intensity setting in the printer driver and try printing again. Print Quality is Poor or Contains Errors 125 Troubleshooting Printed Paper Curls or Ink Blots ■ Use high resolution paper or photo paper to print images that require a lot of ink (for Color Adjustment, then click Set. 3 Drag the Intensity slider to adjust the intensity.
Windows 1 Open the Printer Properties dialog box. 2 On the Main tab, select Manual for example, photos or pictures with intense colors). ■ Reduce the Intensity setting in the printer driver and try printing again. Print Quality is Poor or Contains Errors 125 Troubleshooting Printed Paper Curls or Ink Blots ■ Use high resolution paper or photo paper to print images that require a lot of ink (for Color Adjustment, then click Set. 3 Drag the Intensity slider to adjust the intensity.

S750 User's Guide
Page 132
Troubleshooting Windows 1 Open the Printer Properties dialog box. 2 On the Main tab, select Manual for Color Adjustment, then click Set. 3 Drag the Intensity slider to set the intensity. ■ Ensure you are printing within the recommended printing area. ➡ Printing Area Print Quality is Poor or Contains Errors 131 Macintosh 1 Open the Print dialog box. 2 For Print Mode, select Manual, then click Details. 3 Click the Color icon and drag the Intensity slider to adjust the intensity.
Troubleshooting Windows 1 Open the Printer Properties dialog box. 2 On the Main tab, select Manual for Color Adjustment, then click Set. 3 Drag the Intensity slider to set the intensity. ■ Ensure you are printing within the recommended printing area. ➡ Printing Area Print Quality is Poor or Contains Errors 131 Macintosh 1 Open the Print dialog box. 2 For Print Mode, select Manual, then click Details. 3 Click the Color icon and drag the Intensity slider to adjust the intensity.

S750 User's Guide
Page 134
Macintosh 1 Open the Print dialog box. 2 For Print Mode, select Manual, then click Details. 3 Click the Quality icon, then drag the Print Quality slider to the Fine end. Troubleshooting Colors are Uneven or Streaked ■ Increase the print quality setting in the printer driver settings. Print Quality is Poor or Contains Errors 133 Windows 1 Open the Printer Properties dialog box. 2 On the Main tab, click High for the Print Quality setting.
Macintosh 1 Open the Print dialog box. 2 For Print Mode, select Manual, then click Details. 3 Click the Quality icon, then drag the Print Quality slider to the Fine end. Troubleshooting Colors are Uneven or Streaked ■ Increase the print quality setting in the printer driver settings. Print Quality is Poor or Contains Errors 133 Windows 1 Open the Printer Properties dialog box. 2 On the Main tab, click High for the Print Quality setting.

S750 User's Guide
Page 135
Troubleshooting ■ Set the halftoning method to Diffusion in the printer driver settings. Windows 1 Open the Printer Properties dialog box. 2 On the Main tab, select Custom for the Print Quality setting, then click Set. 3 Click Diffusion for the Halftoning setting. Print Quality is Poor or Contains Errors 134 Macintosh 1 Open the Print dialog box. 2 For Print Mode, select Manual, then click Details. 3 Click the Quality icon, then click Diffusion for the Halftoning setting.
Troubleshooting ■ Set the halftoning method to Diffusion in the printer driver settings. Windows 1 Open the Printer Properties dialog box. 2 On the Main tab, select Custom for the Print Quality setting, then click Set. 3 Click Diffusion for the Halftoning setting. Print Quality is Poor or Contains Errors 134 Macintosh 1 Open the Print dialog box. 2 For Print Mode, select Manual, then click Details. 3 Click the Quality icon, then click Diffusion for the Halftoning setting.
S750 User's Guide
Page 150
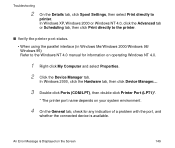
In Windows 2000, click the Hardware tab, then click Device Manager.... 3 Double-click Ports (COM/LPT), then double-click Printer Port (LPT1)*. * The printer port name depends on your system environment. 4 On the General tab, check for information on the Screen 149 Troubleshooting 2 On the ...Details tab, click Spool Settings, then select Print directly to the Windows NT 4.0 manual for any indication of a problem with the port, and ...
In Windows 2000, click the Hardware tab, then click Device Manager.... 3 Double-click Ports (COM/LPT), then double-click Printer Port (LPT1)*. * The printer port name depends on your system environment. 4 On the General tab, check for information on the Screen 149 Troubleshooting 2 On the ...Details tab, click Spool Settings, then select Print directly to the Windows NT 4.0 manual for any indication of a problem with the port, and ...
S750 User's Guide
Page 151
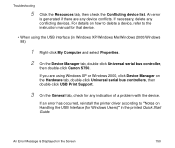
... an error has occurred, reinstall the printer driver according to the instruction manual for Windows Users)" in Windows XP/Windows Me/Windows 2000/Windows 98) 1 Right-click My Computer and select Properties. 2 On the Device Manager tab, double-click Universal serial bus controller, then double-click Canon S750. Troubleshooting 5 Click the Resources tab, then...
... an error has occurred, reinstall the printer driver according to the instruction manual for Windows Users)" in Windows XP/Windows Me/Windows 2000/Windows 98) 1 Right-click My Computer and select Properties. 2 On the Device Manager tab, double-click Universal serial bus controller, then double-click Canon S750. Troubleshooting 5 Click the Resources tab, then...

S750 User's Guide
Page 168
... the ECP mode, first confirm the following: • The printer and computer are connected with Windows 98, Windows Me and Windows 2000. Refer to your computer manual for details on some computers. When using the parallel printer interface, use the ECP data transfer mode for faster printing. ...Note ➤ The ECP mode may not speed up printing on printer port specifications and BIOS settings. 2 Open the Printer Properties dialog box...
... the ECP mode, first confirm the following: • The printer and computer are connected with Windows 98, Windows Me and Windows 2000. Refer to your computer manual for details on some computers. When using the parallel printer interface, use the ECP data transfer mode for faster printing. ...Note ➤ The ECP mode may not speed up printing on printer port specifications and BIOS settings. 2 Open the Printer Properties dialog box...

S750 User's Guide
Page 2
Table of Contents Table of Contents Introduction ...5 How to Use This Manual 6 Safety Precautions 8 Printer Parts and Their Functions 14 Front View 15 Rear View ...16 Inside the Printer 17 Operation Panel 18 Printer Driver Functions (Windows 19 Opening the Printer Properties Dialog Box 20 Printer Properties Dialog Box Description 22 BJ Status Monitor Functions 36 Cancelling a Print Job 39 Uninstalling Printer Drivers 40 Printer Driver Functions (Macintosh 41 Description of Print Settings 42 BJ Print Monitor 58 Cancelling a Print Job 60 2
Table of Contents Table of Contents Introduction ...5 How to Use This Manual 6 Safety Precautions 8 Printer Parts and Their Functions 14 Front View 15 Rear View ...16 Inside the Printer 17 Operation Panel 18 Printer Driver Functions (Windows 19 Opening the Printer Properties Dialog Box 20 Printer Properties Dialog Box Description 22 BJ Status Monitor Functions 36 Cancelling a Print Job 39 Uninstalling Printer Drivers 40 Printer Driver Functions (Macintosh 41 Description of Print Settings 42 BJ Print Monitor 58 Cancelling a Print Job 60 2

S750 User's Guide
Page 8
... Precautions Safety Precautions Please read the safety warnings and cautions provided in this manual to ensure that you ignore any way not described in this manual. s Choosing a location Do not place the printer close to plug in or unplug the printer from the power supply when your hands are wet. s Power supply Never attempt...
... Precautions Safety Precautions Please read the safety warnings and cautions provided in this manual to ensure that you ignore any way not described in this manual. s Choosing a location Do not place the printer close to plug in or unplug the printer from the power supply when your hands are wet. s Power supply Never attempt...

