iP2000 Easy Setup Instructions
Page 1
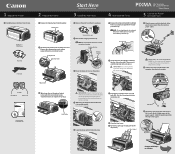
... gray lock lever on the right. Shipping Tape 1 Remove the black ink tank (BCI-24 Black) from the box. Click Series Photo Printer 5 Connect the Printer And Load Paper 1 Plug the power cord into place. 4 Close the front cover. 5 Open the paper support and pull out the output...gray lock lever is raised into the notches located above the print head holder before the printer is securely seated. Slide the guide toward the left . PIXMA iP2000 Photo Printer Print Head Power Cord 2 Prepare the Printer Start Here Easy Setup Instructions 3 Install the Print Head 4 Install the Ink Tanks 1...
... gray lock lever on the right. Shipping Tape 1 Remove the black ink tank (BCI-24 Black) from the box. Click Series Photo Printer 5 Connect the Printer And Load Paper 1 Plug the power cord into place. 4 Close the front cover. 5 Open the paper support and pull out the output...gray lock lever is raised into the notches located above the print head holder before the printer is securely seated. Slide the guide toward the left . PIXMA iP2000 Photo Printer Print Head Power Cord 2 Prepare the Printer Start Here Easy Setup Instructions 3 Install the Print Head 4 Install the Ink Tanks 1...
iP2000 Easy Setup Instructions
Page 2
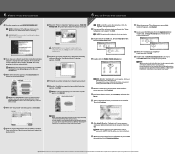
... for the first time, it takes approximately one minute. NOTE: If the setup does not run automatically. QA7-3263-V02 ©2004 Canon Inc. Specifications subject to continue. Select Custom Install in Thailand IMPORTANT: If your CD-ROM drive. 3 When the main menu appears, ...Agree. 6 Select a destination for about one minute until the printer starts printing. · If print quality is not satisfactory after installing the printer, you to restart the computer appears, click Restart. 3 Double-click the PIXMA iP2000 280.pkg icon. 11 When the "Installation is your computer cannot...
... for the first time, it takes approximately one minute. NOTE: If the setup does not run automatically. QA7-3263-V02 ©2004 Canon Inc. Specifications subject to continue. Select Custom Install in Thailand IMPORTANT: If your CD-ROM drive. 3 When the main menu appears, ...Agree. 6 Select a destination for about one minute until the printer starts printing. · If print quality is not satisfactory after installing the printer, you to restart the computer appears, click Restart. 3 Double-click the PIXMA iP2000 280.pkg icon. 11 When the "Installation is your computer cannot...
iP2000 Quick Start Guide
Page 2
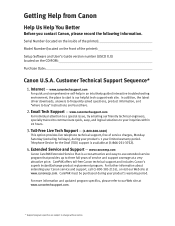
...4. For more information and updated program specifics, please refer to three full years of the printer): Setup Software and User's Guide version number (USCD X.X) located on the CD-ROM: Purchase Date: Canon U.S.A. In addition, the latest driver downloads, answers to frequently asked questions, product information, ...change without notice. CarePAK must be purchased during your inquiries within 24 hours. 3. Serial Number (located on the inside of the printer): Model Number (located on the front of service and support coverage at www.canonesp.com. Telephone Device for the Deaf (TDD) ...
...4. For more information and updated program specifics, please refer to three full years of the printer): Setup Software and User's Guide version number (USCD X.X) located on the CD-ROM: Purchase Date: Canon U.S.A. In addition, the latest driver downloads, answers to frequently asked questions, product information, ...change without notice. CarePAK must be purchased during your inquiries within 24 hours. 3. Serial Number (located on the inside of the printer): Model Number (located on the front of service and support coverage at www.canonesp.com. Telephone Device for the Deaf (TDD) ...
iP2000 Quick Start Guide
Page 4
... manual may not be understood to your Canon PIXMA iP2000 Photo Printer. Under the copyright laws, this manual thoroughly in the U.S. As an ENERGY STAR partner, Canon U.S.A., Inc., has determined that it will be an easy-to-use guide to be, representation or warranties concerning the products described. Canon U.S.A., Inc. All information regarding the accuracy thereof...
... manual may not be understood to your Canon PIXMA iP2000 Photo Printer. Under the copyright laws, this manual thoroughly in the U.S. As an ENERGY STAR partner, Canon U.S.A., Inc., has determined that it will be an easy-to-use guide to be, representation or warranties concerning the products described. Canon U.S.A., Inc. All information regarding the accuracy thereof...
iP2000 Quick Start Guide
Page 5
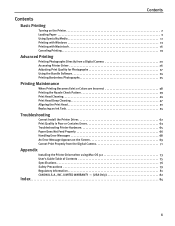
... 16 Canceling Printing 19 Advanced Printing Printing Photographs Directly from a Digital Camera 20 Accessing Printer Driver 26 Adjusting Print Quality for Photographs 27 Using the Bundle Software 34 Printing Borderless ...Replacing an Ink Tank 54 Troubleshooting Cannot Install the Printer Driver 62 Print Quality is Poor or Contains Errors 63 Troubleshooting Printer Hardware 65 Paper Does Not Feed Properly 66 Handling...Print Properly from the Digital Camera 71 Appendix Installing the Printer Driver when using Mac OS 9.x 73 User's Guide Table of Contents 75 Specifications 76...
... 16 Canceling Printing 19 Advanced Printing Printing Photographs Directly from a Digital Camera 20 Accessing Printer Driver 26 Adjusting Print Quality for Photographs 27 Using the Bundle Software 34 Printing Borderless ...Replacing an Ink Tank 54 Troubleshooting Cannot Install the Printer Driver 62 Print Quality is Poor or Contains Errors 63 Troubleshooting Printer Hardware 65 Paper Does Not Feed Properly 66 Handling...Print Properly from the Digital Camera 71 Appendix Installing the Printer Driver when using Mac OS 9.x 73 User's Guide Table of Contents 75 Specifications 76...
iP2000 Quick Start Guide
Page 6
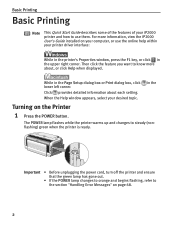
... feature you want to steady (nonflashing) green when the printer is ready. While in the Turning on page 68. 2 When the Help window appears, select your iP2000 printer and how to the section "Handling Error Messages" on the Printer 1 Press the POWER button. Important • Before unplugging... the power cord, turn off the printer and ensure that the green lamp has gone out. •...
... feature you want to steady (nonflashing) green when the printer is ready. While in the Turning on page 68. 2 When the Help window appears, select your iP2000 printer and how to the section "Handling Error Messages" on the Printer 1 Press the POWER button. Important • Before unplugging... the power cord, turn off the printer and ensure that the green lamp has gone out. •...
iP2000 Quick Start Guide
Page 7
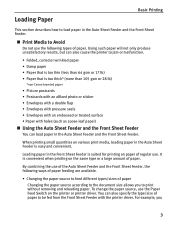
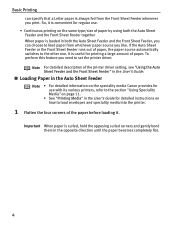
... small quantities on the same type or a large amount of paper. Loading paper in the Front Sheet Feeder is suited for printing on the printer or printer driver. By combining the use the Paper Feed Switch on paper of paper. You can load paper in the Auto Sheet Feeder is convenient when... that is too thin (less than 64 gsm or 17 lb) • Paper that is too thick* (more than 105 gsm or 28 lb) *non-Canon branded paper • Picture postcards • Postcards with an affixed photo or sticker • Envelopes with a double flap • Envelopes with pressure seals • Envelopes...
... small quantities on the same type or a large amount of paper. Loading paper in the Front Sheet Feeder is suited for printing on the printer or printer driver. By combining the use the Paper Feed Switch on paper of paper. You can load paper in the Auto Sheet Feeder is convenient when... that is too thin (less than 64 gsm or 17 lb) • Paper that is too thick* (more than 105 gsm or 28 lb) *non-Canon branded paper • Picture postcards • Postcards with an affixed photo or sticker • Envelopes with a double flap • Envelopes with pressure seals • Envelopes...
iP2000 Quick Start Guide
Page 8
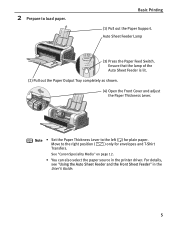
... Front Sheet Feeder" in the User's Guide. „ Loading Paper in the Auto Sheet Feeder Note • For detailed information on the speciality media Canon provides for detailed instructions on the same type/size of the paper before loading it. So, it is convenient for regular use with its various... 11. • See "Printing Media" in the User's Guide for use . • Continuous printing on how to load envelopes and speciality media into the printer. 1 Flatten the four corners of paper by using both the Auto Sheet Feeder and the Front Sheet Feeder together When paper is always fed from...
... Front Sheet Feeder" in the User's Guide. „ Loading Paper in the Auto Sheet Feeder Note • For detailed information on the speciality media Canon provides for detailed instructions on the same type/size of the paper before loading it. So, it is convenient for regular use with its various... 11. • See "Printing Media" in the User's Guide for use . • Continuous printing on how to load envelopes and speciality media into the printer. 1 Flatten the four corners of paper by using both the Auto Sheet Feeder and the Front Sheet Feeder together When paper is always fed from...
iP2000 Quick Start Guide
Page 9
...Move to the right position ( ) only for plain paper. For details, see "Using the Auto Sheet Feeder and the Front Sheet Feeder" in the printer driver. Ensure that the lamp of the Auto Sheet Feeder is lit. (2) Pull out the Paper Output Tray completely as shown. (4) Open the Front ...Cover and adjust the Paper Thickness Lever. Auto Sheet Feeder Lamp (3) Press the Paper Feed Switch. See "Canon Speciality Media" on page 12. • You can also select the paper source in the User's Guide. 5 Note • Set the Paper Thickness Lever...
...Move to the right position ( ) only for plain paper. For details, see "Using the Auto Sheet Feeder and the Front Sheet Feeder" in the printer driver. Ensure that the lamp of the Auto Sheet Feeder is lit. (2) Pull out the Paper Output Tray completely as shown. (4) Open the Front ...Cover and adjust the Paper Thickness Lever. Auto Sheet Feeder Lamp (3) Press the Paper Feed Switch. See "Canon Speciality Media" on page 12. • You can also select the paper source in the User's Guide. 5 Note • Set the Paper Thickness Lever...
iP2000 Quick Start Guide
Page 11
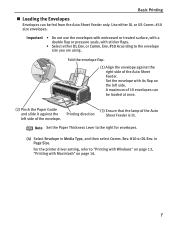
... 10 envelopes can be loaded at once. (2) Pinch the Paper Guide and slide it against the right side of the Auto Sheet Feeder. For the printer driver setting, refer to "Printing with Windows" on page 13, "Printing with sticker flaps. • Select either DL or US Comm. #10 size envelopes. Env...
... 10 envelopes can be loaded at once. (2) Pinch the Paper Guide and slide it against the right side of the Auto Sheet Feeder. For the printer driver setting, refer to "Printing with Windows" on page 13, "Printing with sticker flaps. • Select either DL or US Comm. #10 size envelopes. Env...
iP2000 Quick Start Guide
Page 12
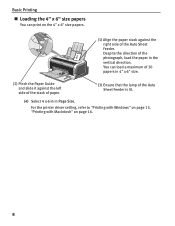
... load a maximum of 20 papers in 4" x 6" size. (2) Pinch the Paper Guide and slide it against the right side of the Auto Sheet Feeder. For the printer driver setting, refer to "Printing with Windows" on page 13, "Printing with Macintosh" on the 4" x 6" size papers. (1) Align the paper stack against the left side...
... load a maximum of 20 papers in 4" x 6" size. (2) Pinch the Paper Guide and slide it against the right side of the Auto Sheet Feeder. For the printer driver setting, refer to "Printing with Windows" on page 13, "Printing with Macintosh" on the 4" x 6" size papers. (1) Align the paper stack against the left side...
iP2000 Quick Start Guide
Page 13
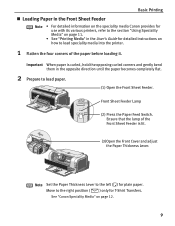
Basic Printing „ Loading Paper in the Front Sheet Feeder Note • For detailed information on the speciality media Canon provides for use with its various printers, refer to the section "Using Speciality Media" on page 11. • See "Printing Media" in the opposite direction until the paper...Feeder. Important When paper is lit. (3)Open the Front Cover and adjust the Paper Thickness Lever. See "Canon Speciality Media" on how to load speciality media into the printer. 1 Flatten the four corners of the Front Sheet Feeder is curled, hold the opposing curled corners and ...
Basic Printing „ Loading Paper in the Front Sheet Feeder Note • For detailed information on the speciality media Canon provides for use with its various printers, refer to the section "Using Speciality Media" on page 11. • See "Printing Media" in the opposite direction until the paper...Feeder. Important When paper is lit. (3)Open the Front Cover and adjust the Paper Thickness Lever. See "Canon Speciality Media" on how to load speciality media into the printer. 1 Flatten the four corners of the Front Sheet Feeder is curled, hold the opposing curled corners and ...

iP2000 Quick Start Guide
Page 14
... to print on the other side, according to the instructions packaged with the print side facing down. Note • You can be fed from the printer driver. For details, refer to "Using the Auto Sheet Feeder and the Front Sheet Feeder" in the User's Guide. • When you load the media...
... to print on the other side, according to the instructions packaged with the print side facing down. Note • You can be fed from the printer driver. For details, refer to "Using the Auto Sheet Feeder and the Front Sheet Feeder" in the User's Guide. • When you load the media...
iP2000 Quick Start Guide
Page 16
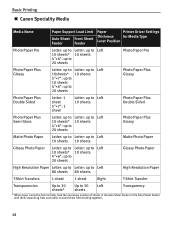
Basic Printing „ Canon Speciality Media Media Name Paper Support Load Limit Paper Printer Driver Settings Auto Sheet Front Sheet Thickness for Media Type Lever Position Feeder Feeder Photo Paper Pro Letter: up to Letter: up to Left 10 ...
Basic Printing „ Canon Speciality Media Media Name Paper Support Load Limit Paper Printer Driver Settings Auto Sheet Front Sheet Thickness for Media Type Lever Position Feeder Feeder Photo Paper Pro Letter: up to Letter: up to Left 10 ...
iP2000 Quick Start Guide
Page 17
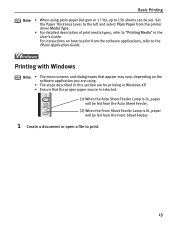
... . • The steps described in this section are using plain paper (64 gsm or 17 lb), up to 150 sheets can be fed from the printer driver Media Type. • For detailed description of print media types, refer to the Photo Application Guide. For instructions on the software application you are...
... . • The steps described in this section are using plain paper (64 gsm or 17 lb), up to 150 sheets can be fed from the printer driver Media Type. • For detailed description of print media types, refer to the Photo Application Guide. For instructions on the software application you are...
iP2000 Quick Start Guide
Page 18
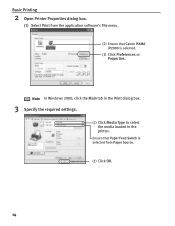
Basic Printing 2 Open Printer Properties dialog box. (1) Select Print from Paper Source. (2) Click OK. 14 Ensure that Canon PIXMA iP2000 is selected from the application software's File menu. (2) Ensure that Paper Feed Switch is selected. (3) Click Preferences or Properties. Note In Windows 2000, click the Main tab in the Print dialog box. 3 Specify the required settings. (1) Click Media Type to select the media loaded in the printer.
Basic Printing 2 Open Printer Properties dialog box. (1) Select Print from Paper Source. (2) Click OK. 14 Ensure that Canon PIXMA iP2000 is selected from the application software's File menu. (2) Ensure that Paper Feed Switch is selected. (3) Click Preferences or Properties. Note In Windows 2000, click the Main tab in the Print dialog box. 3 Specify the required settings. (1) Click Media Type to select the media loaded in the printer.
iP2000 Quick Start Guide
Page 19
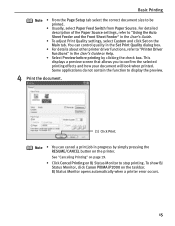
...button on the taskbar. You can cancel a print job in progress by clicking the check box. To show BJ Status Monitor, click Canon PIXMA iP2000 on the printer. Some applications do not contain the function to confirm the selected printing effects and how your document will look when printed. This displays a...Using the Auto Sheet Feeder and the Front Sheet Feeder" in the Set Print Quality dialog box. • For details about other printer driver functions, refer to be printed. • Usually, select Paper Feed Switch from Paper Source. BJ Status Monitor opens automatically when...
...button on the taskbar. You can cancel a print job in progress by clicking the check box. To show BJ Status Monitor, click Canon PIXMA iP2000 on the printer. Some applications do not contain the function to confirm the selected printing effects and how your document will look when printed. This displays a...Using the Auto Sheet Feeder and the Front Sheet Feeder" in the Set Print Quality dialog box. • For details about other printer driver functions, refer to be printed. • Usually, select Paper Feed Switch from Paper Source. BJ Status Monitor opens automatically when...
iP2000 Quick Start Guide
Page 22
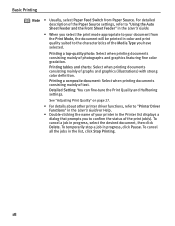
..., refer to "Using the Auto Sheet Feeder and the Front Sheet Feeder" in the User's Guide. • When you select the print mode appropriate to "Printer Driver Functions" in the User's Guide or Help. • Double-clicking the name of text. To cancel a job in the list, click Stop Printing. 18... See "Adjusting Print Quality" on page 27. • For details about other printer driver functions, refer to your printer in progress, click Pause. To temporarily stop a job in the...
..., refer to "Using the Auto Sheet Feeder and the Front Sheet Feeder" in the User's Guide. • When you select the print mode appropriate to "Printer Driver Functions" in the User's Guide or Help. • Double-clicking the name of text. To cancel a job in the list, click Stop Printing. 18... See "Adjusting Print Quality" on page 27. • For details about other printer driver functions, refer to your printer in progress, click Pause. To temporarily stop a job in the...
iP2000 Quick Start Guide
Page 23
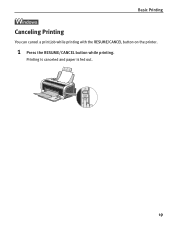
Basic Printing Canceling Printing You can cancel a print job while printing with the RESUME/CANCEL button on the printer. 1 Press the RESUME/CANCEL button while printing. Printing is canceled and paper is fed out. 19
Basic Printing Canceling Printing You can cancel a print job while printing with the RESUME/CANCEL button on the printer. 1 Press the RESUME/CANCEL button while printing. Printing is canceled and paper is fed out. 19
iP2000 Quick Start Guide
Page 24
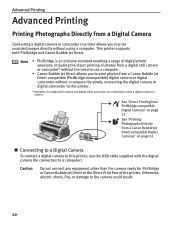
... ready for connection to a computer). Otherwise, electric shock, fire, or damage to the camera could result. 20 This printer supports both PictBridge and Canon Bubble Jet Direct. Note • PictBridge is an Industry standard enabling a range of digital photo solutions, including the direct...incompatible) digital camera or digital camcorder without a computer by simply connecting the digital camera or digital camcorder to this printer, use a computer. • Canon Bubble Jet Direct allows you to print recorded images directly without the need to use the USB cable supplied with ...
... ready for connection to a computer). Otherwise, electric shock, fire, or damage to the camera could result. 20 This printer supports both PictBridge and Canon Bubble Jet Direct. Note • PictBridge is an Industry standard enabling a range of digital photo solutions, including the direct...incompatible) digital camera or digital camcorder without a computer by simply connecting the digital camera or digital camcorder to this printer, use a computer. • Canon Bubble Jet Direct allows you to print recorded images directly without the need to use the USB cable supplied with ...


