iP2000 Easy Setup Instructions
Page 1
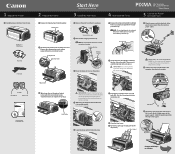
... into the notches located above the print head holder before the printer is ready. 2 Connect one end of blank paper in slots. Load a sheet of a USB cable to the computer, the other end to install the printer driver before proceeding or the print head may not install correctly. 4 Slide the print head into the holder until it is raised into place. 4 Close the front cover. 5 Open the paper support and pull out the output tray.
... into the notches located above the print head holder before the printer is ready. 2 Connect one end of blank paper in slots. Load a sheet of a USB cable to the computer, the other end to install the printer driver before proceeding or the print head may not install correctly. 4 Slide the print head into the holder until it is raised into place. 4 Close the front cover. 5 Open the paper support and pull out the output tray.
iP2000 Easy Setup Instructions
Page 2
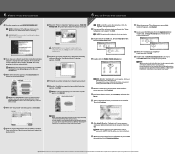
... New Hardware Wizard, click Cancel. 6 When the "Printer Connection" window appears, TURN THE PRINTER ON. QA7-3263-V02 ©2004 Canon Inc. Refer to Windows as an Administrator before continuing. NOTE: When the "Authenticate" screen appears, enter your Quick Start Guide. 7 Click Install. Refer to install the remaining software. IMPORTANT: If you do not know your product. NOTE: If a message prompting you may need to align the print head...
... New Hardware Wizard, click Cancel. 6 When the "Printer Connection" window appears, TURN THE PRINTER ON. QA7-3263-V02 ©2004 Canon Inc. Refer to Windows as an Administrator before continuing. NOTE: When the "Authenticate" screen appears, enter your Quick Start Guide. 7 Click Install. Refer to install the remaining software. IMPORTANT: If you do not know your product. NOTE: If a message prompting you may need to align the print head...

iP2000 Quick Start Guide
Page 2
... the printer): Setup Software and User's Guide version number (USCD X.X) located on the front of service and support coverage at www.canontechsupport.com. * Support program specifics are found here. 2. www.canonesp.com Canon CarePAK Extended Service Plan is our helpful tech support web site. For more information and updated program specifics, please refer to change without notice. www.canontechsupport.com For quick and comprehensive self-help in an intuitively guided interactive troubleshooting environment...
... the printer): Setup Software and User's Guide version number (USCD X.X) located on the front of service and support coverage at www.canontechsupport.com. * Support program specifics are found here. 2. www.canonesp.com Canon CarePAK Extended Service Plan is our helpful tech support web site. For more information and updated program specifics, please refer to change without notice. www.canontechsupport.com For quick and comprehensive self-help in an intuitively guided interactive troubleshooting environment...
iP2000 Quick Start Guide
Page 5
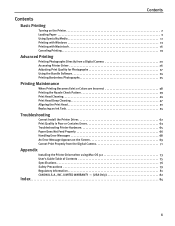
...2 Loading Paper 3 Using Speciality Media 11 Printing with Windows 13 Printing with Macintosh 16 Canceling Printing 19 Advanced Printing Printing Photographs Directly from a Digital Camera 20 Accessing Printer Driver 26 Adjusting Print Quality for Photographs 27 Using the Bundle Software 34 Printing Borderless Photographs 35 Printing Maintenance When Printing Becomes Faint or Colors are Incorrect 38 Printing the Nozzle Check Pattern 39 Print Head Cleaning 44 Print Head Deep Cleaning 47 Aligning the Print Head 50 Replacing an Ink Tank 54 Troubleshooting Cannot Install the Printer...
...2 Loading Paper 3 Using Speciality Media 11 Printing with Windows 13 Printing with Macintosh 16 Canceling Printing 19 Advanced Printing Printing Photographs Directly from a Digital Camera 20 Accessing Printer Driver 26 Adjusting Print Quality for Photographs 27 Using the Bundle Software 34 Printing Borderless Photographs 35 Printing Maintenance When Printing Becomes Faint or Colors are Incorrect 38 Printing the Nozzle Check Pattern 39 Print Head Cleaning 44 Print Head Deep Cleaning 47 Aligning the Print Head 50 Replacing an Ink Tank 54 Troubleshooting Cannot Install the Printer...
iP2000 Quick Start Guide
Page 19
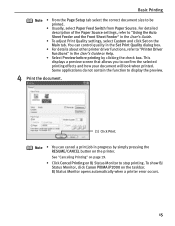
... Page Setup tab select the correct document size to display the preview. 4 Print the document. (1) Click Print. Some applications do not contain the function to be printed. • Usually, select Paper Feed Switch from Paper Source. To show BJ Status Monitor, click Canon PIXMA iP2000 on BJ Status Monitor to "Using the Auto Sheet Feeder and the Front Sheet Feeder" in progress by clicking the check box. BJ Status Monitor opens automatically when a printer error occurs. 15 See "Canceling Printing...
... Page Setup tab select the correct document size to display the preview. 4 Print the document. (1) Click Print. Some applications do not contain the function to be printed. • Usually, select Paper Feed Switch from Paper Source. To show BJ Status Monitor, click Canon PIXMA iP2000 on BJ Status Monitor to "Using the Auto Sheet Feeder and the Front Sheet Feeder" in progress by clicking the check box. BJ Status Monitor opens automatically when a printer error occurs. 15 See "Canceling Printing...
iP2000 Quick Start Guide
Page 27
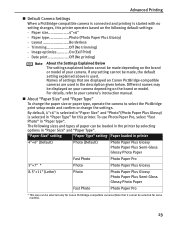
...) - Different names may be selected for Canon PictBridge-compatible cameras (Note that are displayed on the brand or model of settings that it cannot be displayed on the brand or model. Image optimize ...........On (Exif Print) - To use Photo Paper Pro, select "Fast Photo" in "Paper Size" and "Paper Type". Names of your camera. Advanced Printing „ Default Camera Settings When a PictBridge-compatible camera is connected and printing is started with no setting changes, this printer.
...) - Different names may be selected for Canon PictBridge-compatible cameras (Note that are displayed on the brand or model of settings that it cannot be displayed on the brand or model. Image optimize ...........On (Exif Print) - To use Photo Paper Pro, select "Fast Photo" in "Paper Size" and "Paper Type". Names of your camera. Advanced Printing „ Default Camera Settings When a PictBridge-compatible camera is connected and printing is started with no setting changes, this printer.

iP2000 Quick Start Guide
Page 28
... image data to this printer. Print quality setting - "Date Print" depends on the Canon Bubble Jet Direct compatible digital camera connected to produce photos using the controls of the digital camera cannot be set on the settings using PictBridge. • Never disconnect the USB cable during printing. • When disconnecting the USB cable between the digital camera and printer, follow the instructions given in "Trimming" for this printer. „ About "Image optimize" By default, "On (Exif Print...
... image data to this printer. Print quality setting - "Date Print" depends on the Canon Bubble Jet Direct compatible digital camera connected to produce photos using the controls of the digital camera cannot be set on the settings using PictBridge. • Never disconnect the USB cable during printing. • When disconnecting the USB cable between the digital camera and printer, follow the instructions given in "Trimming" for this printer. „ About "Image optimize" By default, "On (Exif Print...
iP2000 Quick Start Guide
Page 31
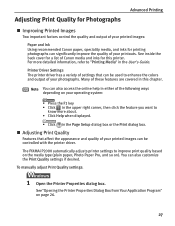
... Help when displayed. • Click in the Page Setup dialog box or the Print dialog box. „ Adjusting Print Quality Features that can be used to "Printing Media" in this printer. Many of these features are covered in the User's Guide. To manually adjust Print Quality settings: 1 Open the Printer Properties dialog box. Advanced Printing Adjusting Print Quality for Photographs „ Improving Printed Images Two important factors control the quality and output of your printed images: Paper and Ink Using recommended Canon paper, speciality media...
... Help when displayed. • Click in the Page Setup dialog box or the Print dialog box. „ Adjusting Print Quality Features that can be used to "Printing Media" in this printer. Many of these features are covered in the User's Guide. To manually adjust Print Quality settings: 1 Open the Printer Properties dialog box. Advanced Printing Adjusting Print Quality for Photographs „ Improving Printed Images Two important factors control the quality and output of your printed images: Paper and Ink Using recommended Canon paper, speciality media...

iP2000 Quick Start Guide
Page 38
... compatible with a digital camera and the paper type on or off, if the camera was in full size without its right-hand side being cropped. Under Exif Print, the digital camera can also copy or move the decorated photos. Also it has tools to read the camera data precisely, producing optimal prints. Canon BJ Printers support Exif Print and use the application(s) suitable for specific camera settings...
... compatible with a digital camera and the paper type on or off, if the camera was in full size without its right-hand side being cropped. Under Exif Print, the digital camera can also copy or move the decorated photos. Also it has tools to read the camera data precisely, producing optimal prints. Canon BJ Printers support Exif Print and use the application(s) suitable for specific camera settings...

iP2000 Quick Start Guide
Page 58
... surrounding area. • Discard empty ink tanks according to the left. 2 Remove the empty ink tank. Printing Maintenance Replacing an Ink Tank If the print result is not improved after maintenance such as Print Head cleaning, an ink tank runs out of consumables. 3 Prepare a replacement ink tank. (1) Unpack a new ink tank and remove the orange protective cap. 54 When replacing an ink tank, check the model number very carefully. Replace the ink tank with a new one.
... surrounding area. • Discard empty ink tanks according to the left. 2 Remove the empty ink tank. Printing Maintenance Replacing an Ink Tank If the print result is not improved after maintenance such as Print Head cleaning, an ink tank runs out of consumables. 3 Prepare a replacement ink tank. (1) Unpack a new ink tank and remove the orange protective cap. 54 When replacing an ink tank, check the model number very carefully. Replace the ink tank with a new one.
iP2000 Quick Start Guide
Page 65
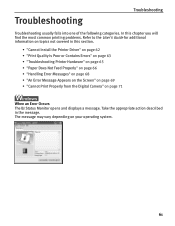
... most common printing problems. Refer to the User's Guide for additional information on topics not covered in the message. Troubleshooting Troubleshooting Troubleshooting usually falls into one of the following categories. The message may vary depending on page 71 When an Error Occurs The BJ Status Monitor opens and displays a message. Take the appropriate action described in this section. • "Cannot Install the Printer Driver" on page 62 • "Print Quality is...
... most common printing problems. Refer to the User's Guide for additional information on topics not covered in the message. Troubleshooting Troubleshooting Troubleshooting usually falls into one of the following categories. The message may vary depending on page 71 When an Error Occurs The BJ Status Monitor opens and displays a message. Take the appropriate action described in this section. • "Cannot Install the Printer Driver" on page 62 • "Print Quality is...
iP2000 Quick Start Guide
Page 66
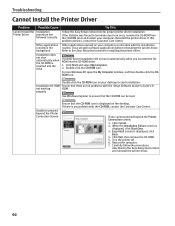
... beyond the Printer Connection screen; 1. For non-Windows XP, open software applications before reinstalling the printer driver. Double-click the CD-ROM icon on the desktop. Unable to the Easy Setup Instructions for proper printer driver installation. When the Installation Failure screen is displayed on your desktop to an error, remove the CD-ROM from the CD-ROM drive and restart your computer can be read. Turn the printer off...
... beyond the Printer Connection screen; 1. For non-Windows XP, open software applications before reinstalling the printer driver. Double-click the CD-ROM icon on the desktop. Unable to the Easy Setup Instructions for proper printer driver installation. When the Installation Failure screen is displayed on your desktop to an error, remove the CD-ROM from the CD-ROM drive and restart your computer can be read. Turn the printer off...
iP2000 Quick Start Guide
Page 67
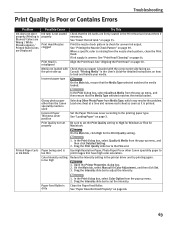
... Check Pattern" on page 50. Print Head is dirty 1. See "Aligning the Print Head" on page 39. Glossy photo paper other Canon speciality paper to print images that your media. Open the Printer Properties dialog box. 2. On the Main tab, select Manual for the Print Quality setting. In the Print dialog box, select Color Option from Media Type, which may resolve the problem. Print the nozzle check pattern to the printing paper type. If ink supply is uneven: See "Print Head Cleaning" on page 3. Incorrect paper type...
... Check Pattern" on page 50. Print Head is dirty 1. See "Aligning the Print Head" on page 39. Glossy photo paper other Canon speciality paper to print images that your media. Open the Printer Properties dialog box. 2. On the Main tab, select Manual for the Print Quality setting. In the Print dialog box, select Color Option from Media Type, which may resolve the problem. Print the nozzle check pattern to the printing paper type. If ink supply is uneven: See "Print Head Cleaning" on page 3. Incorrect paper type...

iP2000 Quick Start Guide
Page 68
... them in the opposite direction to uncurl the media. See "Paper Does Not Feed Properly" on page 12. Set the Paper Thickness Lever in the User's Guide. See "Canon Speciality Media" on page 66. If the paper is scratched even when printing on page 3. Paper Feed Roller is dirty Clean the Paper Feed Roller. See "Print Media to Avoid" on plain paper (left ), set Paper Thickness Lever to see if the paper you are printing on is too thick...
... them in the opposite direction to uncurl the media. See "Paper Does Not Feed Properly" on page 12. Set the Paper Thickness Lever in the User's Guide. See "Canon Speciality Media" on page 66. If the paper is scratched even when printing on page 3. Paper Feed Roller is dirty Clean the Paper Feed Roller. See "Print Media to Avoid" on plain paper (left ), set Paper Thickness Lever to see if the paper you are printing on is too thick...

iP2000 Quick Start Guide
Page 69
... Print Head to End of the paper loaded. Open the Printer Properties dialog box. Click Maintenance tab and then Start Status Monitor. 3. Check the Page Setup tab in the Printer Properties dialog box (for Windows) or the Page Setup dialog box (for the deletion. Printing photographs and high-density graphics can become extremely hot during extended print operation. When the confirmation messages is displayed, click Yes. Incorrect page size selected Not enough free...
... Print Head to End of the paper loaded. Open the Printer Properties dialog box. Click Maintenance tab and then Start Status Monitor. 3. Check the Page Setup tab in the Printer Properties dialog box (for Windows) or the Page Setup dialog box (for the deletion. Printing photographs and high-density graphics can become extremely hot during extended print operation. When the confirmation messages is displayed, click Yes. Incorrect page size selected Not enough free...
iP2000 Quick Start Guide
Page 73
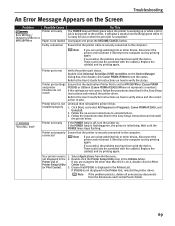
... iP2000 is initializing. Replace the cable(s) and try printing again. Double-click Universal Serial Bus (USB) controllers on the Device Manager dialog box, then double-click Canon PIXMA iP2000 to uninstall driver. 3. If the POWER lamp is flashing green, the printer is not displayed in the Easy Setup Instructions and reinstall the printer driver. Troubleshooting An Error Message Appears on the Screen Problem Error Writing / Output to USBnnn or MPUSBPRNnn Possible Cause Printer not ready Paper is not loaded Faulty connection...
... iP2000 is initializing. Replace the cable(s) and try printing again. Double-click Universal Serial Bus (USB) controllers on the Device Manager dialog box, then double-click Canon PIXMA iP2000 to uninstall driver. 3. If the POWER lamp is flashing green, the printer is not displayed in the Easy Setup Instructions and reinstall the printer driver. Troubleshooting An Error Message Appears on the Screen Problem Error Writing / Output to USBnnn or MPUSBPRNnn Possible Cause Printer not ready Paper is not loaded Faulty connection...
iP2000 Quick Start Guide
Page 75
... for printing. Load the paper in the Auto Sheet Feeder of selecting Continue. *2 The waste ink absorber absorbs ink used during cleaning. 71 Disconnect the cable connected to the camera, turn on the printer flashes five times) The waste ink absorber*2 is nearly full It is nearly full. If a Print Head has already been installed, remove it . Selecting Continue*1 in use Printer warming up No paper Paper error Paper Jam Printer cover open No Print Head is installed (The POWER lamp on the printer flashes five times) The Print Head...
... for printing. Load the paper in the Auto Sheet Feeder of selecting Continue. *2 The waste ink absorber absorbs ink used during cleaning. 71 Disconnect the cable connected to the camera, turn on the printer flashes five times) The waste ink absorber*2 is nearly full It is nearly full. If a Print Head has already been installed, remove it . Selecting Continue*1 in use Printer warming up No paper Paper error Paper Jam Printer cover open No Print Head is installed (The POWER lamp on the printer flashes five times) The Print Head...
iP2000 Quick Start Guide
Page 76
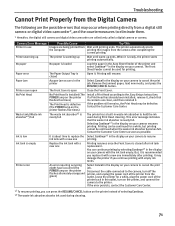
... printer makes and check for direct printing. • This section describes errors that you are using the correct type of flashes the POWER lamp on Canon-brand PictBridgeor Bubble Jet Direct-compatible cameras. For errors on non-Canon PictBridge-compatible cameras, count the number of paper. This may be clogged if printing becomes faint or colors are using . Then, turn the camera on, if it does not automatically turn on the printer, and reconnect the cable...
... printer makes and check for direct printing. • This section describes errors that you are using the correct type of flashes the POWER lamp on Canon-brand PictBridgeor Bubble Jet Direct-compatible cameras. For errors on non-Canon PictBridge-compatible cameras, count the number of paper. This may be clogged if printing becomes faint or colors are using . Then, turn the camera on, if it does not automatically turn on the printer, and reconnect the cable...
iP2000 Quick Start Guide
Page 79
... Envelopes Checking the Status of the Printer BJ Status Monitor Functions (Windows) Printer Setup Utility (or Print Center) (Macintosh) Routine Maintenance When Printing Becomes Faint or Colors are Incorrect Printing the Nozzle Check Pattern Print Head Cleaning Print Head Deep Cleaning Aligning Print Head Replacing an Ink Tank Transporting Printer Troubleshooting Cannot Install Printer Driver Print Quality is Poor Printer Does Not Start or Stops During Print Jobs Paper Does Not Feed Properly or Paper Jams The POWER Lamp Flashes Orange An Error Message is Displayed on the Screen Cannot Print...
... Envelopes Checking the Status of the Printer BJ Status Monitor Functions (Windows) Printer Setup Utility (or Print Center) (Macintosh) Routine Maintenance When Printing Becomes Faint or Colors are Incorrect Printing the Nozzle Check Pattern Print Head Cleaning Print Head Deep Cleaning Aligning Print Head Replacing an Ink Tank Transporting Printer Troubleshooting Cannot Install Printer Driver Print Quality is Poor Printer Does Not Start or Stops During Print Jobs Paper Does Not Feed Properly or Paper Jams The POWER Lamp Flashes Orange An Error Message is Displayed on the Screen Cannot Print...
iP2000 Quick Start Guide
Page 88
... Ink tank 54 Installing the Printer Driver when using Mac OS 9.x .....73 L Load Limit Mark 6 Loading Paper 3 Loading Paper in the Auto Sheet Feeder 4 Loading Paper in the Front Sheet Feeder 9 Low Ink Warning 59 Low Ink Warning Setting 70 M Matte Photo Paper 12 Media Name 12 Media Type 13, 14, 17 Media Types for Digital Camera 23, 24 Media Types Suitable for Borderless Printing 35 Message Prompting Confirmation of Ink Tank Replacement 56 N Nozzle Check 39, 41 Nozzle Check Pattern examining 42 printing 39 O Opening the Printer Properties Dialog Box Directly...
... Ink tank 54 Installing the Printer Driver when using Mac OS 9.x .....73 L Load Limit Mark 6 Loading Paper 3 Loading Paper in the Auto Sheet Feeder 4 Loading Paper in the Front Sheet Feeder 9 Low Ink Warning 59 Low Ink Warning Setting 70 M Matte Photo Paper 12 Media Name 12 Media Type 13, 14, 17 Media Types for Digital Camera 23, 24 Media Types Suitable for Borderless Printing 35 Message Prompting Confirmation of Ink Tank Replacement 56 N Nozzle Check 39, 41 Nozzle Check Pattern examining 42 printing 39 O Opening the Printer Properties Dialog Box Directly...


