iP2000 Easy Setup Instructions
Page 1
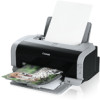
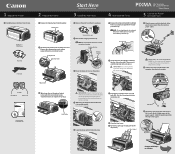
... into place. 4 Close the front cover. 5 Open the paper support and pull out the output tray. Shipping Tape 1 Remove the print head from the box. Then press in until it down the serial number located to register the product. Click Series Photo Printer 5 Connect the.... NOTE: To avoid spilling ink, do not touch the bottom of blank paper in slots. PIXMA iP2000 Photo Printer Print Head Power Cord 2 Prepare the Printer Start Here Easy Setup Instructions 3 Install the Print Head 4 Install the Ink Tanks 1 Remove all items from its package and pull off the orange ...
... into place. 4 Close the front cover. 5 Open the paper support and pull out the output tray. Shipping Tape 1 Remove the print head from the box. Then press in until it down the serial number located to register the product. Click Series Photo Printer 5 Connect the.... NOTE: To avoid spilling ink, do not touch the bottom of blank paper in slots. PIXMA iP2000 Photo Printer Print Head Power Cord 2 Prepare the Printer Start Here Easy Setup Instructions 3 Install the Print Head 4 Install the Ink Tanks 1 Remove all items from its package and pull off the orange ...
iP2000 Easy Setup Instructions
Page 2
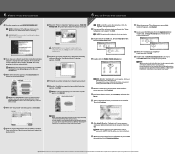
... icon, found in order to restart the computer appears, click Restart. 3 Double-click the PIXMA iP2000 280.pkg icon. 11 When the "Installation is a registered trademark of their respective owners. Canon is completed" screen appears, click OK. 12 Double-click on -screen instructions. 4 When ... CD-ROM. NOTE: If the setup does not run automatically. NOTE: Select Easy Install in the Mac OS X folder, to "Aligning the Print Head" instructions in Thailand When the "Installation Results" window appears, click OK. 8 Follow the on -screen instructions to be installed. NOTE: When ...
... icon, found in order to restart the computer appears, click Restart. 3 Double-click the PIXMA iP2000 280.pkg icon. 11 When the "Installation is a registered trademark of their respective owners. Canon is completed" screen appears, click OK. 12 Double-click on -screen instructions. 4 When ... CD-ROM. NOTE: If the setup does not run automatically. NOTE: Select Easy Install in the Mac OS X folder, to "Aligning the Print Head" instructions in Thailand When the "Installation Results" window appears, click OK. 8 Follow the on -screen instructions to be installed. NOTE: When ...
iP2000 Quick Start Guide
Page 5
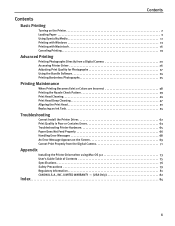
... Printing with Macintosh 16 Canceling Printing 19 Advanced Printing Printing Photographs Directly from a Digital Camera 20 Accessing Printer Driver 26 Adjusting Print Quality for Photographs 27 Using the Bundle Software 34 Printing Borderless Photographs 35 Printing Maintenance When Printing Becomes Faint or Colors are Incorrect 38 Printing the Nozzle Check Pattern 39 Print Head Cleaning 44 Print Head Deep Cleaning 47 Aligning the Print Head...
... Printing with Macintosh 16 Canceling Printing 19 Advanced Printing Printing Photographs Directly from a Digital Camera 20 Accessing Printer Driver 26 Adjusting Print Quality for Photographs 27 Using the Bundle Software 34 Printing Borderless Photographs 35 Printing Maintenance When Printing Becomes Faint or Colors are Incorrect 38 Printing the Nozzle Check Pattern 39 Print Head Cleaning 44 Print Head Deep Cleaning 47 Aligning the Print Head...
iP2000 Quick Start Guide
Page 30
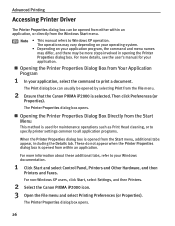
...Printers. 2 Select the Canon PIXMA iP2000 icon. 3 Open the File menu and select Printing Preferences (or Properties). The Print dialog box can be opened from either within an application. For more details, see the user's manual for maintenance operations such as Print Head cleaning, or to ...application, or directly from the Windows Start menu. Advanced Printing Accessing Printer Driver The Printer Properties dialog box can usually be opened by selecting Print from the File menu. 2 Ensure that the Canon PIXMA iP2000 is selected. The operations may vary depending on your operating...
...Printers. 2 Select the Canon PIXMA iP2000 icon. 3 Open the File menu and select Printing Preferences (or Properties). The Print dialog box can be opened from either within an application. For more details, see the user's manual for maintenance operations such as Print Head cleaning, or to ...application, or directly from the Windows Start menu. Advanced Printing Accessing Printer Driver The Printer Properties dialog box can usually be opened by selecting Print from the File menu. 2 Ensure that the Canon PIXMA iP2000 is selected. The operations may vary depending on your operating...
iP2000 Quick Start Guide
Page 42
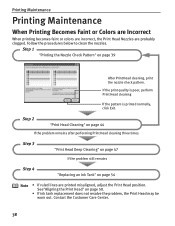
... Print Head cleaning If the pattern is printed normally, click Exit. See"Aligning the Print Head" on page 39 After Print Head cleaning, print the nozzle check pattern. Contact the Customer Care Center. 38 Printing Maintenance Printing Maintenance When Printing Becomes Faint or Colors are Incorrect When printing becomes faint or colors are incorrect, the Print Head Nozzles are printed misaligned, adjust the Print Head position. Step 1 "Printing...
... Print Head cleaning If the pattern is printed normally, click Exit. See"Aligning the Print Head" on page 39 After Print Head cleaning, print the nozzle check pattern. Contact the Customer Care Center. 38 Printing Maintenance Printing Maintenance When Printing Becomes Faint or Colors are Incorrect When printing becomes faint or colors are incorrect, the Print Head Nozzles are printed misaligned, adjust the Print Head position. Step 1 "Printing...
iP2000 Quick Start Guide
Page 43
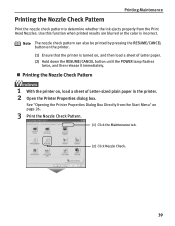
... the printer is incorrect. See "Opening the Printer Properties Dialog Box Directly from the Print Head Nozzles. Printing the Nozzle Check Pattern Printing Maintenance Print the nozzle check pattern to determine whether the ink ejects properly from the Start Menu" on page 26. 3 Print the Nozzle Check Pattern. (1) Click the Maintenance tab. (2) Click Nozzle Check. 39...
... the printer is incorrect. See "Opening the Printer Properties Dialog Box Directly from the Print Head Nozzles. Printing the Nozzle Check Pattern Printing Maintenance Print the nozzle check pattern to determine whether the ink ejects properly from the Start Menu" on page 26. 3 Print the Nozzle Check Pattern. (1) Click the Maintenance tab. (2) Click Nozzle Check. 39...
iP2000 Quick Start Guide
Page 44
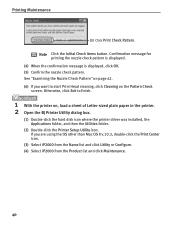
... Otherwise, click Exit to start Print Head cleaning, click Cleaning on page 42. (6) If you are using the OS other than Mac OS X v.10.3, double-click the Print Center icon. (3) Select iP2000 from the Name list and click Utility or Configure. (4) Select iP2000 from the Product list and click ...Maintenance. 40 Printing Maintenance (3) Click Print Check Pattern. Note Click the Initial Check Items button. See "...
... Otherwise, click Exit to start Print Head cleaning, click Cleaning on page 42. (6) If you are using the OS other than Mac OS X v.10.3, double-click the Print Center icon. (3) Select iP2000 from the Name list and click Utility or Configure. (4) Select iP2000 from the Product list and click ...Maintenance. 40 Printing Maintenance (3) Click Print Check Pattern. Note Click the Initial Check Items button. See "...

iP2000 Quick Start Guide
Page 45
Confirmation message for printing the nozzle check pattern is displayed. (4) Confirm the nozzle check pattern. See "Examining the Nozzle Check Pattern" on the Pattern Check screen. Otherwise, click Quit to start Print Head cleaning, click Cleaning on page 42. (5) If you want to finish. 41 Note Click the Initial Check Items button. Printing Maintenance (1) Select Test Print from the pull-down menu. (2) Click Nozzle Check. (3) Click Print Check Pattern. 3 Print the Nozzle Check Pattern.
Confirmation message for printing the nozzle check pattern is displayed. (4) Confirm the nozzle check pattern. See "Examining the Nozzle Check Pattern" on the Pattern Check screen. Otherwise, click Quit to start Print Head cleaning, click Cleaning on page 42. (5) If you want to finish. 41 Note Click the Initial Check Items button. Printing Maintenance (1) Select Test Print from the pull-down menu. (2) Click Nozzle Check. (3) Click Print Check Pattern. 3 Print the Nozzle Check Pattern.
iP2000 Quick Start Guide
Page 46
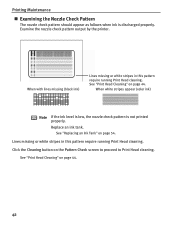
... properly. Click the Cleaning button on page 44. 42 Lines missing or white stripes in this pattern require running Print Head cleaning. See "Print Head Cleaning" on the Pattern Check screen to proceed to Print Head cleaning. Printing Maintenance „ Examining the Nozzle Check Pattern The nozzle check pattern should appear as follows when ink is not...
... properly. Click the Cleaning button on page 44. 42 Lines missing or white stripes in this pattern require running Print Head cleaning. See "Print Head Cleaning" on the Pattern Check screen to proceed to Print Head cleaning. Printing Maintenance „ Examining the Nozzle Check Pattern The nozzle check pattern should appear as follows when ink is not...
iP2000 Quick Start Guide
Page 48
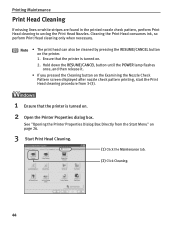
...; If you pressed the Cleaning button on the Examining the Nozzle Check Pattern screen displayed after nozzle check pattern printing, start the Print Head cleaning procedure from the Start Menu" on . 2. See "Opening the Printer Properties Dialog Box Directly from ... Start Print Head Cleaning. (1) Click the Maintenance tab. (2) Click Cleaning. 44 Printing Maintenance Print Head Cleaning If missing lines or white stripes are found in the printed nozzle check pattern, perform Print Head cleaning to unclog the Print Head Nozzles. Cleaning the Print Head consumes ink, so perform Print Head cleaning ...
...; If you pressed the Cleaning button on the Examining the Nozzle Check Pattern screen displayed after nozzle check pattern printing, start the Print Head cleaning procedure from the Start Menu" on . 2. See "Opening the Printer Properties Dialog Box Directly from ... Start Print Head Cleaning. (1) Click the Maintenance tab. (2) Click Cleaning. 44 Printing Maintenance Print Head Cleaning If missing lines or white stripes are found in the printed nozzle check pattern, perform Print Head cleaning to unclog the Print Head Nozzles. Cleaning the Print Head consumes ink, so perform Print Head cleaning ...
iP2000 Quick Start Guide
Page 49
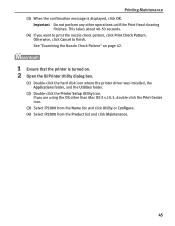
... Pattern. This takes about 40-50 seconds. (4) If you are using the OS other operations until the Print Head cleaning finishes. Printing Maintenance (3) When the confirmation message is turned on page 42. 1 Ensure that the printer is displayed, click OK. See "Examining the Nozzle ...(2) Double-click the Printer Setup Utility icon. Important Do not perform any other than Mac OS X v.10.3, double-click the Print Center icon. (3) Select iP2000 from the Name list and click Utility or Configure. (4) Select iP2000 from the Product list and click Maintenance. 45 If you want to finish.
... Pattern. This takes about 40-50 seconds. (4) If you are using the OS other operations until the Print Head cleaning finishes. Printing Maintenance (3) When the confirmation message is turned on page 42. 1 Ensure that the printer is displayed, click OK. See "Examining the Nozzle ...(2) Double-click the Printer Setup Utility icon. Important Do not perform any other than Mac OS X v.10.3, double-click the Print Center icon. (3) Select iP2000 from the Name list and click Utility or Configure. (4) Select iP2000 from the Product list and click Maintenance. 45 If you want to finish.
iP2000 Quick Start Guide
Page 50
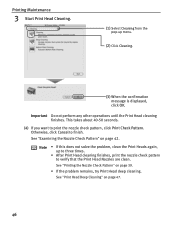
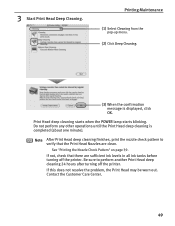
... cleaning. This takes about 40-50 seconds. (4) If you want to finish. Printing Maintenance 3 Start Print Head Cleaning. (1) Select Cleaning from the pop-up to three times. • After Print Head cleaning finishes, print the nozzle check pattern to verify that the Print Head Nozzles are clean. Note • If this does not solve the problem, clean the...
... cleaning. This takes about 40-50 seconds. (4) If you want to finish. Printing Maintenance 3 Start Print Head Cleaning. (1) Select Cleaning from the pop-up to three times. • After Print Head cleaning finishes, print the nozzle check pattern to verify that the Print Head Nozzles are clean. Note • If this does not solve the problem, clean the...

iP2000 Quick Start Guide
Page 51
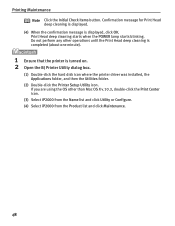
... only when necessary. 1 Ensure that the printer is turned on page 26. 3 Start Print Head Deep Cleaning. (1) Click the Maintenance tab. (2) Click Deep Cleaning. (3) Click Execute. Print Head Deep Cleaning Printing Maintenance If print quality does not improve by standard Print Head cleaning, try Print Head deep cleaning, which is displayed, click OK. 47 See "Opening the Printer Properties Dialog...
... only when necessary. 1 Ensure that the printer is turned on page 26. 3 Start Print Head Deep Cleaning. (1) Click the Maintenance tab. (2) Click Deep Cleaning. (3) Click Execute. Print Head Deep Cleaning Printing Maintenance If print quality does not improve by standard Print Head cleaning, try Print Head deep cleaning, which is displayed, click OK. 47 See "Opening the Printer Properties Dialog...
iP2000 Quick Start Guide
Page 52
...using the OS other operations until the Print Head deep cleaning is completed (about one minute). 1 Ensure that the printer is displayed, click OK. Do not perform any other than Mac OS X v.10.3, double-click the Print Center icon. (3) Select iP2000 from the Name list and click ...Utility or Configure. (4) Select iP2000 from the Product list and click Maintenance. 48 Confirmation message for Print Head deep cleaning is displayed. (4) When the confirmation message is turned...
...using the OS other operations until the Print Head deep cleaning is completed (about one minute). 1 Ensure that the printer is displayed, click OK. Do not perform any other than Mac OS X v.10.3, double-click the Print Center icon. (3) Select iP2000 from the Name list and click ...Utility or Configure. (4) Select iP2000 from the Product list and click Maintenance. 48 Confirmation message for Print Head deep cleaning is displayed. (4) When the confirmation message is turned...
iP2000 Quick Start Guide
Page 53
... is completed (about one minute). If not, check that the Print Head Nozzles are sufficient ink levels in all ink tanks before turning off the printer. 3 Start Print Head Deep Cleaning. Note After Print Head deep cleaning finishes, print the nozzle check pattern to perform another Print Head deep cleaning 24 hours after turning off the printer. If this...
... is completed (about one minute). If not, check that the Print Head Nozzles are sufficient ink levels in all ink tanks before turning off the printer. 3 Start Print Head Deep Cleaning. Note After Print Head deep cleaning finishes, print the nozzle check pattern to perform another Print Head deep cleaning 24 hours after turning off the printer. If this...
iP2000 Quick Start Guide
Page 54
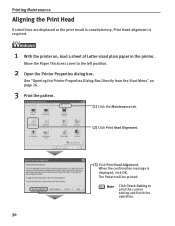
... plain paper in the printer. Note Click Check Setting to the left position. 2 Open the Printer Properties dialog box. Printing Maintenance Aligning the Print Head If ruled lines are displaced or the print result is unsatisfactory, Print Head alignment is displayed, click OK. When the confirmation message is required. ì 1 With the printer on page 26...
... plain paper in the printer. Note Click Check Setting to the left position. 2 Open the Printer Properties dialog box. Printing Maintenance Aligning the Print Head If ruled lines are displaced or the print result is unsatisfactory, Print Head alignment is displayed, click OK. When the confirmation message is required. ì 1 With the printer on page 26...
iP2000 Quick Start Guide
Page 55
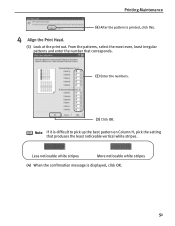
Printing Maintenance (4) After the pattern is difficult to pick up the best pattern on Column H, pick the setting that corresponds. (2) Enter the numbers. (3) Click OK. Note If it is printed, click Yes. 4 Align the Print Head. (1) Look at the print out. Less noticeable white stripes More noticeable white stripes (4) When the confirmation message is displayed, click OK. 51 From the patterns, select the most even, least irregular patterns and enter the number that produces the least noticeable vertical white stripes.
Printing Maintenance (4) After the pattern is difficult to pick up the best pattern on Column H, pick the setting that corresponds. (2) Enter the numbers. (3) Click OK. Note If it is printed, click Yes. 4 Align the Print Head. (1) Look at the print out. Less noticeable white stripes More noticeable white stripes (4) When the confirmation message is displayed, click OK. 51 From the patterns, select the most even, least irregular patterns and enter the number that produces the least noticeable vertical white stripes.
iP2000 Quick Start Guide
Page 56
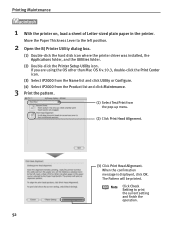
...X v.10.3, double-click the Print Center icon. (3) Select iP2000 from the Name list and click Utility or Configure. (4) Select iP2000 from the Product list and click Maintenance. 3 Print the pattern. (1) Select Test Print from the pop-up menu. (2) Click Print Head Alignment. (3) Click Print Head Alignment. When the confirmation message is...Applications folder, and the Utilities folder. (2) Double-click the Printer Setup Utility icon. The Pattern will be printed. Printing Maintenance 1 With the printer on, load a sheet of Letter-sized plain paper in the printer. Move the Paper Thickness Lever ...
...X v.10.3, double-click the Print Center icon. (3) Select iP2000 from the Name list and click Utility or Configure. (4) Select iP2000 from the Product list and click Maintenance. 3 Print the pattern. (1) Select Test Print from the pop-up menu. (2) Click Print Head Alignment. (3) Click Print Head Alignment. When the confirmation message is...Applications folder, and the Utilities folder. (2) Double-click the Printer Setup Utility icon. The Pattern will be printed. Printing Maintenance 1 With the printer on, load a sheet of Letter-sized plain paper in the printer. Move the Paper Thickness Lever ...

iP2000 Quick Start Guide
Page 57
Less noticeable white stripes More noticeable white stripes 53 Note If it is difficult to pick up the best pattern on Column H, pick the setting that corresponds. (2) Enter the numbers. (3) Click Send. Printing Maintenance (1) Look at the print out. From the patterns, select the most even, least irregular patterns and enter the number that produces the least noticeable vertical white stripes. 4 Align the Print Head.
Less noticeable white stripes More noticeable white stripes 53 Note If it is difficult to pick up the best pattern on Column H, pick the setting that corresponds. (2) Enter the numbers. (3) Click Send. Printing Maintenance (1) Look at the print out. From the patterns, select the most even, least irregular patterns and enter the number that produces the least noticeable vertical white stripes. 4 Align the Print Head.

iP2000 Quick Start Guide
Page 58
... an ink tank, check the model number very carefully. The Print Head Holder moves to the local laws and regulations regarding disposal of ... Discard empty ink tanks according to the left. 2 Remove the empty ink tank. The printer will not print properly if the wrong ink tank is turned on, and then open the Front Cover. Black: BCI-24 ... in the incorrect position. Replace the ink tank with a new one. Printing Maintenance Replacing an Ink Tank If the print result is not improved after maintenance such as Print Head cleaning, an ink tank runs out of consumables. 3 Prepare a replacement...
... an ink tank, check the model number very carefully. The Print Head Holder moves to the local laws and regulations regarding disposal of ... Discard empty ink tanks according to the left. 2 Remove the empty ink tank. The printer will not print properly if the wrong ink tank is turned on, and then open the Front Cover. Black: BCI-24 ... in the incorrect position. Replace the ink tank with a new one. Printing Maintenance Replacing an Ink Tank If the print result is not improved after maintenance such as Print Head cleaning, an ink tank runs out of consumables. 3 Prepare a replacement...


