Easy Setup Instructions
Page 1
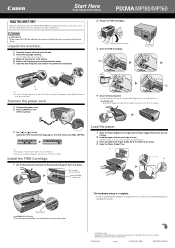
... the stack. 4 Open the Paper Output Tray. (1) (3) (A) (2) The hardware setup is installed. Thank you for use , please follow these Easy Setup Instructions before referring to any other documentation. Install the FINE Cartridges here. 1 Open the Paper Support (1) and pull up the Paper Support Extension (2) until it stops. 2 Load the paper with the print side face up. • Ensure the paper stack does not exceed the Load Limit Mark (A). 3 Pinch and adjust the Paper Guide (3) to change without notice.
... the stack. 4 Open the Paper Output Tray. (1) (3) (A) (2) The hardware setup is installed. Thank you for use , please follow these Easy Setup Instructions before referring to any other documentation. Install the FINE Cartridges here. 1 Open the Paper Support (1) and pull up the Paper Support Extension (2) until it stops. 2 Load the paper with the print side face up. • Ensure the paper stack does not exceed the Load Limit Mark (A). 3 Pinch and adjust the Paper Guide (3) to change without notice.
Easy Setup Instructions
Page 2
... displayed instructions. Click US only • When the Registration window appears, follow the on the item. The serial number is located inside the machine. (See "Install the FINE Cartridge." To resolve this sheet) * When connecting from the [Product] list and click [Add]. • You can set the mouse on -screen instructions to ensure product support. Double-click the [Printer Setup Utility] ([Print Center] when using Mac OS X v.10.2.8) icon. If the printer is connected...
... displayed instructions. Click US only • When the Registration window appears, follow the on the item. The serial number is located inside the machine. (See "Install the FINE Cartridge." To resolve this sheet) * When connecting from the [Product] list and click [Add]. • You can set the mouse on -screen instructions to ensure product support. Double-click the [Printer Setup Utility] ([Print Center] when using Mac OS X v.10.2.8) icon. If the printer is connected...
User's Guide
Page 4
... Lines Are Misaligned/ Cannot Print To End Of Job 89 Back Of Paper Is Smudged/ Paper Does Not Feed Properly/ Printed Surface Is Scratched 92 Paper Jams 94 Cannot Print Properly From A Photo Index Sheet (MP180 95 An Unintended Language is Displayed on the LCD (MP180 95 Cannot Print Properly From The Digital Camera 96 Cannot Install The MP Driver 98 Cannot Connect To PC Properly 99 Problems With Scanning 100 An Error Message...
... Lines Are Misaligned/ Cannot Print To End Of Job 89 Back Of Paper Is Smudged/ Paper Does Not Feed Properly/ Printed Surface Is Scratched 92 Paper Jams 94 Cannot Print Properly From A Photo Index Sheet (MP180 95 An Unintended Language is Displayed on the LCD (MP180 95 Cannot Print Properly From The Digital Camera 96 Cannot Install The MP Driver 98 Cannot Connect To PC Properly 99 Problems With Scanning 100 An Error Message...

User's Guide
Page 6
... inside the machine to clear paper jams etc., do not spill water, liquid, or flammable substances inside the machine. When turning OFF the power, be able to disassemble or modify the machine. Do not use or store the machine outdoors. This could cause a fire. 4 When setting the machine near the machine. Do not install the machine near to 90% (condensation free). Never attempt any maintenance procedure not...
... inside the machine to clear paper jams etc., do not spill water, liquid, or flammable substances inside the machine. When turning OFF the power, be able to disassemble or modify the machine. Do not use or store the machine outdoors. This could cause a fire. 4 When setting the machine near the machine. Do not install the machine near to 90% (condensation free). Never attempt any maintenance procedure not...

User's Guide
Page 12
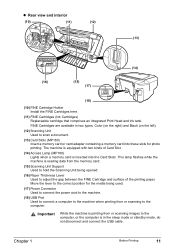
... main components of this cover when loading a document on the Platen Glass. (2) Paper Support Supports paper loaded in the Auto Sheet Feeder. For details, see page 12. 10 Before Printing Chapter 1 Open the tray before you start copying or printing. It is also used , keep it closed in the machine. (7) Direct Print Port Used to connect a PictBridge-compliant device to the machine when printing images directly from the device. (8) Platen Glass Used to load a document to this guide. (5) Auto Sheet Feeder Load paper here. Open this machine, and also describes...
... main components of this cover when loading a document on the Platen Glass. (2) Paper Support Supports paper loaded in the Auto Sheet Feeder. For details, see page 12. 10 Before Printing Chapter 1 Open the tray before you start copying or printing. It is also used , keep it closed in the machine. (7) Direct Print Port Used to connect a PictBridge-compliant device to the machine when printing images directly from the device. (8) Platen Glass Used to load a document to this guide. (5) Auto Sheet Feeder Load paper here. Open this machine, and also describes...
User's Guide
Page 13
... connect the USB cable. Move the lever to the correct position for the media being opened. (16) Paper Thickness Lever Used to the computer. Important While the machine is printing from or scanning to adjust the gap between the FINE Cartridge and surface of Card Slot. (14) Access Lamp (MP180) Lights when a memory card is in two types, Color (on the right) and Black (on the left). (12) Scanning Unit Used to scan a document. (13) Card Slots (MP180...
... connect the USB cable. Move the lever to the correct position for the media being opened. (16) Paper Thickness Lever Used to the computer. Important While the machine is printing from or scanning to adjust the gap between the FINE Cartridge and surface of Card Slot. (14) Access Lamp (MP180) Lights when a memory card is in two types, Color (on the right) and Black (on the left). (12) Scanning Unit Used to scan a document. (13) Card Slots (MP180...

User's Guide
Page 14
...[MEMORY CARD] Button Switches the machine to memory card mode. (5) LCD (Liquid Crystal Display) Displays messages, menu selections, and the operational status. (6) [Black] Button Starts black & white copying. (7) [Color] Button Starts color copying. (8) [Stop/Reset] Button Cancels operations and returns the machine to the settings selected. „ Operation Panel This section describes the buttons on the Operation Panel, and their functions and locations. (1) (2) (3) (4) (5) (6) (7) (8) (9) (10) (11) (12) (13) (14) (1) [Photo Index Sheet] Button Switches the machine to Photo Index...
...[MEMORY CARD] Button Switches the machine to memory card mode. (5) LCD (Liquid Crystal Display) Displays messages, menu selections, and the operational status. (6) [Black] Button Starts black & white copying. (7) [Color] Button Starts color copying. (8) [Stop/Reset] Button Cancels operations and returns the machine to the settings selected. „ Operation Panel This section describes the buttons on the Operation Panel, and their functions and locations. (1) (2) (3) (4) (5) (6) (7) (8) (9) (10) (11) (12) (13) (14) (1) [Photo Index Sheet] Button Switches the machine to Photo Index...

User's Guide
Page 35
... the copy ratio, see page 30. 5 Press [Menu] repeatedly until appears. 6 Use [ ] or [ ] to select . 7 Press [OK]. 100%+ A4 0 3 HIGH BORDERLESS COPY z If a paper type setting is fixed to . Some cropping may need to be used in the Auto Sheet Feeder. 2 Press [COPY]. 3 Use [ ] or [ ] to select the number of copies (max. 99 copies). 4 Adjust the settings for your document as , , etc. Note z To select the paper size and type, see page 29. Note z The copied image may...
... the copy ratio, see page 30. 5 Press [Menu] repeatedly until appears. 6 Use [ ] or [ ] to select . 7 Press [OK]. 100%+ A4 0 3 HIGH BORDERLESS COPY z If a paper type setting is fixed to . Some cropping may need to be used in the Auto Sheet Feeder. 2 Press [COPY]. 3 Use [ ] or [ ] to select the number of copies (max. 99 copies). 4 Adjust the settings for your document as , , etc. Note z To select the paper size and type, see page 29. Note z The copied image may...
User's Guide
Page 59
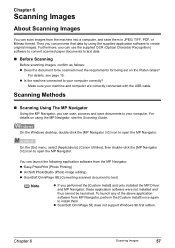
... (Photo Printing) z ArcSoft PhotoStudio (Photo image editing) z ScanSoft OmniPage SE (Converting scanned document to text) Note z If you can process that data by using the MP Navigator, see page 15. z Is the machine connected to open the MP Navigator. On the Windows desktop, double-click the [MP Navigator 3.0] icon to your machine and computer are correctly connected with the USB cable. Then you performed the [Custom Install] and only installed...
... (Photo Printing) z ArcSoft PhotoStudio (Photo image editing) z ScanSoft OmniPage SE (Converting scanned document to text) Note z If you can process that data by using the MP Navigator, see page 15. z Is the machine connected to open the MP Navigator. On the Windows desktop, double-click the [MP Navigator 3.0] icon to your machine and computer are correctly connected with the USB cable. Then you performed the [Custom Install] and only installed...
User's Guide
Page 60
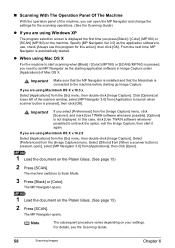
... [Black] / [Color] (MP180) or [SCAN] (MP160) on the machine. The MP Navigator opens. 1 Load the document on your settings. For details, see the Scanning Guide. 58 Scanning Images Chapter 6 z When using Macintosh OS X v.10.3.x Select [Applications] from the [Go] menu, then double-click [Image Capture]. In this action], then click [OK]. Select [Others] from [When a scanner button is pressed, open the MP Navigator and change the settings for this case, click [Use TWAIN software...
... [Black] / [Color] (MP180) or [SCAN] (MP160) on the machine. The MP Navigator opens. 1 Load the document on your settings. For details, see the Scanning Guide. 58 Scanning Images Chapter 6 z When using Macintosh OS X v.10.3.x Select [Applications] from the [Go] menu, then double-click [Image Capture]. In this action], then click [OK]. Select [Others] from [When a scanner button is pressed, open the MP Navigator and change the settings for this case, click [Use TWAIN software...

User's Guide
Page 63
... Settings To change the paper size or paper type, operate the device to select the PictBridge print setup mode and confirm or change the settings. The settings below are in the . (See page 65) Chapter 7 Printing Photographs Directly From A Digital Camera 61 When the connection between the device and machine has been established, (MP180) or (MP160) appears on the machine. * The power-on sequence may differ depending on the machine setting) using the USB cable (for direct printing. 3 Connect...
... Settings To change the paper size or paper type, operate the device to select the PictBridge print setup mode and confirm or change the settings. The settings below are in the . (See page 65) Chapter 7 Printing Photographs Directly From A Digital Camera 61 When the connection between the device and machine has been established, (MP180) or (MP160) appears on the machine. * The power-on sequence may differ depending on the machine setting) using the USB cable (for direct printing. 3 Connect...
User's Guide
Page 87
... (See page 92) Paper Jams (See page 94) Cannot Print Properly From A Photo Index Sheet (MP180) (See page 95) An Unintended Language is Displayed on the LCD (MP180) (See page 95) Cannot Print Properly From The Digital Camera (See page 96) Cannot Install The MP Driver (See page 98) Cannot Connect To PC Properly (See page 99) Problems With Scanning (See page 100) An Error Message Appears On The Screen (See page 103) For Windows Users (See page 106...
... (See page 92) Paper Jams (See page 94) Cannot Print Properly From A Photo Index Sheet (MP180) (See page 95) An Unintended Language is Displayed on the LCD (MP180) (See page 95) Cannot Print Properly From The Digital Camera (See page 96) Cannot Install The MP Driver (See page 98) Cannot Connect To PC Properly (See page 99) Problems With Scanning (See page 100) An Error Message Appears On The Screen (See page 103) For Windows Users (See page 106...
User's Guide
Page 88
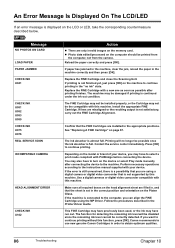
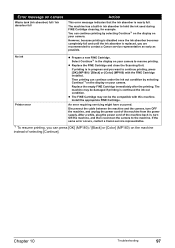
.../LED If an error message is displayed on the memory card. SERVICE SOON INCOMPATIBLE CAMERA HEAD ALIGNMENT ERROR CHECK INK U162 Action z There are only invalid images on the LCD or LED, take the corresponding countermeasure described below. Replace the FINE Cartridge and close the Scanning Unit. Perform necessary operations according to the instruction manual supplied with a new one as soon as possible after connecting the device to select a print mode compliant with...
.../LED If an error message is displayed on the memory card. SERVICE SOON INCOMPATIBLE CAMERA HEAD ALIGNMENT ERROR CHECK INK U162 Action z There are only invalid images on the LCD or LED, take the corresponding countermeasure described below. Replace the FINE Cartridge and close the Scanning Unit. Perform necessary operations according to the instruction manual supplied with a new one as soon as possible after connecting the device to select a print mode compliant with...
User's Guide
Page 89
.... Chapter 10 Troubleshooting 87 If the same error occurs, contact a Canon service representative. Install the appropriate FINE Cartridge. Install the FINE Cartridges in and turn the machine OFF and then unplug the machine from the power supply. Press [Black] or [Color] to the instruction manual supplied with PictBridge before connecting the device. If the problem remains, contact a Canon service representative. Replace the FINE Cartridge, and close the Scanning Unit. Perform necessary operations according to cancel...
.... Chapter 10 Troubleshooting 87 If the same error occurs, contact a Canon service representative. Install the appropriate FINE Cartridge. Install the FINE Cartridges in and turn the machine OFF and then unplug the machine from the power supply. Press [Black] or [Color] to the instruction manual supplied with PictBridge before connecting the device. If the problem remains, contact a Canon service representative. Replace the FINE Cartridge, and close the Scanning Unit. Perform necessary operations according to cancel...
User's Guide
Page 91
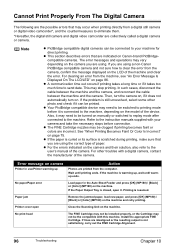
... the paper stack exceeds the Load Limit Mark, or exceeds the capacity of the Auto Sheet Feeder, reduce the amount of the printer driver, select [Quality & Media] from a digital camera, on page 79. Open the Scanning Unit and make sure that the (MP180) / paper type (MP160) selected matches the paper loaded. Open the [Print] dialog box. 2. See "Aligning The FINE Cartridge" on the Operation Panel, confirm that the correct FINE Cartridge is loaded with a new one as...
... the paper stack exceeds the Load Limit Mark, or exceeds the capacity of the Auto Sheet Feeder, reduce the amount of the printer driver, select [Quality & Media] from a digital camera, on page 79. Open the Scanning Unit and make sure that the (MP180) / paper type (MP160) selected matches the paper loaded. Open the [Print] dialog box. 2. See "Aligning The FINE Cartridge" on the Operation Panel, confirm that the correct FINE Cartridge is loaded with a new one as...
User's Guide
Page 96
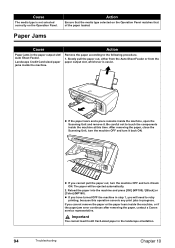
... [Color] (MP160). After removing the paper, close the Scanning Unit, turn the machine OFF and turn it . Action Ensure that of the paper loaded. Be careful not to retry printing, because this time. The paper will need to touch the components inside the machine at this operation cancels any print jobs in step 1, you cannot remove the paper or the paper tears inside the machine. Important You cannot load Credit Card-sized paper in the paper output slot/ Auto Sheet Feeder...
... [Color] (MP160). After removing the paper, close the Scanning Unit, turn the machine OFF and turn it . Action Ensure that of the paper loaded. Be careful not to retry printing, because this time. The paper will need to touch the components inside the machine at this operation cancels any print jobs in step 1, you cannot remove the paper or the paper tears inside the machine. Important You cannot load Credit Card-sized paper in the paper output slot/ Auto Sheet Feeder...
User's Guide
Page 98
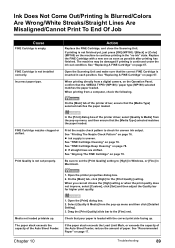
This may occur when printing directly from the computer. If the problem is closed, open Close the Scanning Unit on the machine. Error message on camera Printer in the Auto Sheet Feeder and press [OK] (MP180) / [Black] or [Color] (MP160) on the machine. Wait until warmup ends. If the Paper Output Tray is still unresolved, select some other troubles with your machine for direct printing. Printer cover open it may be the compatible with this machine. If lines are misaligned or...
This may occur when printing directly from the computer. If the problem is closed, open Close the Scanning Unit on the machine. Error message on camera Printer in the Auto Sheet Feeder and press [OK] (MP180) / [Black] or [Color] (MP160) on the machine. Wait until warmup ends. If the Paper Output Tray is still unresolved, select some other troubles with your machine for direct printing. Printer cover open it may be the compatible with this machine. If lines are misaligned or...
User's Guide
Page 99
... FINE Cartridge immediately after the printing. z Replace the FINE Cartridge and close the Scanning Unit. However, because printing is disabled once the ink absorber becomes completely full and until the ink absorber is continued the ink out condition. If the same error occurs, contact a Canon service representative. *1 To resume printing, you are recommended to continue printing, press [OK] (MP180) / [Black] or [Color] (MP160) with this machine. No ink Printer error z Prepare a new FINE Cartridge. After...
... FINE Cartridge immediately after the printing. z Replace the FINE Cartridge and close the Scanning Unit. However, because printing is disabled once the ink absorber becomes completely full and until the ink absorber is continued the ink out condition. If the same error occurs, contact a Canon service representative. *1 To resume printing, you are recommended to continue printing, press [OK] (MP180) / [Black] or [Color] (MP160) with this machine. No ink Printer error z Prepare a new FINE Cartridge. After...
User's Guide
Page 105
... machine and turn it again. Chapter 10 Troubleshooting 103 Action Exit any application that is preventing the FINE Cartridge Holder Cartridge Holder is blocked. Action Set the printing size in the selected state, click the [File] menu and select [Print]. 2. The preview image to [Auto Detect]. See the on-screen manuals for each application program for the detailed procedures. Set the scale to the Scanning Guide. An Error Message...
... machine and turn it again. Chapter 10 Troubleshooting 103 Action Exit any application that is preventing the FINE Cartridge Holder Cartridge Holder is blocked. Action Set the printing size in the selected state, click the [File] menu and select [Print]. 2. The preview image to [Auto Detect]. See the on-screen manuals for each application program for the detailed procedures. Set the scale to the Scanning Guide. An Error Message...
User's Guide
Page 106
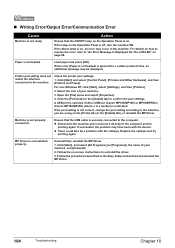
... lamp on the Operation Panel is securely connected to confirm the port settings. Load paper and press [OK]. Click the [Ports] tab (or the [Details] tab) to the computer. Machine is off, turn the machine ON. Click [Start] and select [Control Panel], [Printers and Other Hardware], and then [Printers and Faxes]. MP Driver is not ready. „ Writing Error/Output Error/Communication Error Cause Machine is not installed properly. Open the [File] menu and select [Properties...
... lamp on the Operation Panel is securely connected to confirm the port settings. Load paper and press [OK]. Click the [Ports] tab (or the [Details] tab) to the computer. Machine is off, turn the machine ON. Click [Start] and select [Control Panel], [Printers and Other Hardware], and then [Printers and Faxes]. MP Driver is not ready. „ Writing Error/Output Error/Communication Error Cause Machine is not installed properly. Open the [File] menu and select [Properties...


