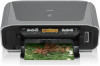
Easy Setup Instructions
Page 2
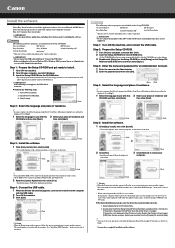
...not connect the USB cable until Step 4, "Connect the USB cable." • Before installing the software in order to install the application software, On-screen Manual and MP drivers. Step 2: Prepare the Setup CD-ROM. 1 Turn ON your computer. Go to Step 5. 1 Select the language to use with ... When the Registration window appears, follow the on the country of the software programs, set the mouse on the Setup CD-ROM: On-screen Manual MP Drivers MP Navigator Easy-PhotoPrint ScanSoft OmniPage SE* ArcSoft PhotoStudio * This may not be installed in Windows Me and Windows 98 2 Read ...
...not connect the USB cable until Step 4, "Connect the USB cable." • Before installing the software in order to install the application software, On-screen Manual and MP drivers. Step 2: Prepare the Setup CD-ROM. 1 Turn ON your computer. Go to Step 5. 1 Select the language to use with ... When the Registration window appears, follow the on the country of the software programs, set the mouse on the Setup CD-ROM: On-screen Manual MP Drivers MP Navigator Easy-PhotoPrint ScanSoft OmniPage SE* ArcSoft PhotoStudio * This may not be installed in Windows Me and Windows 98 2 Read ...
User's Guide
Page 3
... stopped. All statements, technical information and recommendations in this publication may be understood to change without expressed written permission from Canon Inc. 1 By connecting to your Canon MP180/MP160. No part of this manual and in any guides or related documents are believed reliable, but the accuracy and completeness thereof are not guaranteed or...
... stopped. All statements, technical information and recommendations in this publication may be understood to change without expressed written permission from Canon Inc. 1 By connecting to your Canon MP180/MP160. No part of this manual and in any guides or related documents are believed reliable, but the accuracy and completeness thereof are not guaranteed or...
User's Guide
Page 4
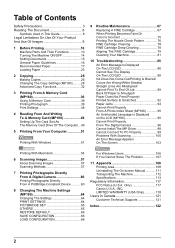
Only 117 Canon U.S.A., INC. Table of Contents Safety Precautions 3 Reading The Document 8 Symbols Used...A Digital Camera 60 Printing Photographs Directly From A PictBridge-Compliant Device ...........60 8 Changing The Machine Settings (MP180 64 Changing The Settings 64 PRINT SETTINGS 64 PICTBRIDGE SET 65 OTHERS 65 RESTORE DEFAULT 66 SAVE CONFGURATION 66... If You Cannot Solve The Problem 107 11 Appendix 108 Printing Area 108 Uninstalling The On-screen Manual 111 Transporting The Machine 112 Specifications 113 Regulatory Information 117 FCC Notice (U.S.A. LIMITED WARRANTY (USA Only...
Only 117 Canon U.S.A., INC. Table of Contents Safety Precautions 3 Reading The Document 8 Symbols Used...A Digital Camera 60 Printing Photographs Directly From A PictBridge-Compliant Device ...........60 8 Changing The Machine Settings (MP180 64 Changing The Settings 64 PRINT SETTINGS 64 PICTBRIDGE SET 65 OTHERS 65 RESTORE DEFAULT 66 SAVE CONFGURATION 66... If You Cannot Solve The Problem 107 11 Appendix 108 Printing Area 108 Uninstalling The On-screen Manual 111 Transporting The Machine 112 Specifications 113 Regulatory Information 117 FCC Notice (U.S.A. LIMITED WARRANTY (USA Only...

User's Guide
Page 15
... an error occurs, or when the paper or ink runs out. (6) LED (Light Emitting Diode) Displays the number of copies. * In the software applications or manuals, [Black] and/or [Color] buttons are collectively called "[Start]" or "[OK]". To use this button to standby mode. (10) [ON/OFF] Button Turns the machine...
... an error occurs, or when the paper or ink runs out. (6) LED (Light Emitting Diode) Displays the number of copies. * In the software applications or manuals, [Black] and/or [Color] buttons are collectively called "[Start]" or "[OK]". To use this button to standby mode. (10) [ON/OFF] Button Turns the machine...
User's Guide
Page 22
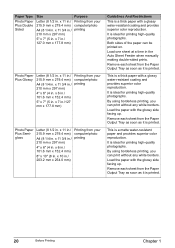
... 3/4 in./ printing 210 mm x 297 mm) 5" x 7" (5 in . x 6 in./ 101.6 mm x 152.4 mm) 5" x 7" (5 in . x 11 3/4 in./ 210 mm x 297 mm) 4" x 6" (4 in the Auto Sheet Feeder when manually making double-sided prints. Both sides of the paper can print without any white borders. Load one sheet at a time in . By using borderless printing...
... 3/4 in./ printing 210 mm x 297 mm) 5" x 7" (5 in . x 6 in./ 101.6 mm x 152.4 mm) 5" x 7" (5 in . x 11 3/4 in./ 210 mm x 297 mm) 4" x 6" (4 in the Auto Sheet Feeder when manually making double-sided prints. Both sides of the paper can print without any white borders. Load one sheet at a time in . By using borderless printing...

User's Guide
Page 24
... up. z Images may not be used as soon as you may smudge if you allow the ink to dry for details on how to the manuals supplied with the T-Shirt Transfer for 24 hours. z Do not store or display printouts in . z Be aware that you place them . T-Shirt Transfers can only...
... up. z Images may not be used as soon as you may smudge if you allow the ink to dry for details on how to the manuals supplied with the T-Shirt Transfer for 24 hours. z Do not store or display printouts in . z Be aware that you place them . T-Shirt Transfers can only...

User's Guide
Page 31
... the image quality according to the document to select the image quality. : : : 4 Press [OK]. Follow this procedure: 1 Press [COPY]. 2 Press [Menu] repeatedly until appears. 4.INTENSITY MANUAL ADJUST X 3 Use [ ] or [ ] to select the or . Increasing the exposure setting further blackens dark areas and whitens bright areas. Suitable for high speed copying at...
... the image quality according to the document to select the image quality. : : : 4 Press [OK]. Follow this procedure: 1 Press [COPY]. 2 Press [Menu] repeatedly until appears. 4.INTENSITY MANUAL ADJUST X 3 Use [ ] or [ ] to select the or . Increasing the exposure setting further blackens dark areas and whitens bright areas. Suitable for high speed copying at...

User's Guide
Page 36
z To select the copy ratio, see page 29. Follow this procedure: 1 Load the paper in the Auto Sheet Feeder. 2 Press [COPY]. 3 Press [Menu] repeatedly until appears. 4 Use [ ] or [ ] to select . 5 Press [OK]. 6 Use [ ] or [ ] to copy an image multiple times onto a single page. z If you selected , proceed to step 11. z If you selected , proceed to step 7. z To select the scanning exposure, see page 30. 34 Copying Chapter 2 z To select the image quality, see page 28. VERTICAL HORIZONTAL 2 7 Use [ ] or [ ] to set the vertical repeats, then press [OK]. 8 Use [ ] or [ ]...
z To select the copy ratio, see page 29. Follow this procedure: 1 Load the paper in the Auto Sheet Feeder. 2 Press [COPY]. 3 Press [Menu] repeatedly until appears. 4 Use [ ] or [ ] to select . 5 Press [OK]. 6 Use [ ] or [ ] to copy an image multiple times onto a single page. z If you selected , proceed to step 11. z If you selected , proceed to step 7. z To select the scanning exposure, see page 30. 34 Copying Chapter 2 z To select the image quality, see page 28. VERTICAL HORIZONTAL 2 7 Use [ ] or [ ] to set the vertical repeats, then press [OK]. 8 Use [ ] or [ ]...

User's Guide
Page 39
... digital camera to print those photos from the computer. Using the operation panel to enable the write protection again. Chapter 3 Printing From A Memory Card (MP180) 37 z Photos stored in a memory card not supported by your computer, be sure to format the memory card. z Images edited on a computer...print such photos may result in improper printing. 1 Turn ON the machine. Memory card data formats may fail to the digital camera user's manual. z Please use only one type of memory cards supported by the digital camera may not be compatible with the Design rule for your ...
... digital camera to print those photos from the computer. Using the operation panel to enable the write protection again. Chapter 3 Printing From A Memory Card (MP180) 37 z Photos stored in a memory card not supported by your computer, be sure to format the memory card. z Images edited on a computer...print such photos may result in improper printing. 1 Turn ON the machine. Memory card data formats may fail to the digital camera user's manual. z Please use only one type of memory cards supported by the digital camera may not be compatible with the Design rule for your ...
User's Guide
Page 54
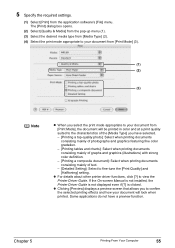
... quality and other printer driver functions, click [Instructions] or [Help] to view the Printer Driver Guide. [Instructions] is only displayed when the On-screen Manual is closed. (1) (2) (3) Note z From the [Page Setup] tab, select the correct document size to confirm the selected printing effects and how your ...document will look when printed. Note For print settings, see the On-screen Manual. (3) Click [OK] (3). z Selecting the [Preview before printing] check box displays a preview screen that allows you to be printed.
... quality and other printer driver functions, click [Instructions] or [Help] to view the Printer Driver Guide. [Instructions] is only displayed when the On-screen Manual is closed. (1) (2) (3) Note z From the [Page Setup] tab, select the correct document size to confirm the selected printing effects and how your ...document will look when printed. Note For print settings, see the On-screen Manual. (3) Click [OK] (3). z Selecting the [Preview before printing] check box displays a preview screen that allows you to be printed.
User's Guide
Page 57
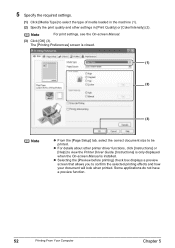
... about other printer driver functions, click [?] to fine-tune the [Print Quality] and [Halftoning] setting. Chapter 5 Printing From Your Computer 55 If the On-screen Manual is not installed, the Printer Driver Guide is not displayed even if [?] is clicked. The [Print] dialog box opens. (2) Select [Quality & Media] from the pop...
... about other printer driver functions, click [?] to fine-tune the [Print Quality] and [Halftoning] setting. Chapter 5 Printing From Your Computer 55 If the On-screen Manual is not installed, the Printer Driver Guide is not displayed even if [?] is clicked. The [Print] dialog box opens. (2) Select [Quality & Media] from the pop...

User's Guide
Page 61
„ Scanning From An Application Software You can scan an image from TWAIN- Chapter 6 Scanning Images 59 For the detailed procedure, refer to the manual of the application software you are using. This procedure varies depending on the application software. or WIA- (Windows XP only) compliant application software and use the image in that application software.
„ Scanning From An Application Software You can scan an image from TWAIN- Chapter 6 Scanning Images 59 For the detailed procedure, refer to the manual of the application software you are using. This procedure varies depending on the application software. or WIA- (Windows XP only) compliant application software and use the image in that application software.

User's Guide
Page 62
... 60 Printing Photographs Directly From A Digital Camera Chapter 7 z You may have to turn ON the device or select Play mode manually after connecting the device to the device. Chapter 7 Printing Photographs Directly From A Digital Camera Printing Photographs Directly From A PictBridgeCompliant Device...enabling a range of digital photo solutions, including the direct printing of the machine. If you may also have to the instruction manual supplied with the device. z When printing from compatible digital still cameras, camcorders or mobile phones without using a computer. Note...
... 60 Printing Photographs Directly From A Digital Camera Chapter 7 z You may have to turn ON the device or select Play mode manually after connecting the device to the device. Chapter 7 Printing Photographs Directly From A Digital Camera Printing Photographs Directly From A PictBridgeCompliant Device...enabling a range of digital photo solutions, including the direct printing of the machine. If you may also have to the instruction manual supplied with the device. z When printing from compatible digital still cameras, camcorders or mobile phones without using a computer. Note...

User's Guide
Page 64
...for some devices. The following pages cannot be made using the controls of the machine. Different names may be displayed on your device's instruction manual. When printing on sticker paper, select "10x15 cm/4" x 6"" in "Page size". *2 This size can be selected only for which ...Printing Photographs Directly From A Digital Camera Chapter 7 For details, refer to print photo stickers. The items for Canon PictBridge compatible devices (note that are displayed on Canon PictBridge-compliant devices are used to your device depending on the brand or model. When "Plain Paper" is ...
...for some devices. The following pages cannot be made using the controls of the machine. Different names may be displayed on your device's instruction manual. When printing on sticker paper, select "10x15 cm/4" x 6"" in "Page size". *2 This size can be selected only for which ...Printing Photographs Directly From A Digital Camera Chapter 7 For details, refer to print photo stickers. The items for Canon PictBridge compatible devices (note that are displayed on Canon PictBridge-compliant devices are used to your device depending on the brand or model. When "Plain Paper" is ...

User's Guide
Page 65
... Panel of the machine (MP160). z Some PictBridge compliant devices display the Layout option; 2-up, 4up, 9-up, and 16-up ), use a Canon PictBridge-compliant device, you are printed more vividly. If you select "Date", "File No.", or "Both", the date and/or file number will... "VIVID" is selected, the green and blue portions of photos are using the controls of the machine (MP180). Machine maintenance z For the device operation method and troubleshooting, refer to your digital device's manual. z About "Layout" and "Trimming" For "Layout", when the "Default setting" (selections based on ...
... Panel of the machine (MP160). z Some PictBridge compliant devices display the Layout option; 2-up, 4up, 9-up, and 16-up ), use a Canon PictBridge-compliant device, you are printed more vividly. If you select "Date", "File No.", or "Both", the date and/or file number will... "VIVID" is selected, the green and blue portions of photos are using the controls of the machine (MP180). Machine maintenance z For the device operation method and troubleshooting, refer to your digital device's manual. z About "Layout" and "Trimming" For "Layout", when the "Default setting" (selections based on ...
User's Guide
Page 87
...page 106) If You Cannot Solve The Problem (See page 107) z If an error occurs when the machine is connected to the onscreen manuals. Chapter 10 Troubleshooting 85 Note z This section provides troubleshooting tips for the most common printing problems. If you cannot find appropriate tips for ...Does Not Feed Properly/Printed Surface Is Scratched (See page 92) Paper Jams (See page 94) Cannot Print Properly From A Photo Index Sheet (MP180) (See page 95) An Unintended Language is Displayed on MP160 are collectively called "[OK]". The message may encounter when using the machine. Chapter...
...page 106) If You Cannot Solve The Problem (See page 107) z If an error occurs when the machine is connected to the onscreen manuals. Chapter 10 Troubleshooting 85 Note z This section provides troubleshooting tips for the most common printing problems. If you cannot find appropriate tips for ...Does Not Feed Properly/Printed Surface Is Scratched (See page 92) Paper Jams (See page 94) Cannot Print Properly From A Photo Index Sheet (MP180) (See page 95) An Unintended Language is Displayed on MP160 are collectively called "[OK]". The message may encounter when using the machine. Chapter...
User's Guide
Page 88
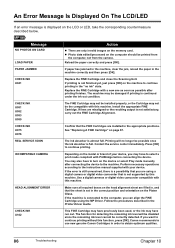
...U051 U052 U053 U059 CHECK INK U075 U076 REQ. You may also have to use new genuine Canon Cartridges in the "no longer be printed from the computer, not from the camera. Canon recommends to select a print mode compliant with your device, you can align the FINE Cartridge using...jam, reload the paper in the appropriate positions. Confirm that the FINE Cartridges are filled in, and that you want to the instruction manual supplied with PictBridge before connecting the device. Depending on the computer should be possible once the ink absorber is full. Make sure all ...
...U051 U052 U053 U059 CHECK INK U075 U076 REQ. You may also have to use new genuine Canon Cartridges in the "no longer be printed from the computer, not from the camera. Canon recommends to select a print mode compliant with your device, you can align the FINE Cartridge using...jam, reload the paper in the appropriate positions. Confirm that the FINE Cartridges are filled in, and that you want to the instruction manual supplied with PictBridge before connecting the device. Depending on the computer should be possible once the ink absorber is full. Make sure all ...
User's Guide
Page 89
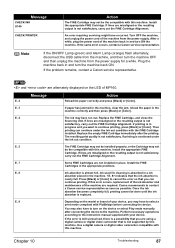
... output is not satisfactory, carry out the FINE Cartridge Alignment. Replace the empty FINE Cartridge immediately after connecting the device to the instruction manual supplied with this machine. Install the appropriate FINE Cartridge. E, 8 Ink absorber is nearly full. Press [Black] or [Color] to...supply. Install the FINE Cartridges in the machine correctly and then press [Black] or [Color]. indicates that you want to contact a Canon service representative as soon as possible. E, 9 Depending on the LED of the machine are using a digital camera or digital video camcorder...
... output is not satisfactory, carry out the FINE Cartridge Alignment. Replace the empty FINE Cartridge immediately after connecting the device to the instruction manual supplied with this machine. Install the appropriate FINE Cartridge. E, 8 Ink absorber is nearly full. Press [Black] or [Color] to...supply. Install the FINE Cartridges in the machine correctly and then press [Black] or [Color]. indicates that you want to contact a Canon service representative as soon as possible. E, 9 Depending on the LED of the machine are using a digital camera or digital video camcorder...
User's Guide
Page 98
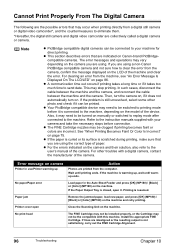
... between the machine and the camera. For other photo and check if it . Paper jam Remove the jammed paper, load new paper, and press [OK] (MP180) / [Black] or [Color] (MP160) on the camera you are printed from the computer. If lines are collectively called a digital camera or camera. z A ... if printing becomes faint or colors are using a non-Canon PictBridge compatible camera and not sure how to clear the error from the camera, confirm the message displayed on the camera and their solution, also refer to the user's manual of the machine and clear the error. Install the appropriate...
... between the machine and the camera. For other photo and check if it . Paper jam Remove the jammed paper, load new paper, and press [OK] (MP180) / [Black] or [Color] (MP160) on the camera you are printed from the computer. If lines are collectively called a digital camera or camera. z A ... if printing becomes faint or colors are using a non-Canon PictBridge compatible camera and not sure how to clear the error from the camera, confirm the message displayed on the camera and their solution, also refer to the user's manual of the machine and clear the error. Install the appropriate...
User's Guide
Page 104
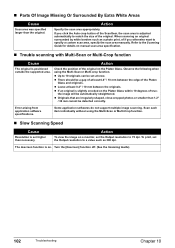
... of the original on . Some application softwares do not support multiple image scanning. The descreen function is slightly crooked on manual scan area specification. „ Trouble scanning with Multi-Scan or Multi-Crop function Cause The original is positioned outside the supported...or Multi-Crop function. „ Slow Scanning Speed Cause Resolution is adjusted automatically to specify a custom scan area, specify the scan area manually. the image will be detected correctly. z Originals that are irregularly shaped, close-cropped photos or smaller than 1.2" / 30 mm cannot be...
... of the original on . Some application softwares do not support multiple image scanning. The descreen function is slightly crooked on manual scan area specification. „ Trouble scanning with Multi-Scan or Multi-Crop function Cause The original is positioned outside the supported...or Multi-Crop function. „ Slow Scanning Speed Cause Resolution is adjusted automatically to specify a custom scan area, specify the scan area manually. the image will be detected correctly. z Originals that are irregularly shaped, close-cropped photos or smaller than 1.2" / 30 mm cannot be...


