User Guide
Page 66
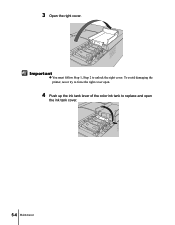
Important z You must follow Step 1, Step 2 to replace and open . 4 Push up the ink tank lever of the color ink tank to unlock the right cover. 3 Open the right cover. To avoid damaging the printer, never try to force the right cover open the ink tank cover. 5-4 Maintenance
Important z You must follow Step 1, Step 2 to replace and open . 4 Push up the ink tank lever of the color ink tank to unlock the right cover. 3 Open the right cover. To avoid damaging the printer, never try to force the right cover open the ink tank cover. 5-4 Maintenance
User Guide
Page 68
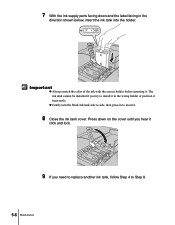
Press down and the label facing in the direction shown below, insert the ink tank into the holder. Important z Always match the color of the ink with the correct holder before inserting it . 8 Close the ink tank cover. z Gently turn the black ink tank side to side, then press in the wrong holder or position it incorrectly. The ink tank cannot be installed if you need to replace another ink tank, follow Step 4 to Step 8. 5-6 Maintenance 7 With the ink supply ports facing down on the cover until you hear it click and lock. 9 If you try to install it in to insert it .
Press down and the label facing in the direction shown below, insert the ink tank into the holder. Important z Always match the color of the ink with the correct holder before inserting it . 8 Close the ink tank cover. z Gently turn the black ink tank side to side, then press in the wrong holder or position it incorrectly. The ink tank cannot be installed if you need to replace another ink tank, follow Step 4 to Step 8. 5-6 Maintenance 7 With the ink supply ports facing down on the cover until you hear it click and lock. 9 If you try to install it in to insert it .

User Guide
Page 77
... sure that the printhead is inserted completely. Replacing the Printhead 5-15 Discard these items immediately in , insert the printhead gently into the carriage below. b c z Never try to re-attach the protective caps or packing material removed from the printhead. z To prevent poor results in printing, never touch the exposed nozzles (b) or...
... sure that the printhead is inserted completely. Replacing the Printhead 5-15 Discard these items immediately in , insert the printhead gently into the carriage below. b c z Never try to re-attach the protective caps or packing material removed from the printhead. z To prevent poor results in printing, never touch the exposed nozzles (b) or...

User Guide
Page 80
19 With the ink ports pointing down on the cover until you try to install it in the wrong holder or position it incorrectly. Press down and the label facing in the direction shown in to insert it. 20 Close the ink tank cover. z Gently turn the black ink tank side to install the other ink tanks. 5-18 Maintenance Important z Always match the color of the ink with the correct holder before inserting it click and lock. 21 Follows Step 18 to Step 20 to side, then press in the illustration below, insert the ink tank into the holder. The ink tank cannot be installed if you hear it .
19 With the ink ports pointing down on the cover until you try to install it in the wrong holder or position it incorrectly. Press down and the label facing in the direction shown in to insert it. 20 Close the ink tank cover. z Gently turn the black ink tank side to install the other ink tanks. 5-18 Maintenance Important z Always match the color of the ink with the correct holder before inserting it click and lock. 21 Follows Step 18 to Step 20 to side, then press in the illustration below, insert the ink tank into the holder. The ink tank cannot be installed if you hear it .

User Guide
Page 86
... 1: Incorrect installer CD-ROM mounted. Solution: Call for the printer has not be selected on the printer operation panel before you can also download the driver from the Canon Home Pages (http://www.canon.com/). Problem 1: Interface cable is damaged. Solution: If Windows... UI. (ÆNetwork Guide) 6-4 Troubleshooting Solution: Open the Printer folder, remove the N1000/N2000 printer icon, then try to a network, perform the network settings with the printer. Solution: If the printer is unstable. You can use the printer. (ÆSetup Guide, Chapter 1, "9 Select the Interface")...
... 1: Incorrect installer CD-ROM mounted. Solution: Call for the printer has not be selected on the printer operation panel before you can also download the driver from the Canon Home Pages (http://www.canon.com/). Problem 1: Interface cable is damaged. Solution: If Windows... UI. (ÆNetwork Guide) 6-4 Troubleshooting Solution: Open the Printer folder, remove the N1000/N2000 printer icon, then try to a network, perform the network settings with the printer. Solution: If the printer is unstable. You can use the printer. (ÆSetup Guide, Chapter 1, "9 Select the Interface")...

User Guide
Page 91
...Content Broken lines are printing. Solution: Use the printer operation panel to align the printhead with the printer by bi-directional data transfer when connected via the parallel port. Problem 2: Another printer driver was selected for the printer and try again. (ÆSetup Guide) Problem 3: The computer... Switch the printer and computer off , and print again. (ÆPrinter driver online Help) Print Job Results Abnormal 6-9 Solution: Select the correct printer driver for the print job. The Thickness of Lines Is Different Problem 1: If you are using Windows XP or Windows 2000, the Fast ...
...Content Broken lines are printing. Solution: Use the printer operation panel to align the printhead with the printer by bi-directional data transfer when connected via the parallel port. Problem 2: Another printer driver was selected for the printer and try again. (ÆSetup Guide) Problem 3: The computer... Switch the printer and computer off , and print again. (ÆPrinter driver online Help) Print Job Results Abnormal 6-9 Solution: Select the correct printer driver for the print job. The Thickness of Lines Is Different Problem 1: If you are using Windows XP or Windows 2000, the Fast ...

User Guide
Page 92
...settings of the printer driver, select Color for the print job. Problem 1: Date and time settings of the Color Adjustment dialog box. (ÆPinter Driver online Help) Problem 2: Colors in the printer driver for the Color Mode and try again. (ÆPinter Driver online Help) Wrong colors are printing. ...using Windows XP or Windows 2000, the Fast Graphic Process setting is printing. For details, see your software application manual. Problem 1: Grayscale printing is selected in the printout do not match the colors on the Color Matching or Color tab of the Server or...
...settings of the printer driver, select Color for the print job. Problem 1: Date and time settings of the Color Adjustment dialog box. (ÆPinter Driver online Help) Problem 2: Colors in the printer driver for the Color Mode and try again. (ÆPinter Driver online Help) Wrong colors are printing. ...using Windows XP or Windows 2000, the Fast Graphic Process setting is printing. For details, see your software application manual. Problem 1: Grayscale printing is selected in the printout do not match the colors on the Color Matching or Color tab of the Server or...

User Guide
Page 93
... job again. Solution: Read the message and select the correct color ink tank for service. Print Job Results Abnormal 6-11 Solution: Switch off the printer, wait a few seconds, then switch the printer on again, and try to start the print job again. Replace x Tank Problem 1:... above, note the number of ink. the power supply. Menu, and set the printer online then try to Off. (ÆP.4-12) Problem 3: Printing a color image over a large printing area. Solution: On the printer operation panel, open the Maint. Solution: Printing a photograph or other large image normally...
... job again. Solution: Read the message and select the correct color ink tank for service. Print Job Results Abnormal 6-11 Solution: Switch off the printer, wait a few seconds, then switch the printer on again, and try to start the print job again. Replace x Tank Problem 1:... above, note the number of ink. the power supply. Menu, and set the printer online then try to Off. (ÆP.4-12) Problem 3: Printing a color image over a large printing area. Solution: On the printer operation panel, open the Maint. Solution: Printing a photograph or other large image normally...

User Guide
Page 100
Pulling it . a b Important z Never touch the encoder film (a), and try to avoid touching other parts of the printer to remove it straight up could affect print quality or damage the printer. 6-18 Troubleshooting z Try to the front of the printer. 7 If you see pieces of torn paper inside the printer, remove the rear upper cover then use both hands to pull the jammed paper to the front of the device. z You must pull the jammed paper to avoid bending the transparent film (b).
Pulling it . a b Important z Never touch the encoder film (a), and try to avoid touching other parts of the printer to remove it straight up could affect print quality or damage the printer. 6-18 Troubleshooting z Try to the front of the printer. 7 If you see pieces of torn paper inside the printer, remove the rear upper cover then use both hands to pull the jammed paper to the front of the device. z You must pull the jammed paper to avoid bending the transparent film (b).


