i9100 Quick Start Guide
Page 53
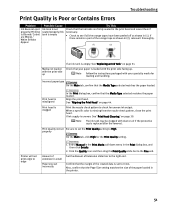
...head is clogged Print the nozzle check pattern to the Fine end. When a specific color is missing from the nozzle check pattern, clean the print head...the print head. Print Quality...removal. Print head is misaligned ...Head Cleaning" on page 31. Printer will not print edge to High. Confirm that the margin of the paper loaded in the printer.... 51 Also, confirm that the Media Type selected matches the paper loaded. Troubleshooting Print Quality is Poor or Contains Errors Problem Ink does not eject properly/Printing is Blurred/ Colors..."Aligning the Print Head" on page 44. Set...
...head is clogged Print the nozzle check pattern to the Fine end. When a specific color is missing from the nozzle check pattern, clean the print head...the print head. Print Quality...removal. Print head is misaligned ...Head Cleaning" on page 31. Printer will not print edge to High. Confirm that the margin of the paper loaded in the printer.... 51 Also, confirm that the Media Type selected matches the paper loaded. Troubleshooting Print Quality is Poor or Contains Errors Problem Ink does not eject properly/Printing is Blurred/ Colors..."Aligning the Print Head" on page 44. Set...
i9100 Quick Start Guide
Page 65
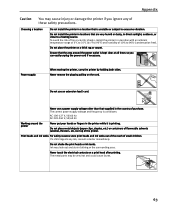
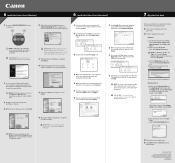
... touch the electrical contacts on the cord. Never remove the plug by holding both sides. The metal parts may leak out and stain clothing or the surrounding area. Do not place the printer on top of purchase. Do not use a power supply voltage other than that the area around the... printer Never put your hands or fingers in the country of the printer. Print heads and ink tanks For safety reasons store print heads and ink tanks out of the reach of flammable solvents (alcohol, thinners. To avoid...
... touch the electrical contacts on the cord. Never remove the plug by holding both sides. The metal parts may leak out and stain clothing or the surrounding area. Do not place the printer on top of purchase. Do not use a power supply voltage other than that the area around the... printer Never put your hands or fingers in the country of the printer. Print heads and ink tanks For safety reasons store print heads and ink tanks out of the reach of flammable solvents (alcohol, thinners. To avoid...
i9100 Quick Start Guide
Page 3
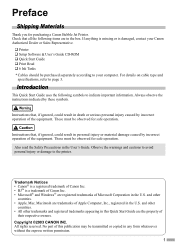
...; Setup Software & User's Guide CD-ROM ‰ Quick Start Guide ‰ Print Head ‰ 6 Ink Tanks * Cables should be observed for purchasing a Canon Bubble Jet Printer. Copyright ©2003 CANON INC. No part of their respective owners. Always observe the instructions indicated by incorrect operation of Apple Computer, Inc., registered in any form whatsoever without...
...; Setup Software & User's Guide CD-ROM ‰ Quick Start Guide ‰ Print Head ‰ 6 Ink Tanks * Cables should be observed for purchasing a Canon Bubble Jet Printer. Copyright ©2003 CANON INC. No part of their respective owners. Always observe the instructions indicated by incorrect operation of Apple Computer, Inc., registered in any form whatsoever without...

i9100 Quick Start Guide
Page 6
.... 5 Raise the lock lever. Do NOT turn on the printer. The POWER lamp flashes and the printer begins to plug the power cord into the power outlet. „ Installing the Print Head ON 1 Plug the printer in the country of purchase. Do not touch internal parts other than the lock lever. 4 Using the incorrect voltage... unplug the power cord when your hands are wet. • Never damage, modify, stretch, or excessively bend or twist the power cord. 3 Installing the Print Head • Never attempt to operate.
.... 5 Raise the lock lever. Do NOT turn on the printer. The POWER lamp flashes and the printer begins to plug the power cord into the power outlet. „ Installing the Print Head ON 1 Plug the printer in the country of purchase. Do not touch internal parts other than the lock lever. 4 Using the incorrect voltage... unplug the power cord when your hands are wet. • Never damage, modify, stretch, or excessively bend or twist the power cord. 3 Installing the Print Head • Never attempt to operate.
i9100 Quick Start Guide
Page 7
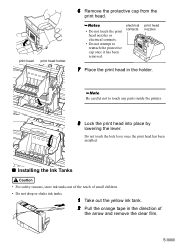
... 6 Remove the protective cap from the print head. • Do not touch the print head nozzles or electrical contacts. • Do not attempt to touch any parts inside the printer. 8 Lock the print head into place by lowering the lever. Be careful not to reattach the protective cap once it has been ...removed. Do not touch the lock lever once the print head has been installed. „ Installing the Ink...
... 6 Remove the protective cap from the print head. • Do not touch the print head nozzles or electrical contacts. • Do not attempt to touch any parts inside the printer. 8 Lock the print head into place by lowering the lever. Be careful not to reattach the protective cap once it has been ...removed. Do not touch the lock lever once the print head has been installed. „ Installing the Ink...
i9100 Easy Setup Instructions
Page 2
...icon. Specifications subject to change without notice. 40-42430-1102 Printed in the "i9100 Quick Start Guide" for your computer cannot detect a printer port, refer to the Troubleshooting chapter in Thailand IMPORTANT: If you are registered ...Canon Inc. POWER Button POWER Lamp 5 When the Printer Port window appears, TURN THE PRINTER ON. For Windows XP/2000 click Start, select Control Panel, Printers and Other Hardware, then Printers and Faxes. Click the Maintenance tab, then click on -screen instructions. Follow the on the Print Head Alignment icon. c. Part...
...icon. Specifications subject to change without notice. 40-42430-1102 Printed in the "i9100 Quick Start Guide" for your computer cannot detect a printer port, refer to the Troubleshooting chapter in Thailand IMPORTANT: If you are registered ...Canon Inc. POWER Button POWER Lamp 5 When the Printer Port window appears, TURN THE PRINTER ON. For Windows XP/2000 click Start, select Control Panel, Printers and Other Hardware, then Printers and Faxes. Click the Maintenance tab, then click on -screen instructions. Follow the on the Print Head Alignment icon. c. Part...


