i9100 Quick Start Guide
Page 38
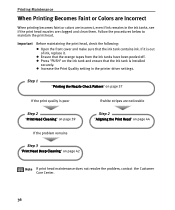
Printing Maintenance When Printing Becomes Faint or Colors are Incorrect When printing becomes faint or colors are incorrect, even if ink remains in the printer driver settings. If it . Important Before maintaining the print head, check the following: z Open the front cover and make sure that the orange tapes from the ink tanks have been peeled off. Step 1 "Printing the...
Printing Maintenance When Printing Becomes Faint or Colors are Incorrect When printing becomes faint or colors are incorrect, even if ink remains in the printer driver settings. If it . Important Before maintaining the print head, check the following: z Open the front cover and make sure that the orange tapes from the ink tanks have been peeled off. Step 1 "Printing the...

i9100 Quick Start Guide
Page 43
... the printer itself. z After print head cleaning finishes, print the nozzle check pattern to verify that the print head nozzles are clean. Hold down menu. (2) Click Cleaning. (3) When the message is on. The cleaning process takes about 50 seconds. If the problem persists, perform print head deep cleaning. See "Print Head Deep Cleaning" on page 37. 3 Start Print Head Cleaning. Ensure the printer is...
... the printer itself. z After print head cleaning finishes, print the nozzle check pattern to verify that the print head nozzles are clean. Hold down menu. (2) Click Cleaning. (3) When the message is on. The cleaning process takes about 50 seconds. If the problem persists, perform print head deep cleaning. See "Print Head Deep Cleaning" on page 37. 3 Start Print Head Cleaning. Ensure the printer is...

i9100 Quick Start Guide
Page 45
... print head deep cleaning finishes, print the nozzle check pattern to complete, so simply wait until the POWER lamp stops flashing. If the problem persists, the print head may be worn out. If the print head is displayed, click OK. Important The process takes one or two minutes to verify that the print head nozzles are clean. Printing Maintenance 1 Ensure the printer...
... print head deep cleaning finishes, print the nozzle check pattern to complete, so simply wait until the POWER lamp stops flashing. If the problem persists, the print head may be worn out. If the print head is displayed, click OK. Important The process takes one or two minutes to verify that the print head nozzles are clean. Printing Maintenance 1 Ensure the printer...
i9100 Quick Start Guide
Page 53
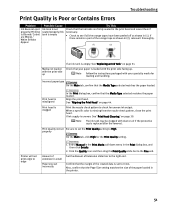
If there remains a part of the orange tape as shown in the Print dialog box, and then click Details. 2. If ink supply is uneven: See "Print Head Cleaning" on page 31. Printer will not print edge to the Fine end. properly On the Main tab, click High for loading and ...mm. Troubleshooting Print Quality is Poor or Contains Errors Problem Ink does not eject properly/Printing is Blurred/ Colors are Wrong / White Streaks Appear Possible Cause Ink tank is not seated properly/Ink tank is empty Try This Check that the ink tanks are firmly seated in the print head and reseat...
If there remains a part of the orange tape as shown in the Print dialog box, and then click Details. 2. If ink supply is uneven: See "Print Head Cleaning" on page 31. Printer will not print edge to the Fine end. properly On the Main tab, click High for loading and ...mm. Troubleshooting Print Quality is Poor or Contains Errors Problem Ink does not eject properly/Printing is Blurred/ Colors are Wrong / White Streaks Appear Possible Cause Ink tank is not seated properly/Ink tank is empty Try This Check that the ink tanks are firmly seated in the print head and reseat...
i9100 Quick Start Guide
Page 54
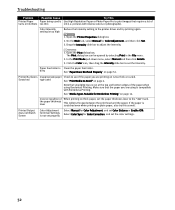
... Photo Paper Pro to print images that require a lot of When printing on thick paper, set Color Balance or Enable ICM. See "Print Media to Avoid" on page 54. the paper thickness lever This widens the gap between the print head and the paper. Color Intensity Reduce the Intensity ... "Media Types Suitable for Color Adjustment, and then click Set. 3. The Print dialog box can be opened by selecting Print in the printer driver and try this as well. Paper feed roller is Clean the paper feed roller. Troubleshooting Problem Possible Cause Try This Printed Paper Paper being used Check...
... Photo Paper Pro to print images that require a lot of When printing on thick paper, set Color Balance or Enable ICM. See "Print Media to Avoid" on page 54. the paper thickness lever This widens the gap between the print head and the paper. Color Intensity Reduce the Intensity ... "Media Types Suitable for Color Adjustment, and then click Set. 3. The Print dialog box can be opened by selecting Print in the printer driver and try this as well. Paper feed roller is Clean the paper feed roller. Troubleshooting Problem Possible Cause Try This Printed Paper Paper being used Check...
i9100 Quick Start Guide
Page 55
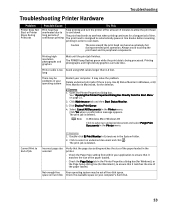
Troubleshooting Troubleshooting Printer Hardware Problem Printer Does Not Start or Printer Stops During Print Jobs Possible Cause Try This Print head has overheated due to long periods of the paper loaded in the printer: - Click Maintenance tab and then Start Status Monitor. 3. Double-click BJ Print Monitor in Extensions in the Printer menu. Incorrect page size selected Verify that the page...
Troubleshooting Troubleshooting Printer Hardware Problem Printer Does Not Start or Printer Stops During Print Jobs Possible Cause Try This Print head has overheated due to long periods of the paper loaded in the printer: - Click Maintenance tab and then Start Status Monitor. 3. Double-click BJ Print Monitor in Extensions in the Printer menu. Incorrect page size selected Verify that the page...
i9100 Quick Start Guide
Page 57
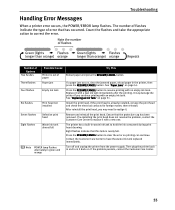
.... Press the RESUME/CANCEL button to clear the error so printing can continue. If the problem persists, contact the Customer Care Center. 55 The number of flashes indicate the type of flashes Two flashes Three flashes Possible Cause Printer is already installed, remove the print head and check the electrical contacts for foreign matter, then...
.... Press the RESUME/CANCEL button to clear the error so printing can continue. If the problem persists, contact the Customer Care Center. 55 The number of flashes indicate the type of flashes Two flashes Three flashes Possible Cause Printer is already installed, remove the print head and check the electrical contacts for foreign matter, then...


