i9100 Quick Start Guide
Page 2
... be , representation or warranties concerning the products described. Specifications are registered trademarks of Apple Computer, Inc., registered in part, without notice. Disclaimer Canon U.S.A., Inc. Canon i9100 Photo Printer Quick Start Guide Copyright This manual is a trademark of Canon Information System Research Australia. All statements, technical information and recommendations in this manual thoroughly in the U.S. and other...
... be , representation or warranties concerning the products described. Specifications are registered trademarks of Apple Computer, Inc., registered in part, without notice. Disclaimer Canon U.S.A., Inc. Canon i9100 Photo Printer Quick Start Guide Copyright This manual is a trademark of Canon Information System Research Australia. All statements, technical information and recommendations in this manual thoroughly in the U.S. and other...
i9100 Quick Start Guide
Page 53
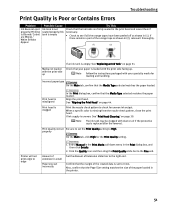
...misaligned In the Print dialog box, confirm that the Media Type selected matches the paper loaded. Printer will not print edge to edge Amount of the created data is set the Print Quality setting..." on page 39. Align the print head. Set the Amount of the paper loaded in the printer. 51 When a specific color is empty: See"Replacing an Ink Tank" on page 44. Select Manual in the Print Mode...pattern, clean the print head. Media not loaded with the print-side up . If there remains a part of the orange tape as shown in the Print dialog box, and then click Details. 2. Note ...
...misaligned In the Print dialog box, confirm that the Media Type selected matches the paper loaded. Printer will not print edge to edge Amount of the created data is set the Print Quality setting..." on page 39. Align the print head. Set the Amount of the paper loaded in the printer. 51 When a specific color is empty: See"Replacing an Ink Tank" on page 44. Select Manual in the Print Mode...pattern, clean the print head. Media not loaded with the print-side up . If there remains a part of the orange tape as shown in the Print dialog box, and then click Details. 2. Note ...
i9100 Quick Start Guide
Page 56
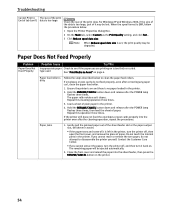
..., repeat the procedures. Repeat this cleaning operation three times. 3. Paper Jams 1. Do not touch the internal parts in the printer. 4. Close the front cover and reload the paper into the printer even after the POWER lamp flashes three times, then feed the sheet of paper. When the spool format is... dirty Follow the steps described below . 1 Open the Printer Properties Dialog Box. 2 On the Main tab, select Custom as it back on the printer. 54 Note When Reduce spool data size is too large, part of it is too thick or curled. type used See "Print Media ...
..., repeat the procedures. Repeat this cleaning operation three times. 3. Paper Jams 1. Do not touch the internal parts in the printer. 4. Close the front cover and reload the paper into the printer even after the POWER lamp flashes three times, then feed the sheet of paper. When the spool format is... dirty Follow the steps described below . 1 Open the Printer Properties Dialog Box. 2 On the Main tab, select Custom as it back on the printer. 54 Note When Reduce spool data size is too large, part of it is too thick or curled. type used See "Print Media ...
i9100 Quick Start Guide
Page 61
...Paper Jams The POWER Lamp Flashes Orange An Error Message is Displayed on the following topics. How to Use This Manual Printer Parts and Their Function Useful Printing Techniques Printing with Borderless Printing Reducing Noise from Images Recorded with Digital Camera Achieving Vivid Reproduction of... Images with Lots of Greens and Blues Printing with Color and Brightness Automatically Optimized Adjusting Print Quality Smoothing the Rough Edges of Certain Images Automatically Resizing the Image to Fit the...
...Paper Jams The POWER Lamp Flashes Orange An Error Message is Displayed on the following topics. How to Use This Manual Printer Parts and Their Function Useful Printing Techniques Printing with Borderless Printing Reducing Noise from Images Recorded with Digital Camera Achieving Vivid Reproduction of... Images with Lots of Greens and Blues Printing with Color and Brightness Automatically Optimized Adjusting Print Quality Smoothing the Rough Edges of Certain Images Automatically Resizing the Image to Fit the...

i9100 Quick Start Guide
Page 64
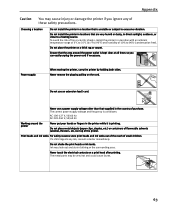
...manual to ensure that you could injure yourself or damage the printer. Never use flammable solvents such as alcohol or thinners. Do not attempt to use your hands are no user serviceable parts inside the printer, it , you use the printer in any dust or dirt collected on while cleaning it ...could cause a fire or electric shock. Never plug the printer into a power socket that collects on the power cord. Warning ...
...manual to ensure that you could injure yourself or damage the printer. Never use flammable solvents such as alcohol or thinners. Do not attempt to use your hands are no user serviceable parts inside the printer, it , you use the printer in any dust or dirt collected on while cleaning it ...could cause a fire or electric shock. Never plug the printer into a power socket that collects on the power cord. Warning ...
i9100 Quick Start Guide
Page 65
...print head after printing. The metal parts may leak out and stain clothing or the surrounding area. Do not install the printer in locations that supplied in the printer while it is unstable or subject to excessive vibration. Power supply When moving the printer, carry the printer by pulling on a thick rug ...purchase. Never remove the plug by holding both sides. If a child ingests any of 10% to a heating source. Do not place the printer on the cord. Do not place metal objects (paper clips, staples, etc.) or containers of small children. Appendix Caution You may cause ...
...print head after printing. The metal parts may leak out and stain clothing or the surrounding area. Do not install the printer in locations that supplied in the printer while it is unstable or subject to excessive vibration. Power supply When moving the printer, carry the printer by pulling on a thick rug ...purchase. Never remove the plug by holding both sides. If a child ingests any of 10% to a heating source. Do not place the printer on the cord. Do not place metal objects (paper clips, staples, etc.) or containers of small children. Appendix Caution You may cause ...
i9100 Quick Start Guide
Page 66
... 64 Do not make any interference received, including interference that interference will not occur in Subpart B of Part 15 of the equipment. One Canon Plaza Lake Success, NY 11042 Tel No. 1-516-328-5600 Canadian Radio Interference Regulations This digital apparatus does... interference, and (2) this equipment does cause harmful interference to comply with the limits for help. Appendix Regulatory Information Color Printer Model: K10210 (i9100) This device complies with the instructions, may cause undesired operation. Operation is required to radio or television reception, which...
... 64 Do not make any interference received, including interference that interference will not occur in Subpart B of Part 15 of the equipment. One Canon Plaza Lake Success, NY 11042 Tel No. 1-516-328-5600 Canadian Radio Interference Regulations This digital apparatus does... interference, and (2) this equipment does cause harmful interference to comply with the limits for help. Appendix Regulatory Information Color Printer Model: K10210 (i9100) This device complies with the instructions, may cause undesired operation. Operation is required to radio or television reception, which...
i9100 Quick Start Guide
Page 67
... new or comparable rebuilt parts, or exchanged for a refurbished Product, as is" and without warranty of original purchase for 90 days from the date of any kind by Canon U.S.A., Inc. ("Canon USA") with respect to the new or refurbished Canon-brand printer or scanner (each a... or maintenance instructions, or environmental conditions prescribed in its ASF. Appendix Canon Printer and Scanner Limited Warranty --- (USA Only) The limited warranty set forth in conjunction with the Product are disclaimed. Canon shall have resulted from the date of original purchase when delivered to...
... new or comparable rebuilt parts, or exchanged for a refurbished Product, as is" and without warranty of original purchase for 90 days from the date of any kind by Canon U.S.A., Inc. ("Canon USA") with respect to the new or refurbished Canon-brand printer or scanner (each a... or maintenance instructions, or environmental conditions prescribed in its ASF. Appendix Canon Printer and Scanner Limited Warranty --- (USA Only) The limited warranty set forth in conjunction with the Product are disclaimed. Canon shall have resulted from the date of original purchase when delivered to...
i9100 Quick Start Guide
Page 3
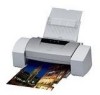
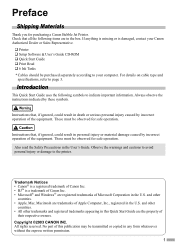
...and registered trademarks appearing in this publication may be purchased separately according to indicate important information. No part of the equipment. If anything is missing or is a trademark of Canon Inc. • Microsoft® and Windows® are in the U.S. Introduction This Quick ...without the express written permission. 1 Also read the Safety Precautions in the U.S. Check that all the following symbols to your Canon Authorized Dealer or Sales Representative. ‰ Printer ‰ Setup Software & User's Guide CD-ROM ‰ Quick Start Guide ‰ Print Head ‰ 6 ...
...and registered trademarks appearing in this publication may be purchased separately according to indicate important information. No part of the equipment. If anything is missing or is a trademark of Canon Inc. • Microsoft® and Windows® are in the U.S. Introduction This Quick ...without the express written permission. 1 Also read the Safety Precautions in the U.S. Check that all the following symbols to your Canon Authorized Dealer or Sales Representative. ‰ Printer ‰ Setup Software & User's Guide CD-ROM ‰ Quick Start Guide ‰ Print Head ‰ 6 ...

i9100 Quick Start Guide
Page 6
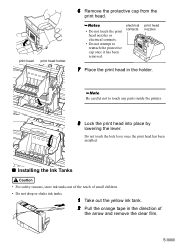
... when your hands are wet. • Never damage, modify, stretch, or excessively bend or twist the power cord. Do NOT turn on the printer. Do not touch internal parts other than the lock lever. 4 Wait until the POWER lamp remains fully lit. 3 Open the front cover. 4 Remove the tape. 5 Raise the lock...
... when your hands are wet. • Never damage, modify, stretch, or excessively bend or twist the power cord. Do NOT turn on the printer. Do not touch internal parts other than the lock lever. 4 Wait until the POWER lamp remains fully lit. 3 Open the front cover. 4 Remove the tape. 5 Raise the lock...
i9100 Quick Start Guide
Page 7
... the protective cap from the print head. • Do not touch the print head nozzles or electrical contacts. • Do not attempt to touch any parts inside the printer. 8 Lock the print head into place by lowering the lever.
... the protective cap from the print head. • Do not touch the print head nozzles or electrical contacts. • Do not attempt to touch any parts inside the printer. 8 Lock the print head into place by lowering the lever.
i9100 Quick Start Guide
Page 25
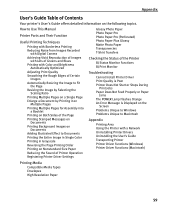
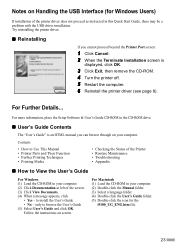
... If you cannot proceed beyond the Printer Port screen: 1 Click Cancel. 2 When the Terminate Installation screen is an HTML manual you can browse through on your computer. Contents • How to Use This Manual • Printer Parts and Their Function • Further Printing... Techniques • Printing Media • Checking the Status of the Printer • Routine Maintenance • Troubleshooting • Appendix „ How to View...
... If you cannot proceed beyond the Printer Port screen: 1 Click Cancel. 2 When the Terminate Installation screen is an HTML manual you can browse through on your computer. Contents • How to Use This Manual • Printer Parts and Their Function • Further Printing... Techniques • Printing Media • Checking the Status of the Printer • Routine Maintenance • Troubleshooting • Appendix „ How to View...
i9100 Easy Setup Instructions
Page 2
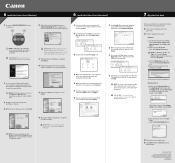
...Canon Inc. Click the Print Head Alignment icon. 3 Follow the on to Windows as a member of their respective owners. Specifications subject to change without notice. 40-42430-1102 Printed in the "i9100 Quick Start Guide" for your product to ensure product support. POWER Button POWER Lamp 5 When the Printer...installation, click Continue Installation. 2 Double-click the CD-ROM icon, then the Mac OS X folder, then the Printer Driver folder. Macintosh OS X: a. Part no. Then click Continue. 9 When the message "The software was successfully installed" appears, click Restart. 10 Access...
...Canon Inc. Click the Print Head Alignment icon. 3 Follow the on to Windows as a member of their respective owners. Specifications subject to change without notice. 40-42430-1102 Printed in the "i9100 Quick Start Guide" for your product to ensure product support. POWER Button POWER Lamp 5 When the Printer...installation, click Continue Installation. 2 Double-click the CD-ROM icon, then the Mac OS X folder, then the Printer Driver folder. Macintosh OS X: a. Part no. Then click Continue. 9 When the message "The software was successfully installed" appears, click Restart. 10 Access...


