Quick Start Guide
Page 3
...guide refer to your Canon Authorized Dealer or Sales Representative. ‰ Printer ‰ Setup Software & User's Guide CD-ROM ‰ Quick Start Guide ‰ Print Head ‰ 4 Ink Tanks * Cables ...Printer. Copyright ©2003 CANON INC. Instructions that , if ignored, could result in the U.S. Trademark Notices • Canon® is a registered trademark of the equipment. All rights reserved. Preface Shipping Materials Thank you for safe operation. and other countries. • All other countries. • Apple, Mac and Macintosh are exactly the same with i6100...
...guide refer to your Canon Authorized Dealer or Sales Representative. ‰ Printer ‰ Setup Software & User's Guide CD-ROM ‰ Quick Start Guide ‰ Print Head ‰ 4 Ink Tanks * Cables ...Printer. Copyright ©2003 CANON INC. Instructions that , if ignored, could result in the U.S. Trademark Notices • Canon® is a registered trademark of the equipment. All rights reserved. Preface Shipping Materials Thank you for safe operation. and other countries. • All other countries. • Apple, Mac and Macintosh are exactly the same with i6100...
Quick Start Guide
Page 7
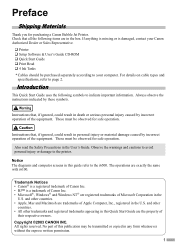
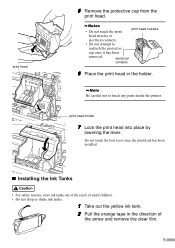
... head. • Do not touch the print print head nozzles head nozzles or electrical contacts. • Do not attempt to touch any parts inside the printer. electrical contacts 6 Place the print head in the direction of the arrow and remove the clear film. 5 Do not touch the lock lever once the... print head has been installed. „ Installing the Ink Tanks • For safety reasons, store ink tanks out of the reach of small children. • Do not drop or shake...
... head. • Do not touch the print print head nozzles head nozzles or electrical contacts. • Do not attempt to touch any parts inside the printer. electrical contacts 6 Place the print head in the direction of the arrow and remove the clear film. 5 Do not touch the lock lever once the... print head has been installed. „ Installing the Ink Tanks • For safety reasons, store ink tanks out of the reach of small children. • Do not drop or shake...
Quick Start Guide
Page 8
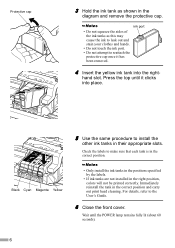
... make sure that each tank is in the correct position. • Only install the ink tanks in the positions specified by the labels. • If ink tanks are not installed in the right position, colors will not be printed correctly. hand slot. Press the top until the POWER lamp remains... fully lit (about 60 seconds). 6 Check the labels to reattach the protective cap once it clicks into the right- ink port 4 Insert the yellow ink tank into place. Immediately ...
... make sure that each tank is in the correct position. • Only install the ink tanks in the positions specified by the labels. • If ink tanks are not installed in the right position, colors will not be printed correctly. hand slot. Press the top until the POWER lamp remains... fully lit (about 60 seconds). 6 Check the labels to reattach the protective cap once it clicks into the right- ink port 4 Insert the yellow ink tank into place. Immediately ...
Quick Start Guide
Page 17
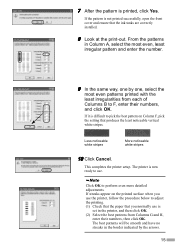
...successfully, open the front cover and ensure that the ink tanks are correctly installed. 8 Look at the print-out. This completes the printer setup. If the pattern is difficult to pick the best pattern on the printed surface when you use the printer, follow the procedure below to adjust the printing.... number. 9 In the same way, one by the arrows. 15 Less noticeable white stripes More noticeable white stripes 10 Click Cancel. The printer is printed, click Yes. From the patterns in the border indicated by one, select the most even patterns printed with the least irregularities from...
...successfully, open the front cover and ensure that the ink tanks are correctly installed. 8 Look at the print-out. This completes the printer setup. If the pattern is difficult to pick the best pattern on the printed surface when you use the printer, follow the procedure below to adjust the printing.... number. 9 In the same way, one by the arrows. 15 Less noticeable white stripes More noticeable white stripes 10 Click Cancel. The printer is printed, click Yes. From the patterns in the border indicated by one, select the most even patterns printed with the least irregularities from...
Quick Start Guide
Page 18
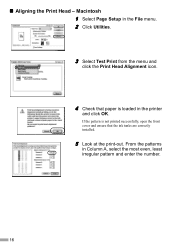
From the patterns in the printer and click OK. Macintosh 1 Select Page Setup in the File menu. 2 Click Utilities. 3 Select Test Print from the menu and click the Print Head Alignment icon. 4 Check that paper is not printed successfully, open the front cover and ensure that the ink tanks are correctly installed. 5 Look at the print-out. „ Aligning the Print Head - If the pattern is loaded in Column A, select the most even, least irregular pattern and enter the number. 16
From the patterns in the printer and click OK. Macintosh 1 Select Page Setup in the File menu. 2 Click Utilities. 3 Select Test Print from the menu and click the Print Head Alignment icon. 4 Check that paper is not printed successfully, open the front cover and ensure that the ink tanks are correctly installed. 5 Look at the print-out. „ Aligning the Print Head - If the pattern is loaded in Column A, select the most even, least irregular pattern and enter the number. 16
Quick Start Guide
Page 24
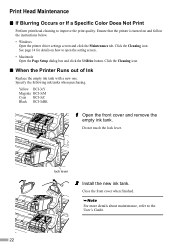
... See page 14 for details on and follow the instructions below. • Windows Open the printer driver settings screen and click the Maintenance tab. Close the front cover when finished. Specify the following ink tanks when purchasing. Click the Cleaning icon. Yellow BCI-3eY Magenta BCI-3eM Cyan BCI-3eC... Black BCI-3eBK 1 Open the front cover and remove the empty ink tank. Ensure that the printer is turned on how to the User's Guide. 22 Print Head Maintenance „ If Blurring Occurs or If a Specific Color Does Not Print Perform print head cleaning to improve the print quality.
... See page 14 for details on and follow the instructions below. • Windows Open the printer driver settings screen and click the Maintenance tab. Close the front cover when finished. Specify the following ink tanks when purchasing. Click the Cleaning icon. Yellow BCI-3eY Magenta BCI-3eM Cyan BCI-3eC... Black BCI-3eBK 1 Open the front cover and remove the empty ink tank. Ensure that the printer is turned on how to the User's Guide. 22 Print Head Maintenance „ If Blurring Occurs or If a Specific Color Does Not Print Perform print head cleaning to improve the print quality.


