User Manual
Page 5
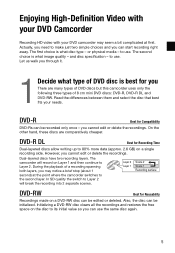
... or delete the recordings. The second choice is best for Reusability Recordings made on the disc to the second layer. Read the differences between them and select the disc that best fits your DVD camcorder may notice a brief stop (about 1 second) at first. you can start recording right...quality the switch to use . On the other hand, these discs are many types of DVD discs but this camcorder uses only the following three types of DVD disc is what disc type - to Layer 2. DVD-R Best for Recording Time Dual-layered discs allow writing up to 80% more data (approx. 2.6 GB)...
... or delete the recordings. The second choice is best for Reusability Recordings made on the disc to the second layer. Read the differences between them and select the disc that best fits your DVD camcorder may notice a brief stop (about 1 second) at first. you can start recording right...quality the switch to use . On the other hand, these discs are many types of DVD discs but this camcorder uses only the following three types of DVD disc is what disc type - to Layer 2. DVD-R Best for Recording Time Dual-layered discs allow writing up to 80% more data (approx. 2.6 GB)...

User Manual
Page 6
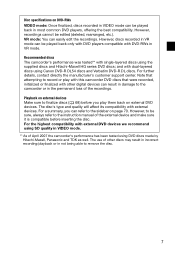
... (HD) video and standard-definition (SD) video. When you use Your camcorder offers two levels of free space on the disc, this selection will delete all the recordings on . DVD-RW discs, on DVD-RWs ( 7). * Disc finalization is composed of the free space (the unrecorded area) on most DVD...play back the disc you recorded on the disc in VIDEO mode. Please note that cannot be reused (DVD-R or DVD-R DL), the disc can be able to eject the disc. "Full HD 1080" refers to process both layers. To finalize a DVD-R DL disc, the camcorder has to Canon camcorders compliant with ...
... (HD) video and standard-definition (SD) video. When you use Your camcorder offers two levels of free space on the disc, this selection will delete all the recordings on . DVD-RW discs, on DVD-RWs ( 7). * Disc finalization is composed of the free space (the unrecorded area) on most DVD...play back the disc you recorded on the disc in VIDEO mode. Please note that cannot be reused (DVD-R or DVD-R DL), the disc can be able to eject the disc. "Full HD 1080" refers to process both layers. To finalize a DVD-R DL disc, the camcorder has to Canon camcorders compliant with ...
User Manual
Page 7
... The use of other digital devices can result in damage to the camcorder or in the permanent loss of the recordings. and with single-layered discs using Canon DVD-R DL54 discs and Verbatim DVD-R DL discs. However, recordings cannot be played back only with DVD players compatible ...with other discs may result in incorrect recording/playback or in VIDEO mode. ** As of April 2007 the camcorder's performance has been ...
... The use of other digital devices can result in damage to the camcorder or in the permanent loss of the recordings. and with single-layered discs using Canon DVD-R DL54 discs and Verbatim DVD-R DL discs. However, recordings cannot be played back only with DVD players compatible ...with other discs may result in incorrect recording/playback or in VIDEO mode. ** As of April 2007 the camcorder's performance has been ...
User Manual
Page 8
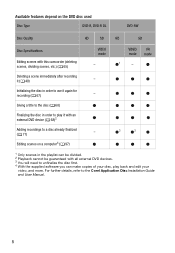
... with all external DVD devices. 3 You will need to unfinalize the disc first. 4 With the supplied software you can make copies of your disc, play it again for recording ( 67) - it ( 40) Initializing the disc in order to use it with this camcorder (deleting scenes, dividing scenes, etc.) ( 65) VIDEO mode - For further details...
... with all external DVD devices. 3 You will need to unfinalize the disc first. 4 With the supplied software you can make copies of your disc, play it again for recording ( 67) - it ( 40) Initializing the disc in order to use it with this camcorder (deleting scenes, dividing scenes, etc.) ( 65) VIDEO mode - For further details...
User Manual
Page 10
... Screen Displays „Preparations 23 Getting Started 23 Charging the Battery Pack 24 Preparing the Accessories and the Wireless Controller 26 Basic Operation of the Camcorder 26 Power Switch 26 Operating Modes 27 Joystick and Joystick Guide 27 Using the Menus 29 First Time Settings 29 Setting the Date and Time... 30 Changing the Time Zone 31 Getting Ready to Start Recording 31 Adjusting the Position and Brightness of the LCD Screen 32 Inserting and Removing a Disc 34 Inserting and Removing a Memory Card 10
... Screen Displays „Preparations 23 Getting Started 23 Charging the Battery Pack 24 Preparing the Accessories and the Wireless Controller 26 Basic Operation of the Camcorder 26 Power Switch 26 Operating Modes 27 Joystick and Joystick Guide 27 Using the Menus 29 First Time Settings 29 Setting the Date and Time... 30 Changing the Time Zone 31 Getting Ready to Start Recording 31 Adjusting the Position and Brightness of the LCD Screen 32 Inserting and Removing a Disc 34 Inserting and Removing a Memory Card 10
User Manual
Page 11
... 44 On-Screen Displays (Data Code) 45 Menu Options Lists 45 FUNC. Menu 47 Setup Menus 47 Camera Setup (Digital Zoom, Image Stabilizer, etc.) 50 Disc Operations (Initialization, Finalization etc.) 51 Still Image Operations (Card Initialization, etc.) 51 Display Setup (LCD Brightness, Language, etc.) 52 System Setup (Volume, Beep...59 Manual Focus Adjustment 60 Manual Exposure Adjustment 61 White Balance 62 Image Effects 63 Digital Effects 65 Managing Scenes and the Disc 65 Creating a Playlist 65 Moving Scenes in the Playlist 66 Dividing Scenes 66 Protecting the...
... 44 On-Screen Displays (Data Code) 45 Menu Options Lists 45 FUNC. Menu 47 Setup Menus 47 Camera Setup (Digital Zoom, Image Stabilizer, etc.) 50 Disc Operations (Initialization, Finalization etc.) 51 Still Image Operations (Card Initialization, etc.) 51 Display Setup (LCD Brightness, Language, etc.) 52 System Setup (Volume, Beep...59 Manual Focus Adjustment 60 Manual Exposure Adjustment 61 White Balance 62 Image Effects 63 Digital Effects 65 Managing Scenes and the Disc 65 Creating a Playlist 65 Moving Scenes in the Playlist 66 Dividing Scenes 66 Protecting the...
User Manual
Page 12
... on an External Device 68 Changing the Disc Title 68 Finalizing the Disc 70 Disc Playback on a Finalized Disc „Photos 72 Basic Recording 72 Taking Photos 73 Selecting Photo Size and Quality 74 Erasing the Last Photo Just Recorded 75 Basic Playback 75 ... 85 Printing Photos - Direct Print 86 Selecting the Print Settings 89 Trimming Settings 90 Print Orders 12 Additional Recordings on External Devices 71 Unfinalizing the Disc -
... on an External Device 68 Changing the Disc Title 68 Finalizing the Disc 70 Disc Playback on a Finalized Disc „Photos 72 Basic Recording 72 Taking Photos 73 Selecting Photo Size and Quality 74 Erasing the Last Photo Just Recorded 75 Basic Playback 75 ... 85 Printing Photos - Direct Print 86 Selecting the Print Settings 89 Trimming Settings 90 Print Orders 12 Additional Recordings on External Devices 71 Unfinalizing the Disc -
User Manual
Page 13
...132;Additional Information 101 Trouble? 101 Troubleshooting 106 List of Messages 110 Do's and Don'ts 110 Handling Precautions 113 Maintenance/Others 114 Using the Camcorder Abroad 116 General Information 116 System Diagram 117 Optional Accessories 120 Product Codes 121 Specifications 124 Index 13 „External Connections 92 Connecting to a ... on a TV Screen 95 Copying your Recordings to an External Video Recorder 97 Connecting to a Computer 97 PC Connection Diagrams 97 Corel Application Disc - Movie Playback/Editing and Various Disc Operations 97 Transferring Photos -
...132;Additional Information 101 Trouble? 101 Troubleshooting 106 List of Messages 110 Do's and Don'ts 110 Handling Precautions 113 Maintenance/Others 114 Using the Camcorder Abroad 116 General Information 116 System Diagram 117 Optional Accessories 120 Product Codes 121 Specifications 124 Index 13 „External Connections 92 Connecting to a ... on a TV Screen 95 Copying your Recordings to an External Video Recorder 97 Connecting to a Computer 97 PC Connection Diagrams 97 Corel Application Disc - Movie Playback/Editing and Various Disc Operations 97 Transferring Photos -

User Manual
Page 14
...3 Select ( ) [DISPLAY SETUP] and press ( ). 14 The terms "photo" and "still image" are used to refer to which the camcorder should be operated Names of disc required, etc.). • : Reference page number. • The following terms are indicated within a "button" frame. For example FUNC. . Changing... table ( 101). Menu item shown at its default position Buttons and switches to start recording until you use the camcorder and retain it for purchasing the Canon HR10. "Scene" refers to one movie unit from the point you press the START/STOP button to be set, the...
...3 Select ( ) [DISPLAY SETUP] and press ( ). 14 The terms "photo" and "still image" are used to refer to which the camcorder should be operated Names of disc required, etc.). • : Reference page number. • The following terms are indicated within a "button" frame. For example FUNC. . Changing... table ( 101). Menu item shown at its default position Buttons and switches to start recording until you use the camcorder and retain it for purchasing the Canon HR10. "Scene" refers to one movie unit from the point you press the START/STOP button to be set, the...

User Manual
Page 15
Getting to Know the Camcorder Supplied Accessories CA-570 Compact Power Adapter (incl. power cord) BP-214 Battery Pack WL-D86 Wireless Controller Lithium Button Battery CR2025 for Wireless Controller CTC-100/S Component Cable Red • Green • Blue plugs STV-100 Stereo Video Cable Yellow • Red • White plugs IFC-300PCU USB Cable Blank DVD-R Disc (8 cm Mini DVD) Software CD-ROM* DIGITAL VIDEO Solution Disk Software CD-ROM and User Manual Corel Application Disc * Includes the electronic version of the Digital Video Software instruction manual on PDF file. 15
Getting to Know the Camcorder Supplied Accessories CA-570 Compact Power Adapter (incl. power cord) BP-214 Battery Pack WL-D86 Wireless Controller Lithium Button Battery CR2025 for Wireless Controller CTC-100/S Component Cable Red • Green • Blue plugs STV-100 Stereo Video Cable Yellow • Red • White plugs IFC-300PCU USB Cable Blank DVD-R Disc (8 cm Mini DVD) Software CD-ROM* DIGITAL VIDEO Solution Disk Software CD-ROM and User Manual Corel Application Disc * Includes the electronic version of the Digital Video Software instruction manual on PDF file. 15
User Manual
Page 17
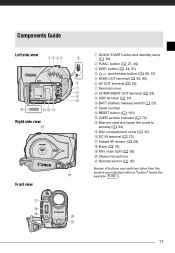
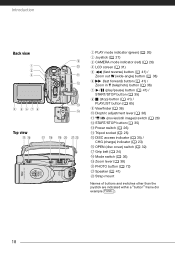
... terminal ( 97) BATT. (battery release) switch ( 23) Serial number RESET button ( 101) CARD access indicator ( 72) Memory card slot (open the cover to access) ( 34) Disc compartment cover ( 32) DC IN terminal ( 23) Instant AF sensor ( 48) Flash ( 78) Mini video light ( 58) Stereo microphone Remote sensor ( 25) Names of buttons...
... terminal ( 97) BATT. (battery release) switch ( 23) Serial number RESET button ( 101) CARD access indicator ( 72) Memory card slot (open the cover to access) ( 34) Disc compartment cover ( 32) DC IN terminal ( 23) Instant AF sensor ( 48) Flash ( 78) Mini video light ( 58) Stereo microphone Remote sensor ( 25) Names of buttons...
User Manual
Page 18
...) Viewfinder ( 36) Dioptric adjustment lever ( 36) / (movies/still images) switch ( 26) START/STOP button ( 35) Power switch ( 26) Tripod socket ( 25) DISC access indicator ( 35) / CHG (charge) indicator ( 23) OPEN (disc cover) switch ( 32) Grip belt ( 24) Mode switch ( 36) Zoom lever ( 38) PHOTO button ( 72) Speaker ( 41) Strap mount Names of...
...) Viewfinder ( 36) Dioptric adjustment lever ( 36) / (movies/still images) switch ( 26) START/STOP button ( 35) Power switch ( 26) Tripod socket ( 25) DISC access indicator ( 35) / CHG (charge) indicator ( 23) OPEN (disc cover) switch ( 32) Grip belt ( 24) Mode switch ( 36) Zoom lever ( 38) PHOTO button ( 72) Speaker ( 41) Strap mount Names of...
User Manual
Page 20
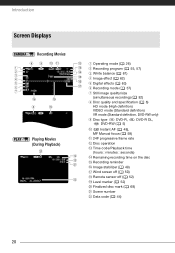
... ( 63) Recording mode ( 37) Still image quality/size (simultaneous recording) ( 82) Disc quality and specification ( 6) HD mode (High definition) VIDEO mode (Standard definition) VR mode (Standard definition, DVD-RW only) Disc type DVD-R, DVD-RW ( 5) DVD-R DL, Instant AF ( 48), MF Manual focus... ( 59) 24F progressive frame rate Disc operation Time code/Playback time (hours : minutes : seconds) Remaining recording time on the disc Recording reminder Image stabilizer ( 49) ...
... ( 63) Recording mode ( 37) Still image quality/size (simultaneous recording) ( 82) Disc quality and specification ( 6) HD mode (High definition) VIDEO mode (Standard definition) VR mode (Standard definition, DVD-RW only) Disc type DVD-R, DVD-RW ( 5) DVD-R DL, Instant AF ( 48), MF Manual focus... ( 59) 24F progressive frame rate Disc operation Time code/Playback time (hours : minutes : seconds) Remaining recording time on the disc Recording reminder Image stabilizer ( 49) ...
User Manual
Page 22
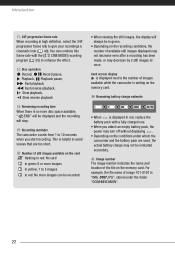
... displayed may not decrease even after a recording has been made, or may not be indicated accurately. Recording reminder The camcorder counts from 1 to 5 images in red: No more disc space available, " END" will stop. Remaining battery charge estimate • When is displayed in red, replace the...Introduction 24F progressive frame rate When recording in high definition, select the 24F progressive frame rate to the number of images available while the camcorder is no more images can combine this frame rate with a fully charged one. • When you start recording. This is "IMG_0107...
... displayed may not decrease even after a recording has been made, or may not be indicated accurately. Recording reminder The camcorder counts from 1 to 5 images in red: No more disc space available, " END" will stop. Remaining battery charge estimate • When is displayed in red, replace the...Introduction 24F progressive frame rate When recording in high definition, select the 24F progressive frame rate to the number of images available while the camcorder is no more images can combine this frame rate with a fully charged one. • When you start recording. This is "IMG_0107...
User Manual
Page 24
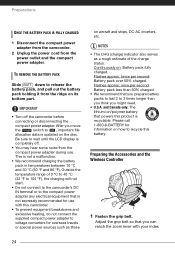
... the Accessories and the Wireless Controller 1 Fasten the grip belt. Be sure to wait until the LCD display is completely off the camcorder before connecting or disconnecting the compact power adapter. Outside the temperature range of the charge status. twice per second: Battery pack less than... the supplied compact power adapter to release the battery pack, and pull out the battery pack holding it from the ridge on the disc. After you move the switch to recycle this product is not a malfunction. • We recommend charging the battery pack in temperatures...
... the Accessories and the Wireless Controller 1 Fasten the grip belt. Be sure to wait until the LCD display is completely off the camcorder before connecting or disconnecting the compact power adapter. Outside the temperature range of the charge status. twice per second: Battery pack less than... the supplied compact power adapter to release the battery pack, and pull out the battery pack holding it from the ridge on the disc. After you move the switch to recycle this product is not a malfunction. • We recommend charging the battery pack in temperatures...
User Manual
Page 26
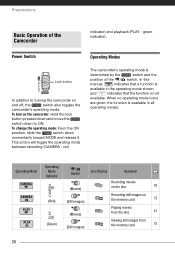
Operating Mode Operating Mode Indicator / Switch Icon Display Operation (Movies) Recording movies on the disc 35 (Red) (Still images) Recording still images on the camcorder: Hold the lock button pressed down and move the switch down momentarily toward MODE and release it. To .... To turn on the memory card 72 (Movies) Playing movies from the disc 41 (Green) (Still images) Viewing still images from the memory card 75 26 Preparations Basic Operation of the Camcorder Basic Operation of the / switch. Power Switch Operating Modes Lock button In addition...
Operating Mode Operating Mode Indicator / Switch Icon Display Operation (Movies) Recording movies on the disc 35 (Red) (Still images) Recording still images on the camcorder: Hold the lock button pressed down and move the switch down momentarily toward MODE and release it. To .... To turn on the memory card 72 (Movies) Playing movies from the disc 41 (Green) (Still images) Viewing still images from the memory card 75 26 Preparations Basic Operation of the Camcorder Basic Operation of the / switch. Power Switch Operating Modes Lock button In addition...
User Manual
Page 28
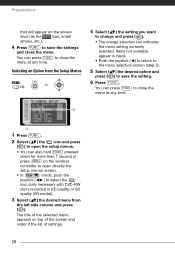
... icon and press ( ) to open directly the setup menus screen. • In mode, push the joystick ( ) to select the icon (only necessary with DVD-RW discs recorded in black. • Push the joystick ( ) to return to the menu selection screen (step 3). 5 Select ( ) the desired option and press ( ) to open the setup...
... icon and press ( ) to open directly the setup menus screen. • In mode, push the joystick ( ) to select the icon (only necessary with DVD-RW discs recorded in black. • Push the joystick ( ) to return to the menu selection screen (step 3). 5 Select ( ) the desired option and press ( ) to open the setup...
User Manual
Page 32
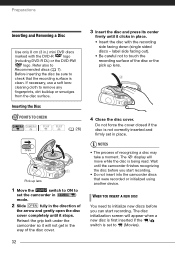
... soft lenscleaning cloth to initialize new discs before you can start recording. • Do not insert into the camcorder discs that the recording surface is not correctly inserted and firmly set the camcorder in mode. 2 Slide OPEN fully in the way of the disc or the pick up lens 1 ...it will move while the disc is set to set in .) mini DVD discs marked with the recording side facing down (single sided discs - NOTES • The process of the arrow and gently open the disc cover completely until the camcorder finishes recognizing the disc before you start recording. ...
... soft lenscleaning cloth to initialize new discs before you can start recording. • Do not insert into the camcorder discs that the recording surface is not correctly inserted and firmly set the camcorder in mode. 2 Slide OPEN fully in the way of the disc or the pick up lens 1 ...it will move while the disc is set to set in .) mini DVD discs marked with the recording side facing down (single sided discs - NOTES • The process of the arrow and gently open the disc cover completely until the camcorder finishes recognizing the disc before you start recording. ...
User Manual
Page 33
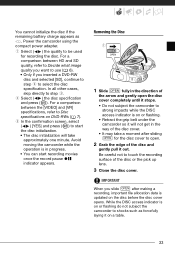
... updated on or flashing. • Retract the grip belt under the camcorder so it on a table. 33 Power the camcorder using the compact power adapter. Avoid moving the camcorder while the operation is on the disc before the disc cover opens. Removing the Disc 1 Slide OPEN fully in the direction of the arrow and gently open...
... updated on or flashing. • Retract the grip belt under the camcorder so it on a table. 33 Power the camcorder using the compact power adapter. Avoid moving the camcorder while the operation is on the disc before the disc cover opens. Removing the Disc 1 Slide OPEN fully in the direction of the arrow and gently open...
User Manual
Page 35
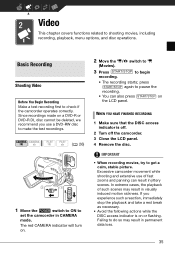
... rest break as necessary. • Avoid the following actions while the DISC access indicator is off. 2 Turn off the camcorder. 3 Close the LCD panel. 4 Remove the disc. Excessive camcorder movement while shooting and extensive use a DVD-RW disc to make the test recordings. ( 26) 1 Move the switch to ...motion sickness. WHEN YOU HAVE FINISHED RECORDING 1 Make sure that the DISC access indicator is on the LCD panel. press START/STOP again to get a calm, stable picture. Failing to check if the camcorder operates correctly. Basic Recording Basic Recording Shooting Video Before You Begin ...
... rest break as necessary. • Avoid the following actions while the DISC access indicator is off. 2 Turn off the camcorder. 3 Close the LCD panel. 4 Remove the disc. Excessive camcorder movement while shooting and extensive use a DVD-RW disc to make the test recordings. ( 26) 1 Move the switch to ...motion sickness. WHEN YOU HAVE FINISHED RECORDING 1 Make sure that the DISC access indicator is on the LCD panel. press START/STOP again to get a calm, stable picture. Failing to check if the camcorder operates correctly. Basic Recording Basic Recording Shooting Video Before You Begin ...


