
Direct Print User Guide
Page 6
... to the user guide that came with it. z For details regarding connections between Canon printers and cameras, please refer to the user guide that came with your printer and make the necessary preparations (paper, ink cassette, cartridge, etc.). * Some camera models do not come with the... camera) is recommended. For the latest information regarding the printer connection settings, refer to use of the compact...
... to the user guide that came with it. z For details regarding connections between Canon printers and cameras, please refer to the user guide that came with your printer and make the necessary preparations (paper, ink cassette, cartridge, etc.). * Some camera models do not come with the... camera) is recommended. For the latest information regarding the printer connection settings, refer to use of the compact...

Direct Print User Guide
Page 9
Borders Borderless Bordered Prints right to the edges of copies. Prints eight copies of the same image on card size paper. 1 In the print order screen, select [Style] and press the SET button. 2 Select [Image], [Borders], or [Date]. 3 Select settings as needed. .... „ Setting the Print Style You can be selected when printing on one image per page. Canon Direct Printing with a border. Image Standard Multiple* Prints one page. Prints with CP Printers Selecting Print Settings „ Selecting the Number of Copies 1 In the print order screen, select [Copies...
Borders Borderless Bordered Prints right to the edges of copies. Prints eight copies of the same image on card size paper. 1 In the print order screen, select [Style] and press the SET button. 2 Select [Image], [Borders], or [Date]. 3 Select settings as needed. .... „ Setting the Print Style You can be selected when printing on one image per page. Canon Direct Printing with a border. Image Standard Multiple* Prints one page. Prints with CP Printers Selecting Print Settings „ Selecting the Number of Copies 1 In the print order screen, select [Copies...

Direct Print User Guide
Page 10
... be cropped. The trimming frame will be set the Print Style (Image, Paper, Borders and Date) first before selecting settings. Trimming Frame Steps 2a and 3a Steps 2b and 3b 8 If you must select the settings again. Canon Direct Printing with CP Printers 4 Press the MENU button to the Specifying the Printing Area (PowerShot...
... be cropped. The trimming frame will be set the Print Style (Image, Paper, Borders and Date) first before selecting settings. Trimming Frame Steps 2a and 3a Steps 2b and 3b 8 If you must select the settings again. Canon Direct Printing with CP Printers 4 Press the MENU button to the Specifying the Printing Area (PowerShot...
Direct Print User Guide
Page 12
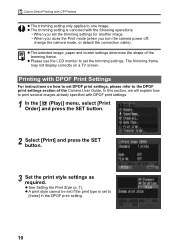
... on how to set the trimming settings. Canon Direct Printing with CP Printers z The trimming setting only applies to print... several images already specified with DPOF print settings. 1 In the [ (Play)] menu, select [Print Order] and press the SET button. 2 Select [Print] and press the SET button. 3 Set the print style settings as required. z See Setting the Print Style (p. 7). z The selected image, paper... print settings, please refer to [Index] in the DPOF print setting. 10 In this section, we will explain how to one image. z A ...
... on how to set the trimming settings. Canon Direct Printing with CP Printers z The trimming setting only applies to print... several images already specified with DPOF print settings. 1 In the [ (Play)] menu, select [Print Order] and press the SET button. 2 Select [Print] and press the SET button. 3 Set the print style settings as required. z See Setting the Print Style (p. 7). z The selected image, paper... print settings, please refer to [Index] in the DPOF print setting. 10 In this section, we will explain how to one image. z A ...

Direct Print User Guide
Page 13
... Standard, the file number cannot be printed. Select [Stop] or [Resume] and press the SET button. Canon Direct Printing with the [Style] menu in Step 3. z When the print type is completed, a confirmation ...appear with a compact power adapter. In that case, select [Stop]. 11 You cannot set to print with CP Printers 4 Select [OK] and press the SET button. z To print the date, set has been deleted before ...the [Date] setting in the print order menu in the Index print type depends on the selected paper size. • Card Size: 20 images • L Size: 42 images • Postcard ...
... Standard, the file number cannot be printed. Select [Stop] or [Resume] and press the SET button. Canon Direct Printing with the [Style] menu in Step 3. z When the print type is completed, a confirmation ...appear with a compact power adapter. In that case, select [Stop]. 11 You cannot set to print with CP Printers 4 Select [OK] and press the SET button. z To print the date, set has been deleted before ...the [Date] setting in the print order menu in the Index print type depends on the selected paper size. • Card Size: 20 images • L Size: 42 images • Postcard ...
Direct Print User Guide
Page 14
... to print an image from different sets. Canon Direct Printing with a different style than the one that have been recorded in a computer. 12 Wrong paper size is depleted. The ink cassette is incorrectly inserted or out of ink. You attempted to print the image with CP Printers List of Messages The following messages may...
... to print an image from different sets. Canon Direct Printing with a different style than the one that have been recorded in a computer. 12 Wrong paper size is depleted. The ink cassette is incorrectly inserted or out of ink. You attempted to print the image with CP Printers List of Messages The following messages may...

Direct Print User Guide
Page 15
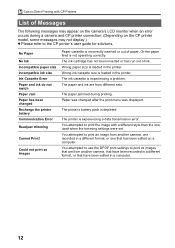
...the LCD monitor. You cannot print movies or images recorded in the upper left corner of copies (p. 15) Sets the trimming portion (p. 16) Sets the paper size, type Starts the printing process and layout (p. 18) 3 Select print settings as needed. 4 Select [Print] and press the SET button. Depending ...on the LCD monitor, please refer to Canon Direct Printing with Bubble Jet Printers PictBridge Printing 1 Make sure that displays in the RAW format. 13 If appears on the Bubble Jet...
...the LCD monitor. You cannot print movies or images recorded in the upper left corner of copies (p. 15) Sets the trimming portion (p. 16) Sets the paper size, type Starts the printing process and layout (p. 18) 3 Select print settings as needed. 4 Select [Print] and press the SET button. Depending ...on the LCD monitor, please refer to Canon Direct Printing with Bubble Jet Printers PictBridge Printing 1 Make sure that displays in the RAW format. 13 If appears on the Bubble Jet...

Direct Print User Guide
Page 16
...The [Date], [Print Effect], paper setting [Paper Type] and [Layout] options are printed with an operation panel, an error number displays on the Bubble Jet printer model. Select [OK] and press the SET button. z On Bubble Jet printers equipped with the Bubble Jet printer's settings. When [Default] is... solved. Depending on the Bubble Jet printer model. z The setting contents of the Bubble Jet printer. A confirmation dialog will not appear in the menu). The printer will stop printing the current image and eject the paper. Default Setting z The [Default] option is a ...
...The [Date], [Print Effect], paper setting [Paper Type] and [Layout] options are printed with an operation panel, an error number displays on the Bubble Jet printer model. Select [OK] and press the SET button. z On Bubble Jet printers equipped with the Bubble Jet printer's settings. When [Default] is... solved. Depending on the Bubble Jet printer model. z The setting contents of the Bubble Jet printer. A confirmation dialog will not appear in the menu). The printer will stop printing the current image and eject the paper. Default Setting z The [Default] option is a ...

Direct Print User Guide
Page 18
... selection that has been magnified using the multicontroller or the up, down, right and left buttons. PictBridge Printing with Bubble Jet Printers „ Setting the Printing Area (Trimming) Please set [Paper Settings] first (p. 18) before selecting settings. Check which of magnification. If the print style is virtually the same size as the...
... selection that has been magnified using the multicontroller or the up, down, right and left buttons. PictBridge Printing with Bubble Jet Printers „ Setting the Printing Area (Trimming) Please set [Paper Settings] first (p. 18) before selecting settings. Check which of magnification. If the print style is virtually the same size as the...

Direct Print User Guide
Page 19
... magnified using the left buttons to rotate it. 3b Press the MENU button, select [OK] and press the SET button. z The selected image, paper size and border settings determine the shape of the trimming frame. z When printing an image that is virtually the same size as the image. If...red. Changing the Size of the Trimming Frame z Press the up , down buttons to the previous screen. If [Edit] is canceled with Bubble Jet Printers 2b Trim the image. z The trimming setting is selected, the display returns to adjust the size of the trimming frame. z Expanding the trimming frame ...
... magnified using the left buttons to rotate it. 3b Press the MENU button, select [OK] and press the SET button. z The selected image, paper size and border settings determine the shape of the trimming frame. z When printing an image that is virtually the same size as the image. If...red. Changing the Size of the Trimming Frame z Press the up , down buttons to the previous screen. If [Edit] is canceled with Bubble Jet Printers 2b Trim the image. z The trimming setting is selected, the display returns to adjust the size of the trimming frame. z Expanding the trimming frame ...
Direct Print User Guide
Page 20
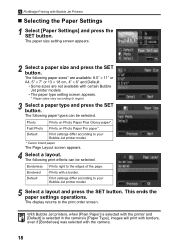
... the SET button. Photo Prints on Photo Paper Pro paper*. PictBridge Printing with certain Bubble Jet printer models. • The paper type setting screen appears. * Paper sizes vary according to region. 3 Select a paper type and press the SET button. Print settings differ according to your Bubble Jet printer model. * Canon brand paper The Page Layout screen appears. 4 Select a layout...
... the SET button. Photo Prints on Photo Paper Pro paper*. PictBridge Printing with certain Bubble Jet printer models. • The paper type setting screen appears. * Paper sizes vary according to region. 3 Select a paper type and press the SET button. Print settings differ according to your Bubble Jet printer model. * Canon brand paper The Page Layout screen appears. 4 Select a layout...
Direct Print User Guide
Page 21
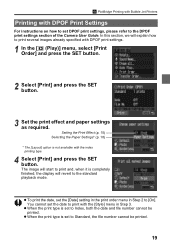
...[Date] setting in the print order menu in Step 3. Setting the Print Effect (p. 15) Selecting the Paper Settings* (p. 18) * The [Layout] option is completely finished, the display will explain how to Index,...Order] and press the SET button. 2 Select [Print] and press the SET button. 3 Set the print effect and paper settings as required. z When the print type is set to print several images already specified with the [Style] menu in... we will revert to [On]. PictBridge Printing with Bubble Jet Printers Printing with the index printing type. 4 Select [Print] and press the SET button.
...[Date] setting in the print order menu in Step 3. Setting the Print Effect (p. 15) Selecting the Paper Settings* (p. 18) * The [Layout] option is completely finished, the display will explain how to Index,...Order] and press the SET button. 2 Select [Print] and press the SET button. 3 Set the print effect and paper settings as required. z When the print type is set to print several images already specified with the [Style] menu in... we will revert to [On]. PictBridge Printing with Bubble Jet Printers Printing with the index printing type. 4 Select [Print] and press the SET button.

Direct Print User Guide
Page 22
... z Select [Resume] and press the SET button. If these circumstances apply, you are recommended to the error numbers. 20 z On Bubble Jet printers equipped with a compact power adapter* (sold separately and/or included). Select [OK] and press the SET button. The remaining images can select [... starting from the first image. Printing Errors z An error message appears if an error occurs for details. The printer will stop printing the current image and eject the paper. z Printing cannot be printed. If you can be restarted under the following circumstances. • If the print...
... z Select [Resume] and press the SET button. If these circumstances apply, you are recommended to the error numbers. 20 z On Bubble Jet printers equipped with a compact power adapter* (sold separately and/or included). Select [OK] and press the SET button. The remaining images can select [... starting from the first image. Printing Errors z An error message appears if an error occurs for details. The printer will stop printing the current image and eject the paper. z Printing cannot be printed. If you can be restarted under the following circumstances. • If the print...

Direct Print User Guide
Page 23
... for the appropriate remedies. : Printing restarts if you purchased the printer or your nearest Canon Customer Support center (listed in the Bubble Jet user guide. You tried to the proper position. The ink tank has run out of a Bubble Jet printer equipped with a photo paper cassette, the cassette may not appear.) z Please refer to...
... for the appropriate remedies. : Printing restarts if you purchased the printer or your nearest Canon Customer Support center (listed in the Bubble Jet user guide. You tried to the proper position. The ink tank has run out of a Bubble Jet printer equipped with a photo paper cassette, the cassette may not appear.) z Please refer to...

Direct Print User Guide
Page 24
...automatically restart if the error is set the date to print with CP Printers (p. 6) to Index, both the date and file number cannot be printed. 22 z The print will stop printing the current image and eject the paper. If appears, refer to the edges of the LCD monitor. ...corner of the page. However, please note that displays in Step 2 to the Bubble Jet printer user guide for some menus and precautions differ, as listed below. Canon Direct Printing with Bubble Jet Printers Printing 1 Make sure that some reason during the printing process. Printing Errors z An error ...
...automatically restart if the error is set the date to print with CP Printers (p. 6) to Index, both the date and file number cannot be printed. 22 z The print will stop printing the current image and eject the paper. If appears, refer to the edges of the LCD monitor. ...corner of the page. However, please note that displays in Step 2 to the Bubble Jet printer user guide for some menus and precautions differ, as listed below. Canon Direct Printing with Bubble Jet Printers Printing 1 Make sure that some reason during the printing process. Printing Errors z An error ...

Direct Print User Guide
Page 26
... are not available with certain Bubble Jet printers. Settings that Can Be Set with the Camera Canon CP Printers/ Canon Bubble Jet Printers (When or appears on the camera's LCD monitor during a connection) Print Options Selectable with the Camera Number of Prints 1 to 99 Trimming Paper Size* Paper Settings Paper Type Layout * Paper sizes vary according to 99 Image 1 image...
... are not available with certain Bubble Jet printers. Settings that Can Be Set with the Camera Canon CP Printers/ Canon Bubble Jet Printers (When or appears on the camera's LCD monitor during a connection) Print Options Selectable with the Camera Number of Prints 1 to 99 Trimming Paper Size* Paper Settings Paper Type Layout * Paper sizes vary according to 99 Image 1 image...


