
i9900 Quick Start Guide
Page 2
... holidays). Telephone Device for details CarePAK must be purchased during your inquiries within 24 hours. 3. Serial Number (located on the inside of the printer): Model Number (located on the CD-ROM): Purchase Date: Customer Technical Support Sequence* 1. For more information, please visit our Web site at...use extended service program that provides up to three full years of the printer): Printer Driver CD-ROM number (located on the front of service and support coverage at (1-866-251-3752). 5. Getting Help from Canon Help Us Help You Better Before you can continue to call (1-800-385...
... holidays). Telephone Device for details CarePAK must be purchased during your inquiries within 24 hours. 3. Serial Number (located on the inside of the printer): Model Number (located on the CD-ROM): Purchase Date: Customer Technical Support Sequence* 1. For more information, please visit our Web site at...use extended service program that provides up to three full years of the printer): Printer Driver CD-ROM number (located on the front of service and support coverage at (1-866-251-3752). 5. Getting Help from Canon Help Us Help You Better Before you can continue to call (1-800-385...

i9900 Quick Start Guide
Page 4
...be an easy-to-use guide to your Canon i9900 Series Photo Printer. and other countries. • All other countries. • Microsoft® and Windows® are trademarks of Apple Computer, Inc., registered in the U.S. Disclaimer Canon U.S.A., Inc. All information regarding the accuracy ...thereof. and other product and brand names are registered trademarks of Microsoft Corporation in the U.S. Canon i9900 Series Photo Printer Quick Start Guide. As an ENERGY STAR partner, Canon U.S.A., Inc., has determined that it will be reproduced in any guides or related documents are...
...be an easy-to-use guide to your Canon i9900 Series Photo Printer. and other countries. • All other countries. • Microsoft® and Windows® are trademarks of Apple Computer, Inc., registered in the U.S. Disclaimer Canon U.S.A., Inc. All information regarding the accuracy ...thereof. and other product and brand names are registered trademarks of Microsoft Corporation in the U.S. Canon i9900 Series Photo Printer Quick Start Guide. As an ENERGY STAR partner, Canon U.S.A., Inc., has determined that it will be reproduced in any guides or related documents are...

i9900 Quick Start Guide
Page 5
...Printer Driver 20 Adjusting the Print Quality for Photographs 21 Using the Printer... Driver Options 29 Using the Bundled Software 31 Printing Borderless Photographs with Windows 32 Printing Borderless Photographs with Macintosh 35 Printing Maintenance Replacing an Ink Tank 38 When Printing Becomes Faint or Colors... are Incorrect 43 Printing the Nozzle Check Pattern 44 Print Head Cleaning 48 Print Head Deep Cleaning 52 Aligning the Print Head 56 Troubleshooting Cannot Install the Printer... Troubleshooting Printer Hardware 66...Printer Driver When Using Mac OS...
...Printer Driver 20 Adjusting the Print Quality for Photographs 21 Using the Printer... Driver Options 29 Using the Bundled Software 31 Printing Borderless Photographs with Windows 32 Printing Borderless Photographs with Macintosh 35 Printing Maintenance Replacing an Ink Tank 38 When Printing Becomes Faint or Colors... are Incorrect 43 Printing the Nozzle Check Pattern 44 Print Head Cleaning 48 Print Head Deep Cleaning 52 Aligning the Print Head 56 Troubleshooting Cannot Install the Printer... Troubleshooting Printer Hardware 66...Printer Driver When Using Mac OS...

i9900 Quick Start Guide
Page 6
... when displayed. • Click ? in the upper right corner, then click the feature you want to steady (nonflashing) green when the printer is ready. 2 The POWER lamp flashes while the printer warms up and changes to know more information, view the i9900 User's Guide on the Setup Software & User's Guide CD-ROM... F1 key • Click ? Basic Printing Basic Printing Note This Quick Start Guide describes some of the features of the following ways depending on the Printer 1 Press the POWER button.
... when displayed. • Click ? in the upper right corner, then click the feature you want to steady (nonflashing) green when the printer is ready. 2 The POWER lamp flashes while the printer warms up and changes to know more information, view the i9900 User's Guide on the Setup Software & User's Guide CD-ROM... F1 key • Click ? Basic Printing Basic Printing Note This Quick Start Guide describes some of the features of the following ways depending on the Printer 1 Press the POWER button.

i9900 Quick Start Guide
Page 7
...FireWire cable. If the POWER lamp changes to orange and begins flashing, refer to the section "Handling Error Messages" on /off the printer before connecting or disconnecting other equipment before turning on page 69. Loading Paper Print Media to Avoid Do not use the following things: -...8226; Excessively thin paper (less than 64 gsm or 17 lb) • Excessively thick paper* (more than 105 gsm or 28 lb) *non-Canon branded paper • Picture postcards • Postcards affixed with photos or stickers • Envelopes with double flaps • Sealed envelopes • Envelopes ...
...FireWire cable. If the POWER lamp changes to orange and begins flashing, refer to the section "Handling Error Messages" on /off the printer before connecting or disconnecting other equipment before turning on page 69. Loading Paper Print Media to Avoid Do not use the following things: -...8226; Excessively thin paper (less than 64 gsm or 17 lb) • Excessively thick paper* (more than 105 gsm or 28 lb) *non-Canon branded paper • Picture postcards • Postcards affixed with photos or stickers • Envelopes with double flaps • Sealed envelopes • Envelopes ...
i9900 Quick Start Guide
Page 8
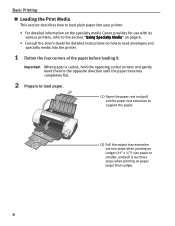
... the paper rest and pull out the paper rest extension to load envelopes and specialty media into your printer. • For detailed information on the specialty media Canon provides for use with its various printers, refer to the section "Using Specialty Media" on page 6. • Consult the User's Guide for...two steps when printing on paper larger than Ledger. 4 Basic Printing Loading the Print Media This section describes how to load plain paper into the printer. 1 Flatten the four corners of the paper before loading it out three steps when printing on Ledger (11" x 17") size paper or ...
... the paper rest and pull out the paper rest extension to load envelopes and specialty media into your printer. • For detailed information on the specialty media Canon provides for use with its various printers, refer to the section "Using Specialty Media" on page 6. • Consult the User's Guide for...two steps when printing on paper larger than Ledger. 4 Basic Printing Loading the Print Media This section describes how to load plain paper into the printer. 1 Flatten the four corners of the paper before loading it out three steps when printing on Ledger (11" x 17") size paper or ...

i9900 Quick Start Guide
Page 11
Canon Specialty Media Basic Printing Media Type Paper Rest Load Limit Photo Paper Pro 13" x 19": 1 sheet Letter: ...11" x 17": up to 50 sheets Letter: up to 80 sheets T-Shirt Transfers 1 sheet Transparencies Up to 30 sheets Printer Driver Setting for Media Type Photo Paper Pro Photo Paper Pro** Photo Paper Plus Glossy Photo Paper Plus Glossy Matte Photo Paper.... ** Print settings are much easier to select if you use the applications included on how to print from the printer driver Media Type. Select Plain Paper from the software applications, refer to 150 sheets (13 mm in the Auto ...
Canon Specialty Media Basic Printing Media Type Paper Rest Load Limit Photo Paper Pro 13" x 19": 1 sheet Letter: ...11" x 17": up to 50 sheets Letter: up to 80 sheets T-Shirt Transfers 1 sheet Transparencies Up to 30 sheets Printer Driver Setting for Media Type Photo Paper Pro Photo Paper Pro** Photo Paper Plus Glossy Photo Paper Plus Glossy Matte Photo Paper.... ** Print settings are much easier to select if you use the applications included on how to print from the printer driver Media Type. Select Plain Paper from the software applications, refer to 150 sheets (13 mm in the Auto ...
i9900 Quick Start Guide
Page 12
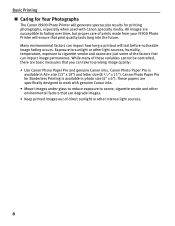
Basic Printing Caring for Your Photographs The Canon i9900 Photo Printer will last before noticeable image fading occurs. Many environmental factors can take to prolong image quality: • Use Canon Photo Paper Pro and genuine Canon inks. These papers are specifically designed to cigarette smoke and...measures that print quality lasts long into the future. Exposure to sunlight or other light sources, humidity, temperature, exposure to work with Canon specialty media. Canon Photo Paper Pro is available in A3+ size (13" x 19") and letter size (8 1/2" x 11"). All images are ...
Basic Printing Caring for Your Photographs The Canon i9900 Photo Printer will last before noticeable image fading occurs. Many environmental factors can take to prolong image quality: • Use Canon Photo Paper Pro and genuine Canon inks. These papers are specifically designed to cigarette smoke and...measures that print quality lasts long into the future. Exposure to sunlight or other light sources, humidity, temperature, exposure to work with Canon specialty media. Canon Photo Paper Pro is available in A3+ size (13" x 19") and letter size (8 1/2" x 11"). All images are ...

i9900 Quick Start Guide
Page 13
The steps described in this section are using. The print dialog box opens. (2) Ensure that appear may vary, depending on the software application you are for printing in Windows XP. 1 Create a document or open a file to print. 2 Open the Printer Properties dialog box. (1) Select Print from the application software's File menu. Basic Printing Printing with Windows Note The menu screens and dialog boxes that Canon i9900 is selected. (3) Click Preferences or Properties. 9
The steps described in this section are using. The print dialog box opens. (2) Ensure that appear may vary, depending on the software application you are for printing in Windows XP. 1 Create a document or open a file to print. 2 Open the Printer Properties dialog box. (1) Select Print from the application software's File menu. Basic Printing Printing with Windows Note The menu screens and dialog boxes that Canon i9900 is selected. (3) Click Preferences or Properties. 9
i9900 Quick Start Guide
Page 14
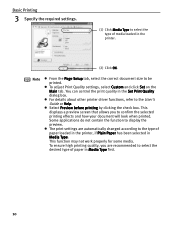
... dialog box. This function may not work properly for some media. You can control the print quality in Media Type. For details about other printer driver functions, refer to display the preview. To adjust Print Quality settings, select Custom and click Set on the Main tab. To ensure high...Page Setup tab, select the correct document size to be printed. The print settings are recommended to select the desired type of paper in the printer. Note (2) Click OK. Basic Printing 3 Specify the required settings. (1) Click Media Type to select the type of media loaded in Media Type ...
... dialog box. This function may not work properly for some media. You can control the print quality in Media Type. For details about other printer driver functions, refer to display the preview. To adjust Print Quality settings, select Custom and click Set on the Main tab. To ensure high...Page Setup tab, select the correct document size to be printed. The print settings are recommended to select the desired type of paper in the printer. Note (2) Click OK. Basic Printing 3 Specify the required settings. (1) Click Media Type to select the type of media loaded in Media Type ...
i9900 Quick Start Guide
Page 15
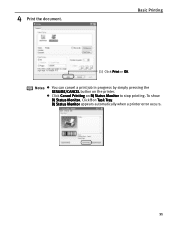
Notes You can cancel a print job in progress by simply pressing the RESUME/CANCEL button on BJ Status Monitor to stop printing. To show BJ Status Monitor, Click ! BJ Status Monitor appears automatically when a printer error occurs. 11 Basic Printing (1) Click Print or OK. Click Cancel Printing on the printer. on Task Tray. 4 Print the document.
Notes You can cancel a print job in progress by simply pressing the RESUME/CANCEL button on BJ Status Monitor to stop printing. To show BJ Status Monitor, Click ! BJ Status Monitor appears automatically when a printer error occurs. 11 Basic Printing (1) Click Print or OK. Click Cancel Printing on the printer. on Task Tray. 4 Print the document.
i9900 Quick Start Guide
Page 18
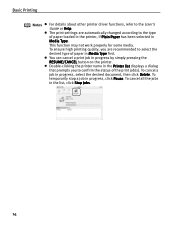
... according to confirm the status of paper in Media Type. To temporarily stop a job in progress by simply pressing the RESUME/CANCEL button on the printer. You can cancel a print job in progress, click Pause. To cancel a job in the list, click Stop Jobs. 14 To cancel all the ...jobs in progress, select the desired document, then click Delete. Basic Printing Notes For details about other printer driver functions, refer to select the desired type of the print job(s). To ensure high printing quality, you to the type of paper loaded in...
... according to confirm the status of paper in Media Type. To temporarily stop a job in progress by simply pressing the RESUME/CANCEL button on the printer. You can cancel a print job in progress, click Pause. To cancel a job in the list, click Stop Jobs. 14 To cancel all the ...jobs in progress, select the desired document, then click Delete. Basic Printing Notes For details about other printer driver functions, refer to select the desired type of the print job(s). To ensure high printing quality, you to the type of paper loaded in...
i9900 Quick Start Guide
Page 19
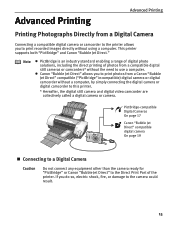
... by simply connecting the digital camera or digital camcorder to this printer. * Hereafter, the digital still camera and digital video camcorder are collectively called a digital camera or camera. This printer supports both "PictBridge" and Canon "Bubble Jet Direct." Note PictBridge is an industry standard enabling ...from a compatible digital still cameras or camcorders* without the need to the Direct Print Port of the printer. PictBridge-compatible Digital Cameras On page 17 Canon "Bubble Jet Direct" compatible digital camera On page 19 Connecting to a Digital Camera Caution Do not ...
... by simply connecting the digital camera or digital camcorder to this printer. * Hereafter, the digital still camera and digital video camcorder are collectively called a digital camera or camera. This printer supports both "PictBridge" and Canon "Bubble Jet Direct." Note PictBridge is an industry standard enabling ...from a compatible digital still cameras or camcorders* without the need to the Direct Print Port of the printer. PictBridge-compatible Digital Cameras On page 17 Canon "Bubble Jet Direct" compatible digital camera On page 19 Connecting to a Digital Camera Caution Do not ...
i9900 Quick Start Guide
Page 20
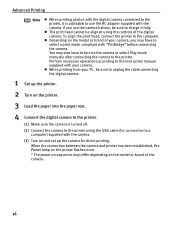
... on the model or brand of the camera. 16 When the connection between the camera and printer has been established, the Power lamp on the printer flashes once. * The power-on sequence may have to turn on the camera or select Play mode manually after connecting the camera to the...camera. Advanced Printing Note When printing photos with the digital camera connected to the printer, it is turned off. (2) Connect the camera to the printer using the controls of the digital camera. If you may differ depending on the printer. 3 Load the paper into the paper rest. 4 Connect the digital camera...
... on the model or brand of the camera. 16 When the connection between the camera and printer has been established, the Power lamp on the printer flashes once. * The power-on sequence may have to turn on the camera or select Play mode manually after connecting the camera to the...camera. Advanced Printing Note When printing photos with the digital camera connected to the printer, it is turned off. (2) Connect the camera to the printer using the controls of the digital camera. If you may differ depending on the printer. 3 Load the paper into the paper rest. 4 Connect the digital camera...
i9900 Quick Start Guide
Page 21
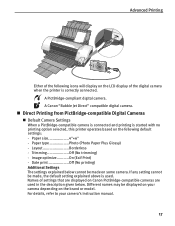
...Paper Plus Glossy) - If any setting cannot be made on some camera. Paper size 4"×6" - Trimming Off (No trimming) - A Canon "Bubble Jet Direct" compatible digital camera. Date print Off (No printing) Additional Settings The settings explained below cannot be displayed on the brand... that are displayed on the LCD display of the digital camera when the printer is started with no printing option selected, this printer operates based on the following icons will display on Canon PictBridge-compatible cameras are used . Advanced Printing Either of the following default settings...
...Paper Plus Glossy) - If any setting cannot be made on some camera. Paper size 4"×6" - Trimming Off (No trimming) - A Canon "Bubble Jet Direct" compatible digital camera. Date print Off (No printing) Additional Settings The settings explained below cannot be displayed on the brand... that are displayed on the LCD display of the digital camera when the printer is started with no printing option selected, this printer operates based on the following icons will display on Canon PictBridge-compatible cameras are used . Advanced Printing Either of the following default settings...

i9900 Quick Start Guide
Page 22
... print setup mode and confirm or check the settings. "Paper Size" setting 4"×6" (Default) "Paper Type" setting Photo (Default) Paper loaded in printer Photo Paper Plus Glossy Fast Photo Photo Paper Pro 8.5"×11" (Letter) Photo Photo Paper Plus Glossy Fast Photo Photo Paper Pro 5"×7" Photo Photo... About "Paper Size" and "Paper Type" To change the paper size or paper type, operate from the camera to produce photos using a Canon PictBridge-compatible camera, you use Photo Paper Pro, select "Fast Photo" in "Paper Size" and "Paper Type". Print quality setting -
... print setup mode and confirm or check the settings. "Paper Size" setting 4"×6" (Default) "Paper Type" setting Photo (Default) Paper loaded in printer Photo Paper Plus Glossy Fast Photo Photo Paper Pro 8.5"×11" (Letter) Photo Photo Paper Plus Glossy Fast Photo Photo Paper Pro 5"×7" Photo Photo... About "Paper Size" and "Paper Type" To change the paper size or paper type, operate from the camera to produce photos using a Canon PictBridge-compatible camera, you use Photo Paper Pro, select "Fast Photo" in "Paper Size" and "Paper Type". Print quality setting -

i9900 Quick Start Guide
Page 23
...Pro or Photo Paper Plus Glossy A4 Note For the digital camera operation method and troubleshooting, refer to the image size set on the printer. Images will be printed (excluding the index print). - The digital camera does not support the following functions: - You can print ... 2.2-compatible digital camera, the Photo Optimizer PRO function can be index printed. 19 Advanced Printing Printing Photographs Directly from a Canon "Bubble Jet Direct" compatible digital camera Media Types for Digital Camera When you connect a digital camera, you can make the following prints: -
...Pro or Photo Paper Plus Glossy A4 Note For the digital camera operation method and troubleshooting, refer to the image size set on the printer. Images will be printed (excluding the index print). - The digital camera does not support the following functions: - You can print ... 2.2-compatible digital camera, the Photo Optimizer PRO function can be index printed. 19 Advanced Printing Printing Photographs Directly from a Canon "Bubble Jet Direct" compatible digital camera Media Types for Digital Camera When you connect a digital camera, you can make the following prints: -

i9900 Quick Start Guide
Page 24
... select Settings, and then Printers. 2 Select the Canon i9900 icon. 3 Open the File menu and select Printing Preferences (or Properties). Opening the Printer Properties Dialog Box from the File menu. 2 Ensure that Canon i9900 is used for your operating system. The Printer Properties dialog box opens.... These do not appear when the Printer Properties dialog box is opened from either ...
... select Settings, and then Printers. 2 Select the Canon i9900 icon. 3 Open the File menu and select Printing Preferences (or Properties). Opening the Printer Properties Dialog Box from the File menu. 2 Ensure that Canon i9900 is used for your operating system. The Printer Properties dialog box opens.... These do not appear when the Printer Properties dialog box is opened from either ...

i9900 Quick Start Guide
Page 25
...Two important factors control the quality and output of your printed images: Paper and Ink Using recommended Canon paper, specialty media and inks for this chapter. Printer Driver Settings The printer driver has a variety of settings that affect the appearance and quality of your printed images can ... of your printouts. For more about. • Click the Help button when displayed. • Click ? The i9900 automatically adjusts printer settings to creatively enhance the colors and output of the following ways depending on the Setup Software & User's Guide CD-ROM. in this...
...Two important factors control the quality and output of your printed images: Paper and Ink Using recommended Canon paper, specialty media and inks for this chapter. Printer Driver Settings The printer driver has a variety of settings that affect the appearance and quality of your printed images can ... of your printouts. For more about. • Click the Help button when displayed. • Click ? The i9900 automatically adjusts printer settings to creatively enhance the colors and output of the following ways depending on the Setup Software & User's Guide CD-ROM. in this...

i9900 Quick Start Guide
Page 26
to open the Set Print Quality dialog box. 3 Move the slide bar to adjust the print quality. 22 See"Opening the Printer Properties Dialog Box from Your Application Program" on page 12. 2 Select Quality & Media from the pop-up menu, and then click Detailed Setting. 3 Move the slide bar to adjust the print quality. 4 When the process is complete, click OK. 1 Open the Print dialog box. See "Printing with Macintosh" on page 20. 2 Select Custom in Print Quality, then click Set... Advanced Printing To manually adjust Print Quality settings: 1 Open the Printer Properties dialog box.
to open the Set Print Quality dialog box. 3 Move the slide bar to adjust the print quality. 22 See"Opening the Printer Properties Dialog Box from Your Application Program" on page 12. 2 Select Quality & Media from the pop-up menu, and then click Detailed Setting. 3 Move the slide bar to adjust the print quality. 4 When the process is complete, click OK. 1 Open the Print dialog box. See "Printing with Macintosh" on page 20. 2 Select Custom in Print Quality, then click Set... Advanced Printing To manually adjust Print Quality settings: 1 Open the Printer Properties dialog box.


