
Users Manual - English
Page 3
... locations. Do not touch the pulley, thread take-up, Setting bobbin 11 needle, or other parts CHANGING PRESSER FOOT 18 • A power failure occurs during use CHANGING NEEEDLE 20 • Lubricating and maintaining the machine • Leaving the machine unattended. SEWING 1. When storing your... COMPUTER SEWING MACHINE CONTENTS CHAPTER 1 Your machine is the most advanced computerized home use extension cords. Be sure to turn off the power switch and unplug the cord when: • Operation is completed STITCH WIDTH AND STITCH LENGTH 14 • Replacing or removing the...
... locations. Do not touch the pulley, thread take-up, Setting bobbin 11 needle, or other parts CHANGING PRESSER FOOT 18 • A power failure occurs during use CHANGING NEEEDLE 20 • Lubricating and maintaining the machine • Leaving the machine unattended. SEWING 1. When storing your... COMPUTER SEWING MACHINE CONTENTS CHAPTER 1 Your machine is the most advanced computerized home use extension cords. Be sure to turn off the power switch and unplug the cord when: • Operation is completed STITCH WIDTH AND STITCH LENGTH 14 • Replacing or removing the...
Users Manual - English
Page 5
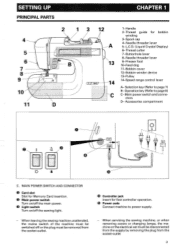
...UP PRINCIPAL PARTS 6 7 8 9 s el 10' 11 CHAPTER 1 12 -)N 13 14 C 1-Handle 2-Thread guide for foot controller operation. • Power code Connect machine to power supply. - Accessories compartment O 4 C. When leaving the sewing machine unattended, the mains switch of the machine must be switched off the sewing light. O...lever 9-Presser foot 10-Feed dog 11-Bobbin cover 12-Bobbin winder device 13-Pulley 14-Speed range control lever A- Main power switch and conne- When servicing the sewing machine, or when removing covers or changing lamps, the machine or the electrical set...
...UP PRINCIPAL PARTS 6 7 8 9 s el 10' 11 CHAPTER 1 12 -)N 13 14 C 1-Handle 2-Thread guide for foot controller operation. • Power code Connect machine to power supply. - Accessories compartment O 4 C. When leaving the sewing machine unattended, the mains switch of the machine must be switched off the sewing light. O...lever 9-Presser foot 10-Feed dog 11-Bobbin cover 12-Bobbin winder device 13-Pulley 14-Speed range control lever A- Main power switch and conne- When servicing the sewing machine, or when removing covers or changing lamps, the machine or the electrical set...
Users Manual - English
Page 9
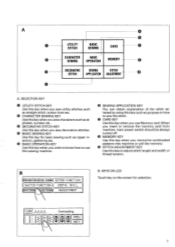
O CARD KEY Use this key when you insert or remove the memory card from machine, main power switch should be always turned off. Overcasting ICI PREU U 0 ( NEXT J 7 When you use this key for selection. O BASIC SEWING KEY Use this sewing machine. O SEWING ...
O CARD KEY Use this key when you insert or remove the memory card from machine, main power switch should be always turned off. Overcasting ICI PREU U 0 ( NEXT J 7 When you use this key for selection. O BASIC SEWING KEY Use this sewing machine. O SEWING ...
Users Manual - English
Page 12
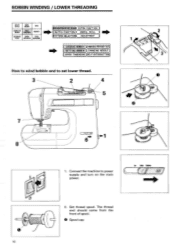
... STITCH APPLICATION ADJUSTMENT (PATTERN SELECTION) ADJUSTMENT 1 WINDING BOBBIN (CHANGING PRESSER FOOT SETTING BOBBIN CHANGING NEEDLE ( UPPER THREADING)(SELF-INTRODUCTION How to wind bobbin and to power supply and turn on the main power. att 10 2. The thread end should come from the front of spool. 0 Spool cap 1/1 En+
... STITCH APPLICATION ADJUSTMENT (PATTERN SELECTION) ADJUSTMENT 1 WINDING BOBBIN (CHANGING PRESSER FOOT SETTING BOBBIN CHANGING NEEDLE ( UPPER THREADING)(SELF-INTRODUCTION How to wind bobbin and to power supply and turn on the main power. att 10 2. The thread end should come from the front of spool. 0 Spool cap 1/1 En+
Users Manual - English
Page 22
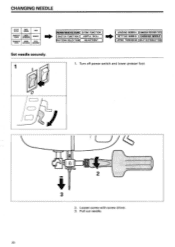
Pull out needle. 20 Turn off power switch and lower presser foot. 0 1 6 1 2 2. CHANGING NEEDLE UTILITY STITCH BASIC SEWING CARD CHARACTER BASIC SEWING OPERATION MEMORY DECORATIVE SEWING STITCH STITCH APPLICATION ADJUSTMENT Set needle securely. 1 PREPARATION BEFORE SEWING)( EXTRA FUNCTION ) ( SWITCH FUNCTION USEFUL SKILL (PATTERN SELECTION)( ADJUSTMENT ) ( WINDING BOBBIN HANGING PRESSER FOOT) ( SETTING BOBBIN CHANGING NEEDLE UPPER THREADING_, (SELF-INTRODUCTION) 1. Loosen screw with screw driver. 3.
Pull out needle. 20 Turn off power switch and lower presser foot. 0 1 6 1 2 2. CHANGING NEEDLE UTILITY STITCH BASIC SEWING CARD CHARACTER BASIC SEWING OPERATION MEMORY DECORATIVE SEWING STITCH STITCH APPLICATION ADJUSTMENT Set needle securely. 1 PREPARATION BEFORE SEWING)( EXTRA FUNCTION ) ( SWITCH FUNCTION USEFUL SKILL (PATTERN SELECTION)( ADJUSTMENT ) ( WINDING BOBBIN HANGING PRESSER FOOT) ( SETTING BOBBIN CHANGING NEEDLE UPPER THREADING_, (SELF-INTRODUCTION) 1. Loosen screw with screw driver. 3.

Users Manual - English
Page 24
Replace the light bulb for a new one. * Light bulb (8 V, 2.4 W/Parts code X50228-001) 22 Loosen screw. 3. Turn off the main power switch. ( C, 2. Remove face plate. 4. CHANGING LIGHT BULB When replacing light bulb 1.
Replace the light bulb for a new one. * Light bulb (8 V, 2.4 W/Parts code X50228-001) 22 Loosen screw. 3. Turn off the main power switch. ( C, 2. Remove face plate. 4. CHANGING LIGHT BULB When replacing light bulb 1.

Users Manual - English
Page 25
I 6 1 6 1 1. Set inner rotary hook by positioning the projection of hook to spring of lower thread sensor. 23 Remove accumulated lint and thread from the inner hook and race with brush or vacuum j 6 cleaner. Turn off main power switch and remove presser foot holder and needle. 2. Remove needle plate. 4. Take out inner rotary hook. 5. O Race 6. O Projection O Spring * Lint and dust accumulated in race sometimes causes bad stitching or malfunction of stopper. CLEANING Always keep the machine clean. Loosen screws. 3.
I 6 1 6 1 1. Set inner rotary hook by positioning the projection of hook to spring of lower thread sensor. 23 Remove accumulated lint and thread from the inner hook and race with brush or vacuum j 6 cleaner. Turn off main power switch and remove presser foot holder and needle. 2. Remove needle plate. 4. Take out inner rotary hook. 5. O Race 6. O Projection O Spring * Lint and dust accumulated in race sometimes causes bad stitching or malfunction of stopper. CLEANING Always keep the machine clean. Loosen screws. 3.
Users Manual - English
Page 89
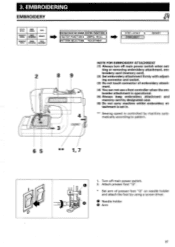
... not carry machine whilst embroidery attachment is set - O 2. 3. N O Needle holder • Arm 0 87 Turn off main power switch when set in. ** Sewing speed is controlled by using a screw driver. EMBROIDERING EMBROIDERY UTILITY STITCH BASIC SEWING CARO CHARACTER BASIC ...SELECTION ( ADJUSTMENT ( STEP LAYOUT EMBROIDERY MEMORY O O 3Y ET ID a 4 Iiii NOTE FOR EMBROIDERY ATTACHMENT (1) Always turn off main power switch. ting or removing embroidery attachment, embroidery card (memory card). (2) Set embroidery attachment firmly with adjusting connector and socket. (3) Do ...
... not carry machine whilst embroidery attachment is set - O 2. 3. N O Needle holder • Arm 0 87 Turn off main power switch when set in. ** Sewing speed is controlled by using a screw driver. EMBROIDERING EMBROIDERY UTILITY STITCH BASIC SEWING CARO CHARACTER BASIC ...SELECTION ( ADJUSTMENT ( STEP LAYOUT EMBROIDERY MEMORY O O 3Y ET ID a 4 Iiii NOTE FOR EMBROIDERY ATTACHMENT (1) Always turn off main power switch. ting or removing embroidery attachment, embroidery card (memory card). (2) Set embroidery attachment firmly with adjusting connector and socket. (3) Do ...
Users Manual - English
Page 90
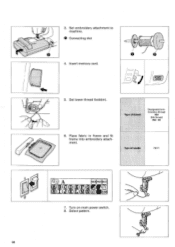
Insert memory card. ) START/ STOP 5. Place fabric in frame and fit frame into embroidery attachment. Type of needle 75/11 mazmazneD CO A NE !C!I PREY L M H I J K L N LAYOUT 0 7. ( 3. Set lower thread (bobbin). Select pattern. 88 Type of thread Designated embroidery thread #50 Silk thread #50-80 6. Turn on main power switch. 8. Set embroidery attachment to machine. 0 Connecting slot 4.
Insert memory card. ) START/ STOP 5. Place fabric in frame and fit frame into embroidery attachment. Type of needle 75/11 mazmazneD CO A NE !C!I PREY L M H I J K L N LAYOUT 0 7. ( 3. Set lower thread (bobbin). Select pattern. 88 Type of thread Designated embroidery thread #50 Silk thread #50-80 6. Turn on main power switch. 8. Set embroidery attachment to machine. 0 Connecting slot 4.
Users Manual - English
Page 91
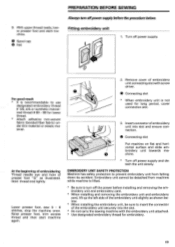
... unit connecting slot with the embroidery unit attached. * Use designated embroidery thread for long period, cover connection slot. 3. Turn off power supply and detach the unit slowly. 9. Insert connector of presser foot "Q" as shown below . At the beginning of embroidering Thread ... thread ready, lower presser foot and start machine again. 2. O Spool cap • Felt PREPARATION BEFORE SEWING Always turn off the power before the procedure below . * When installing the embroidery unit, be detached from falling down by accident. O Connecting slot Put machine ...
... unit connecting slot with the embroidery unit attached. * Use designated embroidery thread for long period, cover connection slot. 3. Turn off power supply and detach the unit slowly. 9. Insert connector of presser foot "Q" as shown below . At the beginning of embroidering Thread ... thread ready, lower presser foot and start machine again. 2. O Spool cap • Felt PREPARATION BEFORE SEWING Always turn off the power before the procedure below . * When installing the embroidery unit, be detached from falling down by accident. O Connecting slot Put machine ...

Users Manual - English
Page 92
Insert memory card straight into card slot as it illustrated. * Arrow mark should face towards you. Turn off power supply. 0 0 2. Avoid inserting card in wrong direction or by excessive force which may damage connector inside slot. broidery. 0 4 r`s 90 Turn off power before the procedure below. Always turn offpower supply before pulling out card. Set fabric to position em- Mark fabric using chalk or marking pen to embroidery frame 1. Inserting memory card 1.
Insert memory card straight into card slot as it illustrated. * Arrow mark should face towards you. Turn off power supply. 0 0 2. Avoid inserting card in wrong direction or by excessive force which may damage connector inside slot. broidery. 0 4 r`s 90 Turn off power before the procedure below. Always turn offpower supply before pulling out card. Set fabric to position em- Mark fabric using chalk or marking pen to embroidery frame 1. Inserting memory card 1.
Users Manual - English
Page 102
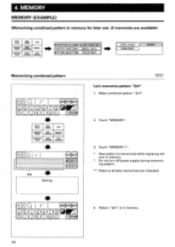
... ADJUSTMENT 4 - Pattern "Girl" is memorized while replacing old one in memory. I CHECk (PHU] NEXT I:Drc1i ((ciaCi, f )02 L A0 h EILL):k) I - 4. N Gi r l (PRE! Do not turn off power supply during memorizing pattern. ** Patterns already memorized are available) UTILITY STITCH BASIC SEWING CARD CHARACTER BASIC SEWING OPERATION MEMORY DECORATIVE SEWING STITCH STITCH APPLICATION ADJUSTMENT...
... ADJUSTMENT 4 - Pattern "Girl" is memorized while replacing old one in memory. I CHECk (PHU] NEXT I:Drc1i ((ciaCi, f )02 L A0 h EILL):k) I - 4. N Gi r l (PRE! Do not turn off power supply during memorizing pattern. ** Patterns already memorized are available) UTILITY STITCH BASIC SEWING CARD CHARACTER BASIC SEWING OPERATION MEMORY DECORATIVE SEWING STITCH STITCH APPLICATION ADJUSTMENT...
Users Manual - English
Page 108
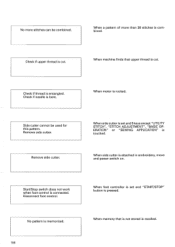
... is set and 5 keys except "UTILITY STITCH", "STITCH ADJUSTMENT", "BASIC OPERATION" or "SEWING APPLICATION" is cut . Check if thread is attached in embroidery, move and power switch on. When side cutter is entangled. When memory that upper thread is touched. When a pattern of more stitches can be used for this pattern...
... is set and 5 keys except "UTILITY STITCH", "STITCH ADJUSTMENT", "BASIC OPERATION" or "SEWING APPLICATION" is cut . Check if thread is attached in embroidery, move and power switch on. When side cutter is entangled. When memory that upper thread is touched. When a pattern of more stitches can be used for this pattern...
Users Manual - English
Page 109
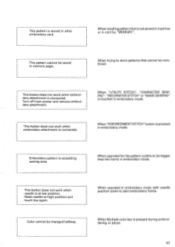
... other embroidery card. When trying to start embroidery frame. When "ENFORCEMENT STITCH" button is exceeding sewing area. When operated in embroidery mode. Turn off main power and remove embroidery attachment. When operated for the pattern outline to high position and touch key again. Raise needle to be saved in embroidery mode.
... other embroidery card. When trying to start embroidery frame. When "ENFORCEMENT STITCH" button is exceeding sewing area. When operated in embroidery mode. Turn off main power and remove embroidery attachment. When operated for the pattern outline to high position and touch key again. Raise needle to be saved in embroidery mode.
Users Manual - English
Page 110
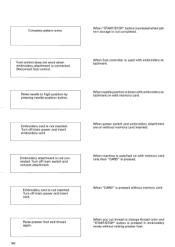
...is connected. When foot controller is used with memory card only then "CARD" is switched on with memory card. Turn off main power and insert embroidery card. When machine is pressed. Foot control does not work when embroidery attachment is not completed. Raise needle to ...change thread color and "START/STOP" button is not inserted. When needle position is not inserted. Turn off main power and insert card. Embroidery card is down with embroidery attachment on with embroidery attachment. Turn off main switch and connect attachment. Embroidery attachment...
...is connected. When foot controller is used with memory card only then "CARD" is switched on with memory card. Turn off main power and insert embroidery card. When machine is pressed. Foot control does not work when embroidery attachment is not completed. Raise needle to ...change thread color and "START/STOP" button is not inserted. When needle position is not inserted. Turn off main power and insert card. Embroidery card is down with embroidery attachment on with embroidery attachment. Turn off main switch and connect attachment. Embroidery attachment...
Users Manual - English
Page 113
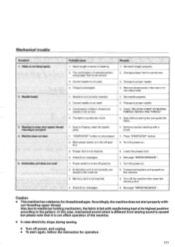
... trimming is not correctly inserted. 2. The combination of fabric, thread and needle is not correct. 2. Remove thread-ends in the off power, and unplug. • To start 5. Needle is not good 4. Combination of selected pattern and presser foot is not correct. 3. ...Sew without threading upper thread. Turn the power on . 3. Connect embroidery unit properly to proper needle. 4. Caution • This machine has a detector for operation. 111 Embroidery unit does...
... trimming is not correctly inserted. 2. The combination of fabric, thread and needle is not correct. 2. Remove thread-ends in the off power, and unplug. • To start 5. Needle is not good 4. Combination of selected pattern and presser foot is not correct. 3. ...Sew without threading upper thread. Turn the power on . 3. Connect embroidery unit properly to proper needle. 4. Caution • This machine has a detector for operation. 111 Embroidery unit does...


