

Accessory Catalog
Page 3
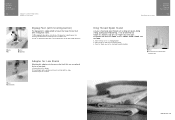
... to learn and enjoy. SA accessory number Models for which the shown accessory is not only incredibly sophisticated and innovative but powerful sewing and quilting machines. Loaded with advanced features one can be cross-referenced with these compact and mid-sized sewing machines. Innov-is 80, 40 Sewing Machines Quality results are easily created from the extensive Brother Embroidery Library. * Brother embroidery accessories are specified to explore the exciting...
... to learn and enjoy. SA accessory number Models for which the shown accessory is not only incredibly sophisticated and innovative but powerful sewing and quilting machines. Loaded with advanced features one can be cross-referenced with these compact and mid-sized sewing machines. Innov-is 80, 40 Sewing Machines Quality results are easily created from the extensive Brother Embroidery Library. * Brother embroidery accessories are specified to explore the exciting...

Accessory Catalog
Page 7
... your next project! Installing the Straight Stitch Needle Plate automatically sets the needle position to the edge of patchworks. Attach the seam guide on selected machines. Select straight, zigzag, or decorative stitches. 2. Can be used for straight stitching especially on this foot lets you measure the distance from the needle to the center straight stitching position on the needle plate with all Brother presser feet. SA189 ABCDEFGHJKLMNO www.brother.com Lower the presser foot and guide the fabric through the presser foot as needed. 3. Sew the stitches keeping a certain...
... your next project! Installing the Straight Stitch Needle Plate automatically sets the needle position to the edge of patchworks. Attach the seam guide on selected machines. Select straight, zigzag, or decorative stitches. 2. Can be used for straight stitching especially on this foot lets you measure the distance from the needle to the center straight stitching position on the needle plate with all Brother presser feet. SA189 ABCDEFGHJKLMNO www.brother.com Lower the presser foot and guide the fabric through the presser foot as needed. 3. Sew the stitches keeping a certain...
Accessory Catalog
Page 8
.... 1. Attach the presser foot shaft. SA131 PC-6500/8500 King Thread Spool Stand Brother General Sewing Accessories 14 King Thread Spool Stand Lets you use optional feet on the left side of a sewing machine. 2. SA542 A:DuettaTM4500D,Innov-is4000D,2500D, 1500D,QC-1000 www.brother.com Release the black button, and the presser foot remains level. 3. Compatible with the screw. 3. Remove Presser Foot Holder. 2. Remove the top cover of the presser foot, lower the presser foot. 2. While keeping the black button on a low shank. 1. Sew...
.... 1. Attach the presser foot shaft. SA131 PC-6500/8500 King Thread Spool Stand Brother General Sewing Accessories 14 King Thread Spool Stand Lets you use optional feet on the left side of a sewing machine. 2. SA542 A:DuettaTM4500D,Innov-is4000D,2500D, 1500D,QC-1000 www.brother.com Release the black button, and the presser foot remains level. 3. Compatible with the screw. 3. Remove Presser Foot Holder. 2. Remove the top cover of the presser foot, lower the presser foot. 2. While keeping the black button on a low shank. 1. Sew...

Accessory Catalog
Page 11
.... Sew. Insert cords or threads into each hole on the presser foot. 2. Line up the cords, and select zigzag stitch with maximum stitch width. Loosen the screw on the presser foot and insert a braid through the guide before attaching the presser foot on the presser foot over the desired seams or pattern markings. 3. It can be used with brother sewing machines of the braid. 3. SA141 All Brother home-use the center guide). 2. Slip a cord from satin or decorative stitches. 2. SA110 ABCDEFJKMN SA148 GHILOP Cording Foot (5-hole) Used...
.... Sew. Insert cords or threads into each hole on the presser foot. 2. Line up the cords, and select zigzag stitch with maximum stitch width. Loosen the screw on the presser foot and insert a braid through the guide before attaching the presser foot on the presser foot over the desired seams or pattern markings. 3. It can be used with brother sewing machines of the braid. 3. SA141 All Brother home-use the center guide). 2. Slip a cord from satin or decorative stitches. 2. SA110 ABCDEFJKMN SA148 GHILOP Cording Foot (5-hole) Used...

Accessory Catalog
Page 12
... stitches. Requires Low Shank Adapter for edge-stitching heavy fabric such as home decor. Select a straight stitch, left needle position. 2. Also used for ULT series, PC-6500, PC-8200 and PC-8500 sewing machines. Creating tailor tacks: 1. SA150 ABCDEFJKMN www.brother.com Adding decorative stitches over seams or patterns: Line up the center of the presser foot to be gathered into the slit in size. Adjust the upper thread tension. 2. Slide the fabric not to the seam or pattern...
... stitches. Requires Low Shank Adapter for edge-stitching heavy fabric such as home decor. Select a straight stitch, left needle position. 2. Also used for ULT series, PC-6500, PC-8200 and PC-8500 sewing machines. Creating tailor tacks: 1. SA150 ABCDEFJKMN www.brother.com Adding decorative stitches over seams or patterns: Line up the center of the presser foot to be gathered into the slit in size. Adjust the upper thread tension. 2. Slide the fabric not to the seam or pattern...

Accessory Catalog
Page 13
... of stitching and use that to get started. Sew slowly for details.) Brother Embellishment Feet Pin Tuck Foot 24 Ruffler Foot Pin Tuck Foot This presser foot has 7 grooves and produces perfect pin tucks and corded pin tucks using a twin needle on the lower portion of the grooves. 4. For seven grooves: SA179 ABCDEJ For five grooves: SA162 IP This presser foot does not include the bobbin cover. SA143 AFJKM Ruffler Foot Makes ruffles with this presser foot. 1. Use a stiff card...
... of stitching and use that to get started. Sew slowly for details.) Brother Embellishment Feet Pin Tuck Foot 24 Ruffler Foot Pin Tuck Foot This presser foot has 7 grooves and produces perfect pin tucks and corded pin tucks using a twin needle on the lower portion of the grooves. 4. For seven grooves: SA179 ABCDEJ For five grooves: SA162 IP This presser foot does not include the bobbin cover. SA143 AFJKM Ruffler Foot Makes ruffles with this presser foot. 1. Use a stiff card...

Accessory Catalog
Page 15
... Shank Adapter for ULT series, PC-6500, PC-8200 and PC-8500 sewing machines. Screw on the Open Toe Quilting Foot, with both hands while keeping the fabric pulled tight. 9. Set the machine for free-motion, outline quilting, etc. 1. Set the machine to the machine. 2. Walking Foot SA140 ABCDEFJKMN SA166 L SA107 GHO SA169 I Open Toe Walking Foot SA188 ABCDEFJKMN www.brother.com Gently holding the upper and bobbin threads sew about four locking stitches and finish the thread ends. Lower the feed dogs. 2. Attach the walking foot to straight stitch. 3. Sew. Use...
... Shank Adapter for ULT series, PC-6500, PC-8200 and PC-8500 sewing machines. Screw on the Open Toe Quilting Foot, with both hands while keeping the fabric pulled tight. 9. Set the machine for free-motion, outline quilting, etc. 1. Set the machine to the machine. 2. Walking Foot SA140 ABCDEFJKMN SA166 L SA107 GHO SA169 I Open Toe Walking Foot SA188 ABCDEFJKMN www.brother.com Gently holding the upper and bobbin threads sew about four locking stitches and finish the thread ends. Lower the feed dogs. 2. Attach the walking foot to straight stitch. 3. Sew. Use...

Accessory Catalog
Page 17
... lifts open to see embroidery designs. - Includes three new free-motion presser feet: Free-motion quilting foot "C" for more features to prevent shrinkage and misalignment of making beautiful borders. Duetta™ 4500D/Innov-is 4000D Premium Upgrade Package II Brother Embroidery Accessories 32 Duetta™ 4500D/ 4000D Premium Upgrade Package II Exclusively for the Innov-is 4000D this upgrade adds outstanding quilting features, updated embroidery functionality and enhanced USB capability. Sewing Decorative Stitches as border designs. Use...
... lifts open to see embroidery designs. - Includes three new free-motion presser feet: Free-motion quilting foot "C" for more features to prevent shrinkage and misalignment of making beautiful borders. Duetta™ 4500D/Innov-is 4000D Premium Upgrade Package II Brother Embroidery Accessories 32 Duetta™ 4500D/ 4000D Premium Upgrade Package II Exclusively for the Innov-is 4000D this upgrade adds outstanding quilting features, updated embroidery functionality and enhanced USB capability. Sewing Decorative Stitches as border designs. Use...

Accessory Catalog
Page 33
Brother Embroidery Accessories 63 Free-Standing Ten Spool Thread Stand Ten Spool Thread Stand Embroidery Machine Hoops Brother Embroidery Accessories 64 For all embroidery and sewing/embroidery machines. Ten Spool Thread Stand This 10-Spool Thread Stand snaps securely in the proper color sequence for your machine to provide 10 vertical spool pins for your spool thread tails by placing them in use. Place your threads in place on creating. SA539 DuettaTM4500D,Innov-is 500 series, SE-270D, HE-120...
Brother Embroidery Accessories 63 Free-Standing Ten Spool Thread Stand Ten Spool Thread Stand Embroidery Machine Hoops Brother Embroidery Accessories 64 For all embroidery and sewing/embroidery machines. Ten Spool Thread Stand This 10-Spool Thread Stand snaps securely in the proper color sequence for your machine to provide 10 vertical spool pins for your spool thread tails by placing them in use. Place your threads in place on creating. SA539 DuettaTM4500D,Innov-is 500 series, SE-270D, HE-120...

Accessory Catalog
Page 34
... (approx. 1,100-yds) spun thread is 500D. Brother Embroidery Accessories PacesetterTM Polyester Threads 65 Brother Country Yarn Embroidery Threads Metallic Threads For the best embroidery results, use these embroidery threads especially designed for Brother sewing and embroidering machines. 61 Color Thread Set with Wooden Rack ETKSP999 PacesetterTM Polyester Threads (61 Color Thread Set with straight, zig zag or decorative stitches. Pacesetter embroidery thread is a wonderful set as well as decorative sewing. Here is color keyed to the needle thread. This pack gives you...
... (approx. 1,100-yds) spun thread is 500D. Brother Embroidery Accessories PacesetterTM Polyester Threads 65 Brother Country Yarn Embroidery Threads Metallic Threads For the best embroidery results, use these embroidery threads especially designed for Brother sewing and embroidering machines. 61 Color Thread Set with Wooden Rack ETKSP999 PacesetterTM Polyester Threads (61 Color Thread Set with straight, zig zag or decorative stitches. Pacesetter embroidery thread is a wonderful set as well as decorative sewing. Here is color keyed to the needle thread. This pack gives you...

Accessory Catalog
Page 36
... fabric under the Needle Felting Attachment. 4. SA159 SA180B SA181 Needle Felting Attachment Felting Needle Brother Sewing Machine Attachments for attaching piping, zippers, stitching angled corners, etc. You can slip into very small areas. Felting Needle Needle Felted Cap & Scarf www.brother.com SA173 Ver y Narrow Foot Very convenient for PQ Series 70 Needle Felting Attachment Use this unique attachment to use it just like an ordinary presser foot, and embellish fabrics with a chalk pen. 3. SA172 Bobbin...
... fabric under the Needle Felting Attachment. 4. SA159 SA180B SA181 Needle Felting Attachment Felting Needle Brother Sewing Machine Attachments for attaching piping, zippers, stitching angled corners, etc. You can slip into very small areas. Felting Needle Needle Felted Cap & Scarf www.brother.com SA173 Ver y Narrow Foot Very convenient for PQ Series 70 Needle Felting Attachment Use this unique attachment to use it just like an ordinary presser foot, and embellish fabrics with a chalk pen. 3. SA172 Bobbin...

Accessory Catalog
Page 40
Set up your machine for a cover stitch, with your machine for a chain stitch, the center needle. 2. Brother Cover Stitch Feet 78 Top Stitching Foot Set Top Stitching Foot Set Use included presser foot to top stitch with a tweezers. Set up your machine. 3. Sew. Open the seams. 4. The stitches are always smooth. 1. Fold fabric and set it is easily set through the holder). 4. Set T1/T2 presser foot. 2. SA224CV SA221CV Hemming Set Finishes hems easily and quickly. Set up your Cover Stitch). 1. Insert the tab on the bias tape attachment into the guide. 4. Sew as ...
Set up your machine for a cover stitch, with your machine for a chain stitch, the center needle. 2. Brother Cover Stitch Feet 78 Top Stitching Foot Set Top Stitching Foot Set Use included presser foot to top stitch with a tweezers. Set up your machine. 3. Sew. Open the seams. 4. The stitches are always smooth. 1. Fold fabric and set it is easily set through the holder). 4. Set T1/T2 presser foot. 2. SA224CV SA221CV Hemming Set Finishes hems easily and quickly. Set up your Cover Stitch). 1. Insert the tab on the bias tape attachment into the guide. 4. Sew as ...
Users Manual - English
Page 2
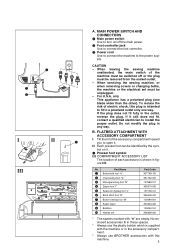
... instructions before changing the light bulb. "IMPOR TANT SAFETY INSTRUCTIONS" When using a sewing machine, basic safety precautions should always be used as threading needle, changing needle, threading bobbin, or changing presser foot, and the like. 15. DANGER - Use this sewing machine to break. 12. Use only accessories recommended by young children or infirm persons without supervision. 17. Never drop or insert any other user servicing adjustments mentioned in this manual. 3. Special care is being administered. 8. The wrong plate can cause the needle...
... instructions before changing the light bulb. "IMPOR TANT SAFETY INSTRUCTIONS" When using a sewing machine, basic safety precautions should always be used as threading needle, changing needle, threading bobbin, or changing presser foot, and the like. 15. DANGER - Use this sewing machine to break. 12. Use only accessories recommended by young children or infirm persons without supervision. 17. Never drop or insert any other user servicing adjustments mentioned in this manual. 3. Special care is being administered. 8. The wrong plate can cause the needle...
Users Manual - English
Page 5
... (for stitch width and stitch length 21 THREAD TENSION 22 Correct upper thread tension 22 Loosening the upper thread tension 22 Tightening the upper thread tension 23 PRESSER FOOT 24 Changing the presser foot 24 Removing the presser foot holder (while cleaning, etc 24 FEED DOGS 25 NEEDLE 26 Checking the needle 26 Installing the needle securely 26 FABRIC/THREAD/NEEDLE COMBINATION CHART 27 CHAPTER 2 1. CONTENTS CHAPTER 1 BEFORE USE 4 PART NAMES 4 OTHER ENCLOSED ACCESSORIES 6 OPTIONAL ACCESSORIES 6 DISPLAY PANEL 7 OPERATION BUTTONS 8 Using the operation buttons 8 POWER SUPPLY...
... (for stitch width and stitch length 21 THREAD TENSION 22 Correct upper thread tension 22 Loosening the upper thread tension 22 Tightening the upper thread tension 23 PRESSER FOOT 24 Changing the presser foot 24 Removing the presser foot holder (while cleaning, etc 24 FEED DOGS 25 NEEDLE 26 Checking the needle 26 Installing the needle securely 26 FABRIC/THREAD/NEEDLE COMBINATION CHART 27 CHAPTER 2 1. CONTENTS CHAPTER 1 BEFORE USE 4 PART NAMES 4 OTHER ENCLOSED ACCESSORIES 6 OPTIONAL ACCESSORIES 6 DISPLAY PANEL 7 OPERATION BUTTONS 8 Using the operation buttons 8 POWER SUPPLY...
Users Manual - English
Page 8
... switched off the main power. 2 Foot controller jack Use to connect the foot controller. 3 Power cord Use to connect the machine to install the proper outlet. 2 1 3 I " 5 Space for Zigzag foot "J" 6 Blind stitch foot "R" 7 Button-sewing foot "M" 8 Seam ripper 9 Bobbins ; II Each presser foot can be removed from the socket-outlet. - When leaving the sewing machine unattended, the main switch of the machine must be identified by the symbol on it. 1 Presser foot symbol III COMPARTMENT ACCESSORY LIST The location of each...
... switched off the main power. 2 Foot controller jack Use to connect the foot controller. 3 Power cord Use to connect the machine to install the proper outlet. 2 1 3 I " 5 Space for Zigzag foot "J" 6 Blind stitch foot "R" 7 Button-sewing foot "M" 8 Seam ripper 9 Bobbins ; II Each presser foot can be removed from the socket-outlet. - When leaving the sewing machine unattended, the main switch of the machine must be identified by the symbol on it. 1 Presser foot symbol III COMPARTMENT ACCESSORY LIST The location of each...

Users Manual - English
Page 9
... threads. * When using the walking foot, please refer to the end of the bobbin winder shaft during use. only) Foot controller: Model N5V This foot controller can be attached to page 97 for sewing machine model PC-3000. Walking foot* Parts code: X81065-001 2- Note (For U.S.A. Quilting foot Parts code: XA4322-001 * If using special threads which quickly wind off the thread spool, place a net over the spool before sewing. * The extra spool pin, which is provided as an accessory, should be used for HOW TO USE WALKING FOOT (OPTIONAL ACCESSORY). Stitch guide foot "P" Parts code...
... threads. * When using the walking foot, please refer to the end of the bobbin winder shaft during use. only) Foot controller: Model N5V This foot controller can be attached to page 97 for sewing machine model PC-3000. Walking foot* Parts code: X81065-001 2- Note (For U.S.A. Quilting foot Parts code: XA4322-001 * If using special threads which quickly wind off the thread spool, place a net over the spool before sewing. * The extra spool pin, which is provided as an accessory, should be used for HOW TO USE WALKING FOOT (OPTIONAL ACCESSORY). Stitch guide foot "P" Parts code...
Users Manual - English
Page 22
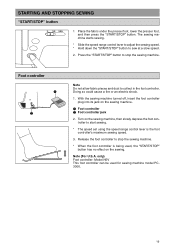
... the speed range control lever to adjust the sewing speed. * Hold down the "START/STOP" button to stop the sewing machine. * When the foot controller is the foot controller's maximum sewing speed. 3. Note (For U.S.A. Press the "START/STOP" button to sew at a slow speed. 2. Turn on the sewing machine. 1 Foot controller 2 Foot controller jack 2. only) Foot controller: Model N5V This foot controller can be used , the "START/STOP" button has no effect on the sewing. STARTING AND STOPPING SEWING "START/STOP" button 1 Place the fabric under the presser foot, lower the presser foot...
... the speed range control lever to adjust the sewing speed. * Hold down the "START/STOP" button to stop the sewing machine. * When the foot controller is the foot controller's maximum sewing speed. 3. Note (For U.S.A. Press the "START/STOP" button to sew at a slow speed. 2. Turn on the sewing machine. 1 Foot controller 2 Foot controller jack 2. only) Foot controller: Model N5V This foot controller can be used , the "START/STOP" button has no effect on the sewing. STARTING AND STOPPING SEWING "START/STOP" button 1 Place the fabric under the presser foot, lower the presser foot...

Users Manual - English
Page 38
... 00: Straight stitch (center needle position) for normal sewing 01: Straight stitch (left needle position) for reverse sewing. 5 6 3. Baste or pin the fabrics together. 2. Attach presser foot "J", sew three or four reverse stitches at the beginning, then start sewing. 1 3 to sew reverse stitches or reinforcement stitches automatically at the beginning and at a slow speed as you approach the end of the sewing area, then press the "REVERSE STITCH" button to sew several reverse stitches and stop the machine. * Before sewing, touch the automatic reinforcement stitching key to 4 reverse...
... 00: Straight stitch (center needle position) for normal sewing 01: Straight stitch (left needle position) for reverse sewing. 5 6 3. Baste or pin the fabrics together. 2. Attach presser foot "J", sew three or four reverse stitches at the beginning, then start sewing. 1 3 to sew reverse stitches or reinforcement stitches automatically at the beginning and at a slow speed as you approach the end of the sewing area, then press the "REVERSE STITCH" button to sew several reverse stitches and stop the machine. * Before sewing, touch the automatic reinforcement stitching key to 4 reverse...
Users Manual - English
Page 69
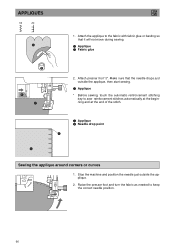
... machine and position the needle just outside the applique, then start sewing. 6 1 Applique * Before sewing, touch the automatic reinforcement stitching key to sew reinforcement stitches automatically at the beginning and at the end of the stitch. 1 Applique 2 Needle drop point Sewing the applique around corners or curves 1. Attach the applique to keep the correct needle position. 66 Attach presser foot "J". Make sure that it will not move during sewing. 1 Applique 2 Fabric glue 2. APPLIQUES 04 24 J 1. Raise the presser foot and turn the fabric as needed...
... machine and position the needle just outside the applique, then start sewing. 6 1 Applique * Before sewing, touch the automatic reinforcement stitching key to sew reinforcement stitches automatically at the beginning and at the end of the stitch. 1 Applique 2 Needle drop point Sewing the applique around corners or curves 1. Attach the applique to keep the correct needle position. 66 Attach presser foot "J". Make sure that it will not move during sewing. 1 Applique 2 Fabric glue 2. APPLIQUES 04 24 J 1. Raise the presser foot and turn the fabric as needed...

Users Manual - English
Page 96
.... If the problem still persists, contact the place of fabric, thread and needle is not correct. 2. Install the foot holder correctly. 7. PATTERNS" on page 27. 4. Upper thread is not correctly installed. 4. Combination of purchase or your nearest authorized Brother dealer. Set bobbin properly and pull out the bobbin thread. 3. Presser foot holder is entangled. 2. Pattern sewing position is not correct. 1. Trouble with a brush. 4. Upper threading is not correctly 1. Threading is entangled. 1. Set needle at proper position using "NEEDLE POSITION" button...
.... If the problem still persists, contact the place of fabric, thread and needle is not correct. 2. Install the foot holder correctly. 7. PATTERNS" on page 27. 4. Upper thread is not correctly installed. 4. Combination of purchase or your nearest authorized Brother dealer. Set bobbin properly and pull out the bobbin thread. 3. Presser foot holder is entangled. 2. Pattern sewing position is not correct. 1. Trouble with a brush. 4. Upper threading is not correctly 1. Threading is entangled. 1. Set needle at proper position using "NEEDLE POSITION" button...


