

Accessory Catalog
Page 4
...finish to your sewing projects. Brother General Sewing Accessories 05 Sew as you like. Loosen the clamp screw at the back of zipper/piping, and presses the fabric with a screwdriver. 5. Requires Low Shank Adapter for ULT series, PC-6500, PC-8200 and PC-8500 sewing machines. Sew. ...-use sewing machines www.brother.com Adjustable Zipper & Piping Foot Brother General Sewing Accessories 06 Adjustable Zipper & Piping Foot Attaches zippers and pipings easily. Screw on the edge of zipper/piping, avoiding the non-flat parts of the presser foot and slide the presser foot...
...finish to your sewing projects. Brother General Sewing Accessories 05 Sew as you like. Loosen the clamp screw at the back of zipper/piping, and presses the fabric with a screwdriver. 5. Requires Low Shank Adapter for ULT series, PC-6500, PC-8200 and PC-8500 sewing machines. Sew. ...-use sewing machines www.brother.com Adjustable Zipper & Piping Foot Brother General Sewing Accessories 06 Adjustable Zipper & Piping Foot Attaches zippers and pipings easily. Screw on the edge of zipper/piping, avoiding the non-flat parts of the presser foot and slide the presser foot...

Accessory Catalog
Page 6
Lower the needle into the curled part of the fabric behind the needle and lower the presser foot. 7. Non Stick Foot Designed for details.) www.brother.com Select an overlock stitch. 2. Sew along the guide. Position the edge of the fabric behind the needle and lower the presser ... fabrics. 1. Place the fabric with the wrong side facing up under the presser foot. 3. Brother General Sewing Accessories 09 Narrow Hemmer Foot Non Stick Foot Overlock Foot Picot Foot Brother General Sewing Accessories 10 SA126 ABCDEFJKMN SA127 GHILOP Skirt Innov-is Project Book (See page 50 for...
Lower the needle into the curled part of the fabric behind the needle and lower the presser foot. 7. Non Stick Foot Designed for details.) www.brother.com Select an overlock stitch. 2. Sew along the guide. Position the edge of the fabric behind the needle and lower the presser ... fabrics. 1. Place the fabric with the wrong side facing up under the presser foot. 3. Brother General Sewing Accessories 09 Narrow Hemmer Foot Non Stick Foot Overlock Foot Picot Foot Brother General Sewing Accessories 10 SA126 ABCDEFJKMN SA127 GHILOP Skirt Innov-is Project Book (See page 50 for...

Users Manual - English
Page 2
... using and before cleaning. 2. "IMPOR TANT SAFETY INSTRUCTIONS" When using a sewing machine, basic safety precautions should always be taken, including the following: "Read all moving parts. The sewing machine should be supervised to the nearest authorized dealer or service center for household use by the manufacturer as described in the instruction...
... using and before cleaning. 2. "IMPOR TANT SAFETY INSTRUCTIONS" When using a sewing machine, basic safety precautions should always be taken, including the following: "Read all moving parts. The sewing machine should be supervised to the nearest authorized dealer or service center for household use by the manufacturer as described in the instruction...
Users Manual - English
Page 4
...yourself. Do not drop or hit the machine. 4. If the problem persists, please consult your nearest authorized Brother service center. 1 CONGRATULATIONS ON CHOOSING A BROTHER COMPUTER SEWING MACHINE Your machine is completed ● Replacing or removing the needle or any accessories, the presser... feet, needle, or other parts to assure correct installation. For a longer service life 1. PLEASE READ BEFORE USING YOUR ...
...yourself. Do not drop or hit the machine. 4. If the problem persists, please consult your nearest authorized Brother service center. 1 CONGRATULATIONS ON CHOOSING A BROTHER COMPUTER SEWING MACHINE Your machine is completed ● Replacing or removing the needle or any accessories, the presser... feet, needle, or other parts to assure correct installation. For a longer service life 1. PLEASE READ BEFORE USING YOUR ...
Users Manual - English
Page 5
CONTENTS CHAPTER 1 BEFORE USE 4 PART NAMES 4 OTHER ENCLOSED ACCESSORIES 6 OPTIONAL ACCESSORIES 6 DISPLAY PANEL 7 OPERATION BUTTONS 8 Using the operation buttons 8 POWER SUPPLY 9 SCREEN 10 About the screen 10 Adjusting the brightness ... stitching 30 STITCH WIDTH AND LENGTH 31 Adjusting the stitch width 31 Adjusting the stitch length 31 USEFUL SKILLS 32 Sewing corners 32 Sewing folded parts 32 Sewing curves 32 Sewing on thick fabric 33 Sewing on thin fabric 33 Using the needle plate 34 Free-arm sewing 34 2 2. UTILITY STITCHES...
CONTENTS CHAPTER 1 BEFORE USE 4 PART NAMES 4 OTHER ENCLOSED ACCESSORIES 6 OPTIONAL ACCESSORIES 6 DISPLAY PANEL 7 OPERATION BUTTONS 8 Using the operation buttons 8 POWER SUPPLY 9 SCREEN 10 About the screen 10 Adjusting the brightness ... stitching 30 STITCH WIDTH AND LENGTH 31 Adjusting the stitch width 31 Adjusting the stitch length 31 USEFUL SKILLS 32 Sewing corners 32 Sewing folded parts 32 Sewing curves 32 Sewing on thick fabric 33 Sewing on thin fabric 33 Using the needle plate 34 Free-arm sewing 34 2 2. UTILITY STITCHES...
Users Manual - English
Page 7
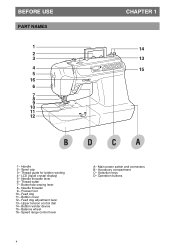
Thread guide for bobbin winding 4- Needle threader lever 6- Buttonhole sewing lever 8- Presser foot 10- Feed dog 11- Balance wheel 16- Handle 2- Spool cap 3- Thread cutter 7- Upper tension control dial 14- Speed range control lever A- Accessory compartment C- Operation buttons 4 LCD (liquid crystal display) 5- Bobbin cover 12- Bobbin winder device 15- Main power switch and connectors B- Needle threader 9- Feed dog adjustment lever 13- Selection keys D- BEFORE USE PART NAMES 1 2 3 4 5 16 6 7 8 9 10 11 12 CHAPTER 1 14 13 15 BDCA 1-
Thread guide for bobbin winding 4- Needle threader lever 6- Buttonhole sewing lever 8- Presser foot 10- Feed dog 11- Balance wheel 16- Handle 2- Spool cap 3- Thread cutter 7- Upper tension control dial 14- Speed range control lever A- Accessory compartment C- Operation buttons 4 LCD (liquid crystal display) 5- Bobbin cover 12- Bobbin winder device 15- Main power switch and connectors B- Needle threader 9- Feed dog adjustment lever 13- Selection keys D- BEFORE USE PART NAMES 1 2 3 4 5 16 6 7 8 9 10 11 12 CHAPTER 1 14 13 15 BDCA 1-
Users Manual - English
Page 8
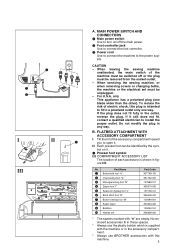
... foot controller. 3 Power cord Use to connect the machine to install the proper outlet. Part Name 1 Buttonhole foot "A" 2 Overcasting foot "G" 3 Monogramming foot "N" 4 Zipper foot "I II 1 J III 1 10 # 2 3 67 8 5 4# 9 A. No enclosed accessories fit in these spaces. * Always use BROTHER accessories with "#" are empty. FLATBED ATTACHMENT WITH ACCESSORY COMPARTMENT I Tilt the lid of each...
... foot controller. 3 Power cord Use to connect the machine to install the proper outlet. Part Name 1 Buttonhole foot "A" 2 Overcasting foot "G" 3 Monogramming foot "N" 4 Zipper foot "I II 1 J III 1 10 # 2 3 67 8 5 4# 9 A. No enclosed accessories fit in these spaces. * Always use BROTHER accessories with "#" are empty. FLATBED ATTACHMENT WITH ACCESSORY COMPARTMENT I Tilt the lid of each...

Users Manual - English
Page 9
... the bobbin winder shaft during use a thread net with metallic threads. * When using the walking foot, please refer to page 97 for sewing machine model PC-3000. OTHER ENCLOSED ACCESSORIES 1 2 3 4 5 6 7 8 9 10 11 12 13 14 15 16 No. Side cutter Parts code: X81028-001 3- Note (For U.S.A. Walking foot...
... the bobbin winder shaft during use a thread net with metallic threads. * When using the walking foot, please refer to page 97 for sewing machine model PC-3000. OTHER ENCLOSED ACCESSORIES 1 2 3 4 5 6 7 8 9 10 11 12 13 14 15 16 No. Side cutter Parts code: X81028-001 3- Note (For U.S.A. Walking foot...

Users Manual - English
Page 16
... of thread before using a fine thread such as it . 1 Cross wound thread 2 Spool cap (small) 3 Gap 13 Connect the machine to use the specified bobbin (part code 136492-151). Place the spool of the spool. Using a different bobbin may result in injuries or damage. 3 2 4,9 5 6 7,8 1 3 1 2 3 1 2 1. BOBBIN WINDING / BOBBIN THREAD SETTING Winding the...
... of thread before using a fine thread such as it . 1 Cross wound thread 2 Spool cap (small) 3 Gap 13 Connect the machine to use the specified bobbin (part code 136492-151). Place the spool of the spool. Using a different bobbin may result in injuries or damage. 3 2 4,9 5 6 7,8 1 3 1 2 3 1 2 1. BOBBIN WINDING / BOBBIN THREAD SETTING Winding the...
Users Manual - English
Page 21
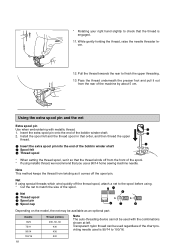
.... 1 4 1 Net 2 Thread spool 3 Spool pin 4 Spool cap 23 4 Depending on the model, the net may be available as it out from twisting as an optional part. Transparent nylon thread can be used is engaged. 11. 5 5 * Rotating your right hand slightly to check that you use a 90/14 home sewing machine needle...
.... 1 4 1 Net 2 Thread spool 3 Spool pin 4 Spool cap 23 4 Depending on the model, the net may be available as it out from twisting as an optional part. Transparent nylon thread can be used is engaged. 11. 5 5 * Rotating your right hand slightly to check that you use a 90/14 home sewing machine needle...
Users Manual - English
Page 31
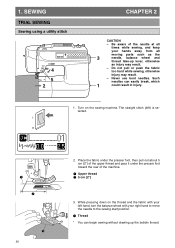
The straight stitch (left hand, turn the balance wheel with your hands away from all moving parts such as the 3 needle, balance wheel and thread take-up the bobbin thread. SEWING TRIAL SEWING Sewing using a utility stitch 4 5 2 CHAPTER 2 CAUTION - Be aware of ...
The straight stitch (left hand, turn the balance wheel with your hands away from all moving parts such as the 3 needle, balance wheel and thread take-up the bobbin thread. SEWING TRIAL SEWING Sewing using a utility stitch 4 5 2 CHAPTER 2 CAUTION - Be aware of ...
Users Manual - English
Page 35
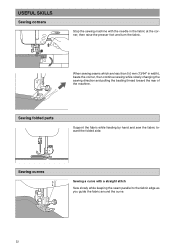
Sewing folded parts Support the fabric while feeding by hand and sew the fabric toward the rear of the machine. When sewing seams which are less than 5.0 mm (...
Sewing folded parts Support the fabric while feeding by hand and sew the fabric toward the rear of the machine. When sewing seams which are less than 5.0 mm (...
Users Manual - English
Page 66
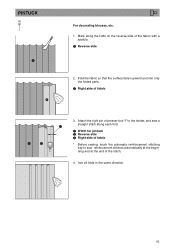
... pintuck 2 Reverse side 3 Right side of fabric I For decorating blouses, etc. 1. Fold the fabric so that the surface faces upward and iron only the folded parts. 1 Right side of the fabric with a spatula. 1 Reverse side 2.
... pintuck 2 Reverse side 3 Right side of fabric I For decorating blouses, etc. 1. Fold the fabric so that the surface faces upward and iron only the folded parts. 1 Right side of the fabric with a spatula. 1 Reverse side 2.

Users Manual - English
Page 75
...). 3. With the reverse side of the fabric facing up, sew one area. This will leave the fabric frayed in this one edge of the frayed part, aligning the stitches so they are parallel. 72 A more attractive finish can be obtained if you , turn the fabric and sew the other edge of... the frayed part. 4. With the back side of fabric. Pull out several threads from one area on shirtfronts. About 5 or 6 threads will not touch the presser foot before...
...). 3. With the reverse side of the fabric facing up, sew one area. This will leave the fabric frayed in this one edge of the frayed part, aligning the stitches so they are parallel. 72 A more attractive finish can be obtained if you , turn the fabric and sew the other edge of... the frayed part. 4. With the back side of fabric. Pull out several threads from one area on shirtfronts. About 5 or 6 threads will not touch the presser foot before...

Users Manual - English
Page 76
... threads and then pull out four threads, the width of finished product. Hem-stitching 2 1 1. Pull out several threads from both sides of the 4 mm (5/32") part which is approximately 4mm (5/32") or less.] 1 Approx. 4.0 mm (5/32") or less. 2 Four threads (Pull out) 3 Five threads (Leave) 3. 5.
... threads and then pull out four threads, the width of finished product. Hem-stitching 2 1 1. Pull out several threads from both sides of the 4 mm (5/32") part which is approximately 4mm (5/32") or less.] 1 Approx. 4.0 mm (5/32") or less. 2 Four threads (Pull out) 3 Five threads (Leave) 3. 5.

Users Manual - English
Page 86
... and the new pattern will be stored in the memory under stitch number 97, touch " memory ( ) " three times. Checking a stored pattern combination To see other parts of the pattern combination stored under the selected stitch number, touch " cfm ( ) " to store the pattern under the five stitch numbers 95, 96, 97, 98...
... and the new pattern will be stored in the memory under stitch number 97, touch " memory ( ) " three times. Checking a stored pattern combination To see other parts of the pattern combination stored under the selected stitch number, touch " cfm ( ) " to store the pattern under the five stitch numbers 95, 96, 97, 98...
Users Manual - English
Page 93
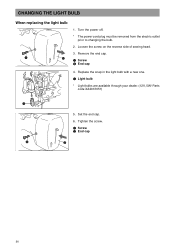
Loosen the screw on the reverse side of sewing head. 3. Tighten the screw. 1 Screw 2 End cap 2 90 Turn the power off. * The power cord plug must be removed from the electric outlet prior to changing the bulb. 2. Replace the snap in the light bulb with a new one. 1 Light bulb * Light bulbs are available through your dealer. (12V, 5W/ Parts code XA2037051) 1 1 5. CHANGING THE LIGHT BULB When replacing the light bulb 1 2 1. Remove the end cap. 1 Screw 2 End cap 4. Set the end cap. 6.
Loosen the screw on the reverse side of sewing head. 3. Tighten the screw. 1 Screw 2 End cap 2 90 Turn the power off. * The power cord plug must be removed from the electric outlet prior to changing the bulb. 2. Replace the snap in the light bulb with a new one. 1 Light bulb * Light bulbs are available through your dealer. (12V, 5W/ Parts code XA2037051) 1 1 5. CHANGING THE LIGHT BULB When replacing the light bulb 1 2 1. Remove the end cap. 1 Screw 2 End cap 4. Set the end cap. 6.


