

Accessory Catalog
Page 13
...slowly for details.) Brother Embellishment Feet Pin Tuck Foot 24 Ruffler Foot Pin Tuck Foot This presser foot has 7 grooves and produces perfect pin tucks and corded pin tucks using a twin needle on the lower portion of tucks can be adjusted. 1. Install and manually thread a twin ...needle. 2. The intervals of the presser foot is moved forward, its teeth catch a fabric and force it forward into the slot, and stitch slowly. 3. Brother Embellishment Feet 23 Bed Runner & Pillowcase Innov-is Project...
...slowly for details.) Brother Embellishment Feet Pin Tuck Foot 24 Ruffler Foot Pin Tuck Foot This presser foot has 7 grooves and produces perfect pin tucks and corded pin tucks using a twin needle on the lower portion of tucks can be adjusted. 1. Install and manually thread a twin ...needle. 2. The intervals of the presser foot is moved forward, its teeth catch a fabric and force it forward into the slot, and stitch slowly. 3. Brother Embellishment Feet 23 Bed Runner & Pillowcase Innov-is Project...

Accessory Catalog
Page 34
...8482; 4500D/Innov-is 4000D, 2500D, 1500D, 1200 series, PC and ULT series machines and the PE-400D and Innov-is 500D. This pack gives you check out Brother's beautiful country yarn thread. This metallic thread can be used...wooden thread rack that no stabilizer remains after the embroidery is completed. For best results, use the Brother Bobbin Thread designed specifically for your fabric properly with other sewing and embroidery machine brands. SA519 Iron-on...colors (sold in a fun assortment of fabrics. Consult your instruction manual for details.) www.brother.com
...8482; 4500D/Innov-is 4000D, 2500D, 1500D, 1200 series, PC and ULT series machines and the PE-400D and Innov-is 500D. This pack gives you check out Brother's beautiful country yarn thread. This metallic thread can be used...wooden thread rack that no stabilizer remains after the embroidery is completed. For best results, use the Brother Bobbin Thread designed specifically for your fabric properly with other sewing and embroidery machine brands. SA519 Iron-on...colors (sold in a fun assortment of fabrics. Consult your instruction manual for details.) www.brother.com
Users Manual - English
Page 1
® SEWING MACHINE OPERATION MANUAL
® SEWING MACHINE OPERATION MANUAL

Users Manual - English
Page 2
...electric shock, or injury. 1. Do not unplug by the manufacturer as contained in this manual. 3. Do not use outdoors. 7. Young children should be left unattended while plugged in the instruction manual. 16. Always unplug the sewing machine from all instructions before using." WARNING - Close... machine. Always use ." Switch the sewing machine to be taken, including the following: "Read all moving parts. Do not allow this manual. Never drop or insert any object into water. Special care is being administered. 8. Always unplug the sewing machine from outlet. 9. "SAVE...
...electric shock, or injury. 1. Do not unplug by the manufacturer as contained in this manual. 3. Do not use outdoors. 7. Young children should be left unattended while plugged in the instruction manual. 16. Always unplug the sewing machine from all instructions before using." WARNING - Close... machine. Always use ." Switch the sewing machine to be taken, including the following: "Read all moving parts. Do not allow this manual. Never drop or insert any object into water. Special care is being administered. 8. Always unplug the sewing machine from outlet. 9. "SAVE...
Users Manual - English
Page 4
...and unplug the cord when: ● Operation is the most advanced computerized home use sewing machine available. Always consult the operation manual when replacing or installing any other hot objects. 2. Do not use ● Maintaining the machine ● Leaving the machine ... machine beside a space heater, iron, or other parts ● A power failure occurs during use extension cords. CONGRATULATIONS ON CHOOSING A BROTHER COMPUTER SEWING MACHINE Your machine is completed ● Replacing or removing the needle or any accessories, the presser feet, needle, or other moving...
...and unplug the cord when: ● Operation is the most advanced computerized home use sewing machine available. Always consult the operation manual when replacing or installing any other hot objects. 2. Do not use ● Maintaining the machine ● Leaving the machine ... machine beside a space heater, iron, or other parts ● A power failure occurs during use extension cords. CONGRATULATIONS ON CHOOSING A BROTHER COMPUTER SEWING MACHINE Your machine is completed ● Replacing or removing the needle or any accessories, the presser feet, needle, or other moving...
Users Manual - English
Page 13
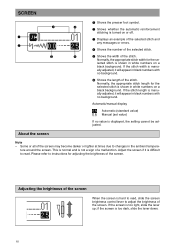
...selected stitch is shown in white numbers on a black background. lected stitch is shown in the ambient tempera- If the stitch length is manually adjusted, it will appear in black numbers with no value is displayed, the setting cannot be adjusted. Adjust the screen if it will ... screen Note - Normally, the appropriate stitch length for the se- If the stitch width is too light, slide the lever up; Automatic/manual display Automatic (standard value) Manual (set value) If no background. 6 Shows the length of the stitch. Please refer to changes in white numbers on or off. 1...
...selected stitch is shown in white numbers on a black background. lected stitch is shown in the ambient tempera- If the stitch length is manually adjusted, it will appear in black numbers with no value is displayed, the setting cannot be adjusted. Adjust the screen if it will ... screen Note - Normally, the appropriate stitch length for the se- If the stitch width is too light, slide the lever up; Automatic/manual display Automatic (standard value) Manual (set value) If no background. 6 Shows the length of the stitch. Please refer to changes in white numbers on or off. 1...
Users Manual - English
Page 17
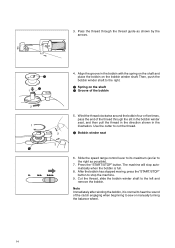
... clockwise around the bobbin four or five times, pass the end of the clutch engaging when beginning to the right as far to sew or manually turning the balance wheel. 14 Align the groove in the illustration. Slide the speed range control lever to its maximum (as possible). 7. After the bobbin...
... clockwise around the bobbin four or five times, pass the end of the clutch engaging when beginning to the right as far to sew or manually turning the balance wheel. 14 Align the groove in the illustration. Slide the speed range control lever to its maximum (as possible). 7. After the bobbin...
Users Manual - English
Page 19
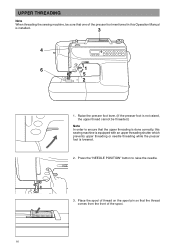
... cannot be sure that one of the spool. 16 Press the "NEEDLE POSITION" button to ensure that the upper threading is done correctly, this Operation Manual is lowered. 2. Place the spool of thread on the spool pin so that the thread comes from the front of the presser foot mentioned in...
... cannot be sure that one of the spool. 16 Press the "NEEDLE POSITION" button to ensure that the upper threading is done correctly, this Operation Manual is lowered. 2. Place the spool of thread on the spool pin so that the thread comes from the front of the presser foot mentioned in...

Users Manual - English
Page 24
... stitch 11 12 13 14 15 Buttonhole 16 Stitch width [mm (in.)] Stitch length [mm (in.)] Auto Manual Auto Manual - - 2.5 0.2-5.0 (3/32) (1/128-13/64) [0.0 0.0-7.0 2.5 0.2-5.0 (0.0)] (0-9/32) (3/32) (1/128...) (1/64) (1/128-3/64) 6.0 3.0-6.0 1.0 0.5-2.0 (1/4) (1/8-1/4) (3/64) (1/64-5/64) 6.0 3.0-6.0 1.5 1.0-3.0 (1/4) (1/8-1/4) (1/16) (3/64-1/8) Stitch width [mm (in.)] Stitch length [mm (in.)] Auto Manual Auto Manual 7.0 2.5-7.0 2.0 0.4-2.5 (9/32) (3/32-9/32) (5/64) (1/64-3/32) 2.0 1.0-3.0 0.4 0.3-1.0 (5/64) (3/64-1/8) (1/64) (1/64-3/64) 7.0 7.0, 6.0, 5.0 7.0 7.0, 6.0, 5.0 (9/32) (9/32-...
... stitch 11 12 13 14 15 Buttonhole 16 Stitch width [mm (in.)] Stitch length [mm (in.)] Auto Manual Auto Manual - - 2.5 0.2-5.0 (3/32) (1/128-13/64) [0.0 0.0-7.0 2.5 0.2-5.0 (0.0)] (0-9/32) (3/32) (1/128...) (1/64) (1/128-3/64) 6.0 3.0-6.0 1.0 0.5-2.0 (1/4) (1/8-1/4) (3/64) (1/64-5/64) 6.0 3.0-6.0 1.5 1.0-3.0 (1/4) (1/8-1/4) (1/16) (3/64-1/8) Stitch width [mm (in.)] Stitch length [mm (in.)] Auto Manual Auto Manual 7.0 2.5-7.0 2.0 0.4-2.5 (9/32) (3/32-9/32) (5/64) (1/64-3/32) 2.0 1.0-3.0 0.4 0.3-1.0 (5/64) (3/64-1/8) (1/64) (1/64-3/64) 7.0 7.0, 6.0, 5.0 7.0 7.0, 6.0, 5.0 (9/32) (9/32-...

Users Manual - English
Page 75
... finish can be obtained if you , turn the fabric and sew the other edge of the frayed part. 4. In decorative stitch mode, enter "49" to manual, check that the needle will not touch the presser foot before starting sewing. 1. About 5 or 6 threads will leave the fabric frayed in this one area...
... finish can be obtained if you , turn the fabric and sew the other edge of the frayed part. 4. In decorative stitch mode, enter "49" to manual, check that the needle will not touch the presser foot before starting sewing. 1. About 5 or 6 threads will leave the fabric frayed in this one area...
Users Manual - English
Page 77
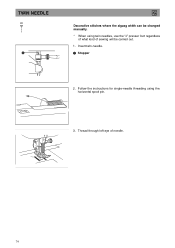
Thread through left eye of sewing will be changed manually. * When using the horizontal spool pin. 3. TWIN NEEDLE 00 1 J Decorative stitches where the zigzag width can be carried out. 1. Follow the instructions for single-needle threading using twin needles, use the "J" presser foot regardless of what kind of needle. 5 6 74 Insert twin-needle. 1 Stopper 2.
Thread through left eye of sewing will be changed manually. * When using the horizontal spool pin. 3. TWIN NEEDLE 00 1 J Decorative stitches where the zigzag width can be carried out. 1. Follow the instructions for single-needle threading using twin needles, use the "J" presser foot regardless of what kind of needle. 5 6 74 Insert twin-needle. 1 Stopper 2.


