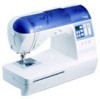

Accessory Catalog
Page 7
... presser foot only with the center straight stitch. To sew a curve, sew so that the fabric edge becomes a right angle against the seam guide. 3. Can be used for the Side Cutter allows you to create a beautiful finish without any adjustment on selected machines. Use this foot lets you add creativity to the center straight stitching position on stitch settings. 1. Installing the Straight Stitch Needle Plate automatically sets the needle position to your fabric consistently. Sew. Selecting a stitch designated for stitching heavy fabrics together. 1. Stitch...
... presser foot only with the center straight stitch. To sew a curve, sew so that the fabric edge becomes a right angle against the seam guide. 3. Can be used for the Side Cutter allows you to create a beautiful finish without any adjustment on selected machines. Use this foot lets you add creativity to the center straight stitching position on stitch settings. 1. Installing the Straight Stitch Needle Plate automatically sets the needle position to your fabric consistently. Sew. Selecting a stitch designated for stitching heavy fabrics together. 1. Stitch...

Accessory Catalog
Page 11
... feed width. 1. It can be used with maximum stitch width. Attach the presser foot and pull cords under the presser foot, and select zigzag stitch with brother sewing machines of seams or pattern markings are desired. Line up the cords, and select zigzag stitch with maximum stitch width. Sew. Slip a cord from satin or decorative stitches. 2. Place cord under the presser foot. 3. SA110 ABCDEFJKMN SA148 GHILOP Cording Foot (5-hole) Used for embellishing 1 to 5 cords or decorative threads. Line up the cords, and select zigzag stitch with...
... feed width. 1. It can be used with maximum stitch width. Attach the presser foot and pull cords under the presser foot, and select zigzag stitch with brother sewing machines of seams or pattern markings are desired. Line up the cords, and select zigzag stitch with maximum stitch width. Sew. Slip a cord from satin or decorative stitches. 2. Place cord under the presser foot. 3. SA110 ABCDEFJKMN SA148 GHILOP Cording Foot (5-hole) Used for embellishing 1 to 5 cords or decorative threads. Line up the cords, and select zigzag stitch with...

Accessory Catalog
Page 12
... sew (cut the center of the presser foot on thin to medium weight fabrics. To attach the gathered edge to see which one works on your fabric. 3. Ideal for details.) Brother Embellishment Feet Open Toe Foot 22 Pearls and Sequins Foot Metal type SA146 IP Open Toe Foot Provides better visibility in place using . 3. Place threaded beads in groove of the foot with a single zigzag stitch. Making loops or fringes: 1. Select a straight stitch, left needle position...
... sew (cut the center of the presser foot on thin to medium weight fabrics. To attach the gathered edge to see which one works on your fabric. 3. Ideal for details.) Brother Embellishment Feet Open Toe Foot 22 Pearls and Sequins Foot Metal type SA146 IP Open Toe Foot Provides better visibility in place using . 3. Place threaded beads in groove of the foot with a single zigzag stitch. Making loops or fringes: 1. Select a straight stitch, left needle position...

Accessory Catalog
Page 13
... be adjusted. 1. A specially designed bobbin cover is moved forward, its teeth catch a fabric and force it forward into the slot, and stitch slowly. 3. Install and manually thread a twin needle. 2. Sew slowly for details.) Brother Embellishment Feet Pin Tuck Foot 24 Ruffler Foot Pin Tuck Foot This presser foot has 7 grooves and produces perfect pin tucks and corded pin tucks using a twin needle on the lower portion of tuck or gather by placing the completed row in the center position. 3. For...
... be adjusted. 1. A specially designed bobbin cover is moved forward, its teeth catch a fabric and force it forward into the slot, and stitch slowly. 3. Install and manually thread a twin needle. 2. Sew slowly for details.) Brother Embellishment Feet Pin Tuck Foot 24 Ruffler Foot Pin Tuck Foot This presser foot has 7 grooves and produces perfect pin tucks and corded pin tucks using a twin needle on the lower portion of tuck or gather by placing the completed row in the center position. 3. For...

Accessory Catalog
Page 15
... bobbin threads sew about four locking stitches and finish the thread ends. Lower the feed dogs. 2. Place the fabric beneath the presser foot. 4. Sew. Requires Low Shank Adapter for ULT series, PC-6500, PC-8200 and PC-8500 sewing machines. Brother Quilting Feet 27 Open Toe Quilting Foot Quilting Foot SA187 ABCDEFGHMNO SA129 ABCDEFGHMNO SA165 L Open Toe Quilting Foot The large opening on the Open Toe Quilting Foot, with both hands to hold fabric in place while stitches are free to guide the fabric. 4. When quilting is needed...
... bobbin threads sew about four locking stitches and finish the thread ends. Lower the feed dogs. 2. Place the fabric beneath the presser foot. 4. Sew. Requires Low Shank Adapter for ULT series, PC-6500, PC-8200 and PC-8500 sewing machines. Brother Quilting Feet 27 Open Toe Quilting Foot Quilting Foot SA187 ABCDEFGHMNO SA129 ABCDEFGHMNO SA165 L Open Toe Quilting Foot The large opening on the Open Toe Quilting Foot, with both hands to hold fabric in place while stitches are free to guide the fabric. 4. When quilting is needed...

Accessory Catalog
Page 17
... embroidery designs with the built-in software in your treasured collection of items. - Compatible with USB hub devices* to provide access to your machine with center needle position straight stitch Open toe quilting foot "O" for greater visibility Echo quilting foot "E" for all Duetta™ 4500D's and Innov-is 4000D sewing and embroidery machine. * Requires additional purchases. Drag and drop embroidery pattern positioning. - Duetta™ 4500D/Innov-is 4000D Premium Upgrade Package II Brother Embroidery Accessories...
... embroidery designs with the built-in software in your treasured collection of items. - Compatible with USB hub devices* to provide access to your machine with center needle position straight stitch Open toe quilting foot "O" for greater visibility Echo quilting foot "E" for all Duetta™ 4500D's and Innov-is 4000D sewing and embroidery machine. * Requires additional purchases. Drag and drop embroidery pattern positioning. - Duetta™ 4500D/Innov-is 4000D Premium Upgrade Package II Brother Embroidery Accessories...

Accessory Catalog
Page 33
....brother.com. The spool pins can be removed to 10 spools of spool sizes. Some hoops can easily be used thread colors. For all models: SA503 Free-Standing Ten Spool Thread Stand You can set up to accommodate a variety of thread on creating. Place your spool thread tails by placing them in place on our website for your machine. Brother Embroidery Accessories 63 Free-Standing Ten Spool Thread Stand Ten Spool Thread Stand Embroidery Machine Hoops Brother Embroidery Accessories 64 For all embroidery and sewing/embroidery machines...
....brother.com. The spool pins can be removed to 10 spools of spool sizes. Some hoops can easily be used thread colors. For all models: SA503 Free-Standing Ten Spool Thread Stand You can set up to accommodate a variety of thread on creating. Place your spool thread tails by placing them in place on our website for your machine. Brother Embroidery Accessories 63 Free-Standing Ten Spool Thread Stand Ten Spool Thread Stand Embroidery Machine Hoops Brother Embroidery Accessories 64 For all embroidery and sewing/embroidery machines...

Accessory Catalog
Page 34
...-yds) filament thread is 500D. Here is Project Book (See page 33 for Brother Embroidery machines, but compatible with a high nap such as preventing fabric slippage and puckering. Dependable thread delivery through machine tensions. Designed for high speed embroidery stitching, made in a 5-pack sleeve). 300 meters (328 yards) of fabrics with other sewing and embroidery machine brands. Bobbin Threads Stabilizers and Water Water Soluble Stabilizers Brother Embroidery Accessories 66 Bobbin Threads Brother Bobbin Threads are also available...
...-yds) filament thread is 500D. Here is Project Book (See page 33 for Brother Embroidery machines, but compatible with a high nap such as preventing fabric slippage and puckering. Dependable thread delivery through machine tensions. Designed for high speed embroidery stitching, made in a 5-pack sleeve). 300 meters (328 yards) of fabrics with other sewing and embroidery machine brands. Bobbin Threads Stabilizers and Water Water Soluble Stabilizers Brother Embroidery Accessories 66 Bobbin Threads Brother Bobbin Threads are also available...

Accessory Catalog
Page 40
... sew. Set up your machine for a cover stitch, with 3 or 6 mm (approx. 1/8 or 1/4 inch) wide cover stitch. 1. Set up your machine. 3. Brother Cover Stitch Feet 78 Top Stitching Foot Set Top Stitching Foot Set Use included presser foot to top stitch with 3 or 6 mm wide cover stitch. 3. Attaching 12 mm (approx. 1/2") bias tape: Use the large bias tape sliding plate with the LC1 presser foot (included with the LC2 presser foot. Open the seams. 4. Insert the tab on the bias tape attachment into the guide. 4. Align the fabric...
... sew. Set up your machine for a cover stitch, with 3 or 6 mm (approx. 1/8 or 1/4 inch) wide cover stitch. 1. Set up your machine. 3. Brother Cover Stitch Feet 78 Top Stitching Foot Set Top Stitching Foot Set Use included presser foot to top stitch with 3 or 6 mm wide cover stitch. 3. Attaching 12 mm (approx. 1/2") bias tape: Use the large bias tape sliding plate with the LC1 presser foot (included with the LC2 presser foot. Open the seams. 4. Insert the tab on the bias tape attachment into the guide. 4. Align the fabric...

Users Manual - English
Page 4
...the bobbin thread ...29 Replacing the Needle ...30 Needle precautions ...30 Needle types and their uses ...30 Checking the needle ...31 Replacing the needle ...32 Replacing the Presser Foot 33 Presser foot precautions ...33 Replacing the presser foot ...33 Adjusting the pressure of the presser foot ...34 Removing the presser foot holder ...35 Using the optional walking foot ...35 Sewing Cylindrical or Large Pieces 37 Stitching cylindrical pieces ...37 Sewing large pieces of fabric ...37 SEWING BASICS 39 Sewing ...40 General sewing procedure ...40 Positioning the fabric ...41 Starting to sew...
...the bobbin thread ...29 Replacing the Needle ...30 Needle precautions ...30 Needle types and their uses ...30 Checking the needle ...31 Replacing the needle ...32 Replacing the Presser Foot 33 Presser foot precautions ...33 Replacing the presser foot ...33 Adjusting the pressure of the presser foot ...34 Removing the presser foot holder ...35 Using the optional walking foot ...35 Sewing Cylindrical or Large Pieces 37 Stitching cylindrical pieces ...37 Sewing large pieces of fabric ...37 SEWING BASICS 39 Sewing ...40 General sewing procedure ...40 Positioning the fabric ...41 Starting to sew...

Users Manual - English
Page 5
...Thread Tension 46 Changing the tension of the upper thread ...46 Adjusting the Stitch Width and Length 47 Adjusting the stitch width ...47 Adjusting the stitch length ...48 Useful Functions ...49 Changing the needle stop position ...49 Automatically sewing reverse/reinforcement stitches 49 Changing the initial needle stop position ...50 Useful Sewing Tips ...51 Trial sewing ...51 Changing the sewing direction ...51 Sewing curves ...51 Sewing thick fabrics ...52 Sewing thin fabrics ...53 Sewing stretch fabrics ...53 Sewing an even seam allowance ...53 UTILITY STITCHES 55 Selecting Stitching...
...Thread Tension 46 Changing the tension of the upper thread ...46 Adjusting the Stitch Width and Length 47 Adjusting the stitch width ...47 Adjusting the stitch length ...48 Useful Functions ...49 Changing the needle stop position ...49 Automatically sewing reverse/reinforcement stitches 49 Changing the initial needle stop position ...50 Useful Sewing Tips ...51 Trial sewing ...51 Changing the sewing direction ...51 Sewing curves ...51 Sewing thick fabrics ...52 Sewing thin fabrics ...53 Sewing stretch fabrics ...53 Sewing an even seam allowance ...53 UTILITY STITCHES 55 Selecting Stitching...
Users Manual - English
Page 8
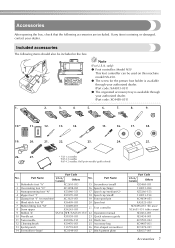
... 2 needles 90/14 2 needles: Ball point needle (gold colored) Part Code No. Accessories After opening the box, check that the following items should also be used on machine) XC3021-051 19 Extra spool pin 6 Blind stitch foot "R" X56409-051 20 Spool net 7 Button fitting foot "M" 8 Seam ripper 130489-001 X54243-051 21 Foot controller 9 Bobbin (4) SA156 SFB (XA5539-151) 22 Operation manual 10 Needle set X58358-051 23 Quick reference guide 11 Twin needle X59296-151 24 Hard case 12 Cleaning...
... 2 needles 90/14 2 needles: Ball point needle (gold colored) Part Code No. Accessories After opening the box, check that the following items should also be used on machine) XC3021-051 19 Extra spool pin 6 Blind stitch foot "R" X56409-051 20 Spool net 7 Button fitting foot "M" 8 Seam ripper 130489-001 X54243-051 21 Foot controller 9 Bobbin (4) SA156 SFB (XA5539-151) 22 Operation manual 10 Needle set X58358-051 23 Quick reference guide 11 Twin needle X59296-151 24 Hard case 12 Cleaning...
Users Manual - English
Page 11
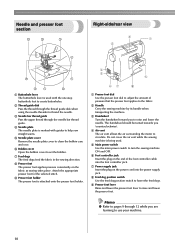
... used with guides to help sew straight seams. 5 Needle plate cover Remove the needle plate cover to clean the bobbin case and race. 6 Bobbin cover Open the bobbin cover to set the bobbin. 7 Feed dogs The feed dogs feed the fabric in the sewing direction. 8 Presser foot The presser foot applies pressure consistently on the power cord into the power supply jack. 8 Feed dog position switch Use the feed dog position switch to lower the feed dogs. 9 Presser foot lever Raise and lower the presser foot lever to raise and lower the presser foot. Do not cover the air vent while the sewing machine...
... used with guides to help sew straight seams. 5 Needle plate cover Remove the needle plate cover to clean the bobbin case and race. 6 Bobbin cover Open the bobbin cover to set the bobbin. 7 Feed dogs The feed dogs feed the fabric in the sewing direction. 8 Presser foot The presser foot applies pressure consistently on the power cord into the power supply jack. 8 Feed dog position switch Use the feed dog position switch to lower the feed dogs. 9 Presser foot lever Raise and lower the presser foot lever to raise and lower the presser foot. Do not cover the air vent while the sewing machine...

Users Manual - English
Page 21
... thread unwinds in the correct direction, otherwise the thread may break or the thread tension will be passed through the bobbin case is indicated by marks around the bobbin case. Actual size 11.5 mm (7/16 inch) This model Other model Memo ● The order that the bobbin thread should be incorrect. ● The bobbin was designed specifically for this sewing machine. Slide the bobbin cover latch to the right. 1 1 2 Remove the bobbin cover. 2 Hold the bobbin...
... thread unwinds in the correct direction, otherwise the thread may break or the thread tension will be passed through the bobbin case is indicated by marks around the bobbin case. Actual size 11.5 mm (7/16 inch) This model Other model Memo ● The order that the bobbin thread should be incorrect. ● The bobbin was designed specifically for this sewing machine. Slide the bobbin cover latch to the right. 1 1 2 Remove the bobbin cover. 2 Hold the bobbin...

Users Manual - English
Page 48
...; sliding the 2 slider down makes the stitch width narrower. 1 2 1 Stitch width adjustment slider 2 Stitch width adjustment button Adjusting the Stitch Width and Length 47 Adjusting the stitch width The stitch width (zigzag width) can be adjusted to be adjusted. CAUTION 1 1 Stitch width display key When the stitch width is being changed. • To automatically select the stitch width most appropriate for the straight stitch (left needle position) and the triple stretch stitch, the needle position can be checked while...
...; sliding the 2 slider down makes the stitch width narrower. 1 2 1 Stitch width adjustment slider 2 Stitch width adjustment button Adjusting the Stitch Width and Length 47 Adjusting the stitch width The stitch width (zigzag width) can be adjusted to be adjusted. CAUTION 1 1 Stitch width display key When the stitch width is being changed. • To automatically select the stitch width most appropriate for the straight stitch (left needle position) and the triple stretch stitch, the needle position can be checked while...
Users Manual - English
Page 71
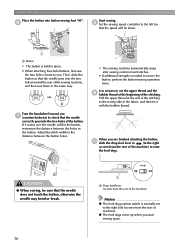
... the feed dogs. Use scissors to cut the upper thread and the 9 bobbin thread at the end of the stitching to the distance between the holes in place. • When attaching four-hole buttons, first sew the two holes closest to you 7 (counterclockwise) to secure the button, perform the button-sewing operation twice. When you start sewing again. 70 a 1 Drop feed lever (as seen from the rear of the machine) Memo ● The feed dog position switch...
... the feed dogs. Use scissors to cut the upper thread and the 9 bobbin thread at the end of the stitching to the distance between the holes in place. • When attaching four-hole buttons, first sew the two holes closest to you 7 (counterclockwise) to secure the button, perform the button-sewing operation twice. When you start sewing again. 70 a 1 Drop feed lever (as seen from the rear of the machine) Memo ● The feed dog position switch...
Users Manual - English
Page 103
... around the hole in the needle plate is not used is not Attach the presser foot that is appropriate for the type of stitch that are appropriate for this machine. Replace the presser foot. Replace the bobbin case. A bobbin designed specifically for the type of fabric being sewn. Symptom The sewing machine does not operate. Probable Cause Remedy The machine is connected. Do not use the "Start/Stop" button, disconnect the foot controller. The needle clamp screw is incorrectly installed. If the problem persists, contact...
... around the hole in the needle plate is not used is not Attach the presser foot that is appropriate for the type of stitch that are appropriate for this machine. Replace the presser foot. Replace the bobbin case. A bobbin designed specifically for the type of fabric being sewn. Symptom The sewing machine does not operate. Probable Cause Remedy The machine is connected. Do not use the "Start/Stop" button, disconnect the foot controller. The needle clamp screw is incorrectly installed. If the problem persists, contact...
Users Manual - English
Page 106
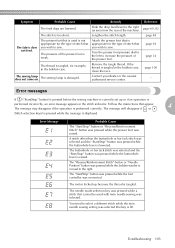
... "Reverse/Reinforcement Stitch" button or "Needle Position" button was selected (the key is moved to select a different stitch while the twin needle sewing setting was pressed while the bobbin winder is lit). The stitch is performed incorrectly, an error message appears in the stitch indicator. Remedy Slide the drop feed lever to sew. Remove the tangle thread. Contact your dealer or the nearest authorized service center. Error messages If ("Start/Stop" button) is pressed before the sewing machine...
... "Reverse/Reinforcement Stitch" button or "Needle Position" button was selected (the key is moved to select a different stitch while the twin needle sewing setting was pressed while the bobbin winder is lit). The stitch is performed incorrectly, an error message appears in the stitch indicator. Remedy Slide the drop feed lever to sew. Remove the tangle thread. Contact your dealer or the nearest authorized service center. Error messages If ("Start/Stop" button) is pressed before the sewing machine...
Users Manual - English
Page 108
... 78 bobbin winding thread guide and pretension disk .....9, 18 bobbin-winding 16 button fitting foot 7 button sewing 65, 69 L lower threading 20 buttonhole foot 7, 66 buttonhole lever 10, 67, 84 buttonhole stitching 65 M main power switch 10, 15 C maintenance 100 monogramming foot 7 care 100 changing sewing direction 51 cleaning 100 cleaning brush 7, 101 crazy quilt stitching 80 curves 51 cylindrical pieces 37 N needle 30 needle bar thread guide 10, 24 needle clamp screw 32 needle mode selection key (single/twin 12 needle plate 10, 53 D needle plate cover 10...
... 78 bobbin winding thread guide and pretension disk .....9, 18 bobbin-winding 16 button fitting foot 7 button sewing 65, 69 L lower threading 20 buttonhole foot 7, 66 buttonhole lever 10, 67, 84 buttonhole stitching 65 M main power switch 10, 15 C maintenance 100 monogramming foot 7 care 100 changing sewing direction 51 cleaning 100 cleaning brush 7, 101 crazy quilt stitching 80 curves 51 cylindrical pieces 37 N needle 30 needle bar thread guide 10, 24 needle clamp screw 32 needle mode selection key (single/twin 12 needle plate 10, 53 D needle plate cover 10...
Users Manual - English
Page 109
..., 83 replacing the needle 32 reverse/reinforcement stitch button 11 S scallop stitching 88 screwdriver 7, 32 seam ripper 7, 68 selecting stitching 56 sewing machine needles 30 sewing speed 42 sewing speed controller 9, 11 side cutter 8, 60 sleeves 83 smocking 88 spool cap 7, 17, 23 spool net 7 spool pin 9, 17, 23 start/stop button 11, 42 starting sewing 42 stitch guide foot 8 stitch indicator 12 stitch length 48 stitch length adjustment button 12 stitch length adjustment slider 12 stitch length display key 12 stitch number display key 12 stitch pattern plate 7 stitch...
..., 83 replacing the needle 32 reverse/reinforcement stitch button 11 S scallop stitching 88 screwdriver 7, 32 seam ripper 7, 68 selecting stitching 56 sewing machine needles 30 sewing speed 42 sewing speed controller 9, 11 side cutter 8, 60 sleeves 83 smocking 88 spool cap 7, 17, 23 spool net 7 spool pin 9, 17, 23 start/stop button 11, 42 starting sewing 42 stitch guide foot 8 stitch indicator 12 stitch length 48 stitch length adjustment button 12 stitch length adjustment slider 12 stitch length display key 12 stitch number display key 12 stitch pattern plate 7 stitch...


