
Accessory Catalog
Page 4
...-use sewing machines www.brother.com Use these utility presser feet and accessories to add a professional finish to your sewing projects. Its position can be adjusted exactly on the edge of zipper/piping, avoiding the non-flat parts of the presser foot and slide the presser foot so that the needle ...fits on the opening on the presser foot. 4. Sew. Brother General Sewing Accessories 05 Sew as you like. Requires Low Shank Adapter for ULT...
...-use sewing machines www.brother.com Use these utility presser feet and accessories to add a professional finish to your sewing projects. Its position can be adjusted exactly on the edge of zipper/piping, avoiding the non-flat parts of the presser foot and slide the presser foot so that the needle ...fits on the opening on the presser foot. 4. Sew. Brother General Sewing Accessories 05 Sew as you like. Requires Low Shank Adapter for ULT...

Accessory Catalog
Page 6
...is Project Book (See page 53 for details.) www.brother.com Select a desired stitch and sew. Overlock Foot For vertical bobbin machines only. Increase upper thread tension. 2. Hold the fabric from the back and front and roll it into the curled part of the foot. 5. Hold the fabric from the... Raise the needle and the presser foot. 4. Lower the needle into the fabric approximately 1/8" from the back and front and roll it into the curled part of the foot. 6. Continue to sew to protect edges from the edge and sew 2-3 stitches. 4. Place the fabric with fabrics such as leather, ...
...is Project Book (See page 53 for details.) www.brother.com Select a desired stitch and sew. Overlock Foot For vertical bobbin machines only. Increase upper thread tension. 2. Hold the fabric from the back and front and roll it into the curled part of the foot. 5. Hold the fabric from the... Raise the needle and the presser foot. 4. Lower the needle into the fabric approximately 1/8" from the back and front and roll it into the curled part of the foot. 6. Continue to sew to protect edges from the edge and sew 2-3 stitches. 4. Place the fabric with fabrics such as leather, ...
Users Manual - English
Page 3
...replacing or installing any adjustments in the needle area. • Do not use bent or damaged needles. • Keep fingers away from all moving parts. Benzene, thinner, and scouring powders can damage the case and machine, and should never be replaced by authorized dealer. • In the event ...incorrect needle plate, as contained in the back of this manual. Save these instructions. For additional product information, visit our web site at www.brother.com 2 Special care is required around the machine needle. • Switch the sewing machine to the symbol "O" position to turn it off ...
...replacing or installing any adjustments in the needle area. • Do not use bent or damaged needles. • Keep fingers away from all moving parts. Benzene, thinner, and scouring powders can damage the case and machine, and should never be replaced by authorized dealer. • In the event ...incorrect needle plate, as contained in the back of this manual. Save these instructions. For additional product information, visit our web site at www.brother.com 2 Special care is required around the machine needle. • Switch the sewing machine to the symbol "O" position to turn it off ...

Users Manual - English
Page 4
Contents Important Safety Instructions 1 Contents ...3 Introduction ...6 Sewing Machine Features ...6 Accessories ...7 Included accessories ...7 Optional accessories ...8 Names of Machine Parts and Their Functions 9 Front view ...9 Needle and presser foot section ...10 Right-side/rear view ...10 Operation buttons ...11 Operation panel ...12 GETTING READY 13 ...
Contents Important Safety Instructions 1 Contents ...3 Introduction ...6 Sewing Machine Features ...6 Accessories ...7 Included accessories ...7 Optional accessories ...8 Names of Machine Parts and Their Functions 9 Front view ...9 Needle and presser foot section ...10 Right-side/rear view ...10 Operation buttons ...11 Operation panel ...12 GETTING READY 13 ...
Users Manual - English
Page 8
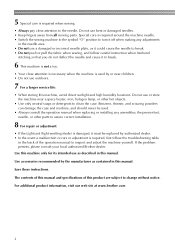
... are included. Part Name 1 Buttonhole foot "A" XC2691-053 15 Screwdriver (small) 2 Overcasting foot "G" XC3098-051 16 Spool cap (large) 3 Monogramming foot "N" X53840-351 17 Spool cap (medium)(2) 4 Zipper foot "I" X59370-051 18 Spool cap (small) 5 Zigzag foot "J" (on this machine model NX-250. ● ... 25 Accessory bag 13 Eyelet punch 135793-001 26 Disc-shaped screwdriver 14 Screwdriver (large) XC8349-051 27 Stitch pattern plate Part Code U.S.A./ Canada Others X55468-051 130012-054 X55260-153 130013-154 XC4654-051 XA5523-050 XD0496-051 (EU area) XC6651-...
... are included. Part Name 1 Buttonhole foot "A" XC2691-053 15 Screwdriver (small) 2 Overcasting foot "G" XC3098-051 16 Spool cap (large) 3 Monogramming foot "N" X53840-351 17 Spool cap (medium)(2) 4 Zipper foot "I" X59370-051 18 Spool cap (small) 5 Zigzag foot "J" (on this machine model NX-250. ● ... 25 Accessory bag 13 Eyelet punch 135793-001 26 Disc-shaped screwdriver 14 Screwdriver (large) XC8349-051 27 Stitch pattern plate Part Code U.S.A./ Canada Others X55468-051 130012-054 X55260-153 130013-154 XC4654-051 XA5523-050 XD0496-051 (EU area) XC6651-...
Users Manual - English
Page 9
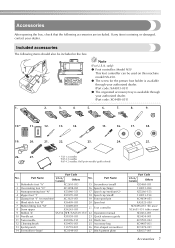
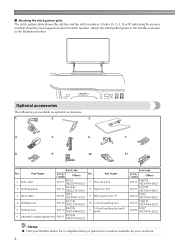
... foot 11 1/4 inch quilting foot with guide Part Code U.S.A./ Canada Others SA114 F007N (XC1949-002) SA147 F027N (XC1964-002) SA160 F035 (XC1969-002) SA125 F001N (XC1944-052) SA185 F057 (XC7416-252) Memo ● Visit your Brother dealer for a complete listing of optional accessories... available for your machine. 8 Part Code No. Optional accessories The following are available as shown in the illustration below the stitch ...
... foot 11 1/4 inch quilting foot with guide Part Code U.S.A./ Canada Others SA114 F007N (XC1949-002) SA147 F027N (XC1964-002) SA160 F035 (XC1969-002) SA125 F001N (XC1944-052) SA185 F057 (XC7416-252) Memo ● Visit your Brother dealer for a complete listing of optional accessories... available for your machine. 8 Part Code No. Optional accessories The following are available as shown in the illustration below the stitch ...
Users Manual - English
Page 10
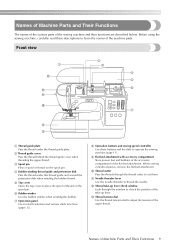
B Thread take -up lever check window Look through the thread cutter to learn the names of the machine parts. Front view 1 C B A 0 2 3 4 5 6 7 9 8 1 Thread guide plate Pass the thread under the thread guide plate. 2 Thread guide cover Pass the thread behind the thread guide cover when ... threader to adjust the tension of the flat bed attachment. C Thread tension dial Use the thread tension dial to thread the needle. Names of Machine Parts and Their Functions The names of the various...
B Thread take -up lever check window Look through the thread cutter to learn the names of the machine parts. Front view 1 C B A 0 2 3 4 5 6 7 9 8 1 Thread guide plate Pass the thread under the thread guide plate. 2 Thread guide cover Pass the thread behind the thread guide cover when ... threader to adjust the tension of the flat bed attachment. C Thread tension dial Use the thread tension dial to thread the needle. Names of Machine Parts and Their Functions The names of the various...
Users Manual - English
Page 12
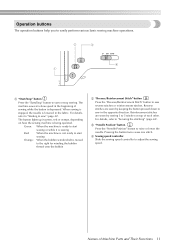
... start sewing Orange: When the bobbin winder shaft is lowered in the opposite direction. The machine sews at a slow speed at the beginning of Machine Parts and Their Functions 11
... start sewing Orange: When the bobbin winder shaft is lowered in the opposite direction. The machine sews at a slow speed at the beginning of Machine Parts and Their Functions 11
Users Manual - English
Page 17
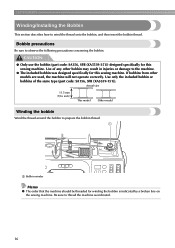
... for this sewing machine. Be sure to the machine. ● The included bobbin was designed specifically for this sewing machine. Use of the same type (part code: SA156, SFB (XA5539-151)). If bobbins from other bobbin may result in injuries or damage to thread the machine as indicated. 16 CAUTION ●...
... for this sewing machine. Be sure to the machine. ● The included bobbin was designed specifically for this sewing machine. Use of the same type (part code: SA156, SFB (XA5539-151)). If bobbins from other bobbin may result in injuries or damage to thread the machine as indicated. 16 CAUTION ●...

Users Manual - English
Page 21
... the machine as indicated. GETTING READY Installing the bobbin Install the bobbin wound with your right hand and 3 hold the end of the same type (part code: SA156, SFB (XA5539151)). Memo ● The order that the bobbin thread should be incorrect. ● The bobbin was designed specifically for this sewing machine...
... the machine as indicated. GETTING READY Installing the bobbin Install the bobbin wound with your right hand and 3 hold the end of the same type (part code: SA156, SFB (XA5539151)). Memo ● The order that the bobbin thread should be incorrect. ● The bobbin was designed specifically for this sewing machine...

Users Manual - English
Page 28
... pin so that it with the twin needle, the sewing machine may bend the needle or damage the machine. ● Never use the twin needle (part code: X59296-151). Pass the thread through a of any other needle may be damaged. 1 Thread guide cover • For details, refer to use the twin...
... pin so that it with the twin needle, the sewing machine may bend the needle or damage the machine. ● Never use the twin needle (part code: X59296-151). Pass the thread through a of any other needle may be damaged. 1 Thread guide cover • For details, refer to use the twin...
Users Manual - English
Page 33
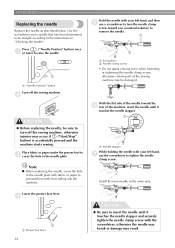
... Turn off the sewing machine. 2 1 Screwdriver 2 Needle clamp screw • Do not apply a strong force when loosening or tightening the needle clamp screw, otherwise certain parts of the needle toward you (counterclockwise) to remove the needle. 1 Press ("Needle Position" button) once 1 or twice to turn off the sewing machine, otherwise injuries...
... Turn off the sewing machine. 2 1 Screwdriver 2 Needle clamp screw • Do not apply a strong force when loosening or tightening the needle clamp screw, otherwise certain parts of the needle toward you (counterclockwise) to remove the needle. 1 Press ("Needle Position" button) once 1 or twice to turn off the sewing machine, otherwise injuries...
Users Manual - English
Page 38
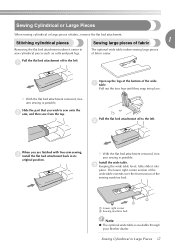
... or Large Pieces When sewing cylindrical or large pieces of fabric easier. X With the flat bed attachment removed, freearm sewing is available through your Brother dealer. Pull the flat bed attachment off to the left . 1 Open up the legs at the bottom of the wide 1 table. Pull ... cylindrical pieces 1 Sewing large pieces of the sewing machine bed. X With the flat bed attachment removed, freearm sewing is possible. Slide the part that you are finished with free-arm sewing, 3 install the flat bed attachment back in its original position. The optional wide table makes sewing...
... or Large Pieces When sewing cylindrical or large pieces of fabric easier. X With the flat bed attachment removed, freearm sewing is available through your Brother dealer. Pull the flat bed attachment off to the left . 1 Open up the legs at the bottom of the wide 1 table. Pull ... cylindrical pieces 1 Sewing large pieces of the sewing machine bed. X With the flat bed attachment removed, freearm sewing is possible. Slide the part that you are finished with free-arm sewing, 3 install the flat bed attachment back in its original position. The optional wide table makes sewing...

Users Manual - English
Page 41
..., refer to "Turning on cutting the thread, refer to sew" (page 42). ↓ 6 Cut the thread. In addition, keep your hands away from all moving parts such as the needle and handwheel, otherwise injuries may occur. ● Do not pull or push the fabric too hard while sewing, otherwise injuries may...
..., refer to "Turning on cutting the thread, refer to sew" (page 42). ↓ 6 Cut the thread. In addition, keep your hands away from all moving parts such as the needle and handwheel, otherwise injuries may occur. ● Do not pull or push the fabric too hard while sewing, otherwise injuries may...
Users Manual - English
Page 67
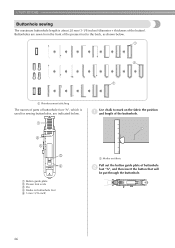
... plate of the button). Buttonholes are sewn from the front of the presser foot to the back, as shown below. 1 1 1 1 Reinforcement stitching The names of parts of buttonhole foot "A", which is about 28 mm (1-1/8 inches) (diameter + thickness of buttonhole 2 foot "A", and then insert the button that will be put through the...
... plate of the button). Buttonholes are sewn from the front of the presser foot to the back, as shown below. 1 1 1 1 Reinforcement stitching The names of parts of buttonhole foot "A", which is about 28 mm (1-1/8 inches) (diameter + thickness of buttonhole 2 foot "A", and then insert the button that will be put through the...
Users Manual - English
Page 70
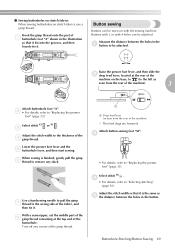
... 6 thread to remove any excess of the machine on stretch fabrics, use a gimp thread. Hook the gimp thread onto the part of the buttonhole. With a seam ripper, cut the middle part of the 8 gimp thread remaining at the rear of the gimp thread. Raise the presser foot lever, and then slide the...
... 6 thread to remove any excess of the machine on stretch fabrics, use a gimp thread. Hook the gimp thread onto the part of the buttonhole. With a seam ripper, cut the middle part of the 8 gimp thread remaining at the rear of the gimp thread. Raise the presser foot lever, and then slide the...

Users Manual - English
Page 102
For a new bobbin case (part code: XC3153-151), contact your nearest authorized service center. ● Be sure that the bobbin case is scratched, otherwise the upper thread may become tangled, ...
For a new bobbin case (part code: XC3153-151), contact your nearest authorized service center. ● Be sure that the bobbin case is scratched, otherwise the upper thread may become tangled, ...

