
Accessory Catalog
Page 13
..., and stitch slowly. 3. The intervals of stitching and use that to guide your first row of tucks can be adjusted. 1. www.brother.com Install and manually thread a twin needle. 2. Move fabric about 1" (2.5 cm) past the needle to slide the fabric from left into gathers or tucks...center position. 3. Use a stiff card to get started. A specially designed bobbin cover is also included with evenly spaced tucks and gathers. Brother Embellishment Feet 23 Bed Runner & Pillowcase Innov-is Project Book (See pages 16 and 17 for most consistent results. SA143 AFJKM Ruffler Foot...
..., and stitch slowly. 3. The intervals of stitching and use that to guide your first row of tucks can be adjusted. 1. www.brother.com Install and manually thread a twin needle. 2. Move fabric about 1" (2.5 cm) past the needle to slide the fabric from left into gathers or tucks...center position. 3. Use a stiff card to get started. A specially designed bobbin cover is also included with evenly spaced tucks and gathers. Brother Embellishment Feet 23 Bed Runner & Pillowcase Innov-is Project Book (See pages 16 and 17 for most consistent results. SA143 AFJKM Ruffler Foot...

Accessory Catalog
Page 34
...): The 1,000-meter (approx. 1,100-yds) spun thread is Project Book (See page 33 for details.) www.brother.com Consult your instruction manual for advice on your sewing counter or can illustrate more of fabrics with other sewing and embroidery machine brands. SA520 Water... MT996, MT997, MT998 & MT999 14-Pack: MTPK14 Metallic Threads 14 different metallic colors, 100% polyester thread developed and made for Brother Embroidery machines, but compatible with other sewing and embroidery machine brands. Dependable thread delivery through machine tensions. Designed for high speed embroidery ...
...): The 1,000-meter (approx. 1,100-yds) spun thread is Project Book (See page 33 for details.) www.brother.com Consult your instruction manual for advice on your sewing counter or can illustrate more of fabrics with other sewing and embroidery machine brands. SA520 Water... MT996, MT997, MT998 & MT999 14-Pack: MTPK14 Metallic Threads 14 different metallic colors, 100% polyester thread developed and made for Brother Embroidery machines, but compatible with other sewing and embroidery machine brands. Dependable thread delivery through machine tensions. Designed for high speed embroidery ...
Users Manual - English
Page 1
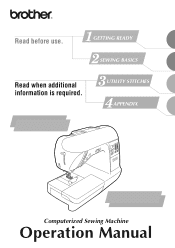
GETTING READY SEWING BASICS Read when additional information is required. UTILITY STITCHES APPENDIX Computerized Sewing Machine Operation Manual Read before use.
GETTING READY SEWING BASICS Read when additional information is required. UTILITY STITCHES APPENDIX Computerized Sewing Machine Operation Manual Read before use.
Users Manual - English
Page 2
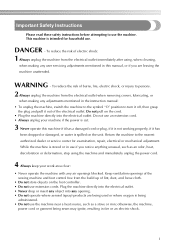
...when making any adjustments mentioned in use . otherwise, the machine, power cord or garment being used or where oxygen is stored or in the instruction manual: • To unplug the machine, switch the machine to the symbol "O" position to turn it off, then grasp the plug and pull it...outlet immediately after using the machine and immediately unplug the power cord. 4 Always keep your machine if the power is cut. 3 Never operate this manual, or if you are leaving the machine unattended. Do not use the machine. This machine is spilled on the unit. DANGER - Important Safety ...
...when making any adjustments mentioned in use . otherwise, the machine, power cord or garment being used or where oxygen is stored or in the instruction manual: • To unplug the machine, switch the machine to the symbol "O" position to turn it off, then grasp the plug and pull it...outlet immediately after using the machine and immediately unplug the power cord. 4 Always keep your machine if the power is cut. 3 Never operate this manual, or if you are leaving the machine unattended. Do not use the machine. This machine is spilled on the unit. DANGER - Important Safety ...
Users Manual - English
Page 3
... soaps or detergents to clean the case. If the problem persists, please consult your local authorized Brother dealer. The contents of this manual and specifications of the operation manual to inspect and adjust the machine yourself. For additional product information, visit our web site at www....brother.com 2 5 Special care is required when sewing: • Always pay close attention is necessary when the machine is used . • Always consult the operation manual when replacing or installing any adjustments in the needle area...
... soaps or detergents to clean the case. If the problem persists, please consult your local authorized Brother dealer. The contents of this manual and specifications of the operation manual to inspect and adjust the machine yourself. For additional product information, visit our web site at www....brother.com 2 5 Special care is required when sewing: • Always pay close attention is necessary when the machine is used . • Always consult the operation manual when replacing or installing any adjustments in the needle area...

Users Manual - English
Page 4
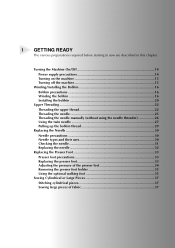
... precautions ...16 Winding the bobbin ...16 Installing the bobbin ...20 Upper Threading ...22 Threading the upper thread ...22 Threading the needle ...25 Threading the needle manually (without using the needle threader 26 Using the twin needle ...27 Pulling up the bobbin thread ...29 Replacing the Needle ...30 Needle precautions ...30 Needle...
... precautions ...16 Winding the bobbin ...16 Installing the bobbin ...20 Upper Threading ...22 Threading the upper thread ...22 Threading the needle ...25 Threading the needle manually (without using the needle threader 26 Using the twin needle ...27 Pulling up the bobbin thread ...29 Replacing the Needle ...30 Needle precautions ...30 Needle...
Users Manual - English
Page 7
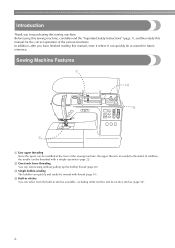
Before using this sewing machine, carefully read the "Important Safety Instructions" (page 1), and then study this manual for the correct operation of the sewing machine, the upper thread can easily be wound with thread (page 16). 4 Built-in stitches You can select ... pulling up the bobbin thread (page 20). 3 Simple bobbin-winding The bobbin can quickly and easily be threaded. Introduction Thank you have finished reading this manual, store it where it can quickly be accessed for future reference.
Before using this sewing machine, carefully read the "Important Safety Instructions" (page 1), and then study this manual for the correct operation of the sewing machine, the upper thread can easily be wound with thread (page 16). 4 Built-in stitches You can select ... pulling up the bobbin thread (page 20). 3 Simple bobbin-winding The bobbin can quickly and easily be threaded. Introduction Thank you have finished reading this manual, store it where it can quickly be accessed for future reference.
Users Manual - English
Page 8
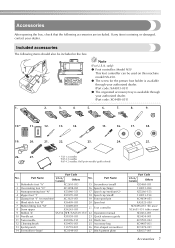
... foot "N" X53840-351 17 Spool cap (medium)(2) 4 Zipper foot "I" X59370-051 18 Spool cap (small) 5 Zigzag foot "J" (on this machine model NX-250. ● The screw for the presser foot holder is available through your authorized dealer. (Part code: XA4813-051) ● The organized accessory tray is ...net 7 Button fitting foot "M" 8 Seam ripper 130489-001 X54243-051 21 Foot controller 9 Bobbin (4) SA156 SFB (XA5539-151) 22 Operation manual 10 Needle set X58358-051 23 Quick reference guide 11 Twin needle X59296-151 24 Hard case 12 Cleaning brush X59476-051 25 Accessory bag...
... foot "N" X53840-351 17 Spool cap (medium)(2) 4 Zipper foot "I" X59370-051 18 Spool cap (small) 5 Zigzag foot "J" (on this machine model NX-250. ● The screw for the presser foot holder is available through your authorized dealer. (Part code: XA4813-051) ● The organized accessory tray is ...net 7 Button fitting foot "M" 8 Seam ripper 130489-001 X54243-051 21 Foot controller 9 Bobbin (4) SA156 SFB (XA5539-151) 22 Operation manual 10 Needle set X58358-051 23 Quick reference guide 11 Twin needle X59296-151 24 Hard case 12 Cleaning brush X59476-051 25 Accessory bag...
Users Manual - English
Page 14
... precautions 16 Winding the bobbin 16 Installing the bobbin 20 Upper Threading ...22 Threading the upper thread 22 Threading the needle 25 Threading the needle manually (without using the needle threader 26 Using the twin needle 27 Pulling up the bobbin thread 29 Replacing the Needle 30 Needle precautions 30 Needle...
... precautions 16 Winding the bobbin 16 Installing the bobbin 20 Upper Threading ...22 Threading the upper thread 22 Threading the needle 25 Threading the needle manually (without using the needle threader 26 Using the twin needle 27 Pulling up the bobbin thread 29 Replacing the Needle 30 Needle precautions 30 Needle...
Users Manual - English
Page 26
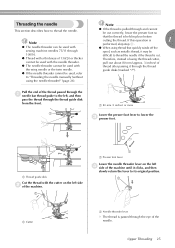
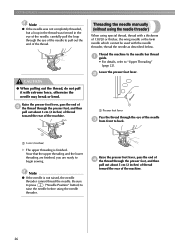
... the 1 needle bar thread guide to the left 4 side of the machine until it clicks, and then slowly return the lever to "Threading the needle manually (without using the thread cutter, pull out about 80 mm (approx. 3 inches) of the needle. Pull the end of the thread passed through the eye...
... the 1 needle bar thread guide to the left 4 side of the machine until it clicks, and then slowly return the lever to "Threading the needle manually (without using the thread cutter, pull out about 80 mm (approx. 3 inches) of the needle. Pull the end of the thread passed through the eye...
Users Manual - English
Page 27
... of 4 the thread through the presser foot, and then pull out about 5 cm (2 inches) of thread toward the rear of the machine. Threading the needle manually (without using the needle threader) When using the needle threader. CAUTION ● When pulling out the thread, do not pull it with the needle threader...
... of 4 the thread through the presser foot, and then pull out about 5 cm (2 inches) of thread toward the rear of the machine. Threading the needle manually (without using the needle threader) When using the needle threader. CAUTION ● When pulling out the thread, do not pull it with the needle threader...

Users Manual - English
Page 28
... use bent needles. Install the twin needle. 1 • For details on installing a needle, refer to the bobbin winder shaft. 1 1 spool pin and the spool cap. Manually thread the left needle 2 eye. • For details, refer to steps 1 through a of "Threading the upper thread" (page 22). Be sure to use the twin...
... use bent needles. Install the twin needle. 1 • For details on installing a needle, refer to the bobbin winder shaft. 1 1 spool pin and the spool cap. Manually thread the left needle 2 eye. • For details, refer to steps 1 through a of "Threading the upper thread" (page 22). Be sure to use the twin...
Users Manual - English
Page 29
... READY Without passing the thread through the eye of stitching are sewn parallel to each other. Pass the thread through the 8 needle bar thread guide, manually thread the right needle. X Two lines of the needle from the fabric, and then raise the presser foot lever and turn the handwheel toward you...
... READY Without passing the thread through the eye of stitching are sewn parallel to each other. Pass the thread through the 8 needle bar thread guide, manually thread the right needle. X Two lines of the needle from the fabric, and then raise the presser foot lever and turn the handwheel toward you...
Users Manual - English
Page 59
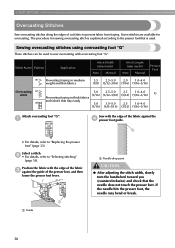
... the fabric with overcasting foot "G". Stitch Name Pattern Application 06 Preventing fraying in medium weight and thin fabrics Stitch Width [mm (inch)] Auto Manual Stitch Length [mm (inch)] Auto Manual Presser Foot 3.5 2.5-5.0 2.0 1.0-4.0 (1/8) (3/32-3/16) (1/16) (1/16-3/16) Overcasting 07 stitch 08 5.0 2.5-5.0 2.5 1.0-4.0 (3/16) (3/32-3/16) (3/32) (1/16-3/16) G Preventing fraying in thick fabrics...
... the fabric with overcasting foot "G". Stitch Name Pattern Application 06 Preventing fraying in medium weight and thin fabrics Stitch Width [mm (inch)] Auto Manual Stitch Length [mm (inch)] Auto Manual Presser Foot 3.5 2.5-5.0 2.0 1.0-4.0 (1/8) (3/32-3/16) (1/16) (1/16-3/16) Overcasting 07 stitch 08 5.0 2.5-5.0 2.5 1.0-4.0 (3/16) (3/32-3/16) (3/32) (1/16-3/16) G Preventing fraying in thick fabrics...
Users Manual - English
Page 60
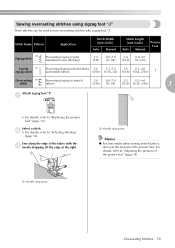
... the fabric with zigzag foot "J". Stitch Name Pattern Application 04 Zigzag stitch Preventing fraying (center baseline/reverse stitching) Stitch Width [mm (inch)] Auto Manual 3.5 0.0-7.0 (1/8) (0-1/4) Stitch Length [mm (inch)] Auto Manual Presser Foot 1.4 0.0-4.0 (1/16) (0-3/16) 3-point 05 zigzag stitch Preventing fraying in thick fabrics 5.0 1.5-7.0 1.0 0.2-4.0 and stretch fabrics (3/16) (1/16-1/4) (1/16) (1/64-3/16) J Overcasting...
... the fabric with zigzag foot "J". Stitch Name Pattern Application 04 Zigzag stitch Preventing fraying (center baseline/reverse stitching) Stitch Width [mm (inch)] Auto Manual 3.5 0.0-7.0 (1/8) (0-1/4) Stitch Length [mm (inch)] Auto Manual Presser Foot 1.4 0.0-4.0 (1/16) (0-3/16) 3-point 05 zigzag stitch Preventing fraying in thick fabrics 5.0 1.5-7.0 1.0 0.2-4.0 and stretch fabrics (3/16) (1/16-1/4) (1/16) (1/64-3/16) J Overcasting...
Users Manual - English
Page 61
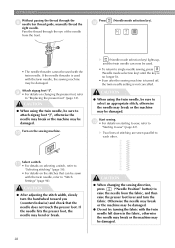
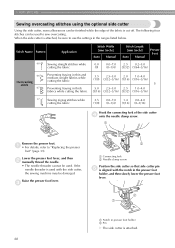
...For details, refer to use the settings in the ranges listed below. Stitch Name Pattern Application Stitch Width [mm (inch)] Auto Manual Stitch Length [mm (inch)] Auto Manual Presser Foot 00 Sewing straight stitches while 0.0 0.0-7.0 2.5 0.2-5.0 cutting the fabric (0) (0-1/4) (3/32) (1/64-3/16) 06 Overcasting stitch...side cutter is aligned with the side cutter, the sewing machine may be damaged. Lower the presser foot lever, and then 2 manually thread the needle. • The needle threader cannot be used to sew overcasting. The following four stitches can be finished while...
...For details, refer to use the settings in the ranges listed below. Stitch Name Pattern Application Stitch Width [mm (inch)] Auto Manual Stitch Length [mm (inch)] Auto Manual Presser Foot 00 Sewing straight stitches while 0.0 0.0-7.0 2.5 0.2-5.0 cutting the fabric (0) (0-1/4) (3/32) (1/64-3/16) 06 Overcasting stitch...side cutter is aligned with the side cutter, the sewing machine may be damaged. Lower the presser foot lever, and then 2 manually thread the needle. • The needle threader cannot be used to sew overcasting. The following four stitches can be finished while...
Users Manual - English
Page 63
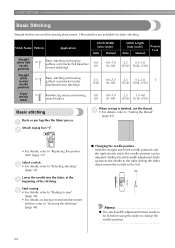
...gathers or pintucks (center baseline/reverse stitching) 3.5 0.0-7.0 (1/8) (0-1/4) Triple 02 stretch stitch Reinforcing seams and sewing stretch fabrics 0.0 0.0-7.0 (0) (0-1/4) Stitch Length [mm (inch)] Auto Manual Presser Foot 2.5 0.2-5.0 (3/32) (1/64-3/16) 2.5 0.2-5.0 J (3/32) (1/64-3/16) 2.5 1.5-4.0 (3/32) (1/16-3/16) Basic stitching Baste or pin together the fabric pieces...available for basic stitching. Stitch Name Pattern Application Stitch Width [mm (inch)] Auto Manual Straight stitch (left 00 needle position) Basic stitching and sewing gathers or pintucks (left .
...gathers or pintucks (center baseline/reverse stitching) 3.5 0.0-7.0 (1/8) (0-1/4) Triple 02 stretch stitch Reinforcing seams and sewing stretch fabrics 0.0 0.0-7.0 (0) (0-1/4) Stitch Length [mm (inch)] Auto Manual Presser Foot 2.5 0.2-5.0 (3/32) (1/64-3/16) 2.5 0.2-5.0 J (3/32) (1/64-3/16) 2.5 1.5-4.0 (3/32) (1/16-3/16) Basic stitching Baste or pin together the fabric pieces...available for basic stitching. Stitch Name Pattern Application Stitch Width [mm (inch)] Auto Manual Straight stitch (left 00 needle position) Basic stitching and sewing gathers or pintucks (left .
Users Manual - English
Page 64
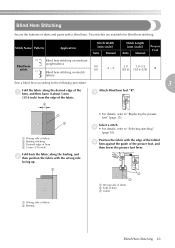
.... 3 1 2 1 Wrong side of fabric 2 Fold of hem 3 Guide 1 Wrong side of the fabric. Stitch Name Pattern Application Stitch Width [mm (inch)] Auto Manual Stitch Length [mm (inch)] Auto Manual Presser Foot 10 Blind hem stitch 11 Blind hem stitching on medium weight fabrics 00 (0) Blind hem stitching on stretch fabrics -3 - 3- 2.0 1.0-3.5 (1/16) (1/16...
.... 3 1 2 1 Wrong side of fabric 2 Fold of hem 3 Guide 1 Wrong side of the fabric. Stitch Name Pattern Application Stitch Width [mm (inch)] Auto Manual Stitch Length [mm (inch)] Auto Manual Presser Foot 10 Blind hem stitch 11 Blind hem stitching on medium weight fabrics 00 (0) Blind hem stitching on stretch fabrics -3 - 3- 2.0 1.0-3.5 (1/16) (1/16...

Users Manual - English
Page 66
M Buttonhole Stitching/Button Sewing 65 Stitch Name Pattern Application Stitch Width [mm (inch)] Auto Manual Stitch Length [mm (inch)] Auto Manual Presser Foot 40 Horizontal buttonholes on thin 5.0 3.0-5.0 0.4 0.2-1.0 and medium weight fabrics (3/16) (1/8-3/16) (1/64) (1/64-1/16) 41 Buttonholes with bar tacks on buttons. Seven stitches ...
M Buttonhole Stitching/Button Sewing 65 Stitch Name Pattern Application Stitch Width [mm (inch)] Auto Manual Stitch Length [mm (inch)] Auto Manual Presser Foot 40 Horizontal buttonholes on thin 5.0 3.0-5.0 0.4 0.2-1.0 and medium weight fabrics (3/16) (1/8-3/16) (1/64) (1/64-1/16) 41 Buttonholes with bar tacks on buttons. Seven stitches ...
Users Manual - English
Page 73
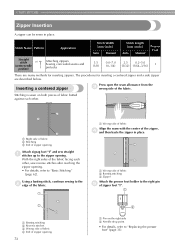
... procedures for inserting a centered zipper and a side zipper are many methods for inserting zippers. Stitch Name Pattern Application Stitch Width [mm (inch)] Auto Manual Stitch Length [mm (inch)] Auto Manual Presser Foot Straight stitch 01 (center needle position) Attaching zippers Sewing concealed seams and pintucks 3.5 (1/8) 0.0-7.0 2.5 0.2-5.0 (0-1/4) (3/32) (1/64-3/16) I 2 1 Pin on both pieces...
... procedures for inserting a centered zipper and a side zipper are many methods for inserting zippers. Stitch Name Pattern Application Stitch Width [mm (inch)] Auto Manual Stitch Length [mm (inch)] Auto Manual Presser Foot Straight stitch 01 (center needle position) Attaching zippers Sewing concealed seams and pintucks 3.5 (1/8) 0.0-7.0 2.5 0.2-5.0 (0-1/4) (3/32) (1/64-3/16) I 2 1 Pin on both pieces...


