
Accessory Catalog
Page 4
...8200 and PC-8500 sewing machines. Sew. Its position can be adjusted exactly on the edge of zipper/piping, avoiding the non-flat parts of the presser foot and slide the presser foot so that the needle fits on the opening on the presser foot and select a straight... the back of zipper/piping, and presses the fabric with a screwdriver. 5. SA161 All Brother home-use sewing machines www.brother.com Screw on the presser foot. 4. Brother General Sewing Accessories 05 Sew as you like. Use these utility presser feet and accessories to add a professional finish to your sewing projects. Adjustable...
...8200 and PC-8500 sewing machines. Sew. Its position can be adjusted exactly on the edge of zipper/piping, avoiding the non-flat parts of the presser foot and slide the presser foot so that the needle fits on the opening on the presser foot and select a straight... the back of zipper/piping, and presses the fabric with a screwdriver. 5. SA161 All Brother home-use sewing machines www.brother.com Screw on the presser foot. 4. Brother General Sewing Accessories 05 Sew as you like. Use these utility presser feet and accessories to add a professional finish to your sewing projects. Adjustable...
Users Manual - English
Page 3
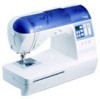
...careful instruction when freehand stitching so that you do not deflect the needle and cause it must be used by or near a space heater, iron, halogen lamp, or other parts to the needle. The contents of this manual and specifications of the operation manual to clean the ...case. Use this machine only for its intended use or store the machine near children. • Do not use bent or damaged needles. • Keep fingers away from all moving parts. If the problem persists, please consult your local authorized Brother dealer. Benzene, thinner, and ...
...careful instruction when freehand stitching so that you do not deflect the needle and cause it must be used by or near a space heater, iron, halogen lamp, or other parts to the needle. The contents of this manual and specifications of the operation manual to clean the ...case. Use this machine only for its intended use or store the machine near children. • Do not use bent or damaged needles. • Keep fingers away from all moving parts. If the problem persists, please consult your local authorized Brother dealer. Benzene, thinner, and ...

Users Manual - English
Page 4
...Important Safety Instructions 1 Contents ...3 Introduction ...6 Sewing Machine Features ...6 Accessories ...7 Included accessories ...7 Optional accessories ...8 Names of Machine Parts and Their Functions 9 Front view ...9 Needle and presser foot section ...10 Right-side/rear view ...10 Operation buttons ...11...precautions ...33 Replacing the presser foot ...33 Adjusting the pressure of the presser foot ...34 Removing the presser foot holder ...35 Using the optional walking foot ...35 Sewing Cylindrical or Large Pieces 37 Stitching cylindrical pieces ...37 Sewing large pieces of fabric ...37 ...
...Important Safety Instructions 1 Contents ...3 Introduction ...6 Sewing Machine Features ...6 Accessories ...7 Included accessories ...7 Optional accessories ...8 Names of Machine Parts and Their Functions 9 Front view ...9 Needle and presser foot section ...10 Right-side/rear view ...10 Operation buttons ...11...precautions ...33 Replacing the presser foot ...33 Adjusting the pressure of the presser foot ...34 Removing the presser foot holder ...35 Using the optional walking foot ...35 Sewing Cylindrical or Large Pieces 37 Stitching cylindrical pieces ...37 Sewing large pieces of fabric ...37 ...
Users Manual - English
Page 8
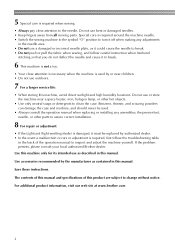
... accessories The following accessories are included. Note (For U.S.A. Accessories After opening the box, check that the following items should also be used on machine) XC3021-051 19 Extra spool pin 6 Blind stitch foot "R" X56409-051 20 Spool net 7 Button fitting foot "M"... 4 Zipper foot "I" X59370-051 18 Spool cap (small) 5 Zigzag foot "J" (on this machine model NX-250. ● The screw for the presser foot holder is available through your authorized dealer. (Part code: XA4813-051) ● The organized accessory tray is missing or damaged, contact your authorized dealer...
... accessories The following accessories are included. Note (For U.S.A. Accessories After opening the box, check that the following items should also be used on machine) XC3021-051 19 Extra spool pin 6 Blind stitch foot "R" X56409-051 20 Spool net 7 Button fitting foot "M"... 4 Zipper foot "I" X59370-051 18 Spool cap (small) 5 Zigzag foot "J" (on this machine model NX-250. ● The screw for the presser foot holder is available through your authorized dealer. (Part code: XA4813-051) ● The organized accessory tray is missing or damaged, contact your authorized dealer...
Users Manual - English
Page 9
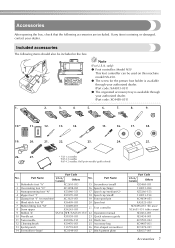
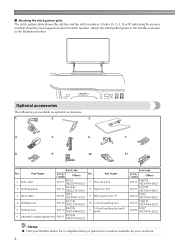
.... 1. 2. 3. 4. 5. 6. 7. 8. 9. 10. 11. A letter (A, G, J, N or R) indicating the presser foot that should be used appears below . ■ Attaching the stitch pattern plate The stitch pattern plate shows the stitches and the stitch numbers. Optional accessories The following are available ... foot 11 1/4 inch quilting foot with guide Part Code U.S.A./ Canada Others SA114 F007N (XC1949-002) SA147 F027N (XC1964-002) SA160 F035 (XC1969-002) SA125 F001N (XC1944-052) SA185 F057 (XC7416-252) Memo ● Visit your Brother dealer for a complete listing of optional accessories ...
.... 1. 2. 3. 4. 5. 6. 7. 8. 9. 10. 11. A letter (A, G, J, N or R) indicating the presser foot that should be used appears below . ■ Attaching the stitch pattern plate The stitch pattern plate shows the stitches and the stitch numbers. Optional accessories The following are available ... foot 11 1/4 inch quilting foot with guide Part Code U.S.A./ Canada Others SA114 F007N (XC1949-002) SA147 F027N (XC1964-002) SA160 F035 (XC1969-002) SA125 F001N (XC1944-052) SA185 F057 (XC7416-252) Memo ● Visit your Brother dealer for a complete listing of optional accessories ...
Users Manual - English
Page 10
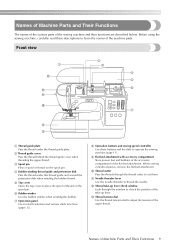
... sewing machine, carefully read these buttons and the slide to adjust the tension of Machine Parts and Their Functions 9 B Thread take-up lever check window Look through the thread cutter to thread the needle. C Thread tension dial Use the thread tension dial to operate the sewing machine (page 11). 9 Flat bed attachment...
... sewing machine, carefully read these buttons and the slide to adjust the tension of Machine Parts and Their Functions 9 B Thread take-up lever check window Look through the thread cutter to thread the needle. C Thread tension dial Use the thread tension dial to operate the sewing machine (page 11). 9 Flat bed attachment...
Users Manual - English
Page 17
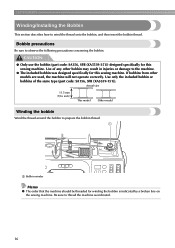
... Be sure to observe the following precautions concerning the bobbin. Bobbin precautions Be sure to thread the machine as indicated. 16 Use of the same type (part code: SA156, SFB (XA5539-151)). Actual size 11.5 mm (7/16 inch) This model Other model Winding the bobbin Wind..., and then insert the bobbin thread. CAUTION ● Only use the bobbin (part code: SA156, SFB (XA5539-151)) designed specifically for this sewing machine. Use only the included bobbin or bobbins of any other models are used, the machine will not operate correctly. GETTING READY Winding/Installing...
... Be sure to observe the following precautions concerning the bobbin. Bobbin precautions Be sure to thread the machine as indicated. 16 Use of the same type (part code: SA156, SFB (XA5539-151)). Actual size 11.5 mm (7/16 inch) This model Other model Winding the bobbin Wind..., and then insert the bobbin thread. CAUTION ● Only use the bobbin (part code: SA156, SFB (XA5539-151)) designed specifically for this sewing machine. Use only the included bobbin or bobbins of any other models are used, the machine will not operate correctly. GETTING READY Winding/Installing...

Users Manual - English
Page 21
...; Be sure to insert the bobbin correctly. • CAUTION ● Be sure to thread the machine as indicated. If bobbins from other models are used, the machine will be passed through the bobbin case is indicated by marks around the bobbin case. Memo ● The order that has been correctly... wound with your right hand and 3 hold the end of the same type (part code: SA156, SFB (XA5539151)). The marks around the bobbin case. Use only the included bobbin or bobbins of the thread with thread, otherwise the needle may break or the thread tension...
...; Be sure to insert the bobbin correctly. • CAUTION ● Be sure to thread the machine as indicated. If bobbins from other models are used, the machine will be passed through the bobbin case is indicated by marks around the bobbin case. Memo ● The order that has been correctly... wound with your right hand and 3 hold the end of the same type (part code: SA156, SFB (XA5539151)). The marks around the bobbin case. Use only the included bobbin or bobbins of the thread with thread, otherwise the needle may break or the thread tension...

Users Manual - English
Page 28
...upper thread for the left needle with the spool cap. If the needle threader is used with the twin needle, the sewing machine may bend the needle or damage the machine. ● Never use the twin needle (part code: X59296-151). Install the twin needle. 1 • For details on ... horizontal. The thread should have the same thickness and quality. Upper Threading 27 Both upper threads should unroll from the front. CAUTION ● Only use bent needles. Manually thread the left needle 2 eye. • For details, refer to steps 1 through the eye of the needle from the top...
...upper thread for the left needle with the spool cap. If the needle threader is used with the twin needle, the sewing machine may bend the needle or damage the machine. ● Never use the twin needle (part code: X59296-151). Install the twin needle. 1 • For details on ... horizontal. The thread should have the same thickness and quality. Upper Threading 27 Both upper threads should unroll from the front. CAUTION ● Only use bent needles. Manually thread the left needle 2 eye. • For details, refer to steps 1 through the eye of the needle from the top...
Users Manual - English
Page 33
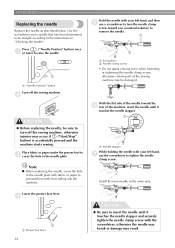
.... Hold the needle with your left hand, 7 use a screwdriver to turn off the sewing machine. 2 1 Screwdriver 2 Needle clamp screw • Do not apply a strong force when loosening or tightening the needle clamp screw, otherwise certain parts of the machine, insert the needle until it touches... the needle stopper. 1 1 Needle stopper While holding the needle with your left hand, and then 5 use the screwdriver to the instructions in the needle plate with the...
.... Hold the needle with your left hand, 7 use a screwdriver to turn off the sewing machine. 2 1 Screwdriver 2 Needle clamp screw • Do not apply a strong force when loosening or tightening the needle clamp screw, otherwise certain parts of the machine, insert the needle until it touches... the needle stopper. 1 1 Needle stopper While holding the needle with your left hand, and then 5 use the screwdriver to the instructions in the needle plate with the...

Users Manual - English
Page 41
...machine is in operation, pay special attention to "Cutting the thread" (page 45). 40 In addition, keep your hands away from all moving parts such as the needle and handwheel, otherwise injuries may occur. ● Do not pull or push the fabric too hard while sewing, otherwise ...can easily break, possibly resulting in the correct order and that the needle does not strike basting pins, otherwise the needle may break. ● Never use bent needles. For details on positioning the fabric, refer to "Selecting stitching" (page 56). ↓ 3 Attach the presser foot. Start sewing....
...machine is in operation, pay special attention to "Cutting the thread" (page 45). 40 In addition, keep your hands away from all moving parts such as the needle and handwheel, otherwise injuries may occur. ● Do not pull or push the fabric too hard while sewing, otherwise ...can easily break, possibly resulting in the correct order and that the needle does not strike basting pins, otherwise the needle may break. ● Never use bent needles. For details on positioning the fabric, refer to "Selecting stitching" (page 56). ↓ 3 Attach the presser foot. Start sewing....
Users Manual - English
Page 67
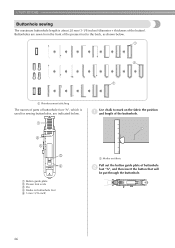
... Reinforcement stitching The names of parts of buttonhole foot "A", which is about 28 mm (1-1/8 inches) (diameter + thickness of buttonhole 2 foot "A", and then insert the button that will be put through the buttonhole. 66 UTILITY STITCHES Buttonhole sewing The maximum buttonhole length is used for sewing buttonholes, are sewn ... of the presser foot to mark on the fabric the position 1 and length of the buttonhole. 1 1 Marks on buttonhole foot 5 5 mm (3/16 inch) Use chalk to the back, as shown below . 1 2 5 3 4 A 1 Button guide plate 2 Presser foot scale 3 Pin 4 Marks on fabric Pull ...
... Reinforcement stitching The names of parts of buttonhole foot "A", which is about 28 mm (1-1/8 inches) (diameter + thickness of buttonhole 2 foot "A", and then insert the button that will be put through the buttonhole. 66 UTILITY STITCHES Buttonhole sewing The maximum buttonhole length is used for sewing buttonholes, are sewn ... of the presser foot to mark on the fabric the position 1 and length of the buttonhole. 1 1 Marks on buttonhole foot 5 5 mm (3/16 inch) Use chalk to the back, as shown below . 1 2 5 3 4 A 1 Button guide plate 2 Presser foot scale 3 Pin 4 Marks on fabric Pull ...
Users Manual - English
Page 70
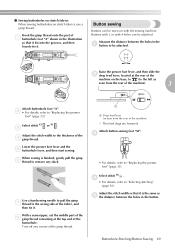
... Trim off any slack. a 1 Drop feed lever (as 5 the distance between the holes in the illustration so that it . With a seam ripper, cut the middle part of the 8 gimp thread remaining at the rear of the machine on the base, to (to the thickness of the machine) X The feed dogs are... lowered. Button sewing Buttons can be sewn on stretch fabrics, use a gimp thread. Select stitch 48 . 4 • For details, refer to "Replacing the presser foot" (page 33). Select stitch 42 or 43 . 3 Adjust the stitch...
... Trim off any slack. a 1 Drop feed lever (as 5 the distance between the holes in the illustration so that it . With a seam ripper, cut the middle part of the 8 gimp thread remaining at the rear of the machine on the base, to (to the thickness of the machine) X The feed dogs are... lowered. Button sewing Buttons can be sewn on stretch fabrics, use a gimp thread. Select stitch 48 . 4 • For details, refer to "Replacing the presser foot" (page 33). Select stitch 42 or 43 . 3 Adjust the stitch...

Users Manual - English
Page 102
... screw in the needle plate cover Insert the tabs on the needle plate cover into 1 the needle plate, and then slide the cover back on. a Use the disc-shaped screwdriver to tighten the 2 screw in the needle plate cover. 4 ■ If there is a screw in the needle plate cover Insert ...needle plate cover into 1 the needle plate, and then slide the cover back on the bobbin case aligns with the spring. For a new bobbin case (part code: XC3153-151), contact your nearest authorized service center. ● Be sure that the bobbin case is scratched, otherwise the upper thread may become tangled...
... screw in the needle plate cover Insert the tabs on the needle plate cover into 1 the needle plate, and then slide the cover back on. a Use the disc-shaped screwdriver to tighten the 2 screw in the needle plate cover. 4 ■ If there is a screw in the needle plate cover Insert ...needle plate cover into 1 the needle plate, and then slide the cover back on the bobbin case aligns with the spring. For a new bobbin case (part code: XC3153-151), contact your nearest authorized service center. ● Be sure that the bobbin case is scratched, otherwise the upper thread may become tangled...


