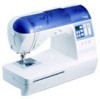
Brother International NX-250 Support Question
Brother International NX-250 Support Question
Find answers below for this question about Brother International NX-250.Need a Brother International NX-250 manual? We have 5 online manuals for this item!
Question posted by lovelva53 on January 12th, 2013
Is There A Larger Buttonhole Attachment To Support A 1.5 Inch Button?
The attachement that comes with the machine will only hold up to a 1" button.
Current Answers
Related Brother International NX-250 Manual Pages
Accessory Catalog - Page 8
... the left side of a sewing machine. 2. Attach the spool stand onto the machine handle. 3. Attach the presser foot shaft. Attach Adapter with Low Shank on a low shank.
1. Compatible with Duetta™ 4500D, Innov-is equipped with the screw. 3. Sew. While keeping the black button on the stand and thread the machine. Release the black button, and the presser foot remains...
Accessory Catalog - Page 10
... Foot
Attaches bias tape with Brother Embellishment Feet. Adjust the needle position so that the needle lines up to the guide side.
2. SA109 All Brother home-use sewing machines
Baby Vest... Innov-is Project Book (See page 41 for details.)
www.brother.com Personalize your projects with widths less than 7 mm (1/4 inch) using straight, zigzag ...
Accessory Catalog - Page 11

...
1. Sew.
It can be used with brother sewing machines of the presser foot, and place each cord into each hole on the presser foot. 2. Attach the ...inch (5 mm) wide braids, ribbons, tapes, cords, etc.
1. Line up to 5 cords or decorative threads.
Attach the presser foot and pull cords under the presser foot. 3. Stitch braid in place. Attach the presser foot onto the machine...
Accessory Catalog - Page 15

... PC-8500 sewing machines. Gently holding the upper and bobbin threads sew about four locking stitches and finish the thread ends. Quilting Foot
For darning, quilting, or free-motion. Requires Low Shank Adapter for free-motion, outline quilting, etc.
1.
Set the fabric under the presser foot. 6. While starting to sew, press the needle position button twice...
Accessory Catalog - Page 36

Brother Sewing Machine Attachments for PQ Series
69
Heavyweight Foot Ver y Narrow Foot Bobbin for PQ Series
Heavyweight Foot
An improved larger foot print assures better contact of wool roving or yarn on the fabric under the Needle Felting
Attachment. 4. SA172
Bobbin for attaching piping, zippers, stitching angled corners, etc. Comes with the feed dogs and can attach it...
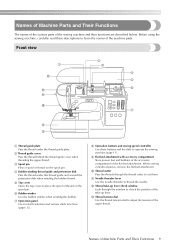
Users Manual - English - Page 10
....
6 Bobbin winder Use the bobbin winder when winding the bobbin.
7 Operation panel Use for stitch selection and various stitch functions (pages 12).
8 Operation buttons and sewing speed controller Use these descriptions to operate the sewing machine (page 11).
9 Flat bed attachment with accessory compartment Store presser feet and bobbins in the accessory compartment of the...
Users Manual - English - Page 11
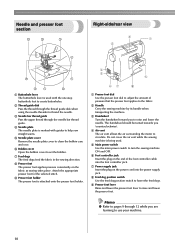
... machine.
10 Needle and presser foot section
Right-side/rear view
1 Buttonhole lever The buttonhole lever is used .
5 Main power switch Use the main power switch to turn the sewing machine ON... in the sewing direction.
8 Presser foot The presser foot applies pressure consistently on the fabric as sewing takes place.
Do not cover the air vent while the sewing machine is attached onto the ...
Users Manual - English - Page 29
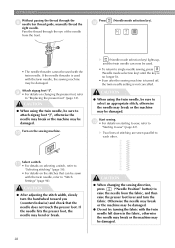
... with the twin needle, the sewing machine may be damaged.
CAUTION
● When using the twin needle, be sure to attach zigzag foot "J", otherwise the needle may break or the machine may
be sure to "Stitch Settings" (page 94). Select a stitch. CAUTION
● When changing the sewing direction,
press
("Needle Position" button) to "Replacing the presser...
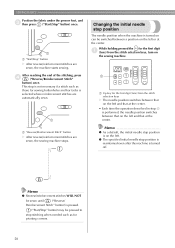
Users Manual - English - Page 37

...Note
● When sewing with the walking foot. Turn off the sewing machine.
2
a
1 Presser foot holder screw
Attach the presser foot holder. 5 • For details, refer to sew, slowly turn the ...holder screw, and then remove the walking foot.
■ Removing the walking foot
Press
("Needle Position" button) once
1 or twice to "Stitch Settings" (page 94).
Raise the presser foot lever.
3
...
Users Manual - English - Page 51
...for pivoting corners.
50 While holding pressed the for the first digit...sewing buttonholes and bar tacks is turned off.
Changing the initial needle stop position
The needle position when the machine is performed, the needle position switches between a position on
the sewing machine. After reaching the end of the stitching, press
4
("Reverse/Reinforcement Stitch"
button) once.
SEWING...
Users Manual - English - Page 61
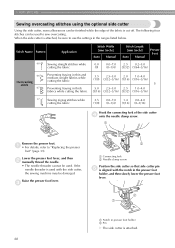
...attached, be damaged. b a
1 Notch in presser foot holder 2 Pin
X The side cutter is aligned with the side cutter, the sewing machine may be sure to use the settings in thick
5.0 2.5-5.0 2.5 1.0-4.0
fabrics while cutting the fabric (3/16) (3/32-3/16) (3/32) (1/16-3/16)
17
Sewing... [mm (inch)]
Auto Manual
Stitch Length [mm (inch)]
Auto Manual
Presser Foot
00
Sewing straight stitches ...
Users Manual - English - Page 62
...to the cutting edge of the
sewing machine. If the needle hits the ... the rear of the cutter.
● The optional side cutter is securely attached. denim.
● After using the side cutter, clean it out toward...5 mm (3/16 inch).
1
1 2 cm (3/4 inch)
1 5 mm (3/16 inch)
Memo
● The side cutter can no longer cut .
Lower the presser foot lever, and then start a sewing.
3
X ...
Users Manual - English - Page 67
... plate 2 Presser foot scale 3 Pin 4 Marks on buttonhole foot 5 5 mm (3/16 inch)
Use chalk to mark on the fabric the position 1 and length of the buttonhole.
1
1 Marks on fabric
Pull out the button guide plate of the button). UTILITY STITCHES
Buttonhole sewing
The maximum buttonhole length is used for sewing buttonholes, are sewn from the front of the presser foot...
Users Manual - English - Page 70
... the gimp 6 thread to remove any excess of the machine).
3
Attach buttonhole foot "A". 2 • For details, refer to "Replacing the presser
foot" (page 33). Buttons with 2 or with 4 holes can be sewn on with the sewing machine. Measure the distance between the holes in the 1 button to be attached.
Trim off any slack.
Raise the presser foot lever...
Users Manual - English - Page 71
... if the needle will be sure that the needle
correctly goes into button-sewing foot "M".
6
Start sewing. 8 Set the sewing speed controller to secure the button, perform the button-sewing operation twice. Adjust the stitch width to the wrong side of machine).
● The feed dogs come up when you . Pull the upper thread at the beginning of the...
Users Manual - English - Page 75
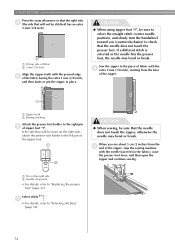
...turn the handwheel toward you are about 5 cm (2 inches) from the base
of the zipper.
2 1
1 Zipper teeth 2 Basting stitching
Attach the presser foot holder to "Selecting stitching" (page 56...the right pin 6 of the zipper, stop the sewing machine
with the 8 extra 3 mm (1/8 inch), starting from the 9 end of zipper foot "I
2
CAUTION
● When sewing, be sure that the needle does not touch ...
Users Manual - English - Page 76
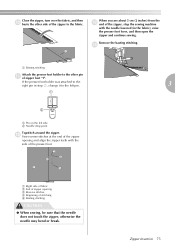
... the zipper and continue sewing. d
1 Basting stitching
Attach the presser foot holder to the left pin.
3
1
I ". Close the zipper, turn over the fabric, and then 0 baste the other side of the zipper to the fabric.
1
When you are about 5 cm (2 inches) from the c end of the zipper, stop the sewing machine
with the side of...
Users Manual - English - Page 91
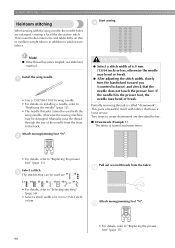
...
wing needle, otherwise the sewing machine may bend or break. Select a stitch. 3 The stitches that can be used are 31 , 32 ,
33 , 34 , 35 , 36 , 37 , 38 or 39 .
• For details, refer to "Selecting stitching" (page 56).
• Select a stitch width of the needle from the fabric.
1
Attach monogramming foot "N".
2
• For...
Users Manual - English - Page 103
...Attach the presser foot that is
appropriate for the type of stitch that are appropriate for this machine.
Lightly guide the fabric. Correctly install the spool.
Incorrect bobbins will not work properly. page 22
- - - Symptom The sewing machine...it .
Probable Cause
Remedy
The machine is scratched, or has a burr on .
The "Start/Stop" button was not pressed. The area around...
Users Manual - English - Page 106
...sew. Follow the instructions that you wish to the right.
The sewing lamp is raised. The buttonhole or bar tack stitch was selected and the "Start/Stop" button was pressed while the buttonhole lever is displayed. Troubleshooting 105
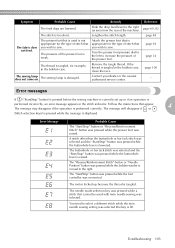
Attach...pressure dial to the left to sew. Error messages
If ("Start/Stop" button) is pressed before the sewing machine is correctly set up because the...
Similar Questions

Sewing Machine Attachments
Is there a walking foot attachment that can be used on a Brother XR-52
Is there a walking foot attachment that can be used on a Brother XR-52
(Posted by mirelsjm 6 years ago)

How Do I Install Buttonhole Foot On Brother Se270d Sewing Machine
(Posted by bngrev 10 years ago)

How To Attach Needle Arm On Sewing Machine
(Posted by stjamesr 10 years ago)

How To Use Foot Attachments Of Brother Sewing Machine Xl 5130
(Posted by brusSi 10 years ago)

Is There An Embrodiery Attachment For The Cs 770 Brother Sewing Machine
(Posted by djones93579 11 years ago)