
Users Manual - English
Page 3
... (Error Correction Mode 3 Control Panel Overview 4 FAX 750 and FAX 770 4 FAX 870MC and MFC 970MC 5 Caution ...7 Packing List...8 Choosing a Location 9 Assembly ...9 Attach the document support 9 Attach the paper wire extension and paper support 10 Install the printing cartridge 11 Load the paper ...13 Acceptable Paper ...13 Connect the handset 13 Connect the...
... (Error Correction Mode 3 Control Panel Overview 4 FAX 750 and FAX 770 4 FAX 870MC and MFC 970MC 5 Caution ...7 Packing List...8 Choosing a Location 9 Assembly ...9 Attach the document support 9 Attach the paper wire extension and paper support 10 Install the printing cartridge 11 Load the paper ...13 Acceptable Paper ...13 Connect the handset 13 Connect the...
Users Manual - English
Page 18
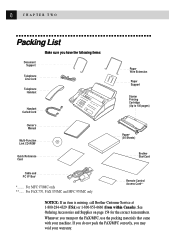
...). For MFC 970MC only **...... If you do not pack the FAX/MFC correctly, you have the following items: Document Support Telephone Line Cord Telephone Handset Handset Curled Cord Owner's Manual Multi-Function Link CD-ROM* Quick Reference Card Paper Wire Extension Paper Support Starter Printing Cartridge (Up to 100 pages) Paper* (50 Sheets) Brother StartCard...
...). For MFC 970MC only **...... If you do not pack the FAX/MFC correctly, you have the following items: Document Support Telephone Line Cord Telephone Handset Handset Curled Cord Owner's Manual Multi-Function Link CD-ROM* Quick Reference Card Paper Wire Extension Paper Support Starter Printing Cartridge (Up to 100 pages) Paper* (50 Sheets) Brother StartCard...
Users Manual - English
Page 21
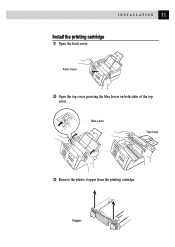
Front Cover 2 Open the top cover, pressing the blue levers on both sides of the top cover. Blue Lever Top Cover 3 Remove the plastic stopper from the printing cartridge. Stopper 11 I N S T A L L A T I O N Install the printing cartridge 1 Open the front cover.
Front Cover 2 Open the top cover, pressing the blue levers on both sides of the top cover. Blue Lever Top Cover 3 Remove the plastic stopper from the printing cartridge. Stopper 11 I N S T A L L A T I O N Install the printing cartridge 1 Open the front cover.
Users Manual - English
Page 22
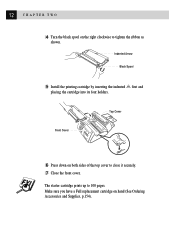
12 CHAPTER TWO 4 Turn the black spool on the right clockwise to close it securely. 7 Close the front cover. Front Cover Top Cover 6 Press down on hand (See Ordering Accessories and Supplies, p.154). Make sure you have a Full replacement cartridge on both sides of the top cover to tighten the ribbon as shown. The starter cartridge prints up to 100 pages. Indented Arrow Black Spool 5 Install the printing cartridge by inserting the indented first and placing the cartridge into its four holders.
12 CHAPTER TWO 4 Turn the black spool on the right clockwise to close it securely. 7 Close the front cover. Front Cover Top Cover 6 Press down on hand (See Ordering Accessories and Supplies, p.154). Make sure you have a Full replacement cartridge on both sides of the top cover to tighten the ribbon as shown. The starter cartridge prints up to 100 pages. Indented Arrow Black Spool 5 Install the printing cartridge by inserting the indented first and placing the cartridge into its four holders.

Users Manual - English
Page 125
115 T R O U B L E S H O O T I N G A N D M A I N T E N A N C E 2 Open the front cover. 3 Then open the top cover by pressing the blue levers on both sides of the machine. If the paper remains jammed, then pull it toward the back of the FAX/MFC. Top Cover Front Cover 5 Remove the printing cartridge and turn the spool to tighten the ribbon. 6 Install the cartridge. 7 Close the top cover. 8 Close the front cover. 9 Load the paper. Front Cover Blue Lever Top Cover 4 Pull the jammed paper gently from the paper feeder toward the front of the top cover.
115 T R O U B L E S H O O T I N G A N D M A I N T E N A N C E 2 Open the front cover. 3 Then open the top cover by pressing the blue levers on both sides of the machine. If the paper remains jammed, then pull it toward the back of the FAX/MFC. Top Cover Front Cover 5 Remove the printing cartridge and turn the spool to tighten the ribbon. 6 Install the cartridge. 7 Close the top cover. 8 Close the front cover. 9 Load the paper. Front Cover Blue Lever Top Cover 4 Pull the jammed paper gently from the paper feeder toward the front of the top cover.
Users Manual - English
Page 131
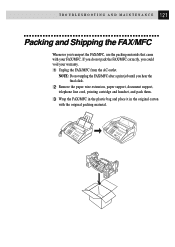
... final click. 2 Remove the paper wire extension, paper support, document support, telephone line cord, printing cartridge and handset, and pack them. 3 Wrap the FAX/MFC in the plastic bag and place it in the original carton with your warranty. 1 Unplug the FAX/MFC from the AC outlet. 121 T R O U B L E S H O O T I N G A N D M A I N T E N A N C E Packing and Shipping the FAX...
... final click. 2 Remove the paper wire extension, paper support, document support, telephone line cord, printing cartridge and handset, and pack them. 3 Wrap the FAX/MFC in the plastic bag and place it in the original carton with your warranty. 1 Unplug the FAX/MFC from the AC outlet. 121 T R O U B L E S H O O T I N G A N D M A I N T E N A N C E Packing and Shipping the FAX...
Users Manual - English
Page 164
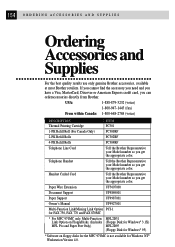
... can orderaccessories directly from Brother. Telephone Handset Tell the Brother Representative your Model number so you get the appropriate color. Paper Wire Extension UF5607000 Document Support UF9869001 Paper Support UF9987001 Owner's Manual UF9927001 Multi-Function Link/Missing Link Option PCI-1 for FAX 750, FAX 770 and FAX 870MC * For MFC 970MC only, Multi-Function...
... can orderaccessories directly from Brother. Telephone Handset Tell the Brother Representative your Model number so you get the appropriate color. Paper Wire Extension UF5607000 Document Support UF9869001 Paper Support UF9987001 Owner's Manual UF9927001 Multi-Function Link/Missing Link Option PCI-1 for FAX 750, FAX 770 and FAX 870MC * For MFC 970MC only, Multi-Function...


