Users Manual - English
Page 4
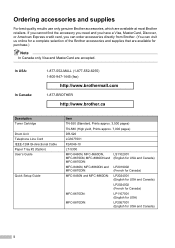
...-BROTHER http://www.brother.ca Description Toner Cartridge Drum Unit Telephone Line Cord IEEE-1284 Bi-directional Cable Paper Tray #2 (Option) User's Guide Quick Setup Guide Item TN-550 (Standard, Prints approx. 3,500 pages) TN-580 (High yield, Prints approx. 7,000 pages) DR-520 LG3077001 F2A046-10 LT-5300 MFC-8460N, MFC-8660DN, LS1102001 MFC-8670DN, MFC-8860DN...
...-BROTHER http://www.brother.ca Description Toner Cartridge Drum Unit Telephone Line Cord IEEE-1284 Bi-directional Cable Paper Tray #2 (Option) User's Guide Quick Setup Guide Item TN-550 (Standard, Prints approx. 3,500 pages) TN-580 (High yield, Prints approx. 7,000 pages) DR-520 LG3077001 F2A046-10 LT-5300 MFC-8460N, MFC-8660DN, LS1102001 MFC-8670DN, MFC-8860DN...
Users Manual - English
Page 6
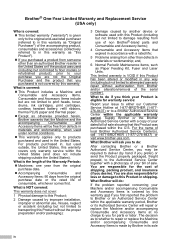
...dated bill of sale showing that this warranty and if you first reported the problem to Brother or an Authorized Service Center within the U.S. The decision as Paper Feeding Kit, Fuser and Laser Units. What is the length of the Warranty Periods: „ Machines: one year ...a rated life; 5 Problems arising from other than defects in materials or workmanship; What Brother will be required to deliver (by this Product was used (including but are not limited to print heads, toner, drums, ink cartridges, print cartridges, cordless handset battery, refill ribbons, therma PLUS paper and ...
...dated bill of sale showing that this warranty and if you first reported the problem to Brother or an Authorized Service Center within the U.S. The decision as Paper Feeding Kit, Fuser and Laser Units. What is the length of the Warranty Periods: „ Machines: one year ...a rated life; 5 Problems arising from other than defects in materials or workmanship; What Brother will be required to deliver (by this Product was used (including but are not limited to print heads, toner, drums, ink cartridges, print cartridges, cordless handset battery, refill ribbons, therma PLUS paper and ...
Users Manual - English
Page 8
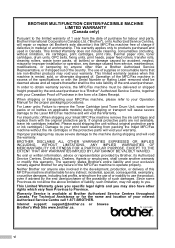
...by accident, neglect, misuse or improper installation or operation, any failure of the MFC/Fax machine to operate properly. For Laser units: Failure to remove the Toner Cartridge (and Toner Drum Unit, waste toner packs or oil bottles on applicable models) during shipping and ...from the date of purchase for labour and parts, Brother International Corporation (Canada) Ltd. ("Brother"), or its Authorized Service Centres, Distributors, Dealers, Agents or employees, shall create another warranty or modify this warranty. Operation of the MFC/Fax machine in excess of the specifications or with ...
...by accident, neglect, misuse or improper installation or operation, any failure of the MFC/Fax machine to operate properly. For Laser units: Failure to remove the Toner Cartridge (and Toner Drum Unit, waste toner packs or oil bottles on applicable models) during shipping and ...from the date of purchase for labour and parts, Brother International Corporation (Canada) Ltd. ("Brother"), or its Authorized Service Centres, Distributors, Dealers, Agents or employees, shall create another warranty or modify this warranty. Operation of the MFC/Fax machine in excess of the specifications or with ...
Users Manual - English
Page 13
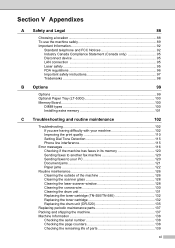
... Important Information 92 Standard telephone and FCC Notices 92 Industry Canada Compliance Statement (Canada only 95 Disconnect device 95 LAN connection 95 Laser safety 95 FDA regulations 96 Important safety instructions 97 Trademarks 98 B Options 99 Options ...99 Optional Paper Tray (LT-5300 100...Routine maintenance 126 Cleaning the outside of the machine 126 Cleaning the scanner glass 128 Cleaning the laser scanner window 128 Cleaning the corona wire 130 Cleaning the drum unit 131 Replacing the toner cartridge (TN-550/TN-580 132 Replacing the toner cartridge 132 Replacing...
... Important Information 92 Standard telephone and FCC Notices 92 Industry Canada Compliance Statement (Canada only 95 Disconnect device 95 LAN connection 95 Laser safety 95 FDA regulations 96 Important safety instructions 97 Trademarks 98 B Options 99 Options ...99 Optional Paper Tray (LT-5300 100...Routine maintenance 126 Cleaning the outside of the machine 126 Cleaning the scanner glass 128 Cleaning the laser scanner window 128 Cleaning the corona wire 130 Cleaning the drum unit 131 Replacing the toner cartridge (TN-550/TN-580 132 Replacing the toner cartridge 132 Replacing...
Users Manual - English
Page 118
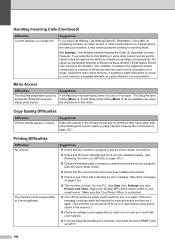
...mode. The Setup Receive access the Setup Receive and setting (Menu, 2, 1) and Setup Send setting (Menu, 2, 2) are installed properly. (See Replacing the drum unit (DR-520) on page 135.) „ Check the interface cable connection on both . (See Cleaning the scanner glass on page 128 and Cleaning the... or it on page 116.) „ The machine is your PC, click Start, then Settings, and then Printers and Faxes. Right-click 'Brother MFC-XXXX (where XXXX is online. Copy Quality Difficulties Difficulties Vertical streaks appear in Fax mode. Suggestions If you try it to see if the LCD...
...mode. The Setup Receive access the Setup Receive and setting (Menu, 2, 1) and Setup Send setting (Menu, 2, 2) are installed properly. (See Replacing the drum unit (DR-520) on page 135.) „ Check the interface cable connection on both . (See Cleaning the scanner glass on page 128 and Cleaning the... or it on page 116.) „ The machine is your PC, click Start, then Settings, and then Printers and Faxes. Right-click 'Brother MFC-XXXX (where XXXX is online. Copy Quality Difficulties Difficulties Vertical streaks appear in Fax mode. Suggestions If you try it to see if the LCD...
Users Manual - English
Page 124
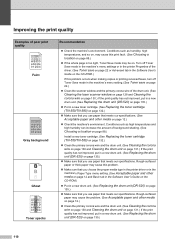
... in the machine's menu setting. (See Toner save on page 22.) „ Clean the scanner window and the primary corona wire of the drum unit. (See Cleaning the laser scanner window on page 128 and Cleaning the corona wire on page 130.) If the print quality has not improved, put in a new... drum unit. (See Replacing the drum unit (DR-520) on page 135.) „ Put in a new drum unit. (See Replacing the drum unit (DR-520) on page 12...
... in the machine's menu setting. (See Toner save on page 22.) „ Clean the scanner window and the primary corona wire of the drum unit. (See Cleaning the laser scanner window on page 128 and Cleaning the corona wire on page 130.) If the print quality has not improved, put in a new... drum unit. (See Replacing the drum unit (DR-520) on page 135.) „ Put in a new drum unit. (See Replacing the drum unit (DR-520) on page 12...
Users Manual - English
Page 125
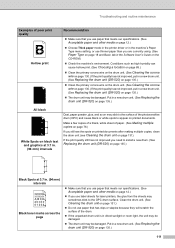
... Paper Type on page 18 and Basic tab in a new drum unit. (See Replacing the drum unit (DR-520) on may stick to the OPC drum surface. Put in the Software User's Guide on page 131.) „ Do not use label sheets for laser printers, the glue from the sheets may be damaged. Clean... the drum unit. (See Cleaning the drum unit on the CD-ROM.) „ Check the machine's environment...
... Paper Type on page 18 and Basic tab in a new drum unit. (See Replacing the drum unit (DR-520) on may stick to the OPC drum surface. Put in the Software User's Guide on page 131.) „ Do not use label sheets for laser printers, the glue from the sheets may be damaged. Clean... the drum unit. (See Cleaning the drum unit on the CD-ROM.) „ Check the machine's environment...

Users Manual - English
Page 126
...See Replacing the drum unit (DR-520) on page 135.) Black lines down the page Printed pages have toner stains or stripes down the page AaAa0bBbc1CBdDec2EfCgdF3hGDie4jHk Page skewed „ Make sure the paper or other print media is at 1-877-BROTHER (1-877-276-8437) (in USA) or 1-877-BROTHER (in a ...on page 130.) „ Clean the scanner window with a soft cloth. (See Cleaning the laser scanner window on page 128.) „ The drum unit may be damaged. Put in a new drum unit. (See Replacing the drum unit (DR-520) on page 135.) ABCDEFGH abcdefghijk ABCD abcde 01234 „ Clean the ...
...See Replacing the drum unit (DR-520) on page 135.) Black lines down the page Printed pages have toner stains or stripes down the page AaAa0bBbc1CBdDec2EfCgdF3hGDie4jHk Page skewed „ Make sure the paper or other print media is at 1-877-BROTHER (1-877-276-8437) (in USA) or 1-877-BROTHER (in a ...on page 130.) „ Clean the scanner window with a soft cloth. (See Cleaning the laser scanner window on page 128.) „ The drum unit may be damaged. Put in a new drum unit. (See Replacing the drum unit (DR-520) on page 135.) ABCDEFGH abcdefghijk ABCD abcde 01234 „ Clean the ...

Users Manual - English
Page 130
... or fed properly, or the document scanned from the ADF was too long. If this happens, your phone line. Load the correct size of the drum unit or toner cartridge is too hot. If the fan is spinning, remove any obstacles that surround the exhaust outlet, and then leave the machine...
... or fed properly, or the document scanned from the ADF was too long. If this happens, your phone line. Load the correct size of the drum unit or toner cartridge is too hot. If the fan is spinning, remove any obstacles that surround the exhaust outlet, and then leave the machine...

Users Manual - English
Page 131
Troubleshooting and routine maintenance Error Message Cause Action DR Mode in the memory. See Turning off Distinctive Ring on page 135. then replace the drum unit with the power on again. Open the front cover, and then press Clear/Back. 2. Remove the duplex tray and install it on . (The...page 130.) Fuser Error The temperature of its memory on page 59.) 117 Verify the number and try again. Duplex Disabled Dust on the drum unit needs to access a One-Touch or Speed Dial number that is too hot. Set Distinctive Ring to reset. problem; See Replacing the...
Troubleshooting and routine maintenance Error Message Cause Action DR Mode in the memory. See Turning off Distinctive Ring on page 135. then replace the drum unit with the power on again. Open the front cover, and then press Clear/Back. 2. Remove the duplex tray and install it on . (The...page 130.) Fuser Error The temperature of its memory on page 59.) 117 Verify the number and try again. Duplex Disabled Dust on the drum unit needs to access a One-Touch or Speed Dial number that is too hot. Set Distinctive Ring to reset. problem; See Replacing the...
Users Manual - English
Page 132
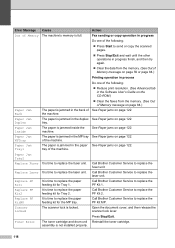
...Paper Jam Tray1 The paper is not installed properly. 118 See Paper jams on page 122. Call Brother Customer Service to replace the fuser unit. Toner Error The toner cartridge and drum unit Reinstall the toner cartridge. assembly is jammed in the paper tray of the machine. It ...is jammed in the duplex tray. Call Brother Customer Service to replace the laser unit. Call Brother Customer Service to replace the PF Kit 2. The...
...Paper Jam Tray1 The paper is not installed properly. 118 See Paper jams on page 122. Call Brother Customer Service to replace the fuser unit. Toner Error The toner cartridge and drum unit Reinstall the toner cartridge. assembly is jammed in the paper tray of the machine. It ...is jammed in the duplex tray. Call Brother Customer Service to replace the laser unit. Call Brother Customer Service to replace the PF Kit 2. The...
Users Manual - English
Page 133
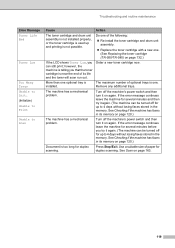
... installed. Order a new toner cartridge now. More than one optional tray is near the end of the following: „ Re-install the toner cartridge and drum unit assembly. „ Replace the toner cartridge with a new one. (See Replacing the toner cartridge (TN-550/TN-580) on again. If the error ... Toner Life End Toner Low Too Many Trays Unable to Init. (Initialize) Unable to Print Unable to Scan Cause Action The toner cartridge and drum unit assembly is not installed properly, or the toner cartridge is used up and printing is one. If the error message continues leave the machine...
... installed. Order a new toner cartridge now. More than one optional tray is near the end of the following: „ Re-install the toner cartridge and drum unit assembly. „ Replace the toner cartridge with a new one. (See Replacing the toner cartridge (TN-550/TN-580) on again. If the error ... Toner Life End Toner Low Too Many Trays Unable to Init. (Initialize) Unable to Print Unable to Scan Cause Action The toner cartridge and drum unit assembly is not installed properly, or the toner cartridge is used up and printing is one. If the error message continues leave the machine...
Users Manual - English
Page 137
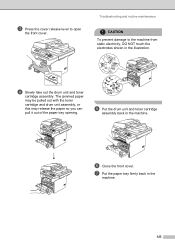
.... Troubleshooting and routine maintenance CAUTION To prevent damage to open the front cover. The jammed paper may be pulled out with the toner cartridge and drum unit assembly, or this may release the paper so you can pull it out of the paper tray opening. d Slowly take out the...
.... Troubleshooting and routine maintenance CAUTION To prevent damage to open the front cover. The jammed paper may be pulled out with the toner cartridge and drum unit assembly, or this may release the paper so you can pull it out of the paper tray opening. d Slowly take out the...
Users Manual - English
Page 138
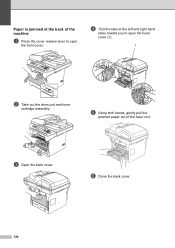
c Open the back cover. Paper is jammed at the left and right hand sides toward you to open the fuser cover (1). 1 b Take out the drum unit and toner cartridge assembly. d Pull the tabs at the back of the fuser unit. f Close the back cover. 124 e Using both hands, gently pull the jammed paper out of the machine C a Press the cover release lever to open the front cover.
c Open the back cover. Paper is jammed at the left and right hand sides toward you to open the fuser cover (1). 1 b Take out the drum unit and toner cartridge assembly. d Pull the tabs at the back of the fuser unit. f Close the back cover. 124 e Using both hands, gently pull the jammed paper out of the machine C a Press the cover release lever to open the front cover.
Users Manual - English
Page 139
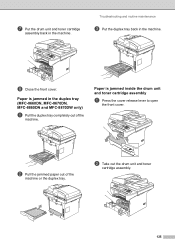
g Put the drum unit and toner cartridge assembly back in the machine. h Close the front cover. Paper is jammed in the duplex tray (MFC-8660DN, MFC-8670DN, MFC-8860DN and MFC-8870DW only) C a Pull the duplex tray completely out of the machine or the duplex tray. b Pull the jammed paper out of the machine. b Take out the drum unit and toner cartridge assembly. 125 Troubleshooting and routine maintenance c Put the duplex tray back in the machine. Paper is jammed inside the drum unit and toner cartridge assembly C a Press the cover release lever to open the front cover.
g Put the drum unit and toner cartridge assembly back in the machine. h Close the front cover. Paper is jammed in the duplex tray (MFC-8660DN, MFC-8670DN, MFC-8860DN and MFC-8870DW only) C a Pull the duplex tray completely out of the machine or the duplex tray. b Pull the jammed paper out of the machine. b Take out the drum unit and toner cartridge assembly. 125 Troubleshooting and routine maintenance c Put the duplex tray back in the machine. Paper is jammed inside the drum unit and toner cartridge assembly C a Press the cover release lever to open the front cover.
Users Manual - English
Page 140
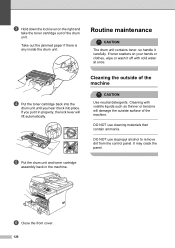
Take out the jammed paper if there is any inside the drum unit. d Put the toner cartridge back into place. e Put the drum unit and toner cartridge assembly back in properly, the lock lever will damage the outside of the machine C CAUTION Use neutral detergents. c Hold down the ... water at once. If toner scatters on the right and take the toner cartridge out of the machine. If you hear it lock into the drum unit until you put it carefully. DO NOT use isopropyl alcohol to remove dirt from the control panel. Cleaning the outside surface of the...
Take out the jammed paper if there is any inside the drum unit. d Put the toner cartridge back into place. e Put the drum unit and toner cartridge assembly back in properly, the lock lever will damage the outside of the machine C CAUTION Use neutral detergents. c Hold down the ... water at once. If toner scatters on the right and take the toner cartridge out of the machine. If you hear it lock into the drum unit until you put it carefully. DO NOT use isopropyl alcohol to remove dirt from the control panel. Cleaning the outside surface of the...
Users Manual - English
Page 142
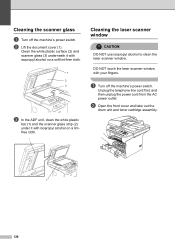
... window C CAUTION DO NOT use isopropyl alcohol to clean the laser scanner window. Cleaning the scanner glass C a Turn off the machine's power switch. a Turn off the machine's power switch. b Open the front cover and take out the drum unit and toner cartridge assembly. 2 128 b Lift the document cover (1). Unplug the telephone line...
... window C CAUTION DO NOT use isopropyl alcohol to clean the laser scanner window. Cleaning the scanner glass C a Turn off the machine's power switch. a Turn off the machine's power switch. b Open the front cover and take out the drum unit and toner cartridge assembly. 2 128 b Lift the document cover (1). Unplug the telephone line...
Users Manual - English
Page 143
d Put the drum unit and toner cartridge assembly back into the AC power outlet first, and then plug in the telephone line cord. HOT SURFACE After you open the front cover of the machine will be extremely hot. e Close the front cover. Troubleshooting and routine maintenance c Gently clean the laser scanner window (1) by... illustration. f Plug the machine's power cord back into the machine. Turn on the machine's power switch. 129 When you have just used the machine, some internal parts of the machine, DO NOT touch the shaded parts shown in the illustration.
d Put the drum unit and toner cartridge assembly back into the AC power outlet first, and then plug in the telephone line cord. HOT SURFACE After you open the front cover of the machine will be extremely hot. e Close the front cover. Troubleshooting and routine maintenance c Gently clean the laser scanner window (1) by... illustration. f Plug the machine's power cord back into the machine. Turn on the machine's power switch. 129 When you have just used the machine, some internal parts of the machine, DO NOT touch the shaded parts shown in the illustration.
Users Manual - English
Page 144
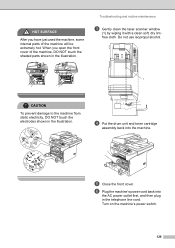
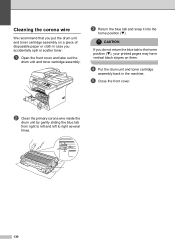
... it into the home position (b). CAUTION If you accidentally spill or scatter toner. e Close the front cover. b Clean the primary corona wire inside the drum unit by gently sliding the blue tab from right to left and left to the home position (b), your printed pages may have vertical black stripes... on a piece of disposable paper or cloth in the machine. d Put the drum unit and toner cartridge assembly back in case you do not return the blue tab to right several times. 130 a Open the front cover and...
... it into the home position (b). CAUTION If you accidentally spill or scatter toner. e Close the front cover. b Clean the primary corona wire inside the drum unit by gently sliding the blue tab from right to left and left to the home position (b), your printed pages may have vertical black stripes... on a piece of disposable paper or cloth in the machine. d Put the drum unit and toner cartridge assembly back in case you do not return the blue tab to right several times. 130 a Open the front cover and...
Users Manual - English
Page 145
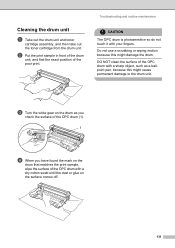
...a ballpoint pen, because this might cause permanent damage to the drum unit. DO NOT clean the surface of the OPC drum with a sharp object, such as you check the surface of the OPC drum (1). 1 d When you have found the mark on the drum that matches the print sample, wipe the surface of the poor... print. Cleaning the drum unit C a Take out the drum unit and toner cartridge assembly, and then take out the toner cartridge ...
...a ballpoint pen, because this might cause permanent damage to the drum unit. DO NOT clean the surface of the OPC drum with a sharp object, such as you check the surface of the OPC drum (1). 1 d When you have found the mark on the drum that matches the print sample, wipe the surface of the poor... print. Cleaning the drum unit C a Take out the drum unit and toner cartridge assembly, and then take out the toner cartridge ...


