
Users Manual - English
Page 37
.... To turn off sleep mode, press Secure and Job Cancel at the same time in sleep mode the LCD will be a short delay while the fuser warms up. The 3 scanner lamp will reduce the lamp's life. Or, press d to make the LCD look lighter or darker. a Press Menu, 1, 8. 18.LCD Contrast... is turned off and on for 16 hours before it goes into sleep mode. LCD Contrast 3 You can choose how long the machine must be reset. When printing or copying in sleep mode, there will display Sleep. Turning off the scanner lamp 3 The scanner lamp stays on . General setup Sleep time...
.... To turn off sleep mode, press Secure and Job Cancel at the same time in sleep mode the LCD will be a short delay while the fuser warms up. The 3 scanner lamp will reduce the lamp's life. Or, press d to make the LCD look lighter or darker. a Press Menu, 1, 8. 18.LCD Contrast... is turned off and on for 16 hours before it goes into sleep mode. LCD Contrast 3 You can choose how long the machine must be reset. When printing or copying in sleep mode, there will display Sleep. Turning off the scanner lamp 3 The scanner lamp stays on . General setup Sleep time...

Users Manual - English
Page 131
...not Response/Busy answer or is set to be turned off for 15 minutes with a new one of fuser unit does not rise at a specified temperature within specified time. Set Distinctive Ring to reset. See Replacing the drum unit (DR-520) on Drum The duplex tray is too hot. Duplex ...Disabled Dust on page 135. The fuser unit is not installed properly. Verify the number and try again. Troubleshooting and ...
...not Response/Busy answer or is set to be turned off for 15 minutes with a new one of fuser unit does not rise at a specified temperature within specified time. Set Distinctive Ring to reset. See Replacing the drum unit (DR-520) on Drum The duplex tray is too hot. Duplex ...Disabled Dust on page 135. The fuser unit is not installed properly. Verify the number and try again. Troubleshooting and ...
Users Manual - English
Page 153
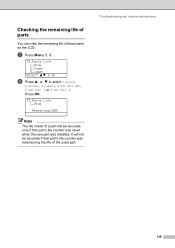
It will be accurate if that part's life counter was reset when the new part was reset during the life of the used part. a Press Menu, 7, 3. 73.Parts Life 1.Drum 2.Fuser 3.Laser Select ab & OK b Press a or b to select 1.Drum, 2.Fuser, 3.Laser, 4.PF Kit MP, 5.PF Kit 1 or 6.PF Kit 2. Press OK. 73.Parts Life 1.Drum Remaining:100% Note The life check of these parts on the LCD. Troubleshooting and routine maintenance 139 Checking the remaining life of parts C You can view the remaining life of a part will not be accurate only if that part's life counter was installed.
It will be accurate if that part's life counter was reset when the new part was reset during the life of the used part. a Press Menu, 7, 3. 73.Parts Life 1.Drum 2.Fuser 3.Laser Select ab & OK b Press a or b to select 1.Drum, 2.Fuser, 3.Laser, 4.PF Kit MP, 5.PF Kit 1 or 6.PF Kit 2. Press OK. 73.Parts Life 1.Drum Remaining:100% Note The life check of these parts on the LCD. Troubleshooting and routine maintenance 139 Checking the remaining life of parts C You can view the remaining life of a part will not be accurate only if that part's life counter was installed.


