Users Manual - English
Page 22
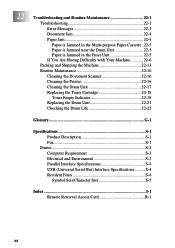
... the Machine 22-13 Routine Maintenance 22-16 Cleaning the Document Scanner 22-16 Cleaning the Printer 22-16 Cleaning the Drum Unit 22-17 Replacing the Toner Cartridge 22-18 Toner Empty Indicator 22-18 Replacing the Drum Unit 22-21 Checking the Drum ...Life 22-22 23 Glossary G-1 24 Specifications S-1 Product Description S-1 Fax S-1 Printer S-2 Computer Requirement S-3 Electrical and Environment S-3 Parallel Interface Specifications ...
... the Machine 22-13 Routine Maintenance 22-16 Cleaning the Document Scanner 22-16 Cleaning the Printer 22-16 Cleaning the Drum Unit 22-17 Replacing the Toner Cartridge 22-18 Toner Empty Indicator 22-18 Replacing the Drum Unit 22-21 Checking the Drum ...Life 22-22 23 Glossary G-1 24 Specifications S-1 Product Description S-1 Fax S-1 Printer S-2 Computer Requirement S-3 Electrical and Environment S-3 Parallel Interface Specifications ...

Users Manual - English
Page 25
... stays on and off when toner is low, so you'll know to order another toner cartridge. Scan to E-mail Press this key to scan a color picture into the machine. (Left Arrow... setting it in function procedure. 4 Print Key: Reset Clears data from the printer memory. 5 Scan Keys: Scan Image Press this key to start scanning a text document. MFC-8500 Control Panel Overview 3 2 1 17 4 16 15 5 14 67 8...you access the Menu and Programming mode. Clear Deletes entered data or backs up one step in your graphics application for further editing. You will convert it to editable text and...
... stays on and off when toner is low, so you'll know to order another toner cartridge. Scan to E-mail Press this key to scan a color picture into the machine. (Left Arrow... setting it in function procedure. 4 Print Key: Reset Clears data from the printer memory. 5 Scan Keys: Scan Image Press this key to start scanning a text document. MFC-8500 Control Panel Overview 3 2 1 17 4 16 15 5 14 67 8...you access the Menu and Programming mode. Clear Deletes entered data or backs up one step in your graphics application for further editing. You will convert it to editable text and...
Users Manual - English
Page 195
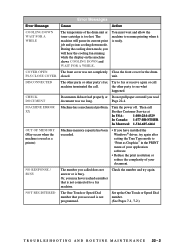
...machine terminated the call Brother Customer Service at In USA: 1-800-284-4329 In Canada: 1-877-BROTHER In Montreal: 1-...One Touch or Speed Dial number. (See Pages 7-1, 7-2.) T R O U B L E S H O O T I N G A N D R O U T I N E M A I N T E N A N C E 22 - 2 Page 22-4. Error Messages Error Message Cause Action COOLING DOWN WAIT FOR A WHILE The temperature of your application software. • Reduce the print resolution or reduce the complexity of the drum unit or toner cartridge... mode to "Print as a printer) Machine memory capacity has been exceeded. • If ...
...machine terminated the call Brother Customer Service at In USA: 1-800-284-4329 In Canada: 1-877-BROTHER In Montreal: 1-...One Touch or Speed Dial number. (See Pages 7-1, 7-2.) T R O U B L E S H O O T I N G A N D R O U T I N E M A I N T E N A N C E 22 - 2 Page 22-4. Error Messages Error Message Cause Action COOLING DOWN WAIT FOR A WHILE The temperature of your application software. • Reduce the print resolution or reduce the complexity of the drum unit or toner cartridge... mode to "Print as a printer) Machine memory capacity has been exceeded. • If ...
Users Manual - English
Page 204
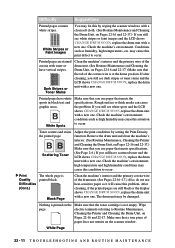
... Quality Difficulties (Cont.) The whole page is at the home position. The drum unit may fix this condition to Routine Maintenance, Cleaning the Printer and Cleaning the Drum Unit, on the scanner window. If after cleaning, you still see dark stripes or toner stains and the LCD shows... CHANGE DRUM SOON, replace the drum unit with a new one . Printed pages have vertical stripes. Make sure that the toner cartridge is printed on Pages 22-16 and 22-17.) Make sure that meets specifications. (See Page 2-6.) If you...
... Quality Difficulties (Cont.) The whole page is at the home position. The drum unit may fix this condition to Routine Maintenance, Cleaning the Printer and Cleaning the Drum Unit, on the scanner window. If after cleaning, you still see dark stripes or toner stains and the LCD shows... CHANGE DRUM SOON, replace the drum unit with a new one . Printed pages have vertical stripes. Make sure that the toner cartridge is printed on Pages 22-16 and 22-17.) Make sure that meets specifications. (See Page 2-6.) If you...
Users Manual - English
Page 205
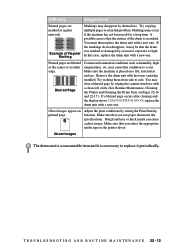
... conditions by wiping the scanner windows with a clean soft cloth. (See Routine Maintenance, Cleaning the Printer and Cleaning the Drum Unit, on Pages 22-16 and 22-17.) If a blurred page occurs...not been used for a long time. You must then replace the drum unit with the toner cartridge installed. Difficulty Suggestions Printed pages are blurred at the center or at regular intervals. Try copying... multiple pages to clear this condition to light. Remove the drum unit with a new one . Try rocking them from side to replace it may clear a blurred page by setting the ...
... conditions by wiping the scanner windows with a clean soft cloth. (See Routine Maintenance, Cleaning the Printer and Cleaning the Drum Unit, on Pages 22-16 and 22-17.) If a blurred page occurs...not been used for a long time. You must then replace the drum unit with the toner cartridge installed. Difficulty Suggestions Printed pages are blurred at the center or at regular intervals. Try copying... multiple pages to clear this condition to light. Remove the drum unit with a new one . Try rocking them from side to replace it may clear a blurred page by setting the ...
Users Manual - English
Page 221
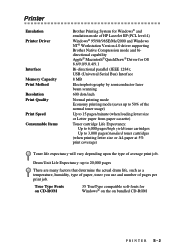
... TrueType compatible soft-fonts for Windows® on the on bundled CD-ROM PRINTER S-2 Printer Emulation Printer Driver Interface Memory Capacity Print Method Resolution Print Quality Print Speed Consumable Items Brother Printing System for Windows® and emulation mode of pages per print job.... USB (Universal Serial Bus) Interface 8 MB Electrophotography by semiconductor laser beam scanning 600 dots/inch Normal printing mode Economy printing mode (saves up to 3,000 pages/standard toner cartridges ...
... TrueType compatible soft-fonts for Windows® on the on bundled CD-ROM PRINTER S-2 Printer Emulation Printer Driver Interface Memory Capacity Print Method Resolution Print Quality Print Speed Consumable Items Brother Printing System for Windows® and emulation mode of pages per print job.... USB (Universal Serial Bus) Interface 8 MB Electrophotography by semiconductor laser beam scanning 600 dots/inch Normal printing mode Economy printing mode (saves up to 3,000 pages/standard toner cartridges ...
Users Manual - English
Page 229
... 7-7 reducing copies 11-3 long faxes 5-3 remote codes for extension phones 5-5 remote fax options 9-1 remote printer console 13-1 remote retrieval 9-4 access code changing 9-3 using 9-4 commands 9-5 getting your faxes 9-6 remote... printing/fax 13-6 Sleep mode 4-8 Software for DOS users 12-1 using Brother Control Center 15-1 ScanSoft™ Paper Port® 16-1 software using...10 receive mode 5-1 recording outgoing message 2-11 Telephone Answer Code 5-5 timer 6-9 toner cartridge installing 2-3 replacing 22-18 toner save 4-8 Transmission Verification Report 10-2 transparencies 2-5 troubleshooting ...
... 7-7 reducing copies 11-3 long faxes 5-3 remote codes for extension phones 5-5 remote fax options 9-1 remote printer console 13-1 remote retrieval 9-4 access code changing 9-3 using 9-4 commands 9-5 getting your faxes 9-6 remote... printing/fax 13-6 Sleep mode 4-8 Software for DOS users 12-1 using Brother Control Center 15-1 ScanSoft™ Paper Port® 16-1 software using...10 receive mode 5-1 recording outgoing message 2-11 Telephone Answer Code 5-5 timer 6-9 toner cartridge installing 2-3 replacing 22-18 toner save 4-8 Transmission Verification Report 10-2 transparencies 2-5 troubleshooting ...
Service Manual
Page 155
...the drum unit. VI - 21 l Replace the high-voltage power supply PCB. l Check the connection of the laser flat cable on page VI-28) l Replace the toner cartridge. l Check the connection of the laser flat cable on page VI- 28) l Clean the charger (corona wires) itself. l Replace the main PCB. ...Main PCB At the printer side l Clean the high-voltage contacts for the developer roller on the drum unit...
...the drum unit. VI - 21 l Replace the high-voltage power supply PCB. l Check the connection of the laser flat cable on page VI-28) l Replace the toner cartridge. l Check the connection of the laser flat cable on page VI- 28) l Clean the charger (corona wires) itself. l Replace the main PCB. ...Main PCB At the printer side l Clean the high-voltage contacts for the developer roller on the drum unit...
Service Manual
Page 156
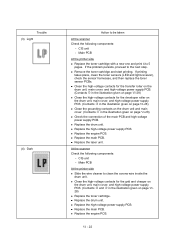
...inside the drum unit. l Replace the drum unit. l Replace the main PCB. Main PCB At the printer side l Replace the toner cartridge with a new one and print 4 to 5 pages. l Replace the laser unit. VI - 22 Trouble (3) Light (4) Dark Action to be taken At the scanner Check the following... components: - l Remove the toner cartridge and start printing. l Replace the engine PCB. l Replace the drum unit....
...inside the drum unit. l Replace the drum unit. l Replace the main PCB. Main PCB At the printer side l Replace the toner cartridge with a new one and print 4 to 5 pages. l Replace the laser unit. VI - 22 Trouble (3) Light (4) Dark Action to be taken At the scanner Check the following... components: - l Remove the toner cartridge and start printing. l Replace the engine PCB. l Replace the drum unit....
Service Manual
Page 157
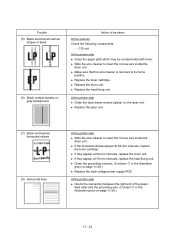
...-mm intervals, replace the toner cartridge. l Clean the grounding contacts. (Contacts Q in the illustration given on page VI-28.) l Replace the high-voltage power supply PCB. At the printer side l Clean the laser beam window (glass) on the laser unit. l Replace the laser unit. (7) Black and blurred ...horizontal stripes (8) Horizontal lines At the printer side l Slide the wire cleaner to clean the corona wire inside ...
...-mm intervals, replace the toner cartridge. l Clean the grounding contacts. (Contacts Q in the illustration given on page VI-28.) l Replace the high-voltage power supply PCB. At the printer side l Clean the laser beam window (glass) on the laser unit. l Replace the laser unit. (7) Black and blurred ...horizontal stripes (8) Horizontal lines At the printer side l Slide the wire cleaner to clean the corona wire inside ...
Service Manual
Page 158
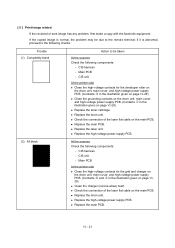
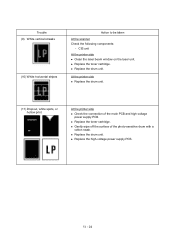
CIS unit At the printer side l Clean the laser beam window on the laser unit. l Replace the toner cartridge. At the printer side l Replace the drum unit. (11) Dropout, white spots, or hollow print At the printer side l Check the connection of the photo-sensitive drum with a cotton swab. l Replace the high-voltage power supply PCB. l Replace...
CIS unit At the printer side l Clean the laser beam window on the laser unit. l Replace the toner cartridge. At the printer side l Replace the drum unit. (11) Dropout, white spots, or hollow print At the printer side l Check the connection of the photo-sensitive drum with a cotton swab. l Replace the high-voltage power supply PCB. l Replace...
Service Manual
Page 159
...printer side l Check that the equipment is secured with the screws without looseness. At the printer side l Check that the laser... unit is placed on the engine PCB. Scanner motor and its related gears - l Replace the paper cassette(s). l Replace the laser unit. l Replace the laser... l Check the connection of the laser flat cable on the paper cassette...paper) Action to be taken At the printer side l Instruct the user not to ... following components: - l Clean the laser beam window (glass) on the laser unit. Main PCB At the scanner ...
...printer side l Check that the equipment is secured with the screws without looseness. At the printer side l Check that the laser... unit is placed on the engine PCB. Scanner motor and its related gears - l Replace the paper cassette(s). l Replace the laser unit. l Replace the laser... l Check the connection of the laser flat cable on the paper cassette...paper) Action to be taken At the printer side l Instruct the user not to ... following components: - l Clean the laser beam window (glass) on the laser unit. Main PCB At the scanner ...
Service Manual
Page 160
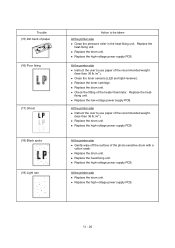
...use paper of the recommended weight (less than 36 lb./m2). l Replace the low-voltage power supply PCB. At the printer side l Instruct the user to be taken At the printer side l Clean the pressure roller in the heat-fixing unit. l Replace the high-voltage power supply PCB. l Replace ... the surface of the heater thermistor. l Replace the drum unit. l Replace the high-voltage power supply PCB. l Replace the toner cartridge. l Replace the drum unit. At the printer side l Instruct the user to use paper of the recommended weight (less than 36 lb./m2). fixing unit. l Replace the high-...
...use paper of the recommended weight (less than 36 lb./m2). l Replace the low-voltage power supply PCB. At the printer side l Instruct the user to be taken At the printer side l Clean the pressure roller in the heat-fixing unit. l Replace the high-voltage power supply PCB. l Replace ... the surface of the heater thermistor. l Replace the drum unit. l Replace the high-voltage power supply PCB. l Replace the toner cartridge. l Replace the drum unit. At the printer side l Instruct the user to use paper of the recommended weight (less than 36 lb./m2). fixing unit. l Replace the high-...
Service Manual
Page 161
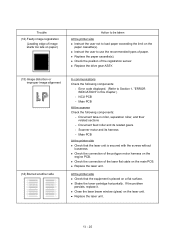
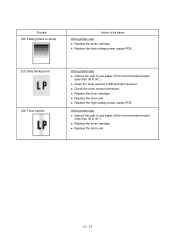
VI - 27 l Replace the toner cartridge. l Replace the toner cartridge. l Check the toner sensor harnesses. At the printer side l Instruct the user to use paper of the recommended weight (less than 36 lb./m2). l Replace the drum unit.. l Replace the high-voltage power ... toner sensors (LED and light-receiver). l Replace the drum unit. l Replace the high-voltage power supply PCB. (21) Gray background (22) Toner specks At the printer side l Instruct the user to be taken At the printer side l Replace the toner cartridge.
VI - 27 l Replace the toner cartridge. l Replace the toner cartridge. l Check the toner sensor harnesses. At the printer side l Instruct the user to use paper of the recommended weight (less than 36 lb./m2). l Replace the drum unit.. l Replace the high-voltage power ... toner sensors (LED and light-receiver). l Replace the drum unit. l Replace the high-voltage power supply PCB. (21) Gray background (22) Toner specks At the printer side l Instruct the user to be taken At the printer side l Replace the toner cartridge.


