
Users Manual - English
Page 4
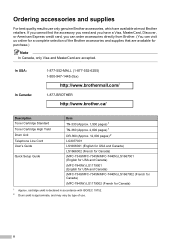
... (English for USA and Canada) (MFC-7340/MFC-7345N/MFC-7440N) LS1667002 (French for Canada) (MFC-7840W) LS1179002 (French for purchase.) Note In Canada, only Visa and MasterCard are accepted. cartridge yield is declared in accordance with ISO/IEC 19752. 2 Drum yield is approximate, and may vary by type of the Brother accessories and supplies that are...
... (English for USA and Canada) (MFC-7340/MFC-7345N/MFC-7440N) LS1667002 (French for Canada) (MFC-7840W) LS1179002 (French for purchase.) Note In Canada, only Visa and MasterCard are accepted. cartridge yield is declared in accordance with ISO/IEC 19752. 2 Drum yield is approximate, and may vary by type of the Brother accessories and supplies that are...
Users Manual - English
Page 6
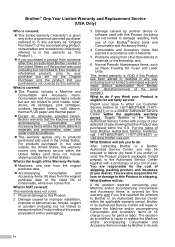
... do: If the problem reported concerning your Product is eligible for parts or labor. For products purchased in shipping. Brother® One-Year Limited Warranty and Replacement Service (USA Only) Who is covered: „ This limited warranty ("warranty") is given only to the ...not limited to floor models or refurbished product), prior to do if you desire). You are not limited to print heads, toner, drums, ink cartridges, print cartridges, cordless handset battery, refill ribbons, therma PLUS paper and thermal paper. „ Except as Paper Feeding Kit, Fuser and Laser Units.
... do: If the problem reported concerning your Product is eligible for parts or labor. For products purchased in shipping. Brother® One-Year Limited Warranty and Replacement Service (USA Only) Who is covered: „ This limited warranty ("warranty") is given only to the ...not limited to floor models or refurbished product), prior to do if you desire). You are not limited to print heads, toner, drums, ink cartridges, print cartridges, cordless handset battery, refill ribbons, therma PLUS paper and thermal paper. „ Except as Paper Feeding Kit, Fuser and Laser Units.
Users Manual - English
Page 8
...the MFC/Fax machine must be the sole liability of the end-user/purchaser. For Laser units: Failure to remove the Toner Cartridge (and Toner Drum Unit, waste toner packs or oil bottles on applicable models) during shipping and will void the warranty. Neither Brother nor... to the machine during shipping or transport will void your Inkjet MFC/Fax machine remove the ink cartridges and replace them with your exclusive remedy against Brother for labour and parts, Brother International Corporation (Canada) Ltd. ("Brother"), or its Authorized Service Centres, Distributors, Dealers, Agents or ...
...the MFC/Fax machine must be the sole liability of the end-user/purchaser. For Laser units: Failure to remove the Toner Cartridge (and Toner Drum Unit, waste toner packs or oil bottles on applicable models) during shipping and will void the warranty. Neither Brother nor... to the machine during shipping or transport will void your Inkjet MFC/Fax machine remove the ink cartridges and replace them with your exclusive remedy against Brother for labour and parts, Brother International Corporation (Canada) Ltd. ("Brother"), or its Authorized Service Centres, Distributors, Dealers, Agents or ...

Users Manual - English
Page 13
...notices 86 Industry Canada Compliance Statement (Canada only 88 Disconnect device 88 LAN connection (MFC-7345N, MFC-7440N and MFC-7840W only 88 International ENERGY STAR® Compliance Statement 89 Laser safety 89 FDA regulations 89 Important safety instructions 90 Trademarks...92 B Troubleshooting and routine... 118 Cleaning the scanner glass 119 Cleaning the laser scanner window 120 Cleaning the corona wire 122 Cleaning the drum unit 123 Replacing the consumable items 126 Replacing a toner cartridge 126 Replacing the drum unit 130 Machine information 132 Checking the serial ...
...notices 86 Industry Canada Compliance Statement (Canada only 88 Disconnect device 88 LAN connection (MFC-7345N, MFC-7440N and MFC-7840W only 88 International ENERGY STAR® Compliance Statement 89 Laser safety 89 FDA regulations 89 Important safety instructions 90 Trademarks...92 B Troubleshooting and routine... 118 Cleaning the scanner glass 119 Cleaning the laser scanner window 120 Cleaning the corona wire 122 Cleaning the drum unit 123 Replacing the consumable items 126 Replacing a toner cartridge 126 Replacing the drum unit 130 Machine information 132 Checking the serial ...
Users Manual - English
Page 32
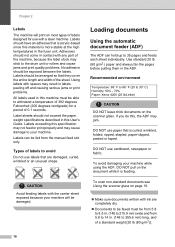
...jam. To scan non-standard documents see Using the scanner glass on page 19. „ Make sure documents written with spaces may stick to the drum unit or rollers and cause jams and print quality problems. No adhesive should not come in . (148 to 35 pages and feeds each sheet ...176; C) Humidity: 50% - 70% Paper: Xerox 4200 (20 lb/Letter) CAUTION DO NOT leave thick documents on the scanner glass. DO NOT use with a laser machine. Chapter 2 Labels 2 The machine will be exposed between the labels. Labels should not exceed the paper weight specifications described in the ADF.
...jam. To scan non-standard documents see Using the scanner glass on page 19. „ Make sure documents written with spaces may stick to the drum unit or rollers and cause jams and print quality problems. No adhesive should not come in . (148 to 35 pages and feeds each sheet ...176; C) Humidity: 50% - 70% Paper: Xerox 4200 (20 lb/Letter) CAUTION DO NOT leave thick documents on the scanner glass. DO NOT use with a laser machine. Chapter 2 Labels 2 The machine will be exposed between the labels. Labels should not exceed the paper weight specifications described in the ADF.

Users Manual - English
Page 98
... power outlet to shut off the power completely. Please carefully clean the toner dust with a dry, lint-free cloth and dispose of your machine and drum unit. Never touch telephone wires or terminals that is easily accessible. To avoid the danger of an emergency, you move the machine, grasp the side...
... power outlet to shut off the power completely. Please carefully clean the toner dust with a dry, lint-free cloth and dispose of your machine and drum unit. Never touch telephone wires or terminals that is easily accessible. To avoid the danger of an emergency, you move the machine, grasp the side...
Users Manual - English
Page 109
... „ Check that machine is turned on. „ Check that the toner cartridge and drum unit are typically caused by dirt or correction fluid on the glass strip, or one of the corona wires for printing is recommended. The Setup Receive setting (Menu, 2, 1) and...copies are installed properly. (See Replacing the drum unit on page 130.) „ Check the interface cable connection on both the machine and your business, a separate line with custom features. Right-click Brother MFC-XXXX Printer. Right-click Brother MFC-XXXX Printer. Troubleshooting and routine maintenance Handling ...
... „ Check that machine is turned on. „ Check that the toner cartridge and drum unit are typically caused by dirt or correction fluid on the glass strip, or one of the corona wires for printing is recommended. The Setup Receive setting (Menu, 2, 1) and...copies are installed properly. (See Replacing the drum unit on page 130.) „ Check the interface cable connection on both the machine and your business, a separate line with custom features. Right-click Brother MFC-XXXX Printer. Right-click Brother MFC-XXXX Printer. Troubleshooting and routine maintenance Handling ...

Users Manual - English
Page 114
...for a long time. „ The drum unit may be damaged. Put in a new drum unit. (See Replacing the drum unit on page 120.) „ Make sure that meets our specifications. Put in a new drum unit. (See Replacing the drum unit on page 130.) „ Wipe the laser scanner windows with a soft cloth. (See... Cleaning the laser scanner window on page 130.) „ Make sure that you use paper that a torn ...
...for a long time. „ The drum unit may be damaged. Put in a new drum unit. (See Replacing the drum unit on page 120.) „ Make sure that meets our specifications. Put in a new drum unit. (See Replacing the drum unit on page 130.) „ Wipe the laser scanner windows with a soft cloth. (See... Cleaning the laser scanner window on page 130.) „ Make sure that you use paper that a torn ...
Users Manual - English
Page 115
Call Brother Customer Service. „ Check the paper type and quality. (See Acceptable paper and other print media on page 14 and Basic tab in Media ... 9.) „ The paper tray may be too full. „ If you are using the manual feed slot, see Loading paper in a new drum unit. (See Replacing the drum unit on page 130.) „ The fuser unit may be contaminated. Put in the manual feed slot on page 10. „ Check the... CD-ROM.) If you print only a few pages, change the printer driver setting in the Software User's Guide on the CD-ROM.) „ The drum unit may be damaged. Rough-
Call Brother Customer Service. „ Check the paper type and quality. (See Acceptable paper and other print media on page 14 and Basic tab in Media ... 9.) „ The paper tray may be too full. „ If you are using the manual feed slot, see Loading paper in a new drum unit. (See Replacing the drum unit on page 130.) „ The fuser unit may be contaminated. Put in the manual feed slot on page 10. „ Check the... CD-ROM.) If you print only a few pages, change the printer driver setting in the Software User's Guide on the CD-ROM.) „ The drum unit may be damaged. Rough-

Users Manual - English
Page 116
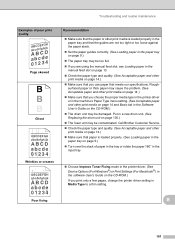
...) „ Make ten copies of a blank, white sheet of poor print quality Recommendation „ Check the paper type and quality. Put in a new drum. (See Replacing the drum unit on page 130.) White Spots on black text and graphics at 2.95 in. (75 mm) intervals 2.95 in. (75 mm) 2.95 in. (75... paper tray. Examples of paper. (See Making multiple copies on page 70.) If the problem is not solved, the drum unit may have glue from a label stuck on page 123.) „ The drum unit may have been in the paper tray. Also, fan the paper stack and then rotate the paper 180...
...) „ Make ten copies of a blank, white sheet of poor print quality Recommendation „ Check the paper type and quality. Put in a new drum. (See Replacing the drum unit on page 130.) White Spots on black text and graphics at 2.95 in. (75 mm) intervals 2.95 in. (75 mm) 2.95 in. (75... paper tray. Examples of paper. (See Making multiple copies on page 70.) If the problem is not solved, the drum unit may have glue from a label stuck on page 123.) „ The drum unit may have been in the paper tray. Also, fan the paper stack and then rotate the paper 180...

Users Manual - English
Page 117
... cartridge on page 82.) „ If the whole page is too light, Toner Save mode may be contaminated. Call Brother Customer Service. „ Clean the corona wire inside the drum unit by sliding the green tab. Roughsurfaced paper may cause the problem. (See Acceptable paper and other print media on ... on page 130.) „ Make sure that you use paper that meets our specifications. B 103 Troubleshooting and routine maintenance Examples of the drum unit. (See Cleaning the laser scanner window on page 120 and Cleaning the corona wire on page 130.) „ The fuser unit may be damaged.
... cartridge on page 82.) „ If the whole page is too light, Toner Save mode may be contaminated. Call Brother Customer Service. „ Clean the corona wire inside the drum unit by sliding the green tab. Roughsurfaced paper may cause the problem. (See Acceptable paper and other print media on ... on page 130.) „ Make sure that you use paper that meets our specifications. B 103 Troubleshooting and routine maintenance Examples of the drum unit. (See Cleaning the laser scanner window on page 120 and Cleaning the corona wire on page 130.) „ The fuser unit may be damaged.

Users Manual - English
Page 118
...laser scanner window and the corona wire inside the drum unit by sliding the green tab. Put in a new toner cartridge. (See Replacing a toner cartridge on page 122.) „ The drum unit may be damaged. Be sure to return the green tab to the OPC drum surface. Call Brother Customer Service at 1-877-BROTHER... (1-877-276-8437) (in USA) or 1-877-BROTHER (in a new drum unit. (See Replacing the drum unit on page 122.) „ ...
...laser scanner window and the corona wire inside the drum unit by sliding the green tab. Put in a new toner cartridge. (See Replacing a toner cartridge on page 122.) „ The drum unit may be damaged. Be sure to return the green tab to the OPC drum surface. Call Brother Customer Service at 1-877-BROTHER... (1-877-276-8437) (in USA) or 1-877-BROTHER (in a new drum unit. (See Replacing the drum unit on page 122.) „ ...

Users Manual - English
Page 121
... messages B As with a new one. (See Replacing the drum unit on the LCD, and put it back into the drum unit again. then replace the drum unit with any sophisticated office product, errors may occur and consumable items may need more help, the Brother Solutions Center offers the latest FAQs...fax machine's polling setup. You tried to check your machine identifies the error or required routine maintenance and shows the appropriate message. The drum unit is indicated on page 130.) The paper in the tray is not installed properly. The most errors and routine maintenance by yourself...
... messages B As with a new one. (See Replacing the drum unit on the LCD, and put it back into the drum unit again. then replace the drum unit with any sophisticated office product, errors may occur and consumable items may need more help, the Brother Solutions Center offers the latest FAQs...fax machine's polling setup. You tried to check your machine identifies the error or required routine maintenance and shows the appropriate message. The drum unit is indicated on page 130.) The paper in the tray is not installed properly. The most errors and routine maintenance by yourself...
Users Manual - English
Page 122
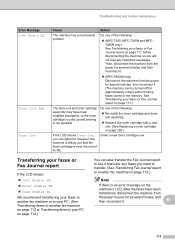
... page 122.) The drum unit has reached the end of its current print job and go into cooling down mode, you will not lose any obstacles that surround the exhaust outlet, and then leave the machine turned on but do one of the following: (MFC-7340, MFC-7345N and MFC-7440N only) See ...Transferring your faxes or Fax Journal report on page 130.) 108 Cleaning the corona wire on the drum unit. (See needs to Off. (See Turning off for approximately 4 ...
... page 122.) The drum unit has reached the end of its current print job and go into cooling down mode, you will not lose any obstacles that surround the exhaust outlet, and then leave the machine turned on but do one of the following: (MFC-7340, MFC-7345N and MFC-7440N only) See ...Transferring your faxes or Fax Journal report on page 130.) 108 Cleaning the corona wire on the drum unit. (See needs to Off. (See Turning off for approximately 4 ...
Users Manual - English
Page 125
...112.) Note If there is near the end of the following : „ Re-install the toner cartridge and drum unit assembly. „ Replace the toner cartridge with a new one of its life. B 111 however, the machine is telling you need to transfer. (See Transferring Fax Journal ... Fax Journal report on page 111.) The drum unit and toner cartridge assembly may have been transferred, disconnect the machine from the power for approximately 4 days without losing faxes stored in the memory. Do one of the following : „ (MFC-7340, MFC-7345N and MFC7440N only) See Transferring your ...
...112.) Note If there is near the end of the following : „ Re-install the toner cartridge and drum unit assembly. „ Replace the toner cartridge with a new one of its life. B 111 however, the machine is telling you need to transfer. (See Transferring Fax Journal ... Fax Journal report on page 111.) The drum unit and toner cartridge assembly may have been transferred, disconnect the machine from the power for approximately 4 days without losing faxes stored in the memory. Do one of the following : „ (MFC-7340, MFC-7345N and MFC7440N only) See Transferring your ...

Users Manual - English
Page 128
... jam in your Brother machine. • If the error message remains, open the front or back cover (back output tray) of disposable paper or cloth underneath it in case you accidentally spill or scatter toner. 114 If you have not installed a drum unit or have just used the machine, some internal parts of...
... jam in your Brother machine. • If the error message remains, open the front or back cover (back output tray) of disposable paper or cloth underneath it in case you accidentally spill or scatter toner. 114 If you have not installed a drum unit or have just used the machine, some internal parts of...
Users Manual - English
Page 129
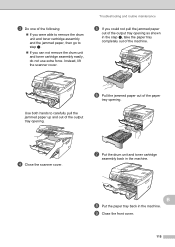
Troubleshooting and routine maintenance e If you can not remove the drum unit and toner cartridge assembly easily, do not use extra force. Use both hands to step g. „ If you could not pull the jammed paper .... f Pull the jammed paper out of the paper tray opening . g Put the drum unit and toner cartridge assembly back in the machine. i Close the front cover. 115 c Do one of the following: „ If you were able to remove the drum unit and toner cartridge assembly and the jammed paper, then go to...
Troubleshooting and routine maintenance e If you can not remove the drum unit and toner cartridge assembly easily, do not use extra force. Use both hands to step g. „ If you could not pull the jammed paper .... f Pull the jammed paper out of the paper tray opening . g Put the drum unit and toner cartridge assembly back in the machine. i Close the front cover. 115 c Do one of the following: „ If you were able to remove the drum unit and toner cartridge assembly and the jammed paper, then go to...

Users Manual - English
Page 130
... and toner cartridge assembly on a clean, flat surface with a sheet of disposable paper or cloth underneath it in the machine. g Put the drum unit and toner cartridge assembly back in case you to open the fuser cover (2). d Pull the tabs (1) toward you accidentally spill or scatter toner. Paper ... fuser unit. c Open the back cover (back output tray). f Close the back cover (back output tray). h Close the front cover. 116 b Slowly take out the drum unit and toner cartridge assembly. 2 1 e Pull the jammed paper out of the machine B a Open the front cover.
... and toner cartridge assembly on a clean, flat surface with a sheet of disposable paper or cloth underneath it in the machine. g Put the drum unit and toner cartridge assembly back in case you to open the fuser cover (2). d Pull the tabs (1) toward you accidentally spill or scatter toner. Paper ... fuser unit. c Open the back cover (back output tray). f Close the back cover (back output tray). h Close the front cover. 116 b Slowly take out the drum unit and toner cartridge assembly. 2 1 e Pull the jammed paper out of the machine B a Open the front cover.

Users Manual - English
Page 131
... flat surface with cold water at once. B 117 Troubleshooting and routine maintenance c Push down the green lock lever and take out the drum unit and toner cartridge assembly. CAUTION Handle the toner cartridge carefully. To avoid print quality problems, DO NOT touch the shaded parts shown ... CAUTION We recommend that you accidentally spill or scatter toner. d Clear the jammed paper if there is jammed inside the drum unit. Paper is any inside the drum unit and toner cartridge assembly B a Open the front cover. b Slowly take the toner cartridge out of disposable paper ...
... flat surface with cold water at once. B 117 Troubleshooting and routine maintenance c Push down the green lock lever and take out the drum unit and toner cartridge assembly. CAUTION Handle the toner cartridge carefully. To avoid print quality problems, DO NOT touch the shaded parts shown ... CAUTION We recommend that you accidentally spill or scatter toner. d Clear the jammed paper if there is jammed inside the drum unit. Paper is any inside the drum unit and toner cartridge assembly B a Open the front cover. b Slowly take the toner cartridge out of disposable paper ...
Users Manual - English
Page 132
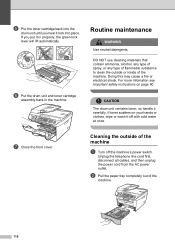
... Turn off with cold water at once. b Pull the paper tray completely out of the machine. If you hear it carefully. f Put the drum unit and toner cartridge assembly back in properly, the green lock lever will lift automatically. Routine maintenance B WARNING Use neutral detergents. For more infomation ... power outlet. Doing this may cause a fire or electrical shock. If toner scatters on page 90 CAUTION The drum unit contains toner, so handle it lock into the drum unit until you put it off the machine's power switch. g Close the front cover. Cleaning the outside or...
... Turn off with cold water at once. b Pull the paper tray completely out of the machine. If you hear it carefully. f Put the drum unit and toner cartridge assembly back in properly, the green lock lever will lift automatically. Routine maintenance B WARNING Use neutral detergents. For more infomation ... power outlet. Doing this may cause a fire or electrical shock. If toner scatters on page 90 CAUTION The drum unit contains toner, so handle it lock into the drum unit until you put it off the machine's power switch. g Close the front cover. Cleaning the outside or...


