Users Manual - English
Page 17
........ 4-4 Paper orientation for printing on both sides of the paper 4-5 Mailbox unit 4-6 Network option NC-4100h (For HL-7050 only 4-8 Installing the Network board 4-8 CompactFlash card 4-11 Installing the CompactFlash card 4-12 RAM expansion 4-13 Installing...4-22 Optional barcode fonts package (BT-1000 4-22 Routine maintenance 5-1 Replacing the consumables 5-1 Toner cartridge 5-2 TONER LOW Message 5-2 (Appears at intervals 5-2 TONER LIFE END message 5-2 Replacing the toner cartridge 5-3 Drum unit 5-6 CHANGE DRUM SOON message 5-6 Replacing the drum unit 5-6 Replacing ...
........ 4-4 Paper orientation for printing on both sides of the paper 4-5 Mailbox unit 4-6 Network option NC-4100h (For HL-7050 only 4-8 Installing the Network board 4-8 CompactFlash card 4-11 Installing the CompactFlash card 4-12 RAM expansion 4-13 Installing...4-22 Optional barcode fonts package (BT-1000 4-22 Routine maintenance 5-1 Replacing the consumables 5-1 Toner cartridge 5-2 TONER LOW Message 5-2 (Appears at intervals 5-2 TONER LIFE END message 5-2 Replacing the toner cartridge 5-3 Drum unit 5-6 CHANGE DRUM SOON message 5-6 Replacing the drum unit 5-6 Replacing ...
Users Manual - English
Page 20
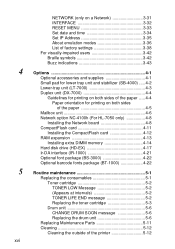
When you unpack the printer, check to see that you have all of the following parts. 1 6 2 5 3 4 Figure 1-1 1 Drum Unit Assembly (Drum Unit with Toner Cartridge) 2 AC Power Cord 3 Paper Tray 4 Quick Setup Guide 5 CD-ROM 6 Printer ABOUT THIS PRINTER 1 - 1 1 About this printer 1 What is in the box?
When you unpack the printer, check to see that you have all of the following parts. 1 6 2 5 3 4 Figure 1-1 1 Drum Unit Assembly (Drum Unit with Toner Cartridge) 2 AC Power Cord 3 Paper Tray 4 Quick Setup Guide 5 CD-ROM 6 Printer ABOUT THIS PRINTER 1 - 1 1 About this printer 1 What is in the box?

Users Manual - English
Page 64
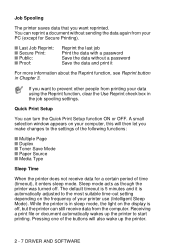
Duplex Printing To use duplex printing, you can change the Resolution in the printer driver as follows: 300 dpi 600 dpi 1200dpi ■ Toner Save Mode You can save running costs by turning on the Toner Save Mode, which reduces the print density. ■ Print Setting (Windows® 95...to install the optional Duplex unit onto your printer. There are six types of booklet options. Booklet Printing (For PCL driver Only) A Booklet Printing function can select from 2 types of duplex print options available. Print Quality Select the Resolution, Toner Save Mode and Print Settings. ■ You...
Duplex Printing To use duplex printing, you can change the Resolution in the printer driver as follows: 300 dpi 600 dpi 1200dpi ■ Toner Save Mode You can save running costs by turning on the Toner Save Mode, which reduces the print density. ■ Print Setting (Windows® 95...to install the optional Duplex unit onto your printer. There are six types of booklet options. Booklet Printing (For PCL driver Only) A Booklet Printing function can select from 2 types of duplex print options available. Print Quality Select the Resolution, Toner Save Mode and Print Settings. ■ You...
Users Manual - English
Page 67
... mode acts as though the printer was turned off , but the printer can still receive data from the computer. Pressing one of the buttons will then let you make changes to the settings of the following functions: ■ Multiple Page ■ Duplex ■ Toner Save Mode ■ Paper ...Source ■ Media Type Sleep Time When the printer does not receive data for Secure Printing). ■ Last Job Reprint: ■ Secure Print: ■ Public: ...
... mode acts as though the printer was turned off , but the printer can still receive data from the computer. Pressing one of the buttons will then let you make changes to the settings of the following functions: ■ Multiple Page ■ Duplex ■ Toner Save Mode ■ Paper ...Source ■ Media Type Sleep Time When the printer does not receive data for Secure Printing). ■ Last Job Reprint: ■ Secure Print: ■ Public: ...

Users Manual - English
Page 74
For more information, see Chapter 3.) Password Job Name HRC Toner Save Sleep Time BR-Script Level DRIVER AND SOFTWARE 2 - 14 1 Select the Paper Size and Copy Count. 2 Set the Print Quality, Scaling and TrueType Font setting. 3 3 You can change settings by selecting the setting in the Printer Features list: Media Type Output Bin Collate APT Job spooling (You will need to set the RAM Disk size first.
For more information, see Chapter 3.) Password Job Name HRC Toner Save Sleep Time BR-Script Level DRIVER AND SOFTWARE 2 - 14 1 Select the Paper Size and Copy Count. 2 Set the Print Quality, Scaling and TrueType Font setting. 3 3 You can change settings by selecting the setting in the Printer Features list: Media Type Output Bin Collate APT Job spooling (You will need to set the RAM Disk size first.

Users Manual - English
Page 108
.... QUALITY Display Shows RESOLUTION HRC TONER SAVE DENSITY Description =300/600/1200 You can select a print resolution of 300, 600 or 1200 dpi (dots per inch). =OFF/LIGHT/MEDIUM/DARK HRC: High Resolution Control (HRC) offers improved print quality of letters, numbers and graphics that conventional laser printers cannot achieve, with a resolution of...
.... QUALITY Display Shows RESOLUTION HRC TONER SAVE DENSITY Description =300/600/1200 You can select a print resolution of 300, 600 or 1200 dpi (dots per inch). =OFF/LIGHT/MEDIUM/DARK HRC: High Resolution Control (HRC) offers improved print quality of letters, numbers and graphics that conventional laser printers cannot achieve, with a resolution of...

Users Manual - English
Page 109
...until the error is a TONER LOW error. HIGH Makes the buzz higher. =1MIN:240MIN =CONTINUE/STOP CONT: Continue printing even if there is cleared. PASS NO.=### =ON/OFF PROTECT = AUTO AUTO, OFF, LETTER, A4 OR LEGAL =AUTO (EPSON)/AUTO(IBM)/HP LASER JET/.... 3 - 25 ...CONTROL PANEL The factory setting is Level 1. The factory setting is 0.1. SETUP Display Shows LANGUAGE PANEL CONTROL ERROR BUZZER PANEL BUZZER BUZZER VOLUME POWER SAVE TIME TONER LOW AUTO CONTINUE LOCK PANEL REPRINT PAGE PROTECTION EMULATION ...
...until the error is a TONER LOW error. HIGH Makes the buzz higher. =1MIN:240MIN =CONTINUE/STOP CONT: Continue printing even if there is cleared. PASS NO.=### =ON/OFF PROTECT = AUTO AUTO, OFF, LETTER, A4 OR LEGAL =AUTO (EPSON)/AUTO(IBM)/HP LASER JET/.... 3 - 25 ...CONTROL PANEL The factory setting is Level 1. The factory setting is 0.1. SETUP Display Shows LANGUAGE PANEL CONTROL ERROR BUZZER PANEL BUZZER BUZZER VOLUME POWER SAVE TIME TONER LOW AUTO CONTINUE LOCK PANEL REPRINT PAGE PROTECTION EMULATION ...

Users Manual - English
Page 122
... Test button on the Network board (NC-4100h) for display messages. ■ The copy setting is always restored to the factory setting when the printer is turned off and on again. ■ It is not possible to the factory settings with the reset menu in the following table. ■.... ■ The emulation mode affects the setting. Display Shows PAPER QUALITY SETUP Submenu SOURCE PRIORITY MP FIRST MP SIZE MANUAL FEED DUPLEX OUTPUT RESOLUTION HRC TONER SAVE DENSITY LANGUAGE PANEL CONTROL POWER SAVE TIME Factory setting =AUTO =MP>T1>T2>T3>T4 =OFF =ANY/A4/LETTER =OFF =OFF =STANDARD =...
... Test button on the Network board (NC-4100h) for display messages. ■ The copy setting is always restored to the factory setting when the printer is turned off and on again. ■ It is not possible to the factory settings with the reset menu in the following table. ■.... ■ The emulation mode affects the setting. Display Shows PAPER QUALITY SETUP Submenu SOURCE PRIORITY MP FIRST MP SIZE MANUAL FEED DUPLEX OUTPUT RESOLUTION HRC TONER SAVE DENSITY LANGUAGE PANEL CONTROL POWER SAVE TIME Factory setting =AUTO =MP>T1>T2>T3>T4 =OFF =ANY/A4/LETTER =OFF =OFF =STANDARD =...

Users Manual - English
Page 123
Display Shows SETUP (continued) PRINT MENU Submenu TONER LOW AUTO CONTINUE LOCK PANEL REPRINT PAGE PROTECTION EMULATION KEEP PCL JAM RECOVERY RAMDISK SIZE TIME STYLE MEDIA TYPE PAPER COPIES ORIENTATION PRINT POSITION AUTO ...
Display Shows SETUP (continued) PRINT MENU Submenu TONER LOW AUTO CONTINUE LOCK PANEL REPRINT PAGE PROTECTION EMULATION KEEP PCL JAM RECOVERY RAMDISK SIZE TIME STYLE MEDIA TYPE PAPER COPIES ORIENTATION PRINT POSITION AUTO ...
Users Manual - English
Page 150
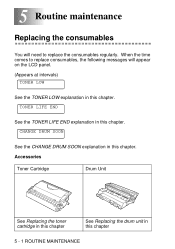
TONER LIFE END See the TONER LIFE END explanation in this chapter 5 - 1 ROUTINE MAINTENANCE Accessories Toner Cartridge Drum Unit See Replacing the toner cartridge in this chapter See Replacing the drum unit in this chapter. 5 Routine maintenance 5 Replacing the consumables You will appear on the LCD panel. (Appears at intervals) TONER LOW See the TONER LOW explanation in this chapter. When the time comes to replace consumables, the following messages will need to replace the consumables regularly. CHANGE DRUM SOON See the CHANGE DRUM SOON explanation in this chapter.
TONER LIFE END See the TONER LIFE END explanation in this chapter 5 - 1 ROUTINE MAINTENANCE Accessories Toner Cartridge Drum Unit See Replacing the toner cartridge in this chapter See Replacing the drum unit in this chapter. 5 Routine maintenance 5 Replacing the consumables You will appear on the LCD panel. (Appears at intervals) TONER LOW See the TONER LOW explanation in this chapter. When the time comes to replace consumables, the following messages will need to replace the consumables regularly. CHANGE DRUM SOON See the CHANGE DRUM SOON explanation in this chapter.
Users Manual - English
Page 151
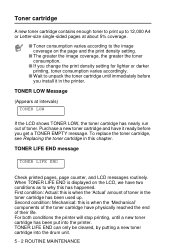
.... ■ Wait to unpack the toner cartridge until a new toner cartridge has been put into the drum unit. 5 - 2 ROUTINE MAINTENANCE TONER LIFE END can only be cleared, by putting a new toner cartridge into the printer. Purchase a new toner cartridge and have physically reached the end of toner. Toner cartridge A new toner cartridge contains enough toner to print up . First condition...
.... ■ Wait to unpack the toner cartridge until a new toner cartridge has been put into the drum unit. 5 - 2 ROUTINE MAINTENANCE TONER LIFE END can only be cleared, by putting a new toner cartridge into the printer. Purchase a new toner cartridge and have physically reached the end of toner. Toner cartridge A new toner cartridge contains enough toner to print up . First condition...

Users Manual - English
Page 152
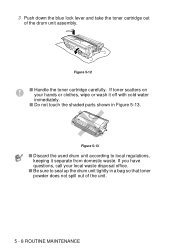
Figure 5-3 Figure 5-4 ROUTINE MAINTENANCE 5 - 3 Figure 5-2 ■ Handle the toner cartridge carefully. Figure 5-1 2 Push down the blue lock lever and take out the toner cartridge. If toner scatters on your hands or clothes, immediately wipe or wash it off with cold water. ■ Do not touch the shaded parts shown in Figure 5-3 and Figure 5-4. When you want to buy toner cartridges, call the dealer you use quality toner cartridges. Replacing the toner cartridge To make sure you get high quality print, make sure you bought the printer from. 1 Open the top cover of the printer.
Figure 5-3 Figure 5-4 ROUTINE MAINTENANCE 5 - 3 Figure 5-2 ■ Handle the toner cartridge carefully. Figure 5-1 2 Push down the blue lock lever and take out the toner cartridge. If toner scatters on your hands or clothes, immediately wipe or wash it off with cold water. ■ Do not touch the shaded parts shown in Figure 5-3 and Figure 5-4. When you want to buy toner cartridges, call the dealer you use quality toner cartridges. Replacing the toner cartridge To make sure you get high quality print, make sure you bought the printer from. 1 Open the top cover of the printer.

Users Manual - English
Page 153
... separate from domestic waste. Figure 5-7 5 - 4 ROUTINE MAINTENANCE If you remove the protective cover. ■ Do not touch the shaded parts shown in the printer immediately after you have questions, call your local waste disposal office. 3 Unpack the new toner cartridge. Figure 5-5 4 Pull off the yellow plastic protective cover. Figure 5-6 ■ Put the...
... separate from domestic waste. Figure 5-7 5 - 4 ROUTINE MAINTENANCE If you remove the protective cover. ■ Do not touch the shaded parts shown in the printer immediately after you have questions, call your local waste disposal office. 3 Unpack the new toner cartridge. Figure 5-5 4 Pull off the yellow plastic protective cover. Figure 5-6 ■ Put the...
Users Manual - English
Page 154
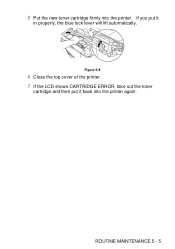
ROUTINE MAINTENANCE 5 - 5 5 Put the new toner cartridge firmly into the printer again. Figure 5-8 6 Close the top cover of the printer. 7 If the LCD shows CARTRIDGE ERROR, take out the toner cartridge and then put it back into the printer. If you put it in properly, the blue lock lever will lift automatically.
ROUTINE MAINTENANCE 5 - 5 5 Put the new toner cartridge firmly into the printer again. Figure 5-8 6 Close the top cover of the printer. 7 If the LCD shows CARTRIDGE ERROR, take out the toner cartridge and then put it back into the printer. If you put it in properly, the blue lock lever will lift automatically.
Users Manual - English
Page 155
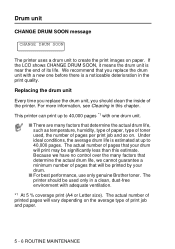
...that determine the actual drum life, such as temperature, humidity, type of paper, type of toner used only in this estimate. We recommend that your drum. ■ For best performance, use only genuine Brother toner. This printer can print up to 40,000 pages. The actual number of pages that you should be... will print may be used , the number of pages per print job and so on. Drum unit CHANGE DRUM SOON message CHANGE DRUM SOON The printer uses a drum unit to create the print images on the average type of print job and paper. 5 - 6 ROUTINE MAINTENANCE Under ideal conditions, the ...
...that determine the actual drum life, such as temperature, humidity, type of paper, type of toner used only in this estimate. We recommend that your drum. ■ For best performance, use only genuine Brother toner. This printer can print up to 40,000 pages. The actual number of pages that you should be... will print may be used , the number of pages per print job and so on. Drum unit CHANGE DRUM SOON message CHANGE DRUM SOON The printer uses a drum unit to create the print images on the average type of print job and paper. 5 - 6 ROUTINE MAINTENANCE Under ideal conditions, the ...
Users Manual - English
Page 156
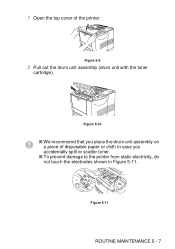
Figure 5-11 ROUTINE MAINTENANCE 5 - 7 1 Open the top cover of disposable paper or cloth in case you place the drum unit assembly on a piece of the printer. Figure 5-9 2 Pull out the drum unit assembly (drum unit with the toner cartridge). Figure 5-10 ■ We recommend that you accidentally spill or scatter toner. ■ To prevent damage to the printer from static electricity, do not touch the electrodes shown in Figure 5-11.
Figure 5-11 ROUTINE MAINTENANCE 5 - 7 1 Open the top cover of disposable paper or cloth in case you place the drum unit assembly on a piece of the printer. Figure 5-9 2 Pull out the drum unit assembly (drum unit with the toner cartridge). Figure 5-10 ■ We recommend that you accidentally spill or scatter toner. ■ To prevent damage to the printer from static electricity, do not touch the electrodes shown in Figure 5-11.
Users Manual - English
Page 157
Figure 5-13 ■ Discard the used drum unit according to seal up the drum unit tightly in Figure 5-13. If toner scatters on your local waste disposal office. ■ Be sure to local regulations, keeping it off with cold water immediately. ■ Do not touch the ...shaded parts shown in a bag so that toner powder does not spill out of the drum unit assembly. If you have questions, call your hands or clothes, wipe or wash it separate from...
Figure 5-13 ■ Discard the used drum unit according to seal up the drum unit tightly in Figure 5-13. If toner scatters on your local waste disposal office. ■ Be sure to local regulations, keeping it off with cold water immediately. ■ Do not touch the ...shaded parts shown in a bag so that toner powder does not spill out of the drum unit assembly. If you have questions, call your hands or clothes, wipe or wash it separate from...

Users Manual - English
Page 158
If you pick up the drum unit. ROUTINE MAINTENANCE 5 - 9 Exposure to unpack a drum unit until immediately before you put the cartridge in properly, the blue lock lever is lifted automatically. Figure 5-15 ■ Make sure you install the toner cartridge properly, or it in the printer. Figure 5-14 5 Put the toner cartridge in Figure 5-14. 4 Unpack the new drum unit. ■ Wait to direct sunlight or room light may separate from the drum when you put it may damage the drum unit. ■ Do not touch the shaded parts shown in the new drum unit.
If you pick up the drum unit. ROUTINE MAINTENANCE 5 - 9 Exposure to unpack a drum unit until immediately before you put the cartridge in properly, the blue lock lever is lifted automatically. Figure 5-15 ■ Make sure you install the toner cartridge properly, or it in the printer. Figure 5-14 5 Put the toner cartridge in Figure 5-14. 4 Unpack the new drum unit. ■ Wait to direct sunlight or room light may separate from the drum when you put it may damage the drum unit. ■ Do not touch the shaded parts shown in the new drum unit.

Users Manual - English
Page 159
Figure 5-16 ■ We recommend that you clean the inside of the printer when you replace only the toner cartridge, do not reset the page counter. 8 Close the top cover of the printer. 5 - 10 ROUTINE MAINTENANCE 6 Put the drum unit assembly in this chapter. 7 Reset the page counter following the instructions we have supplied with the new drum unit. ■ If you replace the drum unit. See Cleaning in the printer.
Figure 5-16 ■ We recommend that you clean the inside of the printer when you replace only the toner cartridge, do not reset the page counter. 8 Close the top cover of the printer. 5 - 10 ROUTINE MAINTENANCE 6 Put the drum unit assembly in this chapter. 7 Reset the page counter following the instructions we have supplied with the new drum unit. ■ If you replace the drum unit. See Cleaning in the printer.
Users Manual - English
Page 161
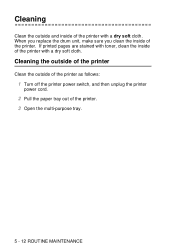
Cleaning Clean the outside of the printer as follows: 1 Turn off the printer power switch, and then unplug the printer power cord. 2 Pull the paper tray out of the printer. 3 Open the multi-purpose tray. 5 - 12 ROUTINE MAINTENANCE If printed pages are stained with toner, clean the inside of the printer. Cleaning the outside of the printer Clean the outside and inside of the printer with a dry soft cloth. When you replace the drum unit, make sure you clean the inside of the printer with a dry soft cloth.
Cleaning Clean the outside of the printer as follows: 1 Turn off the printer power switch, and then unplug the printer power cord. 2 Pull the paper tray out of the printer. 3 Open the multi-purpose tray. 5 - 12 ROUTINE MAINTENANCE If printed pages are stained with toner, clean the inside of the printer. Cleaning the outside of the printer Clean the outside and inside of the printer with a dry soft cloth. When you replace the drum unit, make sure you clean the inside of the printer with a dry soft cloth.


